Saturday, February 28, 2015

Top Tops Abound - McCall 6963 and Simplicity 1916

 
I'm reviewing two more knit top patterns. My goal is to make different styles that will work with a variety of skirt, pant, and jacket combinations.  One of my wardrobe observations is that some tops don't work well with certain jackets or cardigans.  Then there are a few different colors I want to add to my wardrobe as well.


I really like the drape neck knit tops and the surplice/faux wrap knit tops. So I decided to try both using McCall and Simplicity patterns. 

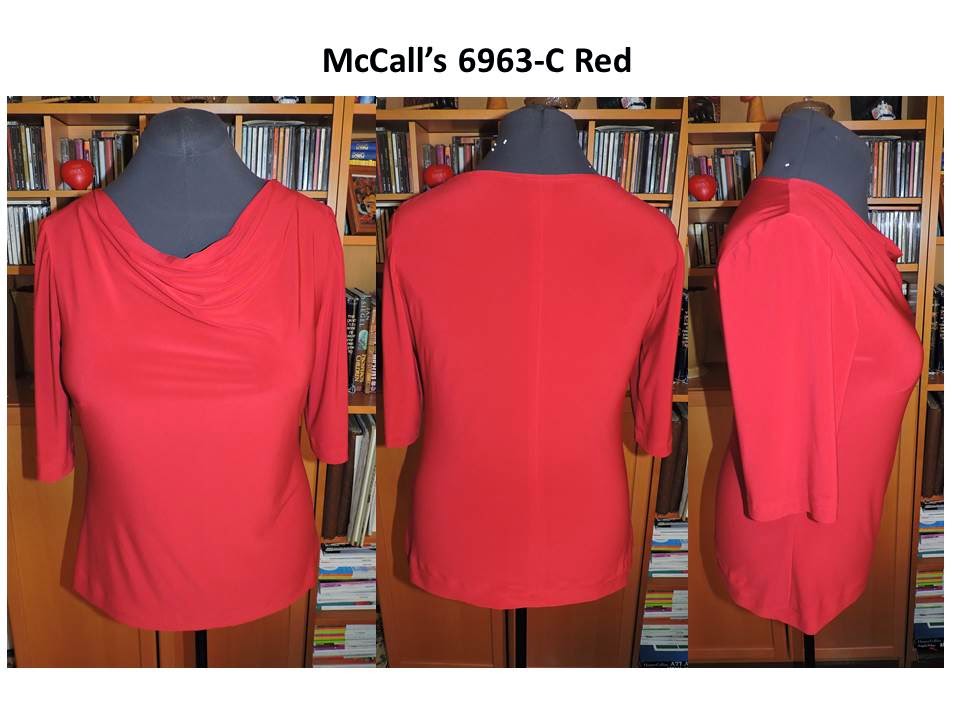
First, I'd like to review McCall 6963.

This pattern has variations in the amount of drape, which I like a lot.  In any instances the drape increases if a FBA is needed. 

McCall's describes this patterns as:  MISSES' TOPS: Close-fitting, pullover tops have draped front neckline variations, narrow hem on back neckline, and stitched hems. A: armhole bands.


It comes in sizes 8 to 24; I used 14 with modifications.

My top does look like the photo/drawing on the pattern envelope.  I made view C.  The instruction were easy, and I did not have any problem following them.

I like:
  • Shorter drape to start with.  After the FBA is done its does not fall too low. 
  • Alteration lines drawn on the pattern that help speed up the fit process.
  • Simple staple knit top.


I have no dislike.

My fabric is a Bazilian knit  from Supreme Novelty fabrics, near down town Chicago.  It's been in my stash for a few years.   It is a low-wrinkle fabric with a great amount of stretch

I made a FBA. I didn't make to large enough thinking the stretch of the fabric would compensate.  Instead I ending up with some drag marks across the front.  They are not bad, but does draw some attention.  So for the next top I will add a little more width.  The only other change I made was a sway back adjustment.  Nothing more.


I recommend this pattern to others.  It a good staple with optional drape and sleeve lengths.


This is an easy fit top that all level sewists can make.  Alterations lines are conveniently added to the tissue pattern, which make it easy to make fit adjusts.


My next top is Simplicity 1916.  This pattern has been around for awhile.  Many reviews posted online.  Some people elected to raise the neckline while some did not.  Here is my review.

This pattern contains misses' knit mock wrap top with sleeve variations. I made view A.  The pattern sizes are from 6 to 24.

The model is wearing view B.  It does not appear to be as low in the front on her as it is on me.  Other than that I think it does look exactly like the photos on the envelope.


I actually like all views of it.  I wanted to try my favorite first this time. ;-)  No dislikes. The instructions are typical and easy to follow.

My fabric is also from my stash and was purchased at New Rainbow Fabrics on Roosevelt Rd.  It is a little slippery and very stretchy.  I had just a little challenge with handling the fabric.  No problems sewing it.  I used a jersey needle (size 10).

Changes:

  • I did make a FBA, similar to McCall 6163
  • Prominent Shoulder Blades adjustment
  • Swayback adjustment
I will make it again.  Next time I'll bring the neckline up an inch or two.

That's it for now!
Cennetta


What's Next?

Hi everyone,

Before I start with another review, I wanted to thank each and everyone who continues to visit my blog.  These days I'm playing catch up on projects made in December and January.

Helen asked if I was challenging myself to make a top a day.  I actually made several over a period of time, but had not talk about them on the blog.

Recently, a few sewists posted projects that were less than wearable because of fit, sewing technique, or quality of fabric.  I have some of those too.  As a matter of fact, last year over ten projects were complete bombs.   I'll discuss some of them soon.

So coming up next are my reviews on Simiplicity 1916 and Mc Call 6963.

Happy Sewing!
C

Wednesday, February 25, 2015

McCall 6797 - A Great Drape Top


I don't know if you can call McCall's 6797 a wardrobe staple. But there are now three versions of this top in my closet. It can be worn with jeans, slim pants, and flared bottom skirts. Very versatile and stylish.


I love it if I may say so myself. This third version was sewn much like the first one, with a 1 1/2" reduction in the length of the neckband. This black, gray and ivory knit was purchased from the Textile Warehouse in Chicago. It has more stretch than the green knit fabric, which made a difference in how the top falls across my body.


I have so many, many top pattern, but this one remains in the front of the "current" top pattern stacks. It's quick and fits the bill for a stylish top.

 Happy Sewing!
C

Tuesday, February 24, 2015

Simplicity 1198 - I Couldn't Resist Making Another One


I like the green version of Simplicity 1198 so well, I couldn't resist making another one.

The multi-color fabric is part of the Hancock spring fabric collection. As soon as I saw it, I knew it would be perfect for another version of this cute side drape top.


I made this one the same as the last. The fabric does not have as much stretch as the green knit from Vogue fabric, but there was enough stretch to skip any fitting adjustments.

I really like the color palette. It can be worn with a variety of colors. For spring I will make two pairs of pants: ivory and paprika. Both will look great with this top. Today, it's worn with Vogue 8799 made a few years ago.

That's all for now. Happy Sewing!
C

Wednesday, February 18, 2015

Fighting the Chill of the Chicago Winds in Mood Chocolate Double Knit - McCall 6996-A


Chicago winters should never be taken lightly.  The arctic blast is brutal, and lasts longer than the average North American winter.  Baby, it's cold outside!  Everyone needs an extra layer under a warm coat to protect them from the wind and snow.


Mood has a nice selection of cozy fabrics, here and here.  For a warm cardigan, I chose this insulated chocolate cotton poly double knit to help shield me from the chilling winds.  This textiles sews without any problems. 


I paired it with McCall 6996 View-A.  It is described as Misses' jackets and belt:  close-fitting, unlined jackets have raised neckline with front or front band extending into gathered back collar, long sleeves, and stitched hems.  A, B:  Lower back and shaped front hemline.  D: Self belt. 


The pattern comes in sizes XS to XXL.  I used between Medium and Large, lengthened the sleeves 1.5".
The instructions were standard and easy to follow.


My cardigan is the same as the drawing.  I like the silhouette of the jacket.  It accentuates the waist.  The long line from the neck to the top of the thigh makes you look lean, while the peplum gives a little oomph to a slender derriere.


This is an excellent pattern to use to beef up your winter wardrobe.  And Mood has a huge collection of cozy fabrics to pair it with.  I highly recommend both.  Hmm.. I think I'll check out the sweater and ponte knit selections.


Happy Sewing!
C  


Tuesday, February 17, 2015

Casual Separates: Simplicity 1198 Draped Top and Paper Cut Ooh La Leggings


This is quickly becoming my favorite comfy casual outfit. I like the combination of the colors and the style of my new knit separates.


Both patterns are new to my collection, having purchased them only last month. I hope to make more of both. Today, I will review each pattern, beginning with Simplicity 1198-E. I bought it for view A. It's funny how I always seem to select the least favorite view to make first.


Simplicity describes this pattern as: Misses' knit tops. Needless to say, Simplicity rarely gives a good description of the pattern views. I described view-e as scooped neck loose fitting knit top with right side drape, 3/4 off the shoulder sleeves, and a curved hemline. The pattern comes in sizes XXS to XXL. I cut between medium and large with no alterations to accommodate fit. There was enough ease across the bust and back areas. I did not make a sway back adjustment as this top is floaty and loose fitting.


The top looks like the drawing and photos. And the instructions were simple and easy to follow. I'd like to give a word of caution when it comes to measuring and applying the elastic to the lower center of each sleeve. I think 3" is a bit long. I cut mine 2.5" instead. The center front neckband does not fit as snug as I like.  I recommend reducing the length of it  and stay stitching the neckline before attaching the neckband.


The side drape and the uneven hemline of this view helped me decide to make this view first. Although the top is loose fitting, it is not an unflattering silhouette. The length and shaping of the drape slenderizes the body. It is important to select a fabric with enough stretch. The fabric I used came from Vogue in Evanston. I found it on a table of assorted knits with assorted fibers. It has a little more stretch than recommended, but is perfect for this top.

I will definitely make this top again. Yesterday I purchased another knit print for my second top. And I do recommend this pattern to others. I like it, and it requires minimum amount of fit adjustment and is not difficult to sew. All level sewists should be able to make it.


Ooh La Leggings with Simplicity 1916 Top


Now for the leggings. Ooh La Leggings


Dawn (Two On Two Off) and Lauren (Lladybird) convinced me that this pattern was worth a try. These leggings come in three lengths: full, 3/4 and knee. They are, of course, close fitting and have front and back yokes with leg seaming for an interesting look.


The sizing is from XXS to XL. I started with a large and had to trim them down a bit for a better fit.


They certainly look like the photo and drawing. The instructions were easy to follow, no problems. What's not to like about these leggings. The seaming is very flattering and gives you the option to color block. They are versatile. You can wear them as part of your workout gear; or choose to wear them as part of a casual outfit.


For my leggings, I used a beefy knit from Vogue (Evanston), with a small amount of stretch crosswise. Lengthwise there is 50 percent stretch. So I use the lengthwise stretch around my body instead. The wrong side of the fabric is just as nice as the right side. So I used both to add a little more interest to my leggings. The front panels are the wrong side of the fabric.


First I added a few inches to the length while cutting them out. The next changes came as I sewed them. I joined the front and back yokes to assess the fit. I had to take out about an inch along the sides of the yoke. I continued with sewing the rest of the legging together. Then another fit check. The arches in the front, back and side were bagging outward. So I reduced them, removing about an inch from each. From the upper thigh to the ankle, I reduced the circumference of the leg by 1.5". Next, I cut off about 1.5" from the top of the center front, decreasing to about an inch at the sides continuing across the entire back of the yoke. I sewed almost the entire pant on the serger. The casing for the elastic and the hem were sewn on the sewing machine. I will sew these again and again.


This is a very good pattern, and I recommend it.


Happy Sewing!
C

Monday, February 16, 2015

DIY - Faux Fur/Leather Clutch


Over the weekend I was so happy to finally complete some of the many, many sewing projects on my list.  I must admit that it has been a bit of a challenge to organize projects and to think about the next phase of my sewing and creative life.


At the Christmas luncheon, Rhonda Buss, carried a super cute fur clutch.  The minute I saw it, I wanted it and made a mental note to add making a faux fur clutch to my list.  This was an easy, simple project.  And luckily, all of the supplies were already in my stash.

To make it you'll need:


Faux fur (Mine's was leftover from this jacket project.  The scraps were too nice to trash.  So I kept them in a bin along with several other remnants.)
Faux leather (or genuine leather)
Lining (remnant)
Felt
Zipper
Pellon #805 Wonder Under Fusible Web
Thread and other basic sewing tools

Steps:
  • Determine the size purse you would like to make
  • Cut the faux fur, leather, and lining based on the dimensions you chose.  Add seam allowances. (Mine was 13.5" X 11" plus seam allowances.)
  • Fuse one side of the wonder under fusible web to the wrong side of the faux fur.
  • Let cool.

  • Remove the wax paper backing and fuse the felt to the other side of the Wonder Under.  The wrong side of the faux fur is now felt.  This adds body to the faux fur.  The faux leather already had a felt backing.

  • Cut a 2" X 1.25" strip of leather.  Fold it in half the long way.  Edge stitch about 1/8" away from the edge.  This strip will be use to cover the zipper stop.
  • Sew the strip to the zipper tape.

  • Sew the faux fur and leather to the zipper tape.
  • Sew the lining to the zipper tape.  The zipper tape on each side should be sandwiched between the lining and the fabric.


  • Edge stitch the lining near the zipper teeth so that it will not get catch in the zipper when you open and close the purse.
  • Put the right sides of the purse together.  Sew the remaining three sides together.
  • Do the same for the lining, leaving a six inch opening at the bottom to turn the purse inside out.
  • Turn the purse inside out and finger press the seams.

  • Stitch the remaining lining together.
  • You're done!


  • You can use it as a purse or a tech case.  The choice is yours. 


Parting Shot:  Rhonda Buss gave a talk on sleeves at the Chicago Chapter American Sewing Guild meeting Friday evening.  The sleeves on this coat are spectacular.


Happy Sewing!
C

LinkWithin

Blog Widget by LinkWithin