Pages

Thursday, January 25, 2024

Copy That - Inspiration from Coachtopia Part III


Hi everyone,

Today, I'm posting my part III of my “Copy That” inspired by Coachtopia Cloud Tote.  First, let me say it has been so much fun making these tote bags.  There is so much you can do with a simple pattern.  You can elevate the look using fabric or by adding design elements to make it stand out.  And then sometimes it can be about making it more functional for your personal use.

Warning - This post is long.  I want to provide details on how I made the second and third tote. So here goes.

Tote #2 - Faux Fur with non-stretch knit "looking" wrong side.  The lining is a polyester taffeta that I purchased at Joann's Fabrics.  It is tightly woven and feels like a waterproof textile.  Very sturdy and perfect for the lining.

I purchased the faux fur from the Textile Warehouse in Chicago (West 21st near Damen Avenue).  It is a fun, funky animal print in hot pink and black.  Upon examining the back of the fabric, I thought it might need an additional layer of support.  So I used a double sided fusible web to adhere a cotton broadcloth to the wrong side of it.  This process added durability to the tote.

After I cut out the tote, I fused the web to the wrong side of the fabric following the manufacturer's instructions.  Below are a few photos that I managed to take during the process.


I wanted my tote bag to have some pockets.  Using the lining fabric, I cut two pieces of fabric, the same size, to make a doubled layered pocket strip.  After sewing the pocket strip to the bag lining, I then sewed four more vertical lines to make two large pockets and two small ones to hold pencils and pens.  For the smaller pockets, I also sewed a horizontal line across them to prevent the pencils/pens from falling too far into the slot.   

(PLEASE NOTE:  POCKET CONSTRUCTION PHOTOS ARE OF THE THIRD TOTE. DIFFERENT COLOR.  I FORGOT TO TAKE PICTURES OF THE PROCESS USING THE BLACK LINING. LAST PHOTO SHOWS BLACK LINING POCKET FOR THE FAUX FUR TOTE.)


Once the broadcloth was secured to the back and the pockets/label were sewn on, I was ready to put the tote together.  

First, I sewed the body of the bag and lining together using a 3/8" seam allowance.  At the top of each side of the tote bag and lining, start sewing 3/8" from the top.  At the bottom curve of both, I sewed a second row of stitches to help prevent break through.  


I also sewed the straps together.  Next, I pressed both and turned the bag to the right side leaving the lining with the wrong side on the outside.  Then I slipped the lining inside the bag matching the straps and the front and back curve of the upper body.  Next, I pinned the two together; then sewed along the straps and upper part of the bag together.

The last step made it easy to add the bias tape to all of the raw edges of the tote bag.  To make my bias tape, follow the instructions in this link.  I cut my tape about 1.5" wide.  For the bias tape, I used a remnant of black silky polyester lining.  It was easier to work with than the taffeta.  The taffeta has almost  no stretch or give on the bias.   So once I had made the strip of bias tape, I folded it in half and pressed it.  Next, I sewed it to the wrong side of the bag along all raw edges keeping them even and slightly stretching the bias tape along the curve areas of the bag.  At each end I left about 1" (loose bias tape) as the ends needed to be sewn together to complete the circle.  There will be three separate sections along the opening and the straps of the bag that require this finishing.  Completing the circle of the bias tape edge was a little tricky; I ended up slightly overlapping them tucking the raw edge of the outer tape under to finish with a folded edge (if that makes sense).  Before rolling the bias tape folded edge to cover the raw edge, I trimmed away about half of the seam allowance to help make it easier. The folded edge of the bias tape should at least cover the seam line. 

Once that is done, Press using a pressing cloth.  Make sure not to flatten the pile of the faux fur.  That's it for this version.


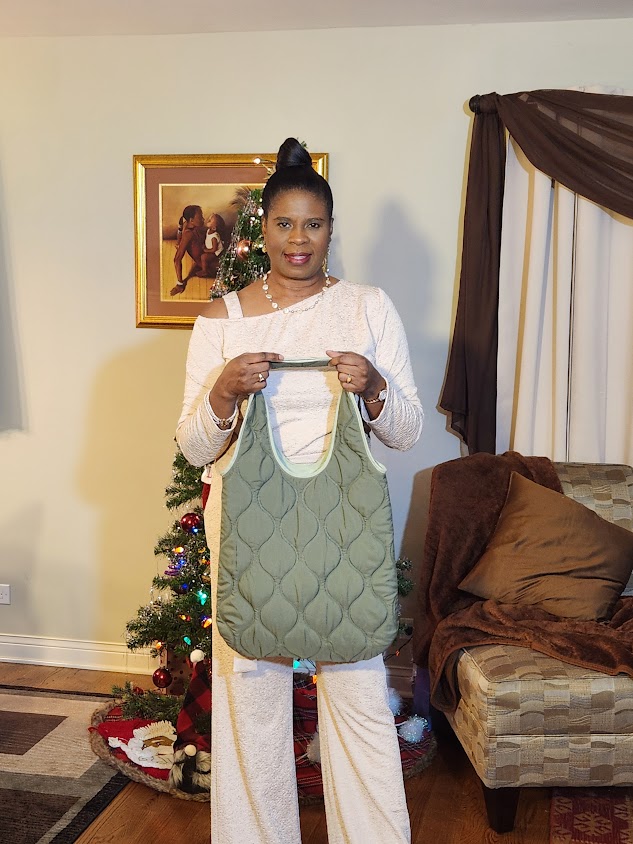
Tote #3.  I used a slightly different method of constructing this tote.  First, the fabric I used is a quilted nylon with a fleece like backing also from the Textile Warehouse.  I added a broadcloth to the wrong side for this version.  Same process as the faux fur version.  The lining was also a taffeta that I purchased at Joann’s. 

I used the same construction process to make the pockets and to sew the lining and bag together.  But instead of sewing the wrong sides together to add a bias tape.  I followed the instructions given by Made Everyday.com Here is the link.  It was pretty easy.  I finished it with top stitching along all edges. 


I hope this was helpful.  Happy Sewing!

C


Sunday, January 21, 2024

Copy That - Inspiration from Coachtopia Part II


This is a quick photo of the progress on tote number two.  No quilted fabric for this version.  Just a bright pink animal print.

Stay turned for details on how I made this version.


Saturday, January 20, 2024

Copy That - Inspiration from Coachtopia Part I


It has been quite sometimes since I made a "Copy That" project. Today I decided to “reboot” the segment on my blog.  I’ve already made a few posts on Facebook and Instagram. 


Anyway, a dear friend of mines, drew my attention to a new product line under the Coach umbrella called Coachtopia.  Her cousin is actually the head designer for Coachtopia.  It is a fresh, youthful spend on classic designs.  One of my favorites is the Cloud tote.  It is a quilted tote bag that is big enough to carry a laptop in it.  


Some time ago, I downloaded the "Made Everyday Reversible Bag".  I made several for gifts.  I have yet to review it on my blog.  It is super easy to make.

So, I used the reversible bag to create my first Cloud tote inspired bag.  This first version is not perfect.  The straps are too wide and can easily slide off the shoulder. 

My second version is already in the works.  I made it with lightly thinner straps and a longer body in hopes of  copying the shape of the Cloud tote.

Stay tuned, More later.


Friday, January 19, 2024

Cozy Stretch Velvet - New Look N6687


I wanted a cozy, black velvet top for the winter season.  When I saw the stretch velvet at Joann's, I really didn't have a pattern in mind.  I just knew I wanted something new and cozy for the season.  After returning home from the store, immediately I tossed the fabric with several other fabrics into the washer.  This velvet washes and dries beautifully.  Love it.


My pattern choice for my velvet top was New Look N6687.  I thought the match up was okay.  Not perfect though.  The fabric for the top used on the envelope appears to be lighter and has more fluidity.  

This pattern top, view A,  may be described as a knit top with a asymmetric neckline, ruched side and long sleeves.  

It comes in sizes 6 to 18.  I used size 16 with a few modifications.


My version of the top looks very much like the drawing and photographs on the envelope.  Because of the heavy fabric, my version does not have as much drape.  Also, the length of my top looks a few inches shorter.  

The instructions were typical and easy to follow.  It's important to transfer all markings, notches and circles.  There was nothing confusing in the instructions.  The top quickly came together.

What I like about this top is the neckline and the ruching.  A change in the neckline of a basic t-shirt is always welcomed.  The ruching helps add interest to the waistline while camouflages that little fluffy area that a few of us have. Lol

As far as alterations of the pattern, I didn't change/alter much.  In the bust area, I added just a bit more width and I lengthen the sleeves about an inch.  Lately, I've been feeling a little lazy when it comes to doing a FBA.  The good thing is it turned out just fine.

I think I will make this again.  Next time I will make it slightly longer.  Plus I will do a better "FBA". Lol  This is a pattern that beginners can make, and I do recommend it.  Surprisingly, there aren't many postings online by sewists who have made it.

In conclusion, this is a nice staple knit top to try.  The neckline and the ruching add interest to a basic t-shirt design.

So that’s it for now.

Happy Sewing!


Sunday, January 7, 2024

Faux Shaved Lamb Fall Coat - Burda Style 7028


I finished this months ago, and it was just in time for the midwestern mild winter.  

I've wanted to make View A for quite some time, and I knew I would make some changes.  Starting with, adding a collar.  And in this case I did just that.  Anyway, here is a quick pattern review of this coat project. 

Pattern Description:  Coat and jacket.  That's all Burda Style indicates on the envelope.  Their descriptions are just as vague as their sewing instructions.  But I must admit, they always have interesting styles.  So, I will add that view A is a cocoon style coat with waist darts and in-seam pockets.  Both views are lined and have drop sleeves.

Pattern Sizing:  The pattern comes in  sizes 10 to 22.  I used a size 16. 

Did it look like the photo/drawing on the pattern envelope once you were done sewing with it?  Pretty much.  I made a few minor changes.  Instead of one button, my coat has three. 

Were the instructions easy to follow? The instructions were typical Burda.  Nothing difficult or confusing.  I did make a few changes in how I constructed my coat.

What did you particularly like or dislike about the pattern?  


Likes:

  • The cocoon silhouette of the coat.  I've never made or had a coat styled like this.
  • The front in-seam pockets. 

Dislikes:

  • Construction of the lining and how it is sewn to the coat.  I followed this step.  After I completed it, I tried it on to see how the coat would lay/hang on my body.  The hem was all wonky.  There needs to be at least an inch hem in the coat to help it hang better, which I did around the curve from one side to the other.  That improve the hang of the coat. 

Fabric Used: This coat is made with Theory black faux shaved lamb (#313222) from Mood Fabrics.  It has been in my stash for at least four years.  So Mood may not have it in stock anymore.  It is soft to the touch and has a knit backing.  It was easy to sew.  For the lining, I used a crepe back satin that I purchased at JoAnn's.  The weight of it adds a bit more thickness to the medium weight coat. 


Pattern alterations or any design changes you made:  I really didn't do much in the area of fit alterations.  I used size 16.  But I think size 14 would have been better.  The sleeves were extremely long (Cut them to appropriate length) and the neckline is a little too roomy.  I did take in the sides about one inch for a slightly closer fit. I added buttons.  One button isn't enough.  Lol  And, I used the crepe satin to make the button loops.  No other changes other than the hem construction that I mention above.


Would you sew it again? Would you recommend it to others?  I really think that I may sew it again.  Maybe next time with a detachable collar.  Just for fun.  I do recommend it to others.  You may want to make a muslin before cutting into your fashion fabric. Wink, wink.

Conclusion:   I like how this coat turned out.  It is quite different from any other coat that I've made.  So that’s it for now.


Happy Sewing!

C


Saturday, January 6, 2024

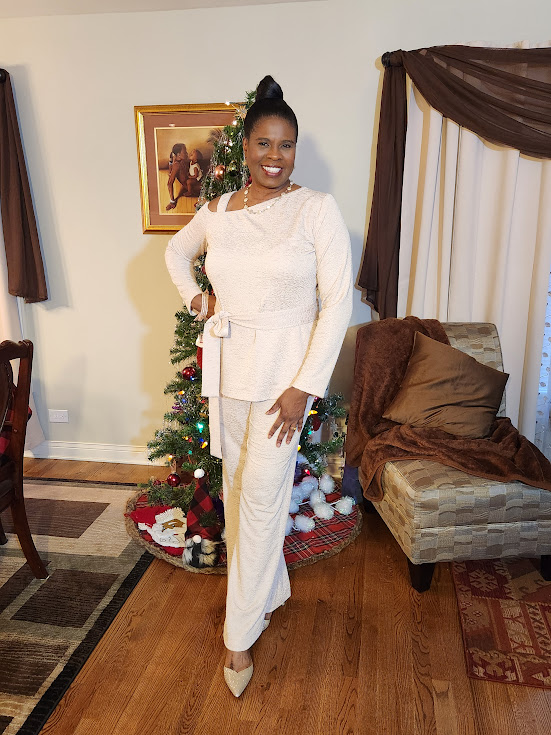
Holiday Champagne Outfit - Butterick B6913


Happy New Year Everyone!

It's good to still be here.  Today, I'm glad to post a pattern review of my Christmas outfit.  I have a few more reviews for 2023 to post.  So please be patient.  I'm hoping to write a few posts at a time in hopes of getting all of them done as  quickly as possible.  

Butterick B6913

I wanted to start with this project because it is my favorite make from the last quarter of 2023.  So, let me begin with the pattern description that is straight from the Simplicity UK website: relaxed, easy, and casual loungewear features knit dress and top with asymmetrical neckline, long sleeves, shoulder strap, and tie belt.  Dress A has side slit.  Skirt C is midcalf length and has elastic waistband.  Pants D are long, flowy, and wide leg, and have elastic waistband.  I made views B and D with minor adjustments.

This pattern comes in sizes small to xx large all in pattern.  I used between sizes medium and large.  My outfit looks like the photo/drawing and the instructions were super easy.  There is nothing complex or confusing about them.  I wanted this to be a super quick construction process for me.  So I used different construction methods.  All modifications are listed in the alteration/change section below.

My likes are:

  • Easy to sew - My number one favorite like.   The pants were easy.  They are literally a simple two-piece pattern pajama pant.  The top is a modified t-shirt pattern with an exposed shoulder.  I made this outfit from start to finish on Christmas Eve.  It took about 5 hours. 
  • Cute and Festive - With the combination of the style and fabric, it is a very festive outfit.  Perfect for the holiday.
  • Comfortable - Knit fabric and relaxed comfort.  Perfect.  No tight, binding clothes on Christmas.  So no distractions from enjoying my family during our Christmas celebration.  Joy.

I have no dislikes.


My fabric is a champagne, textured, novelty knit.  I purchased it at Vogues Fabrics on Roosevelt Rd about ten years ago.  It has about 30 percent stretch and great recovery.  The texture is my favorite.  It is medium weight and has a semi- dry hand.  It's not rough though if that makes sense.  This fabric was very easy to work with and that helps with finishing the hems.

Now, the alterations and construction changes.  My apologies, the alteration changes for fit may not be helpful in this case.  I simply made them as I cut out my outfit.  I'll start with the easiest, the pants.  All I needed was to add about 4 inches to the length of them.  Simply cutting them longer for the bottom edge.  For my top at the bust area (starting 2.5 inches from the top of the side seam) I tapered out about 1/2 inch then tapered back to the edge of the pattern to add a little more room in the bust area.  So it looked a little like a crescent moon on the side.  Sewing the side seam, I had to do a little easing to maintain the integrity of the length of the front side seam.  I also added an inch to the length of both sleeves.  Nothing more on fit.

For the construction changes I did the following:

Top -

  • No double stitching the seams.  I straight stitched them.  For the hem and the upper edge of the neckline/sleeve, I serged the edges turned and stitched.
  • Upper edge (neckline/sleeve) I left and opening to thread a narrow elastic through the channel to help maintain the shape of the neckline/sleeve.  First, I measured the circumference.  Then I cut the elastic 3 inches shorter than the circumference. 
  • Attaching the shoulder strap. I stitched it to the edge of the hem, adjusting the location based on where my bra strap falls.  To reinforce it, I also stitched it to the edge just above the initial attachment stitching (avoiding the elastic).


Pants -

  • Again no double stitching the seams.  I follow the same seaming for the pants.
  • Casing for the elasticized waist.  No turning the raw edges in.  I serged the edge of the waist and the hem.  I turned them and stitched them down. Nothing fancy, but all finishings are neat and clean.


That's it.


I planned to make this outfit at least one more time.  I already have a fabric in mind.  But that's another review.  Lol


This is an easy pattern to sew.  I do recommend it to all level sewists.  Depending on your fabric, you can dress it up or down.  


I am very pleased with how this outfit turned out.  It was perfect for the Christmas family holiday celebration.

Happy Sewing!

C