Today, is the first time in a long time I was able to get some blogging done. I've missed going to my favorite places for inspiration and motivation. So I am grateful to have a few hours to post about a few projects that were finished in January.
This first one, I contemplated throwing in the trash. I had a few fitting issues and construction woes. Then on Monday, I decided to remove the hem of the jacket, for the third time, hoping to get it to lie flat. It's better, but still not 100 percent. I think part of the problem may be due to the loose weave of the fabric and how I attached the lining to the armhole of the sleeve. That's my best guess.
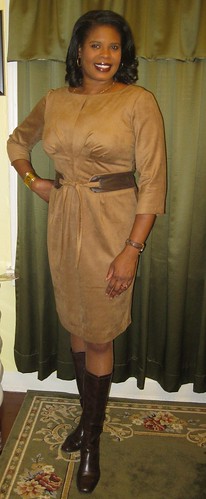
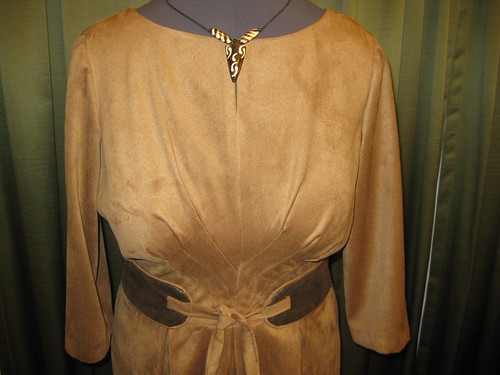
So on Wednesday, I decided to wear my trendy, mix media outfit to work. Here's how I wore it.

Burda Style 7303 - complete review:
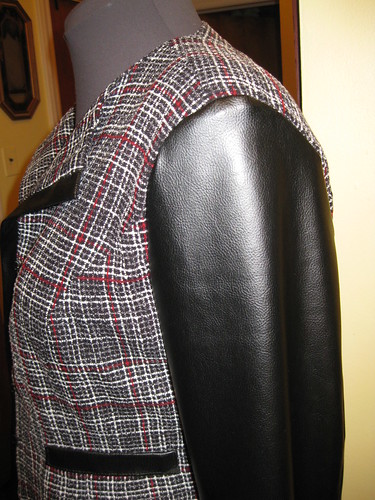
Pattern Description: Collarless princess seam jacket with pocket welts and sleeve variation. An almost A-line skirt with center seam option.
Pattern Sizing: This pattern comes in sizes 10 to 20. I used a size 14 with modifications.
Did it look like the photo/drawing on the pattern envelope once you were done sewing with it? It does look like the photo minus the trimming.
Were the instructions easy to follow? There is nothing confusing in them. I don't like attaching the interfacing to the lining. I skipped that. It didn't really need it; the skirt is faux leather. I did, however, add seam binding to the waist of the skirt for stability.
What did you particularly like or dislike about the pattern? I like the classic style of the suit, and I thought it would be a good pattern to try my first mix materials garment. No serious dislikes.
Fabric Used: remnant boucle from Vogue, faux leather from Hancock's, red polyester lining from my stash, and black polyester charmeuse from Rainbow Fabrics.
Pattern alterations or any design changes you made:

Of course I made my usual adjustments: FBA, prominent shoulder blades, and lengthened the skirt a few inches. I also took most of the ease out of the sleeve cap, but later realized I should have left it in. The faux leather does not have much give and is snug around the upper part of my arm.
My design changes include:
- faux leather sleeves and pocket welts for the jacket.
- exposed zipper on the skirt.
- I like the front center open with the front facing folder down. It's the opposite of how the model is wearing the jacket.
Mishap #1 - While trying to get that final press before wearing the outfit, I touched to faux leather welt with the iron. So it lost some of the shine and "plastic" too. lol

Mishap #2 - I used a pressing clothe, but there are some areas of the faux leather that lost it's shaping and some luster. I probably had the iron too hot. So this is a point that you should consider if you plan to make a faux leather garment.
Would you sew it again? Would you recommend it to others? Not sure. I have many patterns to try. But I do recommend it.
Conclusion: Although I had a few mishaps with this sewing project, I received a lot of compliments. It's not hard to sew. And I think the jacket is good for making a Chanel style jacket.
All photos can be found here.
Pattern Sizing: This pattern comes in sizes 10 to 20. I used a size 14 with modifications.
Did it look like the photo/drawing on the pattern envelope once you were done sewing with it? It does look like the photo minus the trimming.
Were the instructions easy to follow? There is nothing confusing in them. I don't like attaching the interfacing to the lining. I skipped that. It didn't really need it; the skirt is faux leather. I did, however, add seam binding to the waist of the skirt for stability.
What did you particularly like or dislike about the pattern? I like the classic style of the suit, and I thought it would be a good pattern to try my first mix materials garment. No serious dislikes.
Fabric Used: remnant boucle from Vogue, faux leather from Hancock's, red polyester lining from my stash, and black polyester charmeuse from Rainbow Fabrics.
Pattern alterations or any design changes you made:
Of course I made my usual adjustments: FBA, prominent shoulder blades, and lengthened the skirt a few inches. I also took most of the ease out of the sleeve cap, but later realized I should have left it in. The faux leather does not have much give and is snug around the upper part of my arm.
My design changes include:
- faux leather sleeves and pocket welts for the jacket.
- exposed zipper on the skirt.
- I like the front center open with the front facing folder down. It's the opposite of how the model is wearing the jacket.
Mishap #1 - While trying to get that final press before wearing the outfit, I touched to faux leather welt with the iron. So it lost some of the shine and "plastic" too. lol
Mishap #2 - I used a pressing clothe, but there are some areas of the faux leather that lost it's shaping and some luster. I probably had the iron too hot. So this is a point that you should consider if you plan to make a faux leather garment.
Would you sew it again? Would you recommend it to others? Not sure. I have many patterns to try. But I do recommend it.
Conclusion: Although I had a few mishaps with this sewing project, I received a lot of compliments. It's not hard to sew. And I think the jacket is good for making a Chanel style jacket.
All photos can be found here.