Showing posts with label jacket. Show all posts

Wednesday, June 25, 2025

The Brocade Makes The Jacket - Butterick B6915


A little over a year ago, I briefly mentioned my work on the muslin for the jacket of this pattern.  Since that time, I did more tweaking of the pattern and decided to use a beautiful brocade that I purchased from Mood Fabrics several years ago during a visit to New York.  

I thought the style of the jacket was the perfect match for the brocade.  Granted I did want to reduce any chance of something going wrong or turning out wonky before I cut into my fabric.  I really love the fabric and wanted to make something special with it.   


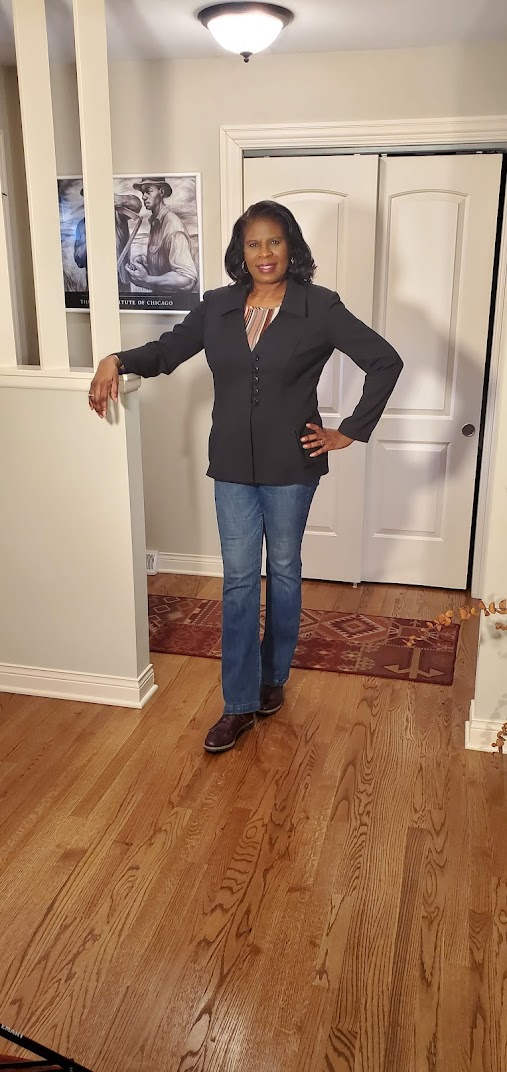
We are now in the hot, muggy days of summer.  It was 94 degrees when I took the photos of me wearing my outfit.  Though the coloration of my new suit is bright and cheery, it is perfect for the fall/winter season.  

Pattern Description:  Classic two-piece suit with a twist.  Lined jacket draws asymmetrically across the body and fastens with three buttons.  Jacket features flap detail at front.  Pants come in ankle length and includes invisible zipper on the side.  View C are wide leg pants.  I made view A and B.


Pattern Sizing:  It comes in two size groups (8 - 16) and (18 - 26) I used size 16 with modifications.

Did it look like the photo/drawing on the pattern envelope once you were done sewing with it?  Yes, my outfit does look like the drawing and the suit that the model is wearing.  

Were the instructions easy to follow?  The instructions were typical and easy to follow.  There was nothing confusing about them.

What did you particularly like or dislike about the pattern?  

Likes -

  • The asymmetrical style line of the jacket.
  • The pleats at the neckline of the jacket
  • The princess seam.
Dislikes -
  • The one piece sleeve.  I prefer a two piece sleeve for a suit jacket.  These sleeves were snug and there was too much in the sleeve cap for my fabric.  When I made the muslin the amount of ease in the sleeve cap was easy to work into the armhole.  But in the brocade it was slightly difficult.  I had to set the sleeve three times.


Fabric Used:  My fabrics were purchased at Mood Fabrics during a trip to met up with several sewing friends (Carolyn, Andrea, Gaylen)  in New York.  My jacket fabric is a silk brocade and the pants is a medium weight polyester satin.  

 
Pattern alterations or any design changes you made:  I made several pattern adjustments beginning with the full bust adjustment and my usual back adjustments.  I also lengthen the sleeves and added an inch width to the upper arm area.  For the pants I had to lengthen the leg and crotch.  Sorry no photo of that adjustment.


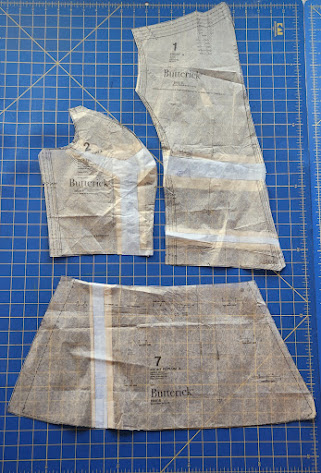
After making the adjustments and a muslin, I still needed to make a few tweaks as I sewed.  Below is a photo of me fitting the lower half of the jacket along side of photo of the finished outfit.  See the difference in the flare of the peplum.  I ripped it all out and reduced the peplum along the sides. 


Would you sew it again? Would you recommend it to others?  I think once is enough.  But, I do recommend this pattern to others.  You should make a muslin before cutting into your fashion fabric.

Conclusion: I'm pleased with how this suit turned out.  I'll probably wear it the first chance I get when cooler weather returns.  This pattern is not difficult to sew. It's time consuming and you should take your time and enjoy the process.


Friday, January 10, 2025

The Not So Famous Jacket - Simplicity S9227


This is one I really did not like how it turned out.  I tried and tried to make it work, but...,  I think it me though.  It's in how it looks on me. 

So here goes my pattern review of Simplicity S9227.  


Pattern Description:  Simplicity's says Misses' jacket and pants.  I'll add:  it is a princess seam style jacket, unlined.  On the model, the sleeve cap does not sit exactly on the ball of the shoulder.  

Pattern Sizing:  The pattern is available in sizes 8 to 26.  I used size 16 with modifications.

Did it look like the photo/drawing on the pattern envelope once you were done sewing with it?  Yes, it does for the most part.

Were the instructions easy to follow?  The instructions were typical, nothing confusing in them.

What did you particularly like or dislike about the pattern?  I do not like the look on me after I made all of the fit alterations.   The princess seam sit more on the side of the body than normal. I think the problem with the "look" is more related to the position of the princess seam and being full busted.  Also, I did not like how the sleeve and arm syce are drafted.  It just does not look good or wear well to me. 


Fabric Used:  I purchased this suiting fabric from the Textile Warehouse a few years ago.  It is a twill like weave..  I thought it was perfect for this pattern.

Pattern alterations or any design changes you made:  I made most of my usual upper body fit adjustments:  FBA, broad shoulders, and lengthen the sleeves.    Sorry, I didn't take pictures of the alterations.  I even made a muslin.  I added Dior darts on the front in hopes of improving the look of the jacket.  No luck.  

Would you sew it again? Would you recommend it to others?  I will not sew this again.  I'm putting the jacket in my donation bag.  I've enough time on it.  Plus, I have so many jacket patterns to try.  If you are thinking about trying this pattern, please make a muslin and make sure it fits perfect (just the way you like it) before cutting into your fashion fabric.

Conclusion:  This jacket really didn't work for me.  Try it with caution.  Make a muslin first.  Side note:  in the photos I'm also wearing a new molly t-shirt.  I have made so many of these.  This is a highly recommended pattern.  It is great for a quick sewing project.


More 2024 to come.


Friday, May 3, 2024

Many Sewing Projects All At Once

Good morning Sewing Friends,

I wanted to post a short update on the many projects that I am currently working on.  During the past few months, most of my sewing time has been on pattern fit adjustments and making muslins to check the fit to make sure it's good.  Often I do several fit adjustments at the same time.  Then once everything is good, I move to the next step of making the actual garments.

Today, I'm posting a few of the muslins that I've completed.  My hope is to post a "Note on a Pattern" and make the garment.  So, here is a preview of some of my upcoming projects.  

McCall M7978 - Blouse


Butterick B6915


Simplicity S9783


Monday, September 4, 2023

Winter Is Coming!

"Winter is coming."  That's a famous line from the "Game of Thrones".  In the movie it means that something bad was about to happen.  In this instance, it literally means "winter is coming." Lol

It's time to start making "our" winter coats.  In my effort to "get ready", I decided to take a look at some of the coats that I've made over the past 15 years.  So this post is to take note of my coat making journey as well as inspire others. 

So here goes!

Butterick B6244 (2016)

Butterick B6385 (2018)

Burda Style Mag 10-2008-101 (2016)

Burda Style 6462 (2019)

Burda Style 6462 (2019)

Kelly Anorak Jacket (2021)

McCall M7254 (2019)

McCall M7480 (2017)

Simplicity S2057 (2020)

Simplicity S2508 (2021)

Simplicity S2812 (2011)


Simplicity S4356 (2011)

Simplicity S9388 (2021)

Simplicity S9388 (2021)

Vogue V1060 (2012)

Vogue V1216 (2011)

Vogue V1262 (2013)

Vogue V8212 (2016)

Vogue V9037 (2016)

Are you planning a coat project? How many? What fabric and color? Please share.

Happy Sewing!
C


Monday, March 21, 2022

Minerva Fabric - Black Neutral Jacket Simplicity S1781


I finally finished a sewing project.  This one stayed on the table too long.  I started on it in February, and I had hoped to finish it that same month.  I'm glad to move it from the sewing studio to one of my closets.  

This black jacket will be part of my neutral wardrobe.  Already I know that it will be in high rotation, especially in the coming spring and early summer seasons.  I can dress it up or down.  For these photos I decided to dress it down with jeans and one of my molly tees.


For the review, I will try to be brief; but at the same time provide enough information about the experience just in case someone in the sewing community is planning to make this.  The pattern isn't new, but I don't think there are a lot of reviews online.


Pattern Description:  Misses' jacket in two lengths with front and collar variations.  Closures feature an exposed zipper, hook and eye, or loops and buttons.  Croquis Kit included with each Project Runway pattern allows you to be your own designer.   This is OOP, but you can find a copy of it on Etsy.

Pattern Sizing:  The pattern comes in sizes 6 to 22.   I used size 16 with a lot of modifications beginning with the view.  I really liked the view in the lower righthand corner with the pleated pocket and side back.  But I wanted the length of the red jacket that the model is wearing.  So that is what I decided to make.

Did it look like the photo/drawing on the pattern envelope once you were done sewing with it?  For the most part. my jacket does look like the jacket drawing, except it is longer.


Were the instructions easy to follow?  The instructions were typical and easy to follow.  I changed a few things.  One being I understitched the facing and along the neckline.  I like the way it slightly rolls the edge to the inside of the jacket.

What did you particularly like or dislike about the pattern?  There are many things that I like about the jacket beginning with the princess seams.  This style always makes it a little easier to do the pattern adjustments for an FBA.  The pleated pockets and side back are also favorite design elements.  They help create a balance between my upper and lower body.  They also add some interest to what could be considered a boring classic princess style jacket. I love the two-piece sleeve in a jacket. They look better and are easier to fit.  The buttonhole loops are on my like list too.  Lastly, I like the draft of this pattern.  Even with all of my fit adjustments, it appears to be well drafted.  

No dislikes.


Fabric Used: I chose a recycled polyester suiting from Minerva Fabrics.  This light/medium weight suiting, sewed up without any problems.  It has a "bubble" texture which adds interest to the feel and look of the jacket.  But it does not make it look heavy.

Pattern alterations or any design changes you made:  I made my usual adjustments for an FBA, swayback, prominent shoulder blades, and I added length to the sleeve and the jacket itself.  

Would you sew it again? Would you recommend it to others?  Yes and yes.  I must use the pattern again.  I spent so much time making the adjustments.  It would be somewhat of a waste if I didn't make it at least one more time.  And of course, I love how it turned out.  The side front and back have three sections.  For the side front there are also pockets.  When I made the FBA and swayback adjustments they affected all of the pieces associated with the side front and back.  So I was doing a lot of slashing and taping.

I do recommend it to others.  But make a muslin and take the time to make the pattern fit adjustments.  

Conclusion:  I really like how my jacket turned out.  And I'm glad I finally finished it.  In the coming months I hope to get plenty of wear out of it.  It's comfortable and the fit is pretty good.  I like wearing it with jeans and a t-shirt.  But it would be great to wear with a skirt or dress. 

For a sewing project like this, take the time to make sure the fit is good and make a muslin before you cut into your lovely fashion fabric. Wink, wink.

Happy Sewing!

C


Saturday, October 30, 2021

Simplicity Shacket S9388 In Denim - Better Than The Last


Here I go again!  This is my second shacket, and I'm loving it even more than the first. 

This medium weight denim that I bought from JoAnn's is perfect.  For this version, view A, I decided to make a few changes.


The first was to change the design of the hemline.  I wanted to add a curve hem with slits on the sides.  So, I used a bowl the create the curve. then I decided the length of the slit. Easy, easy.  


With the first shacket I thought the front placket was a little too short.  But I wasn't absolutely sure because I added a few inches to the length.  For this version I cut the pieces exactly as instructed.  True enough, the placket is nearly two inches too short.  So after changing the hemline, I had to redo it and shorten the front enough to fit the length of the placket.  Easy solution.


Next change, I made the sleeve pleats deeper and I turned the upper part of the vent in.  The sleeves are really BIG, and the cuff too.  This change makes it fit a little better.


The final change was to use snaps instead of buttons.  I put them on today after finishing it a week ago.


This one is so versatile. I can wear it with almost any casual outfit.  today I'm showing two style options:  leggings, tall boots, and a colorful scarf and slim pants and a turtleneck top.  Not shown today, but definitely a great outfit for me too: a simple pullover dress cinched at the waist with a big scarf draped about the neck.  The style options are endless.

So, here's to the trending shacket.  I'm going to get plenty of wear out of this baby. ;-)

More to come.  Rhonda and I will continue our little sew along with a pink wool shacket.  So stay tuned.  Be sure to check us out on Instagram too.  There may be additional postings as we go along. 

Happy Sewing!

C


LinkWithin

Blog Widget by LinkWithin