Showing posts with label knit top. Show all posts

Tuesday, March 25, 2025

Notes on a Pattern - Full Bust Adjustment Tutorial McCall's M8240


This is my muslin


It has been a while since I did a Notes on a Pattern.  

This top is all over social media.  I hesitated to make it for fear of the front placket not being perfect.  To help myself, I researched for some tutorials to get a flawless placket.  I did find a few on Instagram that were helpful.  An easy fit.  My other concern was with the FBA adjustment.  Could I get away without adjusting?  So for my wearable muslin, I decided to use the molly t-shirt front pattern as a sloper for the FBA. 


Well, it didn't exactly work to my liking.  The center front hem is slightly higher than the rest of the hem. So, I did the next best thing:  I made a traditional FBA for the best fit.  Today, I am posting a FBA tutorial for this McCall's pullover.

Below is my tutorial:


Step 1 - Draw the lines to prepare for the slash and spread of the pattern sections.


Step 2 - Cut along the line 1 and spread the desired amount of the adjustment.  In this instance, the amount is 1".


Step 3 - Cut and spread line 2 at the bust area to bring balance back to the side.


Step 4 - fill in with tissue paper along line 1 and 2.  Tape in place except for the lower right portion severl inches above the hem.


Step 5 - Cut and spread line 3 to true up the hemline.  Then fill in with tissue paper.


Step 6 - trim tissue paper all except for the bust area.


Step 7 - Fold the dart in half to trim tissue paper.  True up the bust dart along the side seam.

That's it for the basic traditional full bust adjustment.  I hope this information/tutorial is helpful.

Happy Sewing!
C


Monday, February 17, 2025

Vogue V2049 - New Pattern Release in Review


When I saw Vogue V2049 bodysuit pattern in the catalog, I had to have it.  And a few weeks ago, I was finally able to purchase it at the JoAnn's pattern sale.  Days later I cut it out and begin to make the fit adjustments.


At times making the fit adjustments can take just as much time as it does to sew up a simple t-shirt.  For this top, I got the brilliant idea to use my Molly Tee pattern as a sloper in hopes of speeding up the process.  Low and behold, it was spot on with the adjustments.  

I was extremely happy not to do the entire process of slashing, cutting, and taping. So, here is my review:


 Pattern Description: Misses' Bodysuits:  close-fitting bodysuit has asymmetric neckline stabilized with 1/4" elastic, bust darts, long sleeves and fastens with snap closures.  View A has front and back gathered drape pulled through loop.


Pattern Sizing:  8 to 26.  I used size 16 with modifications.

Did it look like the photo/drawing on the pattern envelope once you were done sewing with it? Yes, it did.  

Were the instructions easy to follow?  One of the things that I love about sewing Vogue patterns is that they sometimes have some very interesting techniques for constructing a garment.  The construction of the right top at the arm was one of those cases.  To my surprise, it went together very well.  

What did you particularly like or dislike about the pattern?  I have some likes and dislikes.

Likes

  • The style of the bodysuit.  I love the drape about the neckline and the scarf. And the asymmetric stabilized neckline is a winner. too

Dislikes


  • Now, the way that vogue instructs on how to finish the leg hole and the snap area, I didn't appreciate at all.  It did not make sense to me.  But for the sake of following the instructions for this wearable muslin, I finished the leg hole and snap area as instructed.  Next time I will probably add a little more to the edges and sew on elastic to finish the area.


Fabric Used:  My fabric came from Walmart.  I got it out of the 2 yard discount bend.  I only paid $4.00 for it.  It is a soft, light weight knit with 75% crosswise stretch required for this top.  Note:  having enough crosswise stretch is key.  Make sure you take the amount of stretch into consideration if you plan to make this top.

Pattern alterations or any design changes you made:  I used what I'll say is a short-cut on the FBA.  If you've been following this blog for at least a year, you know that I love making the Molly Tee and have made several of them throughout the years.  It comes with bust cup sizes, I think, up to G.  I have my pattern at the ready at all times.  So, I placed my Molly Tee under the front of the Vogue V2049 to determine the FBA.  I totally ignored the darts.  Then I added the "curved width" needed to make this new top fit.  When I constructed the bodysuit, I did make darts as instructed.  It worked out perfectly.


I'm hope  I'll be able to take of picture of me wearing it soon.  But for now, I'm showing it on the dress form.

Would you sew it again? Would you recommend it to others?  Yes, this was my wearable muslin.  I think that I will make it as a top, though.  We will see how that goes later.  I do recommend it to others.  Caution, this is not a typical t-shirt pattern.  I can sew up a simple t-shirt within an hour and a half.  This bodysuit took about 3 hours to make minus putting on the snaps.  It takes time and patience on the neckline and drape.

Conclusion:   I really like how this bodysuit turned out with the exception of the finishing of the leg hole and snap area.  The attractive neckline is a winner.  


Happy Sewing!


C


Friday, January 10, 2025

Drapery Cowl Knit Top - McCall M7194


You can never have too many tops.  Especially, comfortable ones.  Today's first pattern review is on McCall's M7194.  Another older pattern that has been in my collection for nearly ten years.  The great thing about this one is that it is a modern day classic style with an "edgy" twist. Lol

It sews up pretty much like a basic t-shirt pattern with the exception of the lower section and the hemline.


Pattern Description:  Misses' tops:  close-fitting pullover tops have hemline variations and stitched hem on sleeves.  B:  Cut on crosswise grain, lower sections out on bias grain.  C:Lower band with left side slit.  A, B, C:  Collar D: Neckband, flounce, wrong side may show.  A, B, D:  Narrow hem.


Pattern Sizing:  XS, S, M, L, XL, and XXL.   I used size medium grading it up between medium and large.  Note:  I added slightly more wide, rounded at the bust area, not much though.  My fabric has a lot of stretch in it. 


Did it look like the photo/drawing on the pattern envelope once you were done sewing with it?  Yes, it did.  

Were the instructions easy to follow? Yes, simple.  Nothing confusing in them.  This top really sews up fast with the most time spent on setting the sleeves in and getting the hem just right.

What did you particularly like or dislike about the pattern?  I like the cowl, hemline and lower section variation.  No dislikes.

Fabric Used:  This smooth hand knit has about 50 percent stretch and was very easy to work with.  As with most projects, I pre-washed my fabric (sometimes I forget to say that.).  I purchased it at New Rainbow Fabrics on Roosevelt Road in Chicago.

Pattern alterations or any design changes you made:  No serious alterations.  I lengthen the sleeve a bit and added some width at the bust area.  I attempted to align the window panes of the upper and lower sections of the bodies, but I missed that (one section cut crosswise and the other on the bias).  Also, I noticed a little too much ease in the sleeve cap.  So, it is a good idea to check it and maybe decrease it a little for a smooth finish.  

Would you sew it again? Would you recommend it to others?  Yes, and yes.  I could use a few more of these.  I'll make view B again as well as view D.  This is an easy pattern.  I think all level sewists can make it without any problems.

Conclusion:   I enjoyed making and wearing this top (Fall 2024 make).  It is super comfy.  Great for those potentially lazy days of winter.  It also great for running errands and pairing with your favorite leggings or jeans.

Happy Sewing!
C


Thursday, January 9, 2025

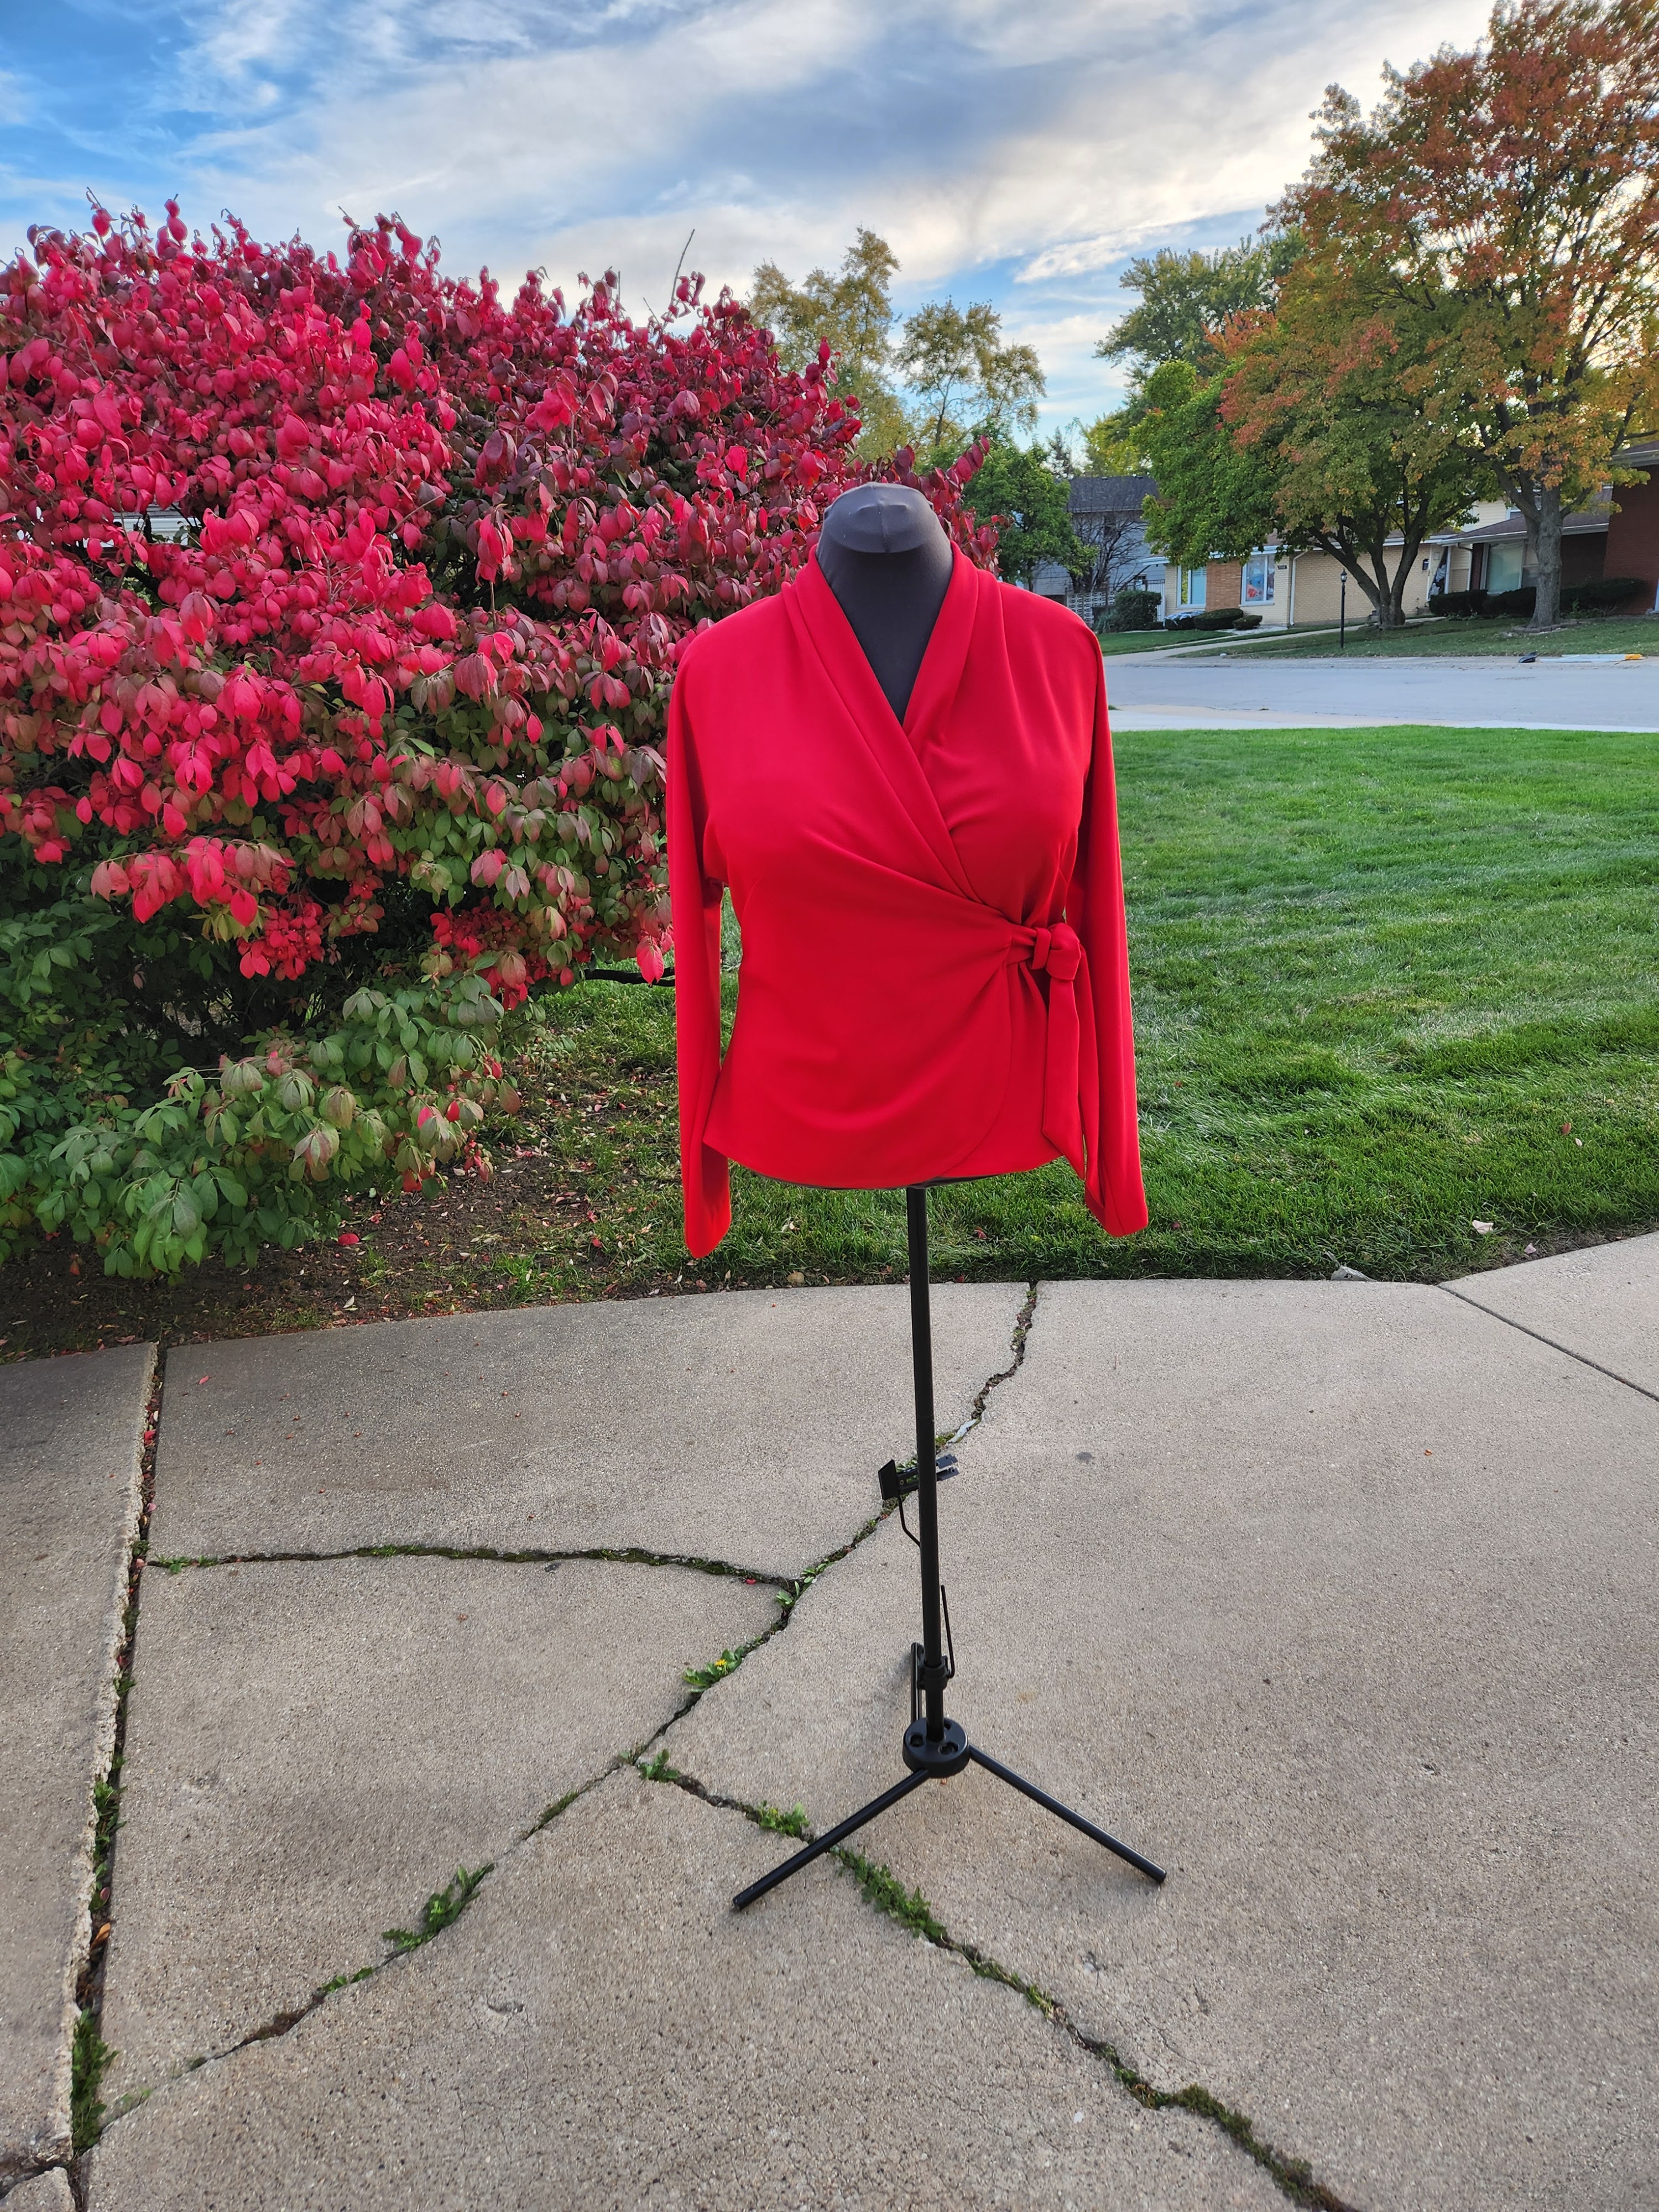
Wrap Top- Butterick B5101


This wrap top was made in October 2024.  It has been on my "to make" list for ages.  Butterick B5101 Lifestyle Wardrobe pattern, with several views to literally make a complete wardrobe with endless outfit options.  The copyright year is 2007.  So it is OOP.


Pattern Description:  Misses' top, dress, skirt and pants:  wrap front top and dress have all-in-one sleeve, pleated collar extending into front neckline, side tie, sleeve length and hem variations.  Mock wrap front skirt and straight leg pants have casing and elastic yoke.


Pattern Sizing:  SX, S, M, L, XL .  I used size medium grading it up somewhere between a medium and large with fit adjustments.

Did it look like the photo/drawing on the pattern envelope once you were done sewing with it?  Yes,  my top does look like the drawing on the envelope.

Were the instructions easy to follow?  The instructions were typical, but not difficult to follow.  

What did you particularly like or dislike about the pattern?  I liked that it is a wrap top/dress with some pleating around the mid section with a tie.  

I do have a few dislikes, though.  The tie is slightly wider than what I'd like for this top/dress.  And I prefer it to be a little longer since I'm so tall.  My other dislikes is the thickness of the belt loop.  It could be thinner.  I'll make these adjustments on my next version, which is already in the making. :-)  No other dislikes.


Fabric Used:  My knit jersey came from New Rainbow Fabrics on Roosevelt Road in Chicago.  It is a vibrant tomato red with a dry hand.  It is easy to work with and is wrinkle free.  I pre-washed and dried it as soon as I bought it home.


Pattern alterations or any design changes you made:  Okay, it may be boring, but I had to make my usual full bust adjustment.    Definitely necessary for the level of stretch of my fabric choice and the style of the top.  Because the sleeve is cut-on, I started the process with removing the sleeve.  Then I made the FBA.  Finally, reattaching the sleeve. See the photo below for the finished fit adjustment. Also, I lengthen the sleeve by an inch.  


Would you sew it again? Would you recommend it to others?  Yes, I will.  I'm in the process of making the pants and the top.  I hope to finish it by the end of this week.  If this is your style, of course, I recommend it.  The pattern is easy to sew and it offers a lot of style options in one pattern.

Conclusion:  This is a good wardrobe pattern that offers many outfit options.  It is easy to sew for all level sewists.  The hem of the top/dress may be a little challenging for beginners, but doable.  Take your time.


Happy Sewing!
C

Friday, January 19, 2024

Cozy Stretch Velvet - New Look N6687


I wanted a cozy, black velvet top for the winter season.  When I saw the stretch velvet at Joann's, I really didn't have a pattern in mind.  I just knew I wanted something new and cozy for the season.  After returning home from the store, immediately I tossed the fabric with several other fabrics into the washer.  This velvet washes and dries beautifully.  Love it.


My pattern choice for my velvet top was New Look N6687.  I thought the match up was okay.  Not perfect though.  The fabric for the top used on the envelope appears to be lighter and has more fluidity.  

This pattern top, view A,  may be described as a knit top with a asymmetric neckline, ruched side and long sleeves.  

It comes in sizes 6 to 18.  I used size 16 with a few modifications.


My version of the top looks very much like the drawing and photographs on the envelope.  Because of the heavy fabric, my version does not have as much drape.  Also, the length of my top looks a few inches shorter.  

The instructions were typical and easy to follow.  It's important to transfer all markings, notches and circles.  There was nothing confusing in the instructions.  The top quickly came together.

What I like about this top is the neckline and the ruching.  A change in the neckline of a basic t-shirt is always welcomed.  The ruching helps add interest to the waistline while camouflages that little fluffy area that a few of us have. Lol

As far as alterations of the pattern, I didn't change/alter much.  In the bust area, I added just a bit more width and I lengthen the sleeves about an inch.  Lately, I've been feeling a little lazy when it comes to doing a FBA.  The good thing is it turned out just fine.

I think I will make this again.  Next time I will make it slightly longer.  Plus I will do a better "FBA". Lol  This is a pattern that beginners can make, and I do recommend it.  Surprisingly, there aren't many postings online by sewists who have made it.

In conclusion, this is a nice staple knit top to try.  The neckline and the ruching add interest to a basic t-shirt design.

So that’s it for now.

Happy Sewing!


Saturday, January 6, 2024

Holiday Champagne Outfit - Butterick B6913


Happy New Year Everyone!

It's good to still be here.  Today, I'm glad to post a pattern review of my Christmas outfit.  I have a few more reviews for 2023 to post.  So please be patient.  I'm hoping to write a few posts at a time in hopes of getting all of them done as  quickly as possible.  

Butterick B6913

I wanted to start with this project because it is my favorite make from the last quarter of 2023.  So, let me begin with the pattern description that is straight from the Simplicity UK website: relaxed, easy, and casual loungewear features knit dress and top with asymmetrical neckline, long sleeves, shoulder strap, and tie belt.  Dress A has side slit.  Skirt C is midcalf length and has elastic waistband.  Pants D are long, flowy, and wide leg, and have elastic waistband.  I made views B and D with minor adjustments.

This pattern comes in sizes small to xx large all in pattern.  I used between sizes medium and large.  My outfit looks like the photo/drawing and the instructions were super easy.  There is nothing complex or confusing about them.  I wanted this to be a super quick construction process for me.  So I used different construction methods.  All modifications are listed in the alteration/change section below.

My likes are:

  • Easy to sew - My number one favorite like.   The pants were easy.  They are literally a simple two-piece pattern pajama pant.  The top is a modified t-shirt pattern with an exposed shoulder.  I made this outfit from start to finish on Christmas Eve.  It took about 5 hours. 
  • Cute and Festive - With the combination of the style and fabric, it is a very festive outfit.  Perfect for the holiday.
  • Comfortable - Knit fabric and relaxed comfort.  Perfect.  No tight, binding clothes on Christmas.  So no distractions from enjoying my family during our Christmas celebration.  Joy.

I have no dislikes.


My fabric is a champagne, textured, novelty knit.  I purchased it at Vogues Fabrics on Roosevelt Rd about ten years ago.  It has about 30 percent stretch and great recovery.  The texture is my favorite.  It is medium weight and has a semi- dry hand.  It's not rough though if that makes sense.  This fabric was very easy to work with and that helps with finishing the hems.

Now, the alterations and construction changes.  My apologies, the alteration changes for fit may not be helpful in this case.  I simply made them as I cut out my outfit.  I'll start with the easiest, the pants.  All I needed was to add about 4 inches to the length of them.  Simply cutting them longer for the bottom edge.  For my top at the bust area (starting 2.5 inches from the top of the side seam) I tapered out about 1/2 inch then tapered back to the edge of the pattern to add a little more room in the bust area.  So it looked a little like a crescent moon on the side.  Sewing the side seam, I had to do a little easing to maintain the integrity of the length of the front side seam.  I also added an inch to the length of both sleeves.  Nothing more on fit.

For the construction changes I did the following:

Top -

  • No double stitching the seams.  I straight stitched them.  For the hem and the upper edge of the neckline/sleeve, I serged the edges turned and stitched.
  • Upper edge (neckline/sleeve) I left and opening to thread a narrow elastic through the channel to help maintain the shape of the neckline/sleeve.  First, I measured the circumference.  Then I cut the elastic 3 inches shorter than the circumference. 
  • Attaching the shoulder strap. I stitched it to the edge of the hem, adjusting the location based on where my bra strap falls.  To reinforce it, I also stitched it to the edge just above the initial attachment stitching (avoiding the elastic).


Pants -

  • Again no double stitching the seams.  I follow the same seaming for the pants.
  • Casing for the elasticized waist.  No turning the raw edges in.  I serged the edge of the waist and the hem.  I turned them and stitched them down. Nothing fancy, but all finishings are neat and clean.


That's it.


I planned to make this outfit at least one more time.  I already have a fabric in mind.  But that's another review.  Lol


This is an easy pattern to sew.  I do recommend it to all level sewists.  Depending on your fabric, you can dress it up or down.  


I am very pleased with how this outfit turned out.  It was perfect for the Christmas family holiday celebration.

Happy Sewing!

C

LinkWithin

Blog Widget by LinkWithin