Showing posts with label New Rainbow Fabrics. Show all posts

Sunday, January 26, 2025

Another 2024 Project In Review - Simplicity S9716


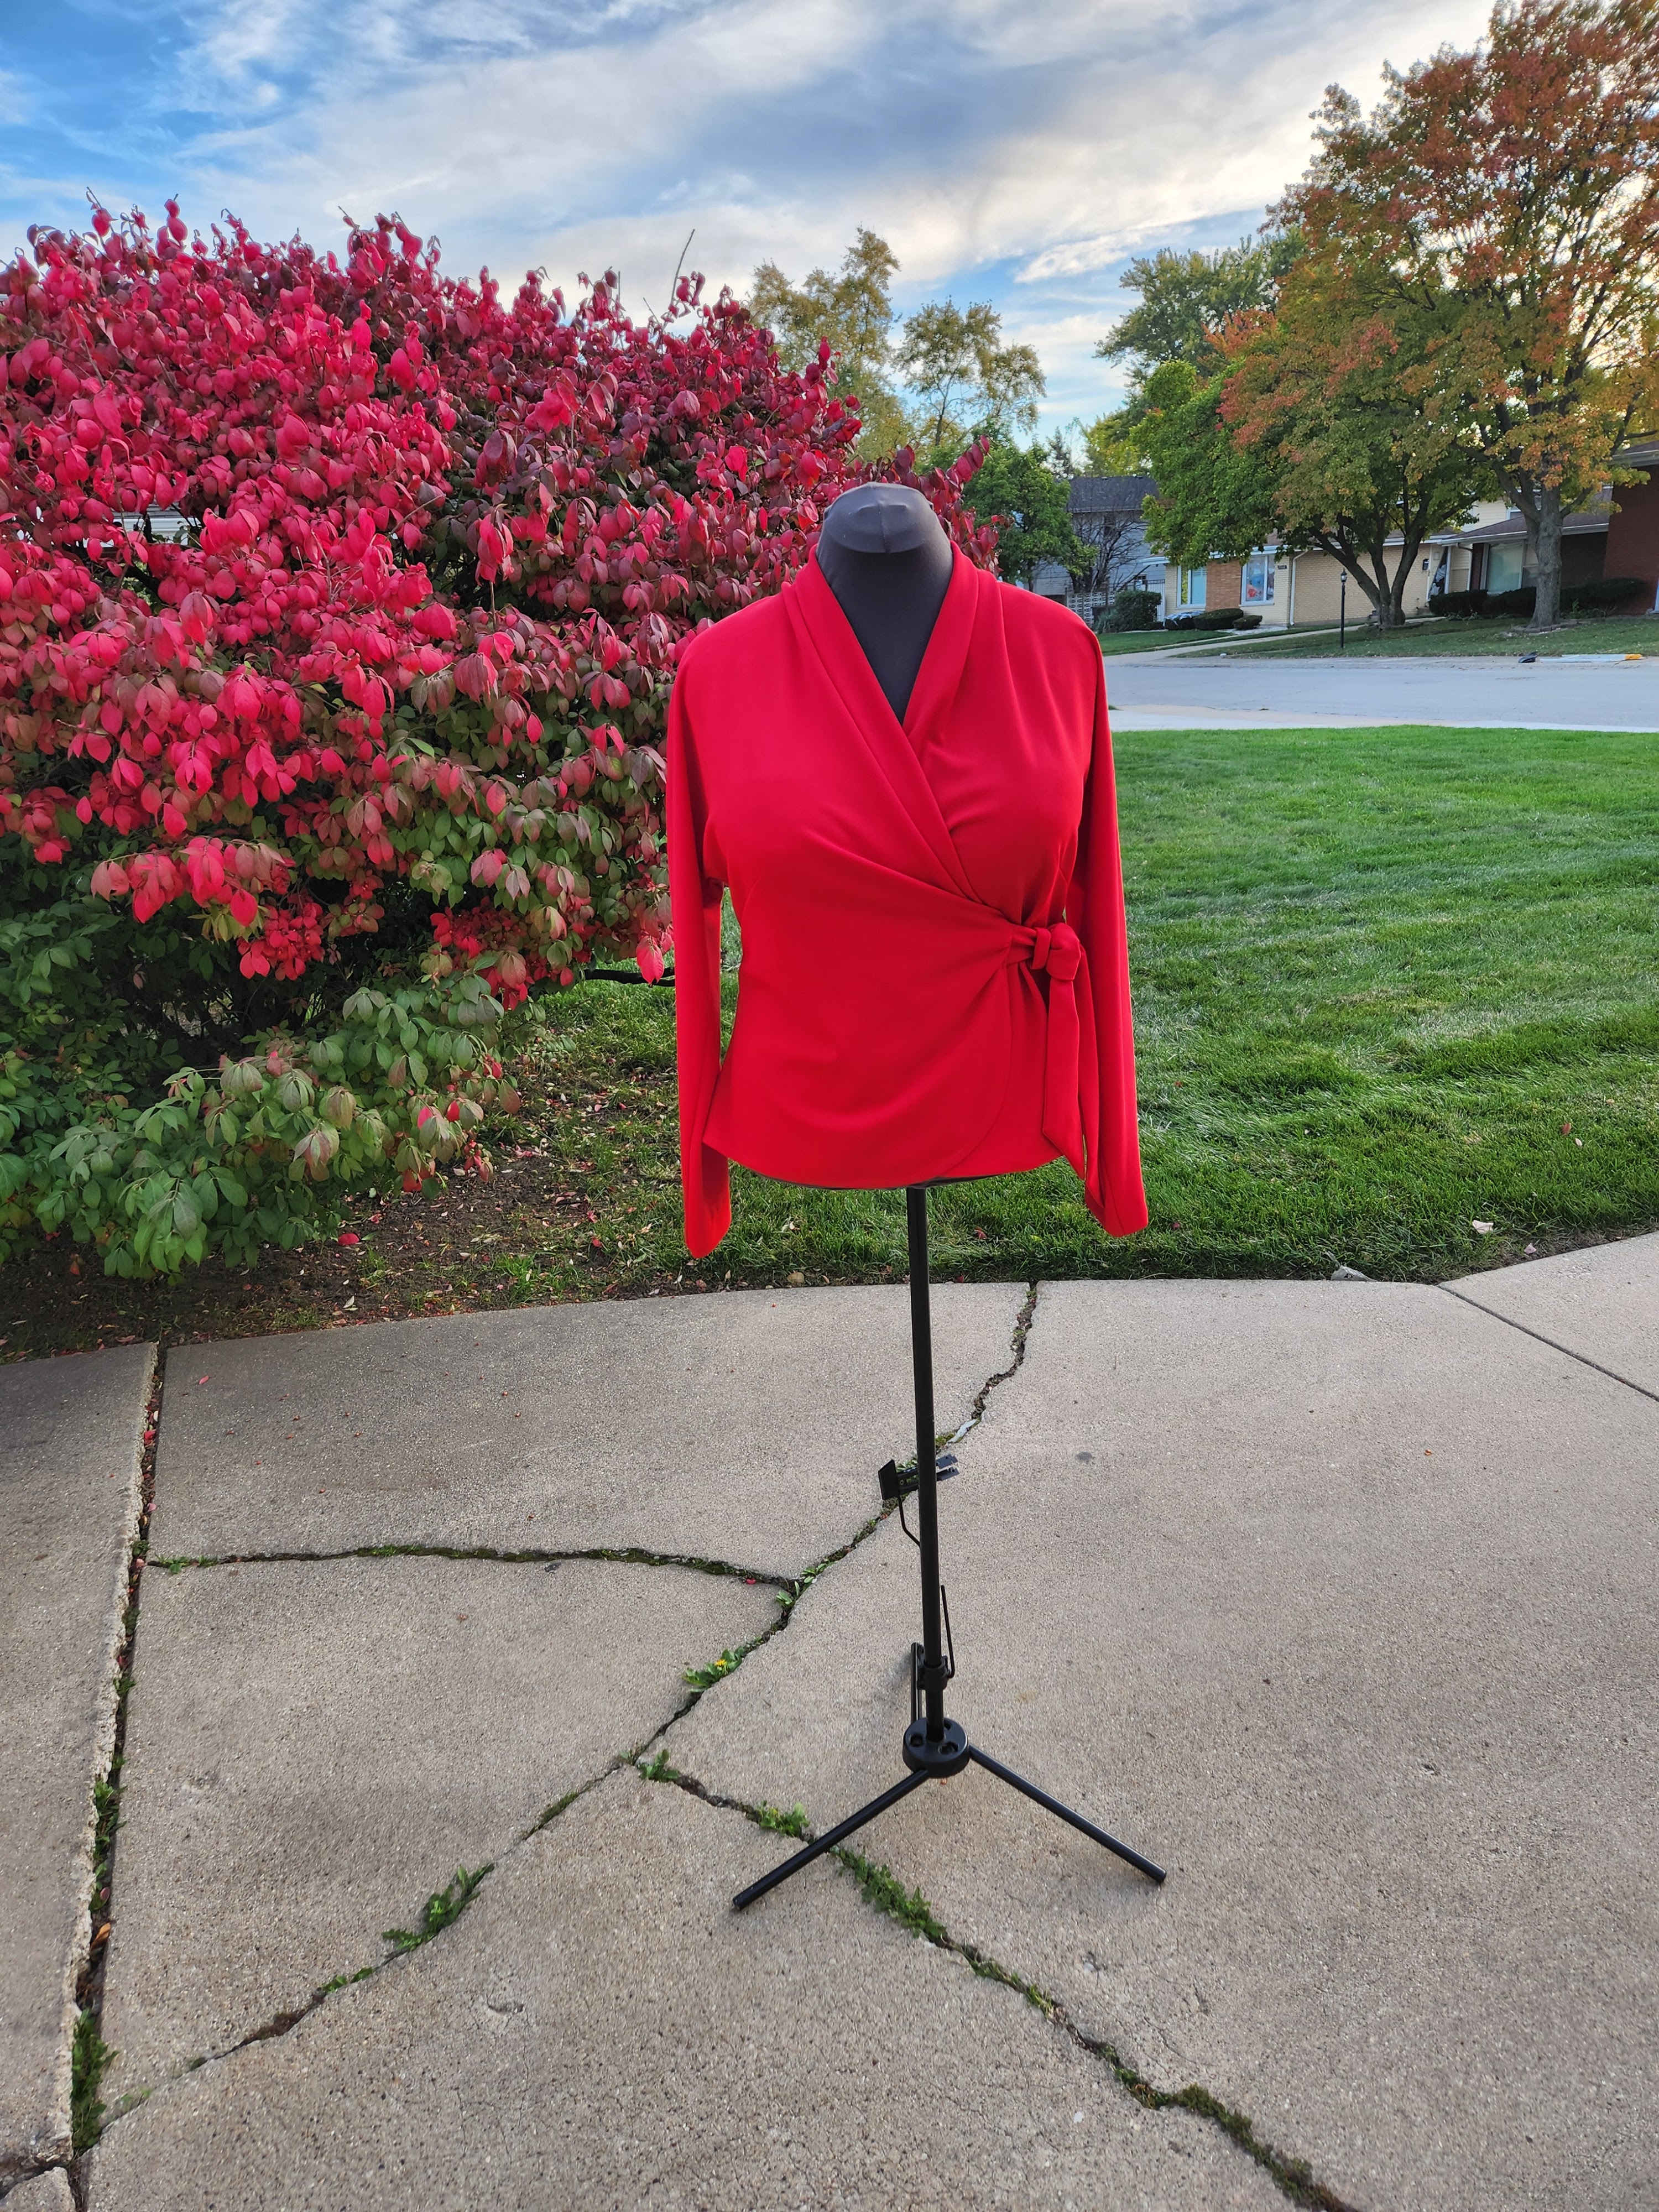
Talk about easy to sew, this pattern is just that.  I made the cardigan, which is perfect for pairing with other simple staples.  Here, I'm wearing it with a ribbed mocked turtle top from JC Penney and a pair of Vogue V8859 pull-on pants that I made a few years ago


Simplicity gives a very basic pattern description:  Misses' knit top, cardigan, and skirt.  It is available in sizes 4 through 20.  I used size 16 with modification. 


This simple cardigan does look like the drawing on the envelope.  I looked closely at the duster that the model is wearing to determine if the shape of the sleeve, the placement of the shoulder seam, and the drape along the side of the cardigan were the same as mine.  I wanted to achieve the same relaxed look of the cardigan as pictured. 

The instructions were typical and nothing difficult in them.  I think this is a great pattern to help beginners start to sew knit fabrics.

What I like most about this pattern is the simplicity of it.  It's super easy and stylish at the same time.  I don't have any dislikes.


The double knit that I used was purchased at New Rainbow Fabrics last fall.  It is a soft but sturdy knit that is perfect for a cardigan.  

I really only made two small changes:

  • Added belt loops to the sides using the fashion fabric
  • At the side bust area I "kind of" curved out that area for added room for a fuller bust.  I hope that makes sense.  I didn't take any photos.
I hope to make at least the duster.  It just a longer cardigan.  As I said earlier, this is a great pattern for beginners.  It can be used to create a mini wardrobe.  A good basic pattern for wardrobe staples.

So that's all for now.

Happy Sewing,
Cennetta


Friday, January 10, 2025

Drapery Cowl Knit Top - McCall M7194


You can never have too many tops.  Especially, comfortable ones.  Today's first pattern review is on McCall's M7194.  Another older pattern that has been in my collection for nearly ten years.  The great thing about this one is that it is a modern day classic style with an "edgy" twist. Lol

It sews up pretty much like a basic t-shirt pattern with the exception of the lower section and the hemline.


Pattern Description:  Misses' tops:  close-fitting pullover tops have hemline variations and stitched hem on sleeves.  B:  Cut on crosswise grain, lower sections out on bias grain.  C:Lower band with left side slit.  A, B, C:  Collar D: Neckband, flounce, wrong side may show.  A, B, D:  Narrow hem.


Pattern Sizing:  XS, S, M, L, XL, and XXL.   I used size medium grading it up between medium and large.  Note:  I added slightly more wide, rounded at the bust area, not much though.  My fabric has a lot of stretch in it. 


Did it look like the photo/drawing on the pattern envelope once you were done sewing with it?  Yes, it did.  

Were the instructions easy to follow? Yes, simple.  Nothing confusing in them.  This top really sews up fast with the most time spent on setting the sleeves in and getting the hem just right.

What did you particularly like or dislike about the pattern?  I like the cowl, hemline and lower section variation.  No dislikes.

Fabric Used:  This smooth hand knit has about 50 percent stretch and was very easy to work with.  As with most projects, I pre-washed my fabric (sometimes I forget to say that.).  I purchased it at New Rainbow Fabrics on Roosevelt Road in Chicago.

Pattern alterations or any design changes you made:  No serious alterations.  I lengthen the sleeve a bit and added some width at the bust area.  I attempted to align the window panes of the upper and lower sections of the bodies, but I missed that (one section cut crosswise and the other on the bias).  Also, I noticed a little too much ease in the sleeve cap.  So, it is a good idea to check it and maybe decrease it a little for a smooth finish.  

Would you sew it again? Would you recommend it to others?  Yes, and yes.  I could use a few more of these.  I'll make view B again as well as view D.  This is an easy pattern.  I think all level sewists can make it without any problems.

Conclusion:   I enjoyed making and wearing this top (Fall 2024 make).  It is super comfy.  Great for those potentially lazy days of winter.  It also great for running errands and pairing with your favorite leggings or jeans.

Happy Sewing!
C


Thursday, January 9, 2025

Wrap Top- Butterick B5101


This wrap top was made in October 2024.  It has been on my "to make" list for ages.  Butterick B5101 Lifestyle Wardrobe pattern, with several views to literally make a complete wardrobe with endless outfit options.  The copyright year is 2007.  So it is OOP.


Pattern Description:  Misses' top, dress, skirt and pants:  wrap front top and dress have all-in-one sleeve, pleated collar extending into front neckline, side tie, sleeve length and hem variations.  Mock wrap front skirt and straight leg pants have casing and elastic yoke.


Pattern Sizing:  SX, S, M, L, XL .  I used size medium grading it up somewhere between a medium and large with fit adjustments.

Did it look like the photo/drawing on the pattern envelope once you were done sewing with it?  Yes,  my top does look like the drawing on the envelope.

Were the instructions easy to follow?  The instructions were typical, but not difficult to follow.  

What did you particularly like or dislike about the pattern?  I liked that it is a wrap top/dress with some pleating around the mid section with a tie.  

I do have a few dislikes, though.  The tie is slightly wider than what I'd like for this top/dress.  And I prefer it to be a little longer since I'm so tall.  My other dislikes is the thickness of the belt loop.  It could be thinner.  I'll make these adjustments on my next version, which is already in the making. :-)  No other dislikes.


Fabric Used:  My knit jersey came from New Rainbow Fabrics on Roosevelt Road in Chicago.  It is a vibrant tomato red with a dry hand.  It is easy to work with and is wrinkle free.  I pre-washed and dried it as soon as I bought it home.


Pattern alterations or any design changes you made:  Okay, it may be boring, but I had to make my usual full bust adjustment.    Definitely necessary for the level of stretch of my fabric choice and the style of the top.  Because the sleeve is cut-on, I started the process with removing the sleeve.  Then I made the FBA.  Finally, reattaching the sleeve. See the photo below for the finished fit adjustment. Also, I lengthen the sleeve by an inch.  


Would you sew it again? Would you recommend it to others?  Yes, I will.  I'm in the process of making the pants and the top.  I hope to finish it by the end of this week.  If this is your style, of course, I recommend it.  The pattern is easy to sew and it offers a lot of style options in one pattern.

Conclusion:  This is a good wardrobe pattern that offers many outfit options.  It is easy to sew for all level sewists.  The hem of the top/dress may be a little challenging for beginners, but doable.  Take your time.


Happy Sewing!
C

Tuesday, October 1, 2024

Birthday Dress 2024 0 Simplicity S9820


Bonjour Sewing Friends,

Really quick post on my birthday dress.  I made it a few weeks before leaving for French.  I used Simplicity S9820.  I also used it for the crepe knit dress I made in June.  That project is posted here with all the pattern adjustments and details.  


The challenge for my red, sequin stretch velvet version was sewing through the sequins.  And using a size 16 embroidery sewing machine needle worked just fine.  It enabled me to NOT remove all of the sequins from the stitching path of the needle.  


I purchased my fabric from New Rainbow Fabrics on Roosevelt Road in Chicago.  At the time, they were having a 30 percent off sale.  So I got three yards for under $70.00.  For the facing at the neckline, I used a stretch velvet for a smooth surface against my skin.  Also, I lined it with a simple tricot knit.  So the dress was comfort to wear.


This dress did not take long to make.  Like the first version, it went together smoothly. I eliminated the bust dart by easing in the access fabric along the side.  Also, I needed to take it in a bit.  So, if I use the pattern again, I'll need to reduce my initial adjustments.  

There nothing more I could really add to the process.  I love how it turned out and it fits pretty well. 


Happy Sewing!

Cennetta


Monday, June 17, 2024

Soft Crepe Dress Simplicity S9820


Hello Sewing Friends,

I finally have something to share with pictures.  This Simplicity dress was made immediately after I finished my Chicago Frock tails dress.  In fact, I made it the morning before the Frock tails Saturday evening affair.  I really needed something to cleanse my palette.  Because I devoted many hours to making my Frock tails dress which in the end lack luster.  The truth is I made two dresses.  One trashed and the other a substitute for what I really wanted to wear.

Anyway, Simplicity S9820 helped me feel better about all the hours that I spent on the party dress.  To start, I had already made the pattern adjustments.  Anyone who has similar adjustments knows that this takes quite some time with every new pattern to use in a sewing project.  It was so satisfying to go right to the cutting table.  Sewing time was about 3.5 hours plus time to hand stitch the hem.


Pattern Description:  As usual, Simplicity gives the vaguest pattern descriptions.  My description:  Misses's knit dresses and shrug.  View A dress is an A-line mid-calf knit dress with shoulder and neckline drape details.  View B dress is a floor length A-line strapless dress with a front knotted long sleeve shrug.  Both dresses close with an invisible zipper at the back of the dress.


Pattern Sizing:  This pattern is available in  sizes 8 to 26, which is very nice.  I used size 16 with modifications.

Did it look like the photo/drawing on the pattern envelope once you were done sewing with it?  Yes, it did.

Were the instructions easy to follow?  The instructions were typical.  Nothing difficult or confusing in them.  

What did you particularly like or dislike about the pattern?  I love the shoulder and neckline drape.  The A-line silhouette was a plus too.  I was mostly interested in making view A.  But after I finished it, I considered making view B at a later date.


I don't have any real dislikes.

Fabric Used: My fabric is from New Rainbow Fabrics on Roosevelt Road in Chicago,  It is a blush, crepe knit with a soft hand.  The stretch of the fabric is more than 25%.  It has great recovery.  I think it is perfect for this dress.  New Rainbow has this crepe knit in a variety of colors at a very reasonable price of $7.00 per yard.

Pattern alterations or any design changes you made:  I have quite a few changes that I made.  I begin by examining the measurements on the pattern front for the finished dress.  The finished bust measurement is only 34 inches.  


  • FBA - Often, for my size it's around 39 inches.  So, I feel this pattern runs a little on the small size.  Because the front and back patterns are designed sleeveless, I had to think about how to make the FBA adjustment without distorting the shape of the dress.  Below is an illustration of the FBA.  I simply slashed through the neckline down to the bust area continuing the length of the pattern.  This had to be done twice because the front pattern piece was for the entire front body instead of half the width of the body.   This adjustment produce a dart.  I decided to angle the dart slightly.  I hate darts that are straight across from side to apex.


  • Added width to the two back pieces - When I make a FBA, the front is sometimes much wider than the back.  Particularly, below the bust. Often, I end up sewing larger side seams to slim down the rest of the dress.  This sometimes causes the back to be even smaller.  And the side seams are off center along the side.  So to balance things out a bit, I added some width across the back.  Note:  My usual prominent shoulder blade adjustment was not needed because the back of the dress falls well  below the shoulder blades.


  • Swayback - There are two back pattern pieces.  I suspect the reason is not to confuse the sewist with the markings for each shoulder and neckline attachments.  Tucks were made on both pieces.  Note:  the amount of the tuck has to be added back at the hem to balance out the hem.  


  • Marking the Lower dress pattern pieces - I decided to cut the pattern pieces at the hem for view A.  Each piece is label with the respective pattern number plus the letter "B".


  • Front and Back Facings -  I adjusted the width of both to match the adjustment that I made to the front and back.


  • Elastic Around the Top of the Dress -  To stabilize the neckline of the dress, elastic is added.  I measured the elastic by first stretching it to relief any added tension.  Then I measure it like I would to take an upper bust measurement.  This is how I determined the length of my elastic.  Next, I divided it into four sections.  Starting at the right back for section 1.  Sections 2 and 3 for the front.  Finally, section 4 for the left back.  I stretched the elastic to fit each section.  The elastic was attached after the facings were sewn on.
  • Shoulder and Neckline Drape - I added about an inch to each.  I didn't need it.  So, I had to remove the added length to those pieces.

These are my adjustments/changes.  I hope this is clear.


Would you sew it again? Would you recommend it to others?  I think I will make it again.  Probably for a holiday dress.  There is always a holiday party to go to.  And this dress is a quick make with great results.  And, yes I do recommend it to others.  

Conclusion: I am very pleased with how this dress turned out.  It was the perfect antidote for recovery from a "not so great" sewing experience.  Lol

Parting Photos:   Me wearing Simplicity Combo S8735 and S8637.  The pattern review is:   Easy, Breezy Summer Dress.  It is perfect for the 90 degree temps we are experiencing right now.


LinkWithin

Blog Widget by LinkWithin