Showing posts with label jersey knit. Show all posts

Saturday, November 27, 2021

DD Is Holiday Party Ready - Simplicity S9370


Holiday Ready!

My DD's first holiday dress of the season.  I used MiMi G's Simplicity 9370.  And it turned out perfect.  She looks fabulous in her new dress.

I've been waiting to post my review for a few weeks.  Sometimes it's a little challenging to coordinate our schedules to do the photo shoot.  This weekend was perfect following our family Thanksgiving fest.  BTW I hope everyone enjoyed their Thanksgiving holiday.

My review:


Description and Sizing

Simplicity - Knit dress with cut out midriff detail is slim or A-line shaped in two lengths with self-ties, sleeve and length variations.  Available in sizes 6 to 24.  I used size 12, view A.   I was able to cut it out without making any fit adjustments.  How great is that.  

Did it look like the photo/drawing on the pattern envelope once you were done sewing with it?

The dress looks exactly like the drawing and photos.  I made a little change with the tie construction, but it didn't change the style of the dress.


Were the instructions easy to follow?

The instructions were super easy to follow.  There weren't anything confusing in them or difficult construction techniques.  The dress went together with no problems. 

What did you particularly like or dislike about the pattern?

There is so much to like about it.  
  • The style in general is cute/sexy.  It's on trend with a lot of the styles that you may see at department stores like Zara's.  
  • The belted, elasticized midriff is one of the elements that I like a lot.  
  • The zipper side front.
  • The length of the slim skirt.
My DD loves it for the same reasons.  

Nothing to dislike.


Fabric Used:

My fabric is "Flaming Red Viscose Jersey Knit" from FabricMart Fabrics.  I checked the online store to see if it was still in stock.  No luck.  I only purchased it two months ago.  On the color:  It looks more like a tomato red to me. Anyway, it's a great color for my DD.  The stretch is about 40 percent and it has great recovery.

Pattern alterations or any design changes you made:

The only thing I changed was the tie.  Instead of a single piece of fabric with the edges finished, I chose to double it, sew two pieces together and turn to the right side.  So, there is a little more bulk in the tie.  But that's all right.  It just adds a little more support around the waist.

Would you sew it again? Would you recommend it to others?

This dress is really unique.  I would only sew it again if DD asked me to.  And yes, I do recommend it to others.  It sews up really fast and it's easy to make.  The most difficult part is to install the zipper.  

Conclusion: 

I love how this dress turned out and my DD does too.  I'm also happy to have the dress done for an upcoming holiday party early in December.  This is a very stylish dress that is certainly worth trying.

Happy Sewing!
C

Wednesday, February 10, 2021

Presto Popover Top - Naughty Bobbin Pattern


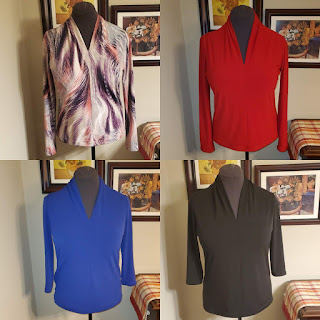
This was my first time using Naughty Bobbin patterns.  And I decided to try the Presto Popover top.  

Pattern Description from the website: The Presto! Popover Top is designed specifically for knits for the wash and wearability your daily life needs.  Knits with 5% or more stretch, especially ITY knits and rayon/elastane come in all colors and patterns, so make more than one and get on with your life.  Good bye washday blues!  With it’s clever double-front V-neck collar construction and the always comfy 3/4 sleeve the Presto! sews up quickly on the serger, but can be made on a zig-zag machine, too.  Can be made in heavier knits for winter, lighter knits for summer. Excellent choice for sheerer knits.

For its ease, comfort and a fast sewing project, you’re gonna love the Presto!


Pattern Sizing: It comes in sizes small to 4 x-large.  I used large with a few tweaks.


This is the first version made.  I call this my wearable muslin.  For the other three tops, I added a few inches to the bottom.  I could use a little more move in the bust area.  So when I make it again, I do a little FBA (no dart) to have a better fit.


My tops look exactly like the drawing and the photos.  The instructions were very good and easy to follow. 


I really like the construction of the front of the top. The double layers of fabric and hide "body details" that aren't as flattering.  The seam down the center front also has a slimming affect.  Another detail that I like is the neckline.  You can choose to lower it and bring it up a bit.  Your choice.


All of the fabrics that I used were from FabricMart Fabrics.  The red and blue are a crepe knit that has a beautiful drape. The purple/pink print  and the black are jersey knits.  All fabrics have about the same amount of stretch.

My alterations were minor.  And like I said, I need a little more room in the bust area. When I make it again, I think I make it into a dress.  Rhonda gave me that idea when I saw her dress version on Instagram and on her blog.

This is a neat pattern that is flattering on most figures.  Try it. It easy and doesn't take a lot of time.

Happy Sewing!
C  


Monday, October 19, 2020

My First Cashmerette Appleton Dress


Wheee!

After that ten plus hour blouse, I needed something quick and easy.  The Cashmerette Appleton Dress fit the bill.  I used her sizing chart and my t-shirt dress sloper to help identify my size.  This process significantly reduced the amount of time that I would spend on fit adjustments.

One of the beauties of Cashmerette's patterns is that they include multiple cup sizes beyond D, which is great for a lot of people.  So for this dress I used size 16 with cup size E/F.  This was spot on for me.  The only other pattern alterations and changes made were lengthen the dress by 3 inches, lengthen the sleeve by 2 inches, lengthen the ties, and added just a little width across the back.    I didn't make a swayback adjustment because the dress ties around the waist.  


I can have a dozen of these dresses in my closet.  ;-)


The Appleton Dress is described as the classic wrap dress designed to play up your curves with a crossover front, a built-in waist tie, and a deep v-neck.  Designed by and for curvy women.

It is available in sizes 12 to 28 with cup sizes C/D, E/F, and G/H. 

My dress looks like the illustrations on the pattern cover.  And I am very pleased with how it turned out.

The instructions were good.  Easy to follow.  I really like that the construction for the ties, neck, and front bands. It creates a neat, clean finish.

There is so much to like about this dress; no dislikes for me.

Likes:

  • Easy to sew classic wrap dress.
  • Multiple cup size for easy fitting.
  • Shoulder length is perfect.
  • Stylish and classic
  • Great wardrobe staple.


My fabric choice was perfect for this wrap dress.  It is a ITY jersey knit from Gorgeous Fabrics: Bold Scale Paisley ITY jersey
It sews up beautifully.  Before cutting it out, I tossed the fabric into the washer, then into the dryer.  Just a great yardage of fabrics that washes well too.  It has a soft hand and is great against the skin. 

I've already cut my second dress out.  So you can expect to see this wrap dress over and over again on my blog.  I highly recommend it to others.  But I think a large percentage of the online sewing community has already try it. 

 This is a great classic wrap dress.  A must have staple for every well dressed lady.  


Happy Sewing!

C

Thursday, January 23, 2020

Merlot Crepe Knit Coordinates - Sewing Workhop Pearl Cardigan and S9017 Pants


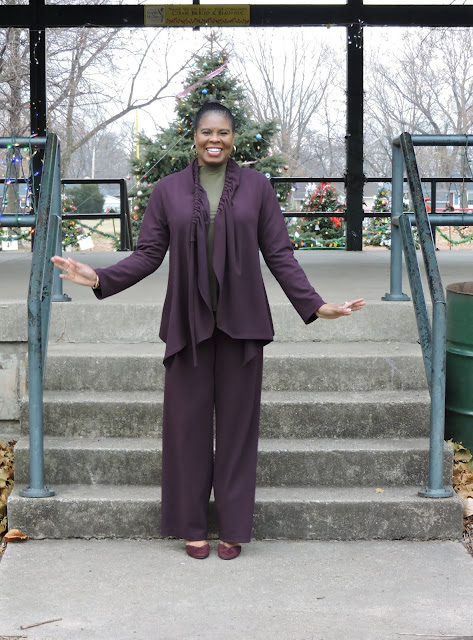
Today I'd like to share an outfit I made for my book club holiday party (2019).  I wanted to keep it simple. I paired the Mood's Merlot crepe knit with the Sewing Workshop Pearl cardigan and Simplicity S9017 pants.  This is a beefy fluid knit that is perfect for fall and winter apparel.   Before cutting into it, I tossed it into the washer. It came out of the dryer with the same touchable softness, unchanged color, and beautiful recovery.


Jewel tones are my favorite.  The rich hues of purple, red, and green are staple colors in my wardrobe. I'm always on the hunt for these vibrant beauties.  That's why I had to have it.  Too bad, it's no longer available, but there are several gorgeous purple textiles in Mood's warehouse just waiting for you.

The Pearl Cardigan is loose fitting with a front casing and drawstring to ruche, cascading side panels, back waist seam, long sleeves and narrow hems.  The wrong sides of the cardigan will show.  The cardigan can be made up in a variety of fabrics from ponte knit to linen and silk.  All sizes are available in the pattern XS to XXL.  I used a size large with a lot of modifications.

For the most part, it looks like the drawing on the envelope.  From the pattern drawing it is difficult to see the fullest of the collar.  There is quite a bit of fabric that bunches up around the neck. 


The instructions were super easy to follow. Nothing confusing about how to assemble the cardigan.  That was one of the things that I especially liked about it.  My challenges were more with the fit and choosing the appropriate size.


My other likes were the drawstring and the drape.  This was an interesting design element.  You could wear it loosely drawn or as I'm wearing it with lots of ruching.

My dislikes are the huge amount of fabric that bunches up around the back of my neck.  If I make it again, I will definitely reduce the width of that area.  Secondly, the length of the shoulder seams.  Extremely long.  The shoulder seam was about 1.75" too long for me. Thirdly, the size large was like an XXL on me.  This pattern runs BIG.  I had to take it in several inches all the way around.


 My other adjustments:

  • For starter no FBA needed.  Hooray!
  • Added center back seam and back darts.
  • Reduced length of shoulder seams by 1.75"
  • Reduced the side seams by 1.5"
  • Reduced width of the sleeve by 1.5"
All of these reductions gave my cardigan some shape, and now it looks like the picture on the envelope.  Happiness..,

With that being said, next;

The Pants Simplicity S9017

Easy, easy..,

Front, back, and waistband.  These pants sewed up like your typical pull-on pants.  No significant changes other than to lengthen the pants by several inches.  I don't particularly care for cropped pants.  From start to finish, it took me about 2.5 hours to make them, which was a great finish to an outfit that I'd spent more time than I thought I would.


In the end, I was able to wear my new holiday outfit with a smile.  So happy this one did not hit the can!

Happy Sewing!
C


Monday, October 8, 2018

Vogue 1352 - A Seemingly Easy Vogue Dress


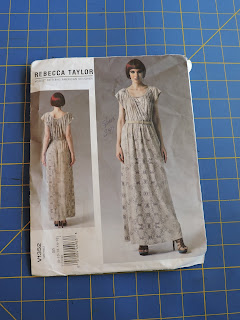
I love wearing maxi dresses. Especially a comfortable one.  My review today is on a Rebecca Taylor Vogue pattern (V1352)  It's been out for a few years, copyright 2013.  When it was first published, I hesitated on buying it.   Then after about two years, I did.  If it works; good.  If not, in the trash it goes.

You're wondering why I hesitated?  The "required" FBA and the possibly of me not being able to get the "perfect" neck binding finish.  The FBA with all that gathering could be a bad look on me.  And who wants I wonky neckline on top of that. Anyway..,

There are only five pattern pieces.  Sounds pretty easy, right?  For the most part it was once I tweaked, tweaked it.


This is a pullover maxi dress with a gathered neckline. The front is a mock wrap bodice with a small inverted triangle at the center front.  It has short sleeves, and an elasticized waist.  I used size 16 with modifications.  Some I could have skipped if I may add.

The pattern is available in two size groupings:  (8-16) and (16-24).

The drawing and photos do look very much like my dress.  My neck binding is wider  because I didn't do the folder process.  I like the wider binding and the front opening drapes just a little, but the modeled dress does not.  I didn't think about making a tuck along the opening to reduce the length of it.   If I make it again, I'll make that adjustment.  Also, the back neckline is much lower on the modeled dress.  And I think my dress has a little more wearing ease than the one pictured on the envelope.


My fabric is a jersey knit from Vogue Fabrics in Evanston.  I bought three yards and knew that I'd make a maxi dress out of it.  I love the colors and the smooth hand of this knit.  It has a nice weight and great recovery.  I used a microtex sewing needle, size 12.

The instructions were typical and easy to understand.  But I didn't follow then to the letter. I also made a few fit adjustments.  All noted below:

  • I didn't do the double needle top stitches along the front and to hem the sleeve.  And no top stitching on the neck binding.

  • The first time I attached the neck binding I followed the instructions: basting it and matching the notches and circles, with right sides together.  When I tried it on, it didn't lay flat as illustrated on the envelope. So, I decided to take a break and think about how to make it work.  After a  day or two, I tried it on again to determine the amount of excess binding to remove.  The neck binding was about six inches too long.  Luckily, I did not removed the gathering stitches.  I measured each section of the dress bodice: front 6.5; sleeve 4.125; and back 5.5 (I created a center back seam that wasn't needed.  More below on that.).  For the neck binding, I reduced each section by an inch and removed the basting  so I could stretch the band to fit each section of the neckline.  I did not change the location of the center front large circles where the front opening is attached.  If that makes sense.  The results were perfect.  The band lies flat and smooth.  I didn't in case the raw edges of the binding.  Maybe next time.  I like the width of the binding as shown on my version of the dress.


Portion of the neck binding with the new marking on it.


  •  The construction of the sleeve was a little weird too.  The ends are not sewn together, but overlapped at the top of the side seam.  If you follow the instructions, you'll end up with raw edges showing on the right side of you dress.  I curved the outer end into the armscye so that no raw edges were exposed.  Note:  the armhole is wide and low.  It wouldn't hurt to raise the armhole about an inch or two.  That will eliminate the exposure of your under garments.

  • I didn't cut the back on the fold.  I should have.  This dress is roomy and I really didn't require a prominent shoulder blade adjustment.  Anyway, the center back seam took up the added width of that adjustment.  Save..,
  • Full bust adjustment - just a small one to add a little width and length.  This FBA does not create I bust dart.  

  • Finally, I added a few inches to the length of the dress.
After working through all those changes and adjustments, I still like the dress for the ease of wear, the mock wrap bodice, and the gathered neckline.


I have an obscene number of dress patterns to try, but I'll kept this one for me just in case I want to make it again.


Vogue rated this dress as easy to make.  It is once you've worked out the kinks.  Remember, it's very loose fitting.  The armholes are low and the neck binding may be too long.  Other than that it's good.

Happy Sewing!
C


LinkWithin

Blog Widget by LinkWithin