Showing posts with label mood blogger. Show all posts

Tuesday, May 19, 2020

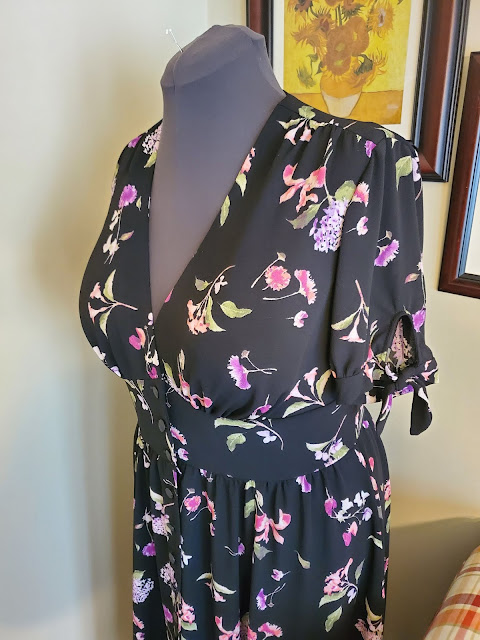
My New Floaty Romantic Dress - McCall M7974 -


This is one of those feel good and pretty dresses that you cherish for years to come.  I love the way it moves.  The floaty fabric dances about you as you walk.   It feels soft and spongy.  The surface has that pebble crepe texture, but it is not rough. 

This is a closeout fabric that I purchased from Mood Fabric last winter.  The fabric was labelled item# 327930 Black Byzantium and Sage Green Polyester Crepe.  Unfortunately, it is no longer available.


This pattern has been made by so many fabulous sewists on Instagram.   All of the beautiful dresses that I saw inspired me to make it too.  I put it on my "To Make List" last year in July soon after I purchased the pattern.  And I think around September I made the pattern adjustments.  I didn't see the need to make a muslin because I'd made dresses with a similar front bodice.  So, I just went from adjusting to laying out the pattern and cutting the dress out. 

I was able to make my own romantic floaty floral dress for which I am very pleased.  So hear is my review.  


The pattern description  given by McCall's  is misses' dresses: buttoned front dress. A, B. C. D has sleeve and length variations, fitted bodice with front midriff, back yoke and gathered skirt with side seam pockets.

It is available in sizes 6 to 22.  I used 16 with modifications.

I made view A with the length between A and C. The skirt takes up a lot of yardage.  I had four yards of the crepe.  It wasn't enough for the length of view C.  

My dress does look like the illustrations.  The bodice is less fitted then I expected.  And that is true for the dress on the model pictured on the envelope.  The "V" neck is deep.  So I am wearing a lace trim full slip underneath.  It's needed for modesty for the dress as a whole because of transparency.  

The instructions were typical.  I've seen these steps in many, many other similar patterns.  There was nothing confusing in them.


My likes for this dress are many:
  • The sleeves of view A and C
  • "V" neckline and midriff
  • The yoke back
  • The fullness of the six panel skirt
  • Buttons instead of zipper.  Nice change
Dislikes:
  • None

I made my usual fit adjustments:


  • FBA -  I started out with a much larger adjustment.  I changed it.  So It might be a little hard to follow what was done.  But here is the photo of the front bodice and the facing.

  • Prominent Shoulder Blades - I added about an inch to the width of the back.  Then gathered the excess for more ease at the shoulder blades.  At the waist, I just gathered at center back.  So it slightly change the design.  Excess could also be taken up with waist darts.  I followed the design with gathers. 
  • I used a bias strip of the fabric to finish the keyhole on the sleeve.  It looks better to me. ;-)
  • Skirt Length Change - I just cut it where I wanted between view A and C.

My chest needs some sun. Tee Hee.


Of course, I have to make it again in a solid color next time. I highly recommend this dress to others.  There are a lot of buttonholes to sew and a lot of gathers to make, but it is worth it.  In the end, you will have a lovely dress.

I  am glad I decided to make it.  I think the sleeves of view A and C are adorable, and I will probably mix and match them with other patterns.   

Happy Sewing!
C


Tuesday, April 21, 2020

Summertime Is Coming - I Can't Wait To Wear My New Dress Butterick B6674


Finally, me and my DD spent the weekend taking pictures of all the garments that I've made over the past month and a half.  It was a sunny day, but cold.  I didn't want to go outside for most of the photo shoot. 


First to show is Butterick B6674.  This was the first garment that I made during my recovery from what could have been a bad case of the flu.  I was eager to get to my sewing room after the news of the "corona lock down" for the state of Illinois.

The deets on the pattern review and the sewing process are here.

Thanks for stopping by.

Happy Sewing!
Cennetta


Thursday, April 2, 2020

Butterick B5429 - Knit Top The Second Try


I had enough fabric leftover from the Sandra Betzina ruched top.  So I decided to use the remnant to make this Butterick twist yoke top. This was one of my late March quarantine sewing projects. This was I relatively easy top to make.  The twist construction was a little different from the more recent Big four pattern instructions.

This was my second attempt to make this top. Years ago when I first purchased this pattern, I tried the top and it just didn't turned out right, a wadder.  I think it was the fabric though.

Anyway


Butterick Pattern Description: Misses'/Misses' Petite coat, top, skirt and pants.  Coat A is loose-fitting, lined with patch pockets and dropped shoulders.  Tops B, C are close fitting with front neckline twist, dropped shoulders and stitched hems.  B sleeveless C; long sleeves.  Straight skirt D has fron and back darts, back zipper and waistline facing, length is 2" above mid-knee.  Pants E have straight legs , fron and back darts, mock fly front, side seam pockets and waistband.

That is one long pattern description. 

Pattern Sizing:  Group pattern sizes (8-14) and (16-22).  I used the 14 with modifications and a little grading up the size.


Did it look like the photo/drawing on the pattern envelope once you were done sewing with it?  Pretty much.  It could be a little more close fitting.  That's an easy adjustment.


Were the instructions easy to follow?  Typical and easy.  Nothing confusing.  With the twist, you just have to take your time.


What did you particularly like or dislike about the pattern?  I liked the twist.  I'm always looking for comfortable, simple knit tops with a "twist".   No dislikes.


Fabric Used:  I used Mood's Shaded Spruce, Baleine Blue and White Abstract Printed Polyester Jersey knit.  Unfortunately, it's sold out.  Here's the other top that I made in January.


Pattern alterations or any design changes you made: I graded the pattern up and mini FBA, prominent shoulder blade, and swayback adjustments.


Would you sew it again? Would you recommend it to others?  Yes and yes.  This is a good staple.  You can dress it up or down, down to lounge wear.  I recommend it to all level sewists if you have the pattern.  It's out of print (c 2009).


This was another quick and easy top.  Perfect for using up remnants.  I will definitely make a few more.  Good pattern for beginners.  A little twist to a basic t-shirt like pattern.

Parting Shot:   Reading or listening suggestion - "The Hiding Place" by Corrie Ten Boom


Happy Sewing!
C


Tuesday, March 31, 2020

Summer Dresses In The Making - Butterick B6674


This fabric is a Mood Exclusive Abstract Concepts Stretch Cotton.  What drew me to it was the delicate outline of printed faces.  I'd seen similar prints but would not seen them in a fabric store.  So this one was just right for me.  It's 97% cotton; 3% Elastane.  The fabric has a slight sheen to it with a smooth hand.  Easy sewing and pressing helps speed up the construction process.  I used a universal sewing machine needle, size 12.

I it with Butterick B6674 which includes separate pattern pieces for cup sizes.  A plus and is helpful to me.  Because it decreases the amount a time I spent making pattern adjustments.  The FBA is the most involved adjustment I made.  Butterick pattern description: " A, B, C close fitting through bust, front self facings, sash, flared hem. A: Above mid knee length. B, C: Below mid knee length. C: Self ruffle. A/B, C, D Cup Sizes. D: Lined bag, bias tape seam finish. Note: Separate pattern pieces are included for cup sizes A/B, C, D."  I used size 16 with some modifications.


This was the first garment that I made while in quarantine. I spent two days making this dress.  The first, finishing everything except the buttonholes, buttons, and hem.

This is a very simple skirt waist dress.  Another example of a fit and flare style.  This style is very appealing to me.  And I hope to make more similar dresses this year.  The ruffled neckline adds a little more interest to a simple silhouette and no pockets because the print was enough of an attraction.  So view C was perfect for my project.

My dress does look like the drawing, except I did not make a belt.  I have a RTW belt that would be perfect for the dress.  The instructions were typical but very easy to follow.  No part of the dress requires interfacing.  In general, a very quick sew.

Before I cut into my fashion fabric, I made a muslin.  I actually made it last summer.  So I tried it on again to make sure the fit was still okay.  It was good.  My usual pattern adjustments were also made last year.  So I checked them again since I hadn't looked at this pattern in awhile.

My fit changes:
  • Tweaked the D cup bodice pattern to fit.
  • Lengthen the bodice a bit
  • Swayback adjustment
  • Prominent shoulder blade at the shoulder seam, which produced a little dart.  I should have made it along the neckline.  I think it would look better. Next time.
  • Added a bit to the bodice back a the shoulder seam for my forward shoulders.
  • Lengthen the skirt a bit
My construction changes:
  • The fabric was too thick to follow the construction of the ruffle.  I decided to use Mood Italian Black Venise Lace trim .   I cut the lace the length of the ruffle.  Then I cut a piece of 1/4" black elastic the length of the finished neckline.  Stretched and sewed the elastic to the lace.  Then I sewed the trim to the neckline of the dress being careful not to stretch it.  NOTE:  A little stretching did occur, but it did not deform the neckline.  It actually helped it lie flat with no gapping.
  • For the neckline and armholes, I make bias tape from fashion fabric.
  • I used hem tape and hem the dress by hand instead of machine stitching it as instructed.

I am very please with how this dress turned out.  It is a classic silhouette.  And I can see myself making it again.  Next time with pockets and matching bag.  Isn't that tote cute?

This is a relatively easy dress to make once you have gotten past your fit adjustments.  You can also have some fun with trims to change it up a bit.  I recommend this pattern to all level sewists.  Have fun building your summer wardrobe.  Now is the time if you are quarantined or on coronavirus lock down.

Happy Sewing!
C


Saturday, March 28, 2020

Bright Orange/White Floral Speaks Summer - B6680


I finished this dress two days before my vacation.  Into the suitcase it went. The bright orange/white with royal blue floral knit was perfect for the sunny days of my Los Cabos vacation.  But I didn't get a chance to wear it!  Grrrgh..., Missed opportunity for a great photo shoot.

No worries.  Summer is coming!  And I'll have plenty of opportunities to wear it here is the States. But today, I wanted to take this opportunity to share my experience of making it.

My fabric comes from Mood Fabrics.  It's labelled Bright Orange White and Royal Blue Floral Printed Lightweight Ponte knit.  It has a smooth hand and has a firm weave with about 30% stretch.  Excellent recovery.  The colors are vibrant and rich.  Great print and color combination; perfect for summer.

The pattern used is Butterick B6680, published last year.  It is described as:  Misses' dress dress A, B, C is close-fitting with side gathers, neck and armhole bands; and slightly flared hem in three lengths.  I made view B below mid-knee length.  The pattern is available is sizes 6 to 22.  I used size 16 with modifications.


Three dress was on my to make list last year, but I didn't get around to making it until now.  I did a little online research to see if others had made it.  This is another pattern that I didn't find many pattern review for.  Only a few tried it, and they did not appear to have the same fit issues that I have.  I must admit, once I started to prep the pattern I wondered if the ruching at the side would be problematic.  Considering my swayback and the little fluff around the middle.

Anyway, I continued on with making a FBA.  Nothing extraordinary.  I just looked passed the curve on the left side where the ruching goes and followed the standard process of making a FBA.  I decided if darts are needed, then I sew them in.

Initial Dart on Right Side Just above the ruching


In the end I tested darts on both sides.   It was perfect on the left side.  But on the right side it didn't look good.  So I plucked out the stitches and extended the ruching through the dart area.  The construction process was to simply add the elastic.  The difference created by the dart needed to be gathered; then sewn together and elasticized.

Final Right Side with No Dart

Final Left Side with Dart

With that little challenge out of the way, my thoughts turned to whether or not this would be a good look for me given my swayback coupled with the ruching.  I did not do a swayback adjustment.  My rationale was it's ruched.  The extra would be ruched.  Anyway, it's a little more ruching then seen in the photograph and drawing, but it a good look.  So my only other fit adjustment was the prominent shoulder blade.

The instructions typical and easy.  Nothing confusing  Aside from my testing and adjusting, the dress went together very quickly.

I like the neck and armhole bands.  They create a very nice finish to the dress.  Godet of the right side and the flounce at the bottom of the dress add interest and flare, which I like as well.


No dislike.

This is a quick and easy dress to make if you don't have the FBA issue to address.  It easy to wear.  A nice casual summer dress that can be worn in the spring with a cardigan or jacket. I don't think I'll make it again, but I do recommend it to others.


Happy Sewing!
C


Friday, January 31, 2020

What's Going On


Hi everyone,

It's been a minute! Okay, several minutes (weeks) since I last posted.  I've been quiet on the blog this month, but I'm busy working multiple projects with most of my sewing time being sent of my latest coat project. This will be the second year that I chose to make a coat close to Spring instead of in the fall.  Believe it or not, it's a good time to make a coat in preparation for the next fall/winter season.  The excitement of having something new is not lost because it is the end of the season make.  Living in the mid west, I can expect at least two more months of cold weather and will probably get to wear my new coat at least a few times before it's stored in the coat closet. Then when winter comes again, it will be just as nice to have a new made coat to keep me warm.


My new coat is made using a Simplicity Project Runway pattern that I purchased many years ago.  I'm calling it a coat of many pieces.  The version that I'm making requires the use of 21 pattern pieces.  That's a lot!  I'm using a black wool blend from Minerva Crafts online store.  The plan this weekend is to finish my coat.  So stay tune to the reveal and full review.

Another thing that has been keeping me busy is pattern preparation for upcoming projects.  This year, I'll be trying several new jacket and dress patterns.  When I say "new" I mean it will be the first time to make something using them.  I'm continuing my plan to make a variety of jackets/coats to complement my wardrobe.  Additionally, my dress collection is a little anemic, in my mind. ;-).  There are a few I want to make this spring and summer.  Below are a few that I'm currently working on with  potential fabric already to cut and sew.


Mood Fabric #328986


Mood Fabrics #MD0368

So, that's my little sewing update.  Hopefully I'll have another post up before next week.

Happy Sewing!

C

Thursday, January 23, 2020

Merlot Crepe Knit Coordinates - Sewing Workhop Pearl Cardigan and S9017 Pants


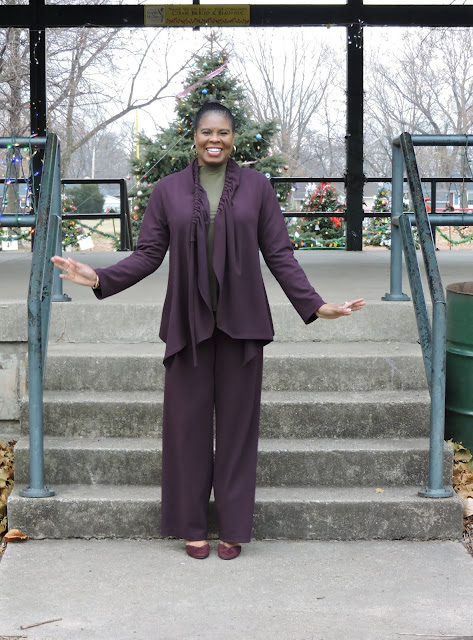
Today I'd like to share an outfit I made for my book club holiday party (2019).  I wanted to keep it simple. I paired the Mood's Merlot crepe knit with the Sewing Workshop Pearl cardigan and Simplicity S9017 pants.  This is a beefy fluid knit that is perfect for fall and winter apparel.   Before cutting into it, I tossed it into the washer. It came out of the dryer with the same touchable softness, unchanged color, and beautiful recovery.


Jewel tones are my favorite.  The rich hues of purple, red, and green are staple colors in my wardrobe. I'm always on the hunt for these vibrant beauties.  That's why I had to have it.  Too bad, it's no longer available, but there are several gorgeous purple textiles in Mood's warehouse just waiting for you.

The Pearl Cardigan is loose fitting with a front casing and drawstring to ruche, cascading side panels, back waist seam, long sleeves and narrow hems.  The wrong sides of the cardigan will show.  The cardigan can be made up in a variety of fabrics from ponte knit to linen and silk.  All sizes are available in the pattern XS to XXL.  I used a size large with a lot of modifications.

For the most part, it looks like the drawing on the envelope.  From the pattern drawing it is difficult to see the fullest of the collar.  There is quite a bit of fabric that bunches up around the neck. 


The instructions were super easy to follow. Nothing confusing about how to assemble the cardigan.  That was one of the things that I especially liked about it.  My challenges were more with the fit and choosing the appropriate size.


My other likes were the drawstring and the drape.  This was an interesting design element.  You could wear it loosely drawn or as I'm wearing it with lots of ruching.

My dislikes are the huge amount of fabric that bunches up around the back of my neck.  If I make it again, I will definitely reduce the width of that area.  Secondly, the length of the shoulder seams.  Extremely long.  The shoulder seam was about 1.75" too long for me. Thirdly, the size large was like an XXL on me.  This pattern runs BIG.  I had to take it in several inches all the way around.


 My other adjustments:

  • For starter no FBA needed.  Hooray!
  • Added center back seam and back darts.
  • Reduced length of shoulder seams by 1.75"
  • Reduced the side seams by 1.5"
  • Reduced width of the sleeve by 1.5"
All of these reductions gave my cardigan some shape, and now it looks like the picture on the envelope.  Happiness..,

With that being said, next;

The Pants Simplicity S9017

Easy, easy..,

Front, back, and waistband.  These pants sewed up like your typical pull-on pants.  No significant changes other than to lengthen the pants by several inches.  I don't particularly care for cropped pants.  From start to finish, it took me about 2.5 hours to make them, which was a great finish to an outfit that I'd spent more time than I thought I would.


In the end, I was able to wear my new holiday outfit with a smile.  So happy this one did not hit the can!

Happy Sewing!
C


LinkWithin

Blog Widget by LinkWithin