Showing posts with label sway back. Show all posts

Monday, October 14, 2024

Maxi Dress Wardrobe Staple - Dart Rotation M7386 and M6559


Now that I've shared many of the major events and activities of my birthday celebration, I'm back to playing catch up with my sewing projects from the summer.  Sometimes it is a challenge to take the photos and organize them.  


So let me get started with two maxi dresses that I made in August.  Both dresses are really easy to make.  The first is a "Learn to Sew for Fun" pattern. The second pattern that I used may be OOP. There are so many options for hacking or making changes to either pattern to suit your own taste or design preference.  

One of the major adjustments that I almost always make is a FBA, which I made for these two dresses.  Before I start with all the changes, let me provide some of the basic information about the two dresses.


Pattern Descriptions:

M7386 -  McCall's gives a really basic description:  Pullover top, dresses and pull-on skirts have narrow hem.  One of  my favorite elements of the design is the fishtail skirt of the maxi dress.

 M6559 - Close-fitting, unlined jacket in two lengths has front extending into single-layer tie ends (wrong side shows).  Very close-fitting, pullover dresses.

Pattern Sizing:

M7386 - Size groupings (XS, S, M and L, XL, XXL)

M6559 - Size groupings (6-14 and 14-22)

I used what would be large and size 16, respectively.  And, of course, I made some modifications.

Did it look like the photo/drawing on the pattern envelope once you were done sewing with it?

The silhouette is basically the same. 

Were the instructions easy to follow?

The instructions are simple.  Any level sewist should be able to follow them with no problems

What did you particularly like or dislike about the pattern?

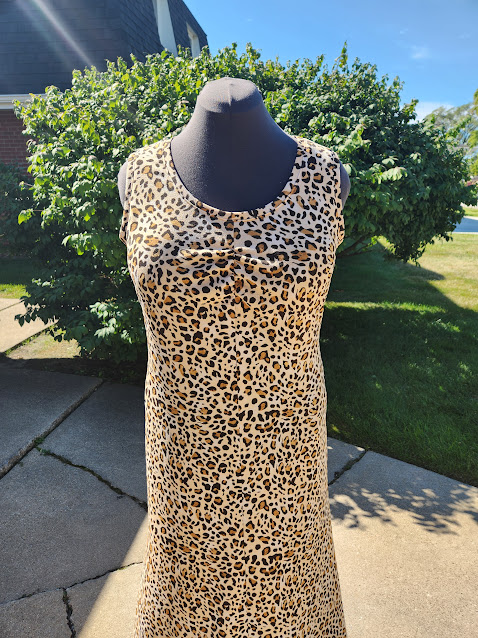
With my changes, my likes are the ruching in the bust area, the fishtail skirt, and the finishing of the bands at the neck and armholes.

Fabric Used:

My knit fabric is from Hobby Lobby.  It is a spongy knit, similar to Liverpool knit.  It was very easy to work with.  Before cutting into it, I pre-washed and dried it. 

Pattern alterations or any design changes you made:

the adjustment is made for the length of the front and back pattern pieces.


#1 dress - animal print (M7386). 

  • FBA and Dart Rotation - For this dress I used M7386 front and back.  The FBA was made to rotate the dart to the center front to create ruching at the bust area.  This eliminates the bust dart all together.  I've posted a tutorial years ago if you are interested in the steps to do the dart rotation.  Here 
  • This process is pretty easy to follow.  Once I did the dart rotation, I just added seam allowance to the center front.
  • Neck and armhole band -  I simply measured the circumference of  each for the length of the band minus 2 to 3 inches depending on the stretch of the fabric.  The width of the bands 2".  The ends of the bands were sewn together (3/8" seam allowance) to create a circle.  Then attached to the appropriate areas using a 5/8" seam allowance; trimmed after sewing.  Then top-stitched for a nice finish.
  • Broad shoulder adjustment - I added width across the back.
  • Swayback - horizontal tuck across the back at the waist.
  • Length - I also have to add length. Lol  Just a few inches so that the dress is truly a maxi dress.
  • I did do some tweaking along the way.  The added width across all areas isn't needed throughout the entire dress.  So I adjusted as needed taking in larger seam allowances.


#2  dress rust Solid (M6559) 

  • I used the front of M7386.  But for the back I wanted a racerback.  So, I used the top of M6559.  And to keep the skirt silhouette of M7386, I overlaid the skirt back of M7386 folding and tucking the rest of the pattern out of the cutting path.  No need to retrace unless you really want to.  Lol.  So the skirt (fishtail) was the same for the front and back.  All other adjustments were the same.  I did need to add a center back seam.  The center back seam helps with getting that close fit at the small of my back.
  • All other changes are the same as M7386.

Would you sew it again? Would you recommend it to others?

Sure.  This is a quick and easy dress, a wardrobe staple.  It has many style options, which can be worn well into fall with cardigans, jackets, shrugs, or a knit t-shirt underneath.

I recommend these patterns to all level sewists.

Conclusion:  Both patterns are easy to sew for all level sewists.  It is versatile and stylish.  

Happy Sewing!

C


Wednesday, April 8, 2020

Notes on a Pattern - Butterick B6090


Way, way back in November of 2014 Rhonda  helped me fit Butterick B6090.  It was a workshop that she and Susan Khalje hosted in Chicago.  Oddly, I never made the dress, but I knew one day I would.  At the beginning of every year, I review my list of unfinished projects and decide which ones to add to my list of things to finish the first half of the year.  I pulled this muslin from the closet to try on to see if all the adjustments were still valid.  Luckily, they were. 


Prior to coming to the workshop, I made this muslin.  It was made with my initial pattern adjustments listed below:

  • FBA
  • Prominent Shoulder Blades
  • Swayback Adjustment
  • Lengthening of the Sleeve

FBA

Lengthen Sleeve

Prominent Shoulder Blades and Sway Back


My goal was to see if Rhonda or Susan could help me get the best fit for this dress and to provide my with the best approach for fitting a non-princess seam bodice. I love the way Rhonda talked through all of the changes as she made them and show me how the change affected the look and fit of the dress. 

Below are explanations of the changes.

Please note: this post is mainly to express the importance of making a muslin and to provide some explanation of the fit process.  Some of you may need similar adjustments. So these details may or may not help you with your fitting process.   By no means am I an expert, but this process helped me get the best fit for this garment.

  • The full bust adjustment is usually the first thing I tackled. I start with examining the pattern and determining how much more width is needed to make the front bodice fit.  My adjustment can be anywhere between 1.5" to 2.5".  With this adjustment I decided to make two waist darts instead of one.  The FBA extended into the yoke pattern as well.  When I tried on the muslin, Rhonda saw a few more adjustments needed in the yoke, the side, and the armhole.


  •  The yoke had to be adjusted above the bust at the armhole and on the side of the bust at the armhole.  So the front armhole was decreased by 1/2", 1/4" in each area.  See above pictures.  Next, the side seam needs to be taken in starting 2" below the armhole almost to the waist.  The front sleeve was fine.
  • The prominent shoulder blade adjustment.  I made a 3/4" adjustment.  At the left shoulder seam I made a small dart and at the right shoulder seam I eased the excess to fit the front yoke shoulder seam.  This was a test to see which construction technique looks the best.  And the small shoulder dart was the winner giving a smooth seam and curve at the shoulder.

Left shoulder seam with dart.


Right shoulder seam with ease.


  • As Rhonda worked her way around the upper back, she indicated that more room was needed in the upper back sleeve area.  She pulled out the stitches and re-pinned the upper sleeve to secure the change.
  • Next, she said that the shoulder seam was not aligned and that I needed to add about 1/2"to the back along the shoulder seam near the armhole and reduce the same amount on the front yoke.  I think this is a forward shoulder adjustment.  The shoulder seam should be parallel to the ear.  You can see the marked adjustment in the picture above. 
  • My initial swayback adjustment was not enough.  Starting from the right side front all the way around the back, I need to reduce the length at the waist.  So that the waist remains parallel to the floor all the way around.  The reduced length now needs to be added to the hem of the skirt so that the dress hangs evenly.

These changes were transferred to the tissue pattern to finalize the fit adjustments for this dress.  Now, this dress pattern is ready to make into my fashion fabric.

This process is so important.  Making a muslin gives you the experience of making the garment, testing not only the fit but also the construction.  You will be able to identify any challenges with making the garment.  Without the expense of cutting into your fashion fabric, you can determine whether or not you like the style. So many benefits of the muslin making and fitting process.


My next step for this project is to choose a fabric for the actual dress.  Hopefully, I can decide this week.  I think for sure I'll make two dresses.  A lot of work went into getting the fit right.  I'll be able to benefit from this exercise for future projects of similar style lines.  I'll use the muslin and the pattern as a point of reference.  That will save me some time with future adjustments.

I hope you find something useful in this post.

Happy Sewing!
C


Tuesday, September 23, 2014

McCall 6464 Making the Adjustment - Points of Reference

Good morning everyone,

A few days ago, I published a post on McCall 6464, a new dress I'm making in celebration of my birthday. In that post I provided a few photos showing the pattern adjustments needed to get the best fit for me. One of my dear readers asked if I would provide more details on how I go about making my adjustments. Of course, I agreed to share more information. But in doing that, I must say that these adjustments are especially made for me. Each of us have a unique size and will need to make adjustments based on our own unique requirements.  Second, there are so many approaches to pattern fitting.  Each of us has to determine which technique is best for us.  I follow the Palmer/Pletsch fit system and use tips from a variety of sewing friends and bloggers.  In this post  I will provide a few more details for the adjustments made for my version of the McCall dress 6464. Also, I will provide a list of references and resources that may aide in the fitting process.  But first, here is the comment from KJ2007 and my reply.


McCall 6464 - More details on how to fit (FBA, Prominent Shoulder Blades, and Sway Back).


Each McCall Palmer/Pletsch patterns includes details and illustrations on how to fit the pattern.  This information is part of the guide sheet. It is not uncommon to have four sheets consisting of quick, product reference, and details on how to achieve a well fitted garment.  I've used Palmer/Pletsch patterns for years.  Their patterns feature a variety of styles and the fit tips can be used to fit other patterns.

Sorry I don't have personal illustrations of some processes.  The patterns do have all of the steps. I only included a few illustrations in this post

Getting Started:
  • Select the right size.  Very, very important step.  Don't skip.

  • Tissue Fitting Instructions - Built-in Fit.  This is one of my favorite things about the Palmer/Pletsch pattern.  All of the alteration lines are drawn on the pattern pieces.

  • Tissue Fitting Instructions - Getting The Tissue Ready.  Use 1/2" tape to reinforce the tissue pattern around curved areas 5/8" away from the edge of the pattern.  This will allow you to try on the tissue to determine where alterations are needed.
  • Tissue Fitting Instructions - Try on The Tissue.  Pin the bodice together and try it on.  Start with analyzing the back.  You will need someone to help you.   There are lines on the pattern for back adjustments.  Measure the distance from the pattern center back to your center back.  Check the length.  Make sure it falls in the appropriate place on your back.   Assess the curve of your back upper and lower.  Cut and spread where needed and fill with pattern paper.  
  • For me, I cut the vertical line from the shoulder to the waist and spread 3/4" for my prominent shoulder blades.  I only need more room across my shoulder blades.  So I add a shoulder dart or ease in the excess at the shoulder seam. There are tucks on the lower back pattern pieces to make a sway back adjustment.  Typically, I make a 1/2" tuck across the back.  Sometimes I need to curve the center and side back seams in those areas as well.   Pin the back and front bodice together again.  Make additional back adjustments as needed.  Pin out excess as needed. and mark your pattern.  Next, determine if a FBA is needed.   "Measure from the pattern center front to your center front.  That is the amount you need to add."  
  • For me that amount is greater than 1".  So I use the "Y" FBA.  The lines are on the pattern piece and the steps in the guide sheet.  Here is how the FBA looks for my measurements.  Now I need to make a bust dart and make the waist dart deeper.


  • "If the bodice comes to your center front, but you have a gap in the armholes add 1/2" in the bust width to make the armhole smooth."

  • Because my body shape is an inverted triangle.  I don't need the extra width below the bust.  Often I removed the excess during the sewing process.

Should you make a muslin?  Yes.  I make the body upper muslin about 85% of the time when fitting a new pattern.  The tissue pattern response differently to the curves of our body than fabric.  Fabrics come in a variety of weaves.  Some may be loose while others are very tightly woven.  Knits have variations of stretch.  So make a muslin out of fabric with a similar weave as the fashion fabric for the garment.  Sometimes you may need to make more changes. 


References:

Palmer/Pletsch - Fit for Real People.  Acquire this very useful book.  It will provide a step by step process for making fit adjustment for all body types.  This technique can be used for any pattern.  Palmer/Pletsch has a series of books on fit available on their website.

Vogue Sewing - This is a must have in your sewing library.  It too has tips on making fit adjustments.

PatternReview.com - has tons of resources available to members and non-members.  This is where I found several sewing experts and bloggers who shared tips and techniques on fit.

Workshops and Seminars - I had the pleasure of attending two excellent workshops:  Palmer/Pletsch and Power Sewing.  Both are worth the money and time spent. 

Sewing Bloggers:

I follow several bloggers who share fit information:

Ann Steeves of Gorgeous Fabrics Blog - Ann has several post on Fit.
Debbie Cook of Stitches and Seams - Debbie has several tutorials available on Fit as well.
Diana of SewPassionate - Diana has links to Lessons and Fit Videos on her blog.
  and
Marji Graham of Fibers a Float - Marji does not blog very much these days, but she does share some fit information on her blog.

These are only a few bloggers that have help me with online fitting information.

Search Online for Fit Techniques and Videos:

Google Search on key words to find information on fit.  There are times when I'm starting a new project, I will Google the pattern to see if anyone has try it.  You may also Google:  full bust adjustment, pattern alteration, pattern fitting, how to fit ...,

My Pinterest:

DIY Tutorials - Sewing and Other Crafts - Here is where I collect helpful craft tips and techniques.

My Blog:

FBA and Dart Rotation

Sway Back

Example of Tissue Fitting


I hope this is helpful.

Happy Sewing!
Cennetta


Thursday, November 15, 2012

The Sway Back Dilemma - Simplicity 5956 and Vogue 1197

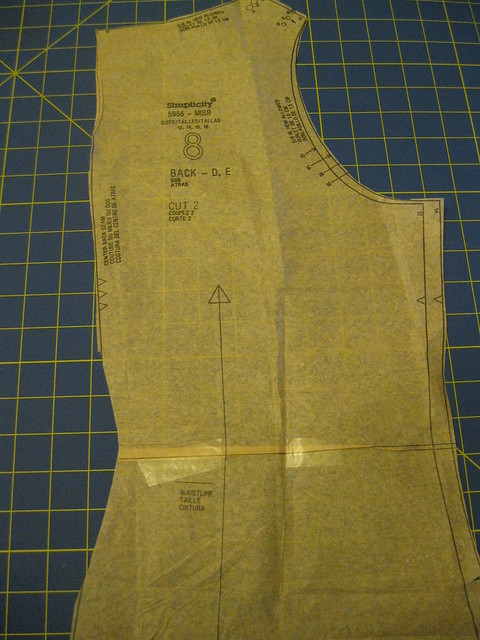
One of my biggest fitting challenges is the sway back adjustment. I have tried adding darts and folding out were the pooling occurs. Sometimes it works and other times it doesn't. I've tried using the method of making the horizontal tuck with placing the center back on the fold. That doesn't completely resolve the issue.

 A few years ago, Pati Palmer noticed that one of my hips was slightly higher than the other and gave me some advice on how to fit my pants (M5818) better. After an spinal x-ray two years ago, I learned that I have slight scoliosis in my lower back. This discovery supported Pati's observation. So of course, when I went to the Palmer/Pletsch fit workshop, I planned to learn more about addressing my back fitting issues.

Because of the curve, the level of adjustment is slightly different for each side. This is probably no surprise. I think most of us are larger on one side of our bodies.

I decided to try a different approach for the sway back adjustment. It's easiest to make the adjustment if the back has a center seam. This allows me to scoop out access at the lower, center back as well as make a horizontal tuck across the lower back. I also have the option of making two backs to address the differences between my left and right side.

When making the horizontal tucks, I noticed that the back hem along the center is shorter than the rest of the garment by the amount of the tuck. This amount needs to be added back into the garment either in the hip or at the hem. I haven't figured out the best place to add this for a top, jacket, or dress. Recommendations are welcomed.

The type of garments where the sway back fitting is the biggest challenge are in knit tops and dresses that do not have a horizontal seam at the waist. I made Simplicity 5956 several times. Last year I tried this adjustment and it was nearly perfect. I had added the tucked length to the hemline where needed. This method was also used in the two versions I made this year.

Last month, I made a wearable muslin of Sandra Betzina's Vogue 1197. Pictured at the top of this post.  This top does not have a center back seam. I created one. I think the adjustment worked. I also think I will use this approach more often to get a better fit across the sway in my back.

What are your thoughts on sway back adjustments? Do you have issues with fitting your back? Have you found a way to successfully alter your garments for your back fitting issues? Please share.

Happy Sewing!
Cennetta

LinkWithin

Blog Widget by LinkWithin