Saturday, October 30, 2021

Simplicity Shacket S9388 In Denim - Better Than The Last


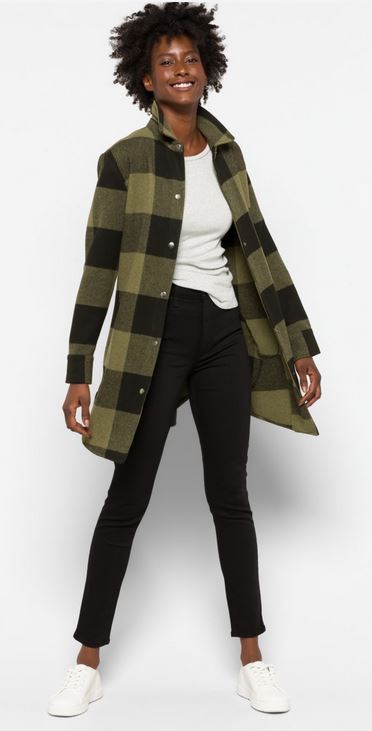
Here I go again!  This is my second shacket, and I'm loving it even more than the first. 

This medium weight denim that I bought from JoAnn's is perfect.  For this version, view A, I decided to make a few changes.


The first was to change the design of the hemline.  I wanted to add a curve hem with slits on the sides.  So, I used a bowl the create the curve. then I decided the length of the slit. Easy, easy.  


With the first shacket I thought the front placket was a little too short.  But I wasn't absolutely sure because I added a few inches to the length.  For this version I cut the pieces exactly as instructed.  True enough, the placket is nearly two inches too short.  So after changing the hemline, I had to redo it and shorten the front enough to fit the length of the placket.  Easy solution.


Next change, I made the sleeve pleats deeper and I turned the upper part of the vent in.  The sleeves are really BIG, and the cuff too.  This change makes it fit a little better.


The final change was to use snaps instead of buttons.  I put them on today after finishing it a week ago.


This one is so versatile. I can wear it with almost any casual outfit.  today I'm showing two style options:  leggings, tall boots, and a colorful scarf and slim pants and a turtleneck top.  Not shown today, but definitely a great outfit for me too: a simple pullover dress cinched at the waist with a big scarf draped about the neck.  The style options are endless.

So, here's to the trending shacket.  I'm going to get plenty of wear out of this baby. ;-)

More to come.  Rhonda and I will continue our little sew along with a pink wool shacket.  So stay tuned.  Be sure to check us out on Instagram too.  There may be additional postings as we go along. 

Happy Sewing!

C


Saturday, October 16, 2021

Three Ways To Wear My New Shacket S9388

This is almost a wordless post. I was lucky to have my DD do the photo shoot today. So here are three ways I can choose to wear my new shacket.


Til next time.
C


Friday, October 15, 2021

Ready for October with My First Shacket S9388


Just in time! Fall is here! 

On this lovely Fall day temps are in the mid 60's.  It's suppose to be sunny with clear skies. The perfect Fall day.


Also, perfect for sharing my latest sewing project,  my first shacket. 

My last Inspiration post was all about, the now trending, shacket. All of the popular stores are overflowing with shackets. You can find them in a variety of colors, prints, and styles. But I love the idea of designing and creating my very own. 


Simplicity S9388 is the great pattern to customizing your shacket.  My plan is to make a few of these babies over a next few weeks. My first is finished; the second is cut and ready to sew; and the third is a little shacket challenge that Rhonda and I are doing. Please join us if you like. It's a fun project.

Today I'm also sharing my pattern review of S9388.

Button front jackets with yoke, front patch pockets and seam pockets. Long sleeves, button cuffs with pleats. Back yoke with pleat. Lined yokes. Sizes XS to XXL.

I used size medium/large with very little modifications.

It sews up like a typical oversized shirt with a front button placket. My jacket looks like the view B on the envelope. In addition to the patch pockets there are inseam side pockets, that I like.

The instructions were pretty typical too. Nothing difficult. I did change a few of the construction steps though.


There are a few things I like about this pattern:
  • The oversize style. Comfortable and great for layering.
  • Easy to sew
  • Lined yoke
  • Front placket.  Adds stability and nicer detail than the cut-on front facing design.
Dislikes:
  • Some seams were bulky and hard to work buttonholes around. This was due to my fabric selection. So it made it very important to trim some of the seam allowances.  This may also inspire a slight design change to eliminate the front yoke and/or use snaps buttons instead of regular ones.
I purchased my fabric from Joann's.  It's a heavy plaid like fannel. They carry it in a few colors.  It's soft and warm, very easy to work with.

I cut between a medium and large, mostly large (upper body). None of my usual fit adjustments were needed. It's extremely over-sized.

Initially,  I added an inch to the sleeve length. Then I had to cut it off plus some. The cuff rests on the upper part of my hand. But that's alright. I I want to be able to wear a hoodie underneath. 

For the underarm curve, I did not trim the seam allowance.  Instead I clipped along the curve to eliminate that plucker look in the armsyce top-stitching. 

My side seam pockets were peeking out at the hem. So I tacked the bottom of the pocket to the hem.

My hem is 1.5 inches.

Note : no serious pattern matching for this project.

I enjoyed making this shacket. It was easy to sew. I recommend this pattern. There are so many style options. 

More to come. Stay tuned.

Happy Sewing!

C


Thursday, September 30, 2021

Shacket - Trending Now Simplicity S9388


Shacket (a.k.a., the shirt jacket)


Just a little inspiration today.  I added Simplicity S9388 to my sewing list.  I want a shacket.  I don't know what color yet. 


Stay Tuned.  More on this upcoming project.

Happy sewing and have a great weekend!

C

Wednesday, September 29, 2021

More Molly Tees


Two more Molly tees.  I've made nearly a dozen versions of it in the past two years.  It's a bona-fide TNT. I love making this t-shirt.  It sews up quickly, comfy to wear, and great for cleansing the palette after an intense project.

These two were designed/made in an effort to use up some of the knit remnants that I have accumulated over the years. 

This striped one is a remnant from a dress that I made a few years ago. The fabric is a light weight sweater knit from Mood. Dress below.


My second tee is made of two knits: the beige from Mood and the floral print from So Sew Fabrics. I'm pleased with how both turned out. And I'll get a lot of wear out of them. 


What do you do with your remnants? Any creative projects? Or do you donate them?

Happy Sewing!

C


Tuesday, September 28, 2021

Press, Press, Stitch, Press - McCall 2233


Press, press, stitch, and press.

In sewing, pressing is just as important as stitching. This is something that I teach my sewing students.  One of the first projects that we make is an apron.


An apron gives students repeated opportunities to practice pressing and straight stitching, essential to developing good basic sewing skills.  I like teaching these skills using a basic apron like McCall's m2233.

This apron project was at the bottom of the UFO box that I decided to tackle at the beginning of the year.  Two aprons were cut almost ten years ago!  Last week I decided to finish them. One I will give to one of my sewing students and the other I'll keep for myself.  

The instructions included were antiquated. To form the strap they instruct to sew with right sides together to form a tube, then turn to the right.


Instead, I decided to press by folding it in half lengthwise, then turning the raw edges in. The same way that you would form belt carriers. See below.


The entire apron: hems, pockets, and straps are all completed by a series of folded edges, presses, and stitches.

Benefits to student:

  • Ample practice with pressing
  • Ample practice with straight stitching
  • Ample practice with measuring and forming hems and seam allowance
  • Opportunity to use needle positioning to create double rows of stitching for a hem
  • Attaching straps and "D" rings
In conclusion,  a sewing student is able to create  agreat looking aprons that they can be proud of.


The fabric that I used for these came from Joann's.  A novelty cotton depicting a love for sewing.

That's all for this post.  I'm happy to complete two more UFO'S. 


LinkWithin

Blog Widget by LinkWithin