Wednesday, December 30, 2009

Coats -M5767 and S2508

Today I wanted to get at least one more sewing review post in before my end of the year review. Both coats were finished about two weeks ago along with a few other garments that won't be posted until next year. Here are my reviews.


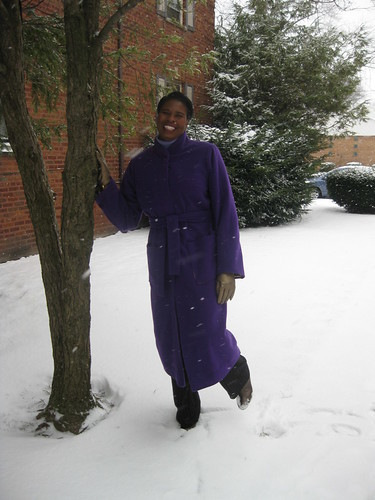
When I selected this pattern, I thought it would be a great basic classic belted coat. The pattern envelope shows four photographed versions of the coat, which look perfect. It looked pretty simple and easy to make up without a lot of fuss.

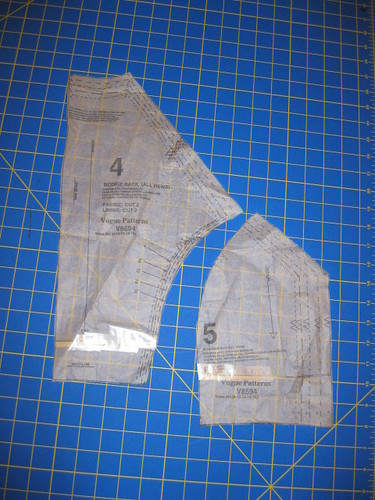
Pattern Description: Misses' Lined Coat in Three Lengths, Belt and Totes: Loose fitting, lined coat in three lengths has collar, concealed front button, buttonhole closures, welt or patch pockets, two piece sleeves and optional shoulder pads; coat may be worn with or without belt.

Pattern Sizing: 8 to 24. I made a size 14 with modifications.

Did it look like the photo/drawing on the pattern envelope once you were done sewing with it? Pretty much. But there is a lot of wearing ease in this coat.

Were the instructions easy to follow? Yes. Nothing I haven't seen before or confusing.

What did you particularly like or dislike about the pattern? No "hard" dislikes. I just had a few issues with it. Likes:

- Two piece sleeves
- Hidden button fly
- Palmer/Pletsch pattern

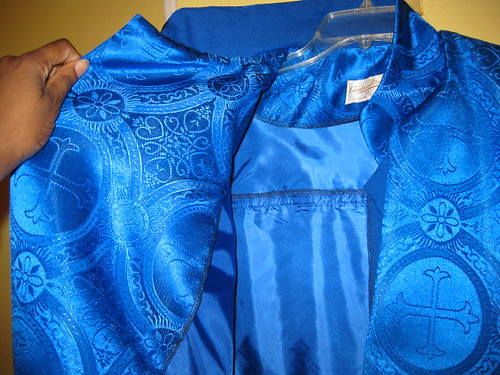
Fabric Used: Wool coating from Gorgeous Fabrics and coat lining from JoAnn's Fabric.

Pattern alterations or any design changes you made:

- I made a FBA (On the fly as well), but think I could have gotten away with skipping it. The finished bust width is 46 for size 14. I did my usual modification. The pattern says it's roomy enough to wear a jacket underneath it. True, true. I ended up removing some of the ease by increasing the sleeve and side seams allowances to fit a little better. When I tried it on, I noticed that is was a little snug in the neck area.

- I lengthen it a few inches.

- Added Belt Loops.

Now my little issues:

- I used a contrasting lining (gold), which is a no, no (for me) when making patch pockets. I made three attempts to get them on so the lining did not show. Failed..., on this coat, but will try this again 2010. ;-)

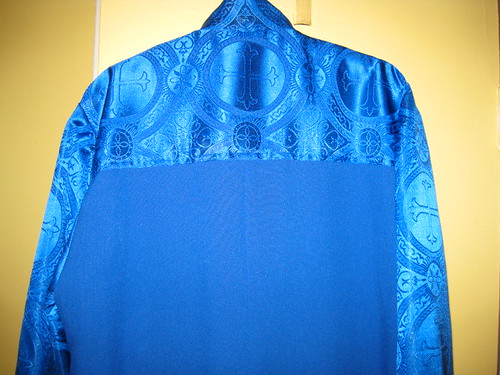
- Pressing is always an issue. Tryiing desperately not to have the "railroad Track" look, the first pressing wasn't firm enough to create a crisp look. So I gave it another try, which gave me the "railroad track" look in some areas. I'm hoping the dry cleaners will bring the crushed pile back to life.

- When I asked DD, "How does it look?". She replied, "It looks like a bath robe." :-( But my sister said, " No, no. This is one you can dress up a bit with a pretty scarf." Anyway, I understand both comments and will try to enjoy the coat. It may not be the very best style for me.


Would you sew it again? Would you recommend it to others? Probably not. I have so many other coat patterns to try. But if you are looking for something simple, this may be the ticket.

Conclusion: This is a simple classic coat that offers useful pro and fit tips.


Simplicity 2508


Pattern Description:
Misses' coat in two lengths or jacket with front and collar variations.

Pattern Sizing: 4 - 22, I used a 14 with modifications.

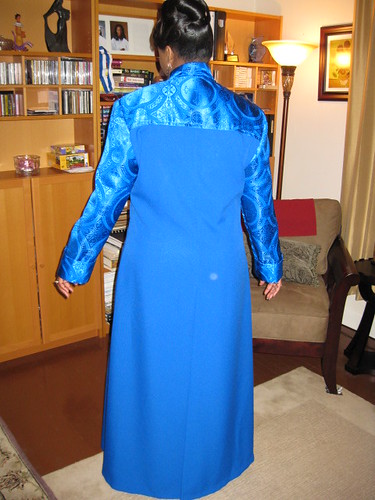
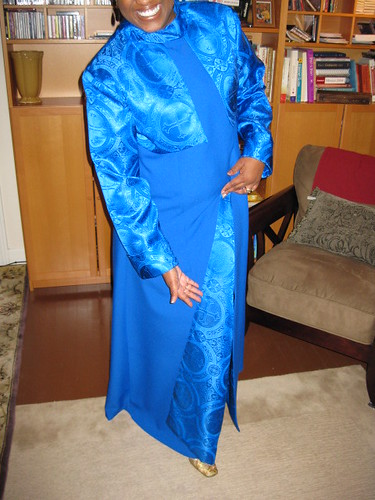
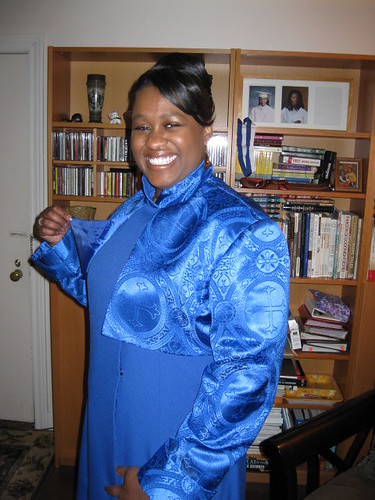
Did it look like the photo/drawing on the pattern envelope once you were done sewing with it? My version is similar to the small drawing on the envelope (blue version), sleeves are different and I added the pocket flaps.

Were the instructions easy to follow? No problems. Pretty standard.

What did you particularly like or dislike about the pattern? I like to style variations of this coat pattern. I could see myself making at least two more coats from this pattern.

Fabric Used: Wool coating from Gorgeous Fabrics and lining from JoAnn's Fabrics.

Pattern alterations or any design changes you made:

- FBA: Side Front and Front.

- Added a few inches to the length.

Would you sew it again? Would you recommend it to others? Yes I plan to see this again, and yes I recommend it to others. The basic lines of this coat are classic with updated collars and sleeves variations. Cute.

Conclusion: Nice pattern to try with multiple style options, not difficult to sew.

My Flickr set is here.

Friday, December 25, 2009

Merry Christmas!

Wishes each and everyone a Merry Christmas!

Monday, December 14, 2009

Working My Way Back To Blogging

Lately, I've had a hard time finding time to blog. Work, sewing, the season..., can't pinpoint why. But I have sewn plenty; now I need to finish something and blog it. In my sewing queue are:

- 2 coats
- 2 jackets
- 3 dresses
- 3 pants
- several accessories


A side from that I have been crocheting like crazy. It all started about three months ago when I gave my sister a bag of hats and scarves (some crocheted and some sewn {velvet}). They sold like hot cakes. Both of us were very pleased with the sells. So now I'm working on filling orders (I don't like specified orders - I prefer free styling). Anyway here are a few of the styles that I've sold. My niece is always the willing model. Of course, she put an order in too.


Hopefully, after I get some rest (today I'm too tired to sew), I can get sewn garments finished.

Happy Sewing and Happy Holidays!
C

Monday, November 30, 2009

Adding A Little Black to the Wardrobe - M5530-A


Purple is the new neutral, and red is the new black. In my mind, there is always a need for several black garments in a lady's wardrobe. Black comes with many attractions: it's slimming, classic, elegant, and very versatile. This fall I'm incorporating several "black" garments into the wardrobe along with a few of those noted trends. Over the Thanksgiving weekend (I hope everyone had a grand Thanksgiving holiday.), I sewed this matching jacket for my dress (M5818).

This is the second time around for M5530. I made View C about two years ago.


This view is actually my favorite of the three jackets included in the pattern. It has a vintage look about it and the unique little bow at the necklace is super cute (to me of course).

The fabric: polyester from Hancock's.

The finished jacket looked similar to the jacket worn by the model. But at first glance, the sleeves looked dolman instead of in-set. The drawing, however, clearly shows them as in-set.

Nothing difficult about the instructions. I followed most of them as they were standard instructions for putting together a lined jacket.

I used a size 14, View A, with a few modifications/changes.
- Instead of top stitching along the front opening, I under stitched.
- Under stitched along the neckline as well.
- Used a contrasting fabric for collar -- slightly lighter in weight and has glossy finish.
- Made loop 1" smaller -- it looked better and helped form a better bow.
- FBA - No Sway back adjustment needed.
- Hem and lining -- followed my own method leaving a six inch opening in one of the sleeves (lining) so I could easily turn the jacket right side out after attaching the lining almost completely by machine, expect the lower front corners. I only hemmed where the seams joined to eliminate the appearance of hemming at the base of the jacket and sleeves. I copied this method from RTW.

My Flickr photo set is here.

Tuesday, November 24, 2009

Do You Shift or Sheath? - Part II V8555 and M5818


Several months ago I blogged several months ago the question: Do you shift or sheath? I received some really great comments from my fellow fashionistas. Personally I like both styles. As I reviewed the garments that I've made over the past three years, the majority of them have been dresses. My goal is to find best fit as I'm two different sizes on top.

Each of us have an unique body shape, but in general we can see how our unique body shape fits into one of the standardized silhouettes. Today while research all things dresses, I stumbled upon Nordstrom's Fit Fundamental videos. Four neat little videos about fit and style.

The Vogue sheath is one of my favorite silhouettes. The black shift is my second dress made from M5818 Palmer Pletsch pattern. This is a great simple classic dress that is versatile and easy to wear. For the fall version I wanted a simple black dress that I could dress up or down. It's made from a nice poly from Hancock's (formal wear section). No additional changes wear made.


Last summer I had planned to plan the jacket as well but didn't get around to it yet. (Still on the "To Sew List".) I'm matching this version up with M5530-View A.

My DD made the perfect necklace to wear with this version.


My reviews are on PR. More pictures are on Flickr.

Tuesday, November 17, 2009

Vacation and Sewing

It feels like it's been ages since I last blogged. Just before vacation time I couldn't seem to find time to blog post or read. Well I must say after being away, it's even harder getting back into it.

Last month's I vacationed (cruised) to the Bahamas. It was excellent! Four days and four nights is a good first cruise. This time in the Bahamas not much time on the beach, but plenty of time about Freeport and Nassau. Katrina (cousin) and I did a few tours during the days at port, and spent the evenings with the rest of the group. Loads of fun. Here are a some of the photos:


Me on the Queen's Stairs - Nassau

Tree Growing out of rock - Nassau


Tricey - Cruise Planner

The Ladies at airport in Florida

Marilyn - Tour Guide at the Groves - Freeport

Me at the Tree of Life - Freeport

Spider Plant in Gloom at the Groves - Freeport

Tilapia - Freeport

Katrina - Captain's Ball

Me and a few of the ladies - Captain's Ball

Trina - Miniature Golf - Hole in one

Me and Trina - Bottom of the Queen's Stairs - Nassau

Friends we meet on the tour - Nassau -Oops don't remember their names

Waterfall - Freeport
Beautiful sunset - Leaving Nassau


Resident - at the Grove Garden - Freeport


More picture on Flickr.

Sewing.., Of course..., It's mostly about the sewing. I've made two dresses, two pairs of pants and two skirts. Currently working on jackets for DD and coat for me. Will post my reviews and pictures soon. Finally, Minister Ross's husband sent me pictures of all of the robes that I've made for her. The first one (white and gold) made..., I'm thinking about twelve years ago. Not sure. Then I wasn't to keen on taking photos of completed projects.


This week off to the Abbey for some relaxing spa treatments. That's all for now.
C

Tuesday, October 13, 2009

Fall Projects Are Looming

First I would like to thank everyone for continuing to visit my blog. Lately I've been a little slow with posting and reading blogs. But will be making my rounds to the blogs of my favorite designers/sewists soon. Last night I finished the second (fifth) robe for Min. Ross. This will probably be the last commission of the year as I plan to make most of my Christmas gifts. I also want some time to sew for myself and DD.

On the table are two mini wardrobe garments both need to be hemmed and pressed. I'm hoping to finish at least one wardrobe before Thanksgiving and maybe two dresses for myself.

More on my pending projects later.

Happy Sewing!
C

Tuesday, October 6, 2009

Costume Pattern Transformed Into Clergy Robe S5386


Over the past several years, I have made several garments for Minister Ross. The commissions range from formal wear to clergy robes. In August her husband asked me to make two robes for her: one using the standard pattern Butterick 6844. He allowed me to express my creativity for the second one. ;-) For it I went on a hunt to find something a little different. As I searched the pattern books at JoAnn, I stumbled upon this costume pattern S5386.

Pattern Description: Men's and Teens' Duster. I transformed this pattern into a clergy robe.

Pattern Sizing: Sizes from XS to XL

Did it look like the photo/drawing on the pattern envelope once you were done sewing with it? Yes and No. The style lines of the duster are the same. I did make some changes using contrasting fabric and some in the construction of the garment.

Were the instructions easy to follow? Yes. But again I didn't follow them exactly. All changes construction and design are below.

What did you particularly like or dislike about the pattern? Everything. It was perfect for the project. The design resembled a basic priest robe.

Fabric Used: polyester crepe and jacquard royal blue on royal blued with cross motif.

Pattern Alterations or any design changes you made:
- Underlined from the neckline to the waist.
- Used contrasting fabric for the sleeves, outer collar, gun flaps, back yoke, front and back facings.


- Sew on snaps instead of Velcro for front closure.
- Reverse the closure (right front side over the left front).
- lined the gun flaps instead of forming a narrow hem around the outer edges.


- Under stitched the upper edge of the collar and front facing instead of top stitching them.

Would you sew it again? Would you recommend it to others? Yes. Minister Ross would like another robe made from the pattern.

Conclusion: This costume pattern was easy to sew even with the many changes made to transform it into a clergy robe. This is a very well drafted pattern. The pieces went together easily. An advanced beginner should be able to sew it without any problems.


My Flickr set on this project.

Monday, October 5, 2009

Kreativ Blogger Award 2009


Thanks to three lovely ladies, I have been nominated three times for the Kreativ Blogger Award. Josie, Trudy, and Ivalyn all thought me worthy. Of course, I need to tell seven things about myself. Hmmm.., I think I've shared quite a bit already. Maybe some of the new bloggers will say, "Oh I didn't know that." lol Also, I have to nominate seven other bloggers. Now that will be hard. Most of the crafty ladies have already been nominated. So hear goes:


Spottedroo
Stitch and Snitch
JTS Closet
Allisonc C Sewing Gallery
Faye's Sewing Adventure
Krustallos
Kbenco


These are just a few of the creative blogs that I follow. There are so many, many that have been nominated already. So consider this my short list.

Seven things about me..., What can I say that I haven't say before; I guess I could talk about current things:

-Going on a cruise pretty soon. Didn't make anything new to take with. Decided to finish client projects to free up my time and make a little cash. I've travelled a bit, but this is my first cruise and I'm so excited.

-Started sewing DD's wardrobe.

-Making three coats for me this fall/winter.

-Seriously thinking about going back to school. Also want to take a course or two at the neighborhood tailoring school. Can't until next year. I enjoy structured learning.

-Planning to create a line of accessories to sell.

-Planning to make most of my Christmas gift this year.

-This week I will complete my certification for non-linearing editing (CanTV). I'm one of the co-producer for the media services auxiliary at my church.

That's it for now. Happy sewing!
C

Tuesday, September 29, 2009

Update! It's Been A While

It's been a while since I've blogged. I'm not short on material, just short of time. Lots of things happening: church, work, and sewing(life in general). Last week was our Annual Men and Women's Unity Conference. And to sum it all up in one word: "Excellent". So I took a few days off. The media crew was expected to be at church for the duration. To top that I'm taking a non-linear editing course at CAN TV every Monday from 5:35 to 9:30 pm. It's fun, but exhausting. Work: playing catch up and major testing of two new upgrades to one of our servers. Argh!! Now the good stuff: sewing..., lots of projects under way (DD and me). But I'm currently working on two clergy robes for a regular client. This will be the forth and fifth robe that I have made for her. Here are a few shots of one of them.

Inside front. I used the "cross" fabric for the front facing. It's underlined to the waistline.

Back view. I like the look of the print from the collar to the yoke.

Back Vent. I only have the set the shoulder pads, sew on the snaps, hem and press. Then finish the second robe.


Also, sharing and teaching the gift of sewing with my DD and niece. Saturday before last we had a four hours sewing lesson. The young ladies were thrilled and did learn how to sew thread the sewing machine, sew a straight stitch, sew the zig zag stitch, and make button holes. At the end of the session, each had made traveler shoe bags.


Last week Trudy Callan and Ivalyn Actie nominated me for the Kreativ blogger award. Thanks ladies. I'll post my nominees soon. I'm playing catch up with blog reading and posting.

Happy Sewing!
Cennetta

Friday, September 18, 2009

Fitting V8555 and V8594

Not much sewing going on this week. We are in the middle of our Unity Conference at church. So at most, I thinking about the fall wardrobe for myself and DD.

Last week, I was able to fit the bodice of two dresses for myself. One was supoosed to be my birthday dress (to wear Sunday). I don't think it's going to happen. But at least I was able to got most of the fitting done. Both are sheaths. A sheath that is very appealing to me and seems to be a good match for my body type.

Here are both back views of the muslin for both dresses. I cut V8555 at size 14 with a small adjust to the front bodice hoping to compensate for the bust area. It's still a little snug. There is a slight gap about three inches from the center back of the neckline. So further adjustment is needed. V8594 was cut at size 16 with no changes. As you can see there is a lot of move across the back. At the neckline I could increase the seam allowance for a better fit. Across the lower back I need a sway back adjustment. May be increase the side seam allowance a little bit.


Now for the front. V8555 (too much information) omitted. But I can say it's a little too snug. (lol). V8594 gaps at the neckline and is too large through the bodice. However, the upper bodice need to be length to make the horizontal seam hit in the right place where the lower front bodice in joined.


Here are the adjustment made so far.

V8555 - Removed the gap by folding out the excess and rotating the difference to the dart. Increasing the shoulder, armhole and side.

V8555- Increasing the shoulder, armhole, and side. Previously cut to include a FBA. Will also add about 5/8" to the neckline for modesty.
V8555 - Increase width of the midriff.

V8594 - Here I added the length needed to the upper bodice. I didn't address the slight gap in the neckline. I think if I reduce the shoulder seam to a size 14 that will solve that problem. Also there needed to be a slight reduction along the armhole and side.
V8594 - Sway back adjustment. The neckline through the shoulder blade area needs to be adjustment as well.
There is still a little work needed on fitting the muslin. May be this weekend I'll have time to work on it. We will see.

Happy Sewing!
C

LinkWithin

Blog Widget by LinkWithin