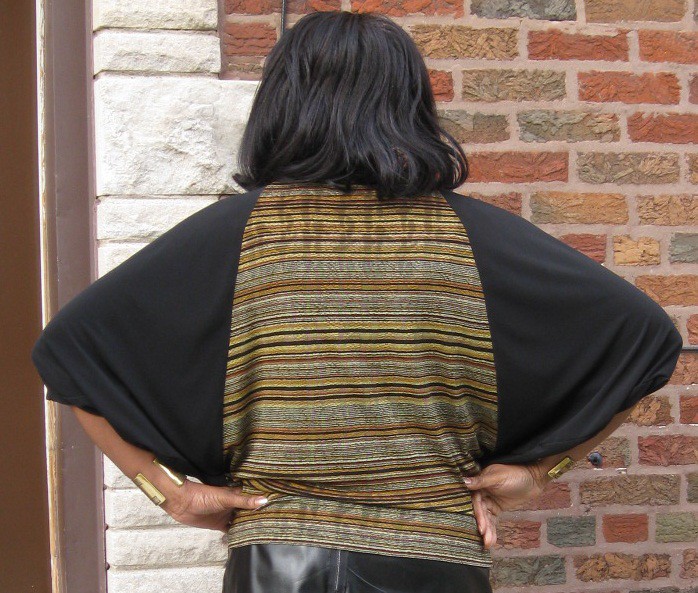
Last Friday, I made my second Sandra Betzina Butterfly top. This time using knit fabric. Before cutting it out, I readjusted the pattern by eliminating all of the changes made for the previous woven version.
This time around it sew up even quicker with no zipper to install. I used two fabrics: the print is from Vogue and the Black Lux Jersey is from Supreme Novelty Fabrics.
Many of my Chicago sewing friends frequently shop at Supreme Novelty Fabrics, but three weeks ago was my first time. It's only 5 minutes away from the job. I went looking for a nice knit for a Haute Couture Club Blue Challenge dress. And of course, I found a few more fabrics to buy. Good I was on my lunch break and needed to get back to work within an hour. So the damage to my pocket was minimum. Lol
Okay, back to the review..,
This top is described as a loose-fitting, pullover top has bias neck band, front sleeve
overlapping back sleeve forming shoulder opening, no shoulder seams and
narrow hems.
I still like it for the reasons mentioned in the previous review. It's stylish and comfortable. I drafted a little skirt with a narrow black side panel to wear with it. The two garments aren't so hot together but worn with other separates they look fine.
I plan to make some faux leather/knit skinny pant to wear with this new top. But in the meantime, I can pair it with jeans or my faux leather skirt (Burda 7303).
This is a great top to add to your wardrobe. You can dress it up or down, and it is easy to sew.
For Christmas I decided to make my daughter I few new dresses. I also wanted to sew a simple knit dress to help her learn to
fit and sew garments for herself. I chose Simplicity 2054 because it is
very simple and gives options to make a crew or turtleneck top.
I
started with making the usual adjustments for my daughter. There are
three basic adjustments: pigeon chest, sway back, and decrease width
across the center back.
Simplicity describes this
pattern as a Misses' knit dress with a cowl collar.
It comes in sizes 6 to 22. I used size 10 with modifications.
I
changed the style of the dress. It was a loose fit. For the fabric I
selected, the loose fit would not work. So my version, didn't
exactly look like the picture or drawing.
I only looked
at the instructions to be able to comment on them in this review. They
were typical and straight forward. Nothing confusing about them.
There
are a few reasons why I selected this pattern. The first is I liked
that it was simple. The fabric that I chose is the "speaker" in this
garment. So a simple pattern worked best. The second reason was to
alter a pattern for DD that she could try to make it for herself.
Throughout the adjustment phase of the process, I told her why I made
the adjustments. I also talked a little about the sewing process. I'm
sure I'll have to give her another lesson when she is ready to try it on
her own. And the third and final reason why I selected this particular
pattern is because it can serve as a great sloper for future garments
of a similar style. It can also be used to make t-shirts and
turtlenecks.
The navy fabric was purchased at Stone
Mountain and Daughter (San Francisco). It's a medium weight knit with
raised waves running crosswise. It has about 30 percent stretch and was
very easy to sew.
The first adjustment I made was to the
front dress. DD's upper chest is slightly rounded, like a bird. Her RTW
tops and dresses pull across the shoulders and upper arm. Vogue Sewing
describes this alteration as a pigeon chest adjustment. I made the
horizontal slash a few inches below the armhole, to give her a
little more room across the bust area. Then I made a vertical slash up
to the shoulder seam then spread the pattern as needed. This adjustment
increases the length of the side seam of the front. I just eased the
difference in above the notch. No dart needed.
The next
adjustments are to the back. I started with the sway back adjustment.
It's a small one, which consists of a horizontal tuck across the lower
back. I think because DD's chest protrudes, her center back is slightly
concave. So I have to make a vertical tuck within the neckline curve
of the back of the pattern. This adjustment removes the pooling that
occurs. The tuck is only needed for the back area. So I have to add to
the sides to make sure there is enough ease/room in the hip area. This is
usually done as I cut. For this dress I didn't add to the side seams. There was enough ease built into the pattern.
After I cut
the front and back dress out, I pin fit it to see how the dress would
fit and look on DD. It was shapeless, like a sack. So I created shape. I pinned
the silhouette I envisioned. Then I used tailor chalk to mark the
stitching line on both sides of the dress (wrong side of the fabric).
After that was done, sewing it together was a piece of cake.
We will probably use this pattern over and over. It's a great sloper for other garments and we can modify it to make tops.
Today was the last day of class for me. I'm very pleased with how
well I've transitioned back into school. But I'm glad I can relax and enjoy sewing a little more.
This
morning, I realized I didn't wish my devoted readers a Happy
Thanksgiving. I hope you had a great feast with your family and
friends.
It's Christmas time again. This is my
favorite times of the year. Most people seem to be happier and full of
cheer during this holiday season. I'm looking forward to spending more
time with my family and friends.
Over
the past few
weeks, I've been thinking about making things, all sorts of things; things
to wear, things to sell, and things to teach other people
who want to learn more about sewing. Although, school has consumed a
great deal of my time, I've managed to continue to teach a little and to
sew a few garments. My productivity is very low compared to
last year. But that's okay. I was blessed to attend two sewing retreats
this year, which is awesome. It gave me many
opportunities to develop new skills and techniques. I hope to set
some new goals next month to take full advantage of the knowledge I've
gained over the past several months.
The Haute Couture
Club of Chicago Fashion Show is fast approaching (May, 2012). I'm excited about the
event and hope to make something special. The next challenge is the
Embellished Coat. I haven't a clue as to what I will make for it. We
will see..
Well enough chatter for now. I'll start reviewing the garments that I made during October and November.
Last summer I made two pairs of "Fancy Pants". But I still not satisfied. For months I have searched for more ideas. Pinterest is the major source of my recent search for wearable "Fancy Pants". Caution, some are more "run way" than "real way". So here goes!
Now comes the hard part deciding which will be my prime source for my next pair of fancy pants.
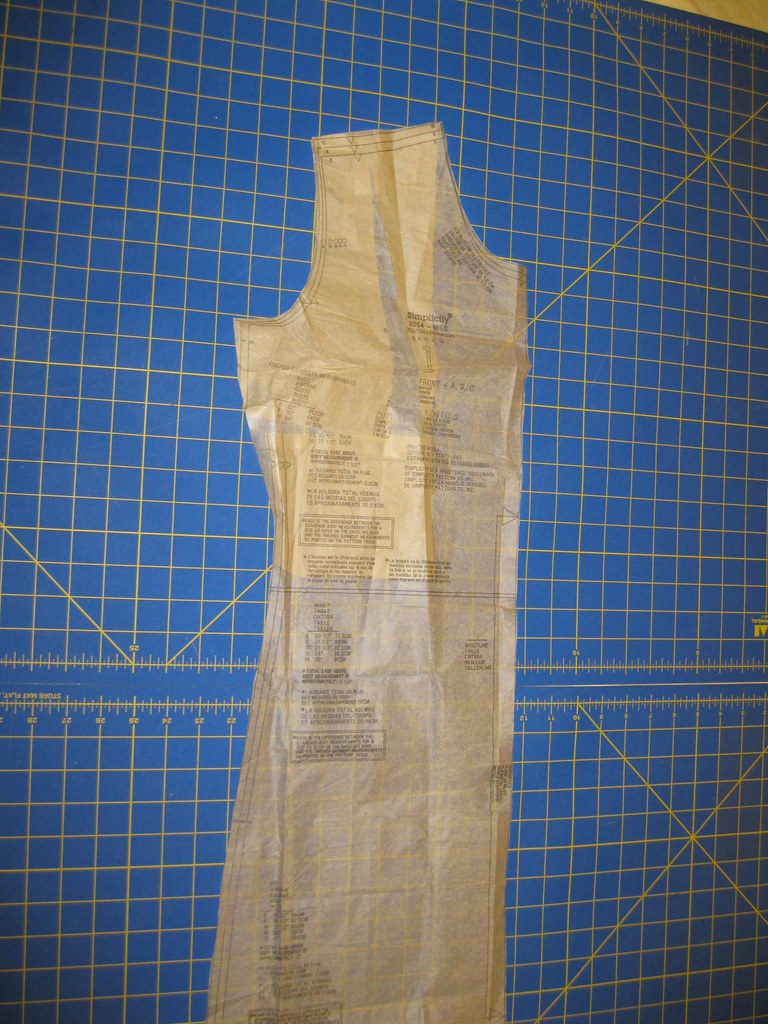
One of my biggest fitting challenges is the sway back adjustment. I have tried adding darts and folding out were the pooling occurs. Sometimes it works and other times it doesn't. I've tried using the method of making the horizontal tuck with placing the center back on the fold. That doesn't completely resolve the issue.
A few years ago, Pati Palmer noticed that one of my hips was slightly higher than the other and gave me some advice on how to fit my pants (M5818) better. After an spinal x-ray two years ago, I learned that I have slight scoliosis in my lower back. This discovery supported Pati's observation. So of course, when I went to the Palmer/Pletsch fit workshop, I planned to learn more about addressing my back fitting issues.
Because of the curve, the level of adjustment is slightly different for each side. This is probably no surprise. I think most of us are larger on one side of our bodies.
I decided to try a different approach for the sway back adjustment. It's easiest to make the adjustment if the back has a center seam. This allows me to scoop out access at the lower, center back as well as make a horizontal tuck across the lower back. I also have the option of making two backs to address the differences between my left and right side.
When making the horizontal tucks, I noticed that the back hem along the center is shorter than the rest of the garment by the amount of the tuck. This amount needs to be added back into the garment either in the hip or at the hem. I haven't figured out the best place to add this for a top, jacket, or dress. Recommendations are welcomed.
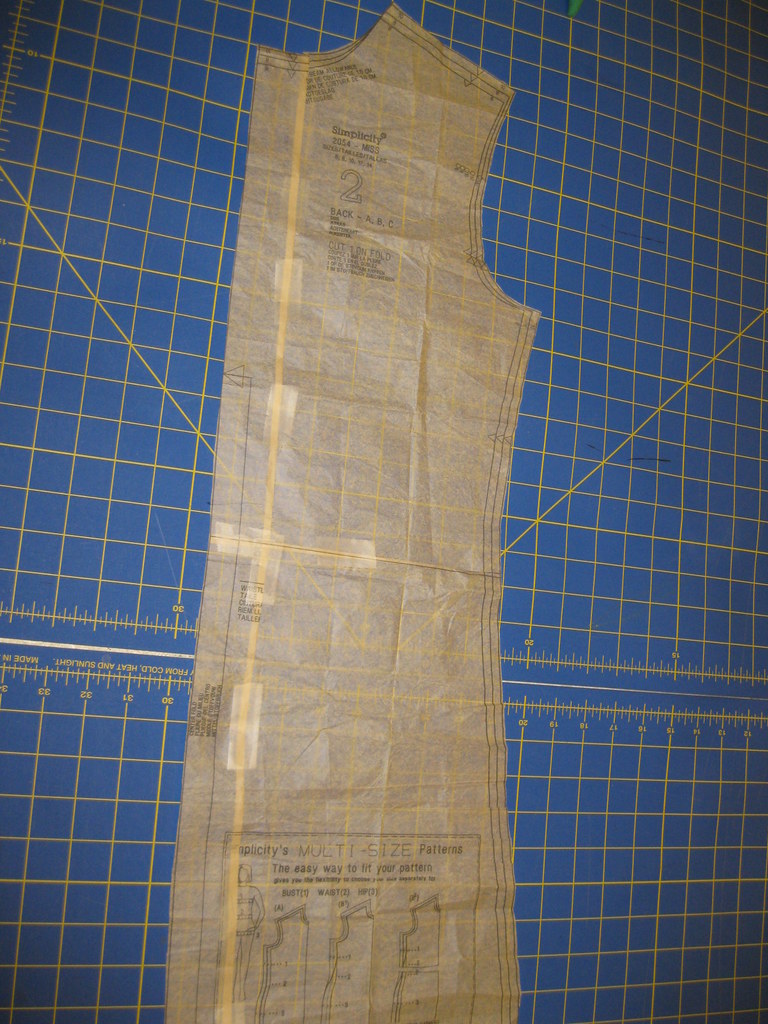
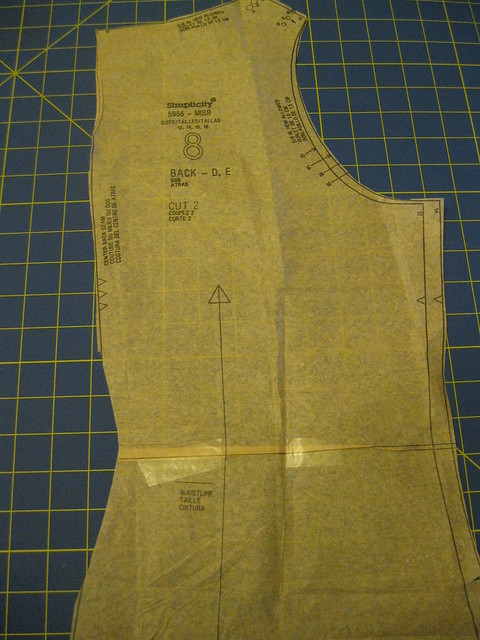
The type of garments where the sway back fitting is the biggest challenge are in knit tops and dresses that do not have a horizontal seam at the waist. I made Simplicity 5956 several times. Last year I tried this adjustment and it was nearly perfect. I had added the tucked length to the hemline where needed. This method was also used in the two versions I made this year.
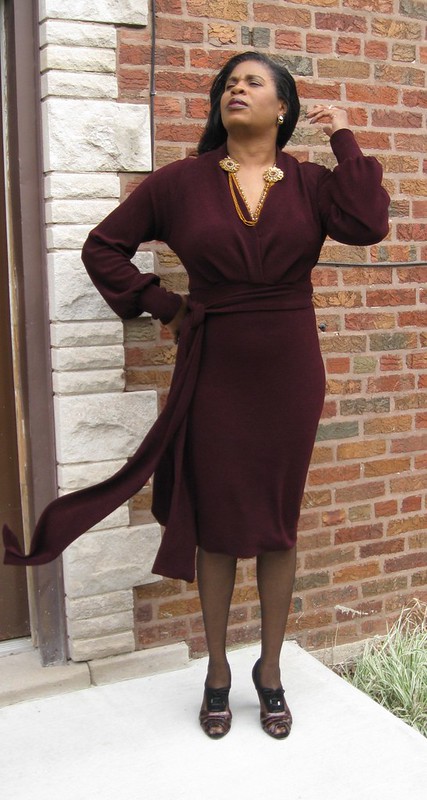
Last month, I made a wearable muslin of Sandra Betzina's Vogue 1197. Pictured at the top of this post. This top does not have a center back seam. I created one. I think the adjustment worked. I also think I will use this approach more often to get a better fit across the sway in my back.
What are your thoughts on sway back adjustments? Do you have issues with fitting your back? Have you found a way to successfully alter your garments for your back fitting issues? Please share.
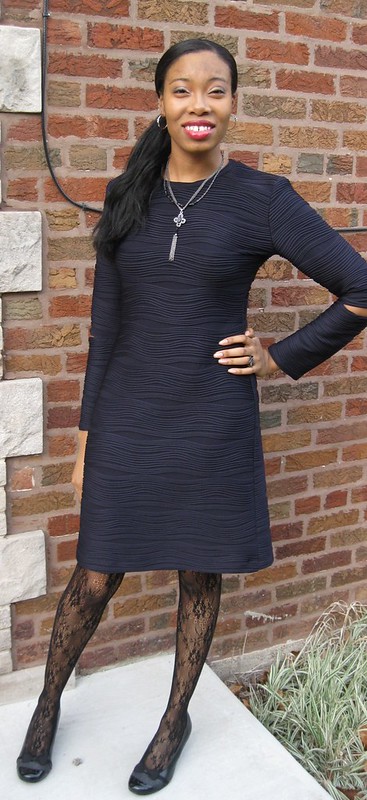
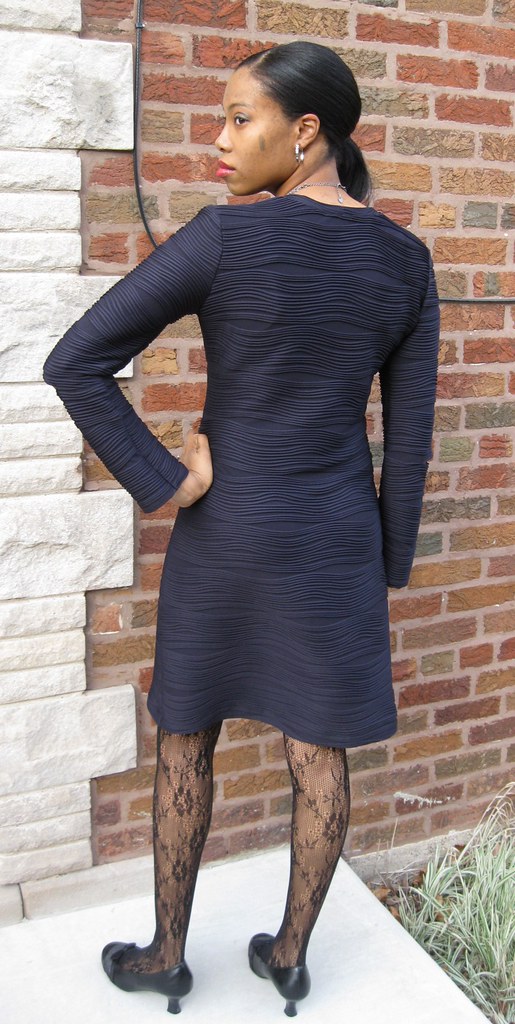
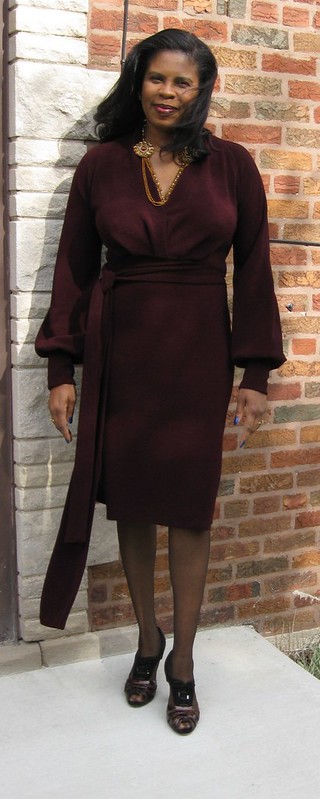
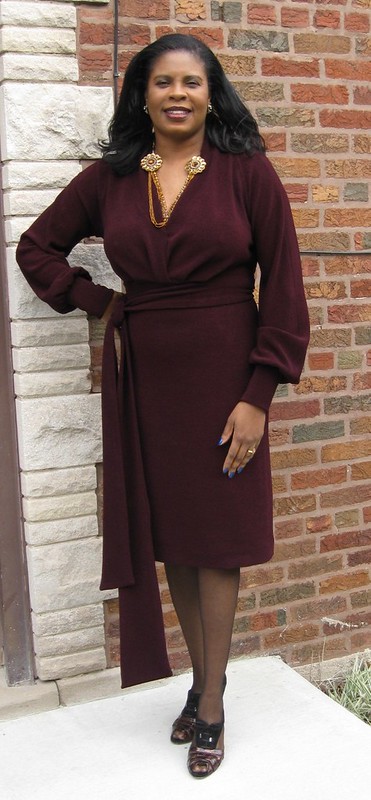
This is a quick save from by last dress disappointment. This dress literally sewed up in a few hours. And I'm happy with the results. It was 70 degrees and windy on Sunday morning, but we were able to get a few deceit photos.
Pattern Description:
MISSES' TUNIC, DRESS AND PANTS: Pullover tunic or dress has front extending into back collar, fitted, front pleated bodice, raised waist, tie ends, two-piece sleeves with barrel cuffs, and stitched hem. Fitted, straight-legged pants (below waist) have elastic waist.
Pattern Sizing:
8 to 24; I used a 16 with modifications. But here again I could have used 14.
Did it look like the photo/drawing on the pattern envelope once you were done sewing with it?
Yes it did.
Were the instructions easy to follow?
A piece of cake. I barely looked at them. The only problem a beginner may have is at the neck and shoulder seams. But if you properly mark the circles and sew it precisely as instructed, you will be okay.
What did you particularly like or dislike about the pattern?
There are several things I liked about this pattern. There are:
- pleated bodice
- cut on sleeve with barrel cuffs
- Tie to create a more attractive waistline.
- Center back seam with darts so I could easily address my sway back adjustments
No dislikes.
Fabric Used:
I got this knit from Vogue on Roosevelt Rd. It was on the novelty knits table for $4.99 per yard. It's a medium weight poly knit with two way stretch. The feel is kind of spongy, but a soft hand. The texture has a crepey, pebble affect.
Pattern alterations or any design changes you made:
I thought I could minimize the adjustments if I used size 16. I did make a 1" FBA and rotated the dart to the pleats at the waist. At the center back seam I sewed the bottom half seam at 7/8". I also sewed 7/8" waist seam. At the neckline, I didn't finish the seam as recommended. The fabric was too bulky. So I just joint the upper edge of the collar across the back of the neck. Also, I didn't double seam any of the seams. I pressed open most of them. I serged the cuffs to the sleeves and I serged the neckline and hem. I also had to sew the seam and lower arm seams at 1" because the dress was too big along the sides. The barrel cuffs were also to big. So I sewed them with a 1" seam allowance. This time I didn't add any length to the skirt. I didn't mind if it was slightly shorter than pictured on the envelope.
Would you sew it again? Would you recommend it to others?
Probably not. I really like this dress, but one is enough. There are at least 20 dress patterns I'd like to try this winter. I may sew the pants though. Yes I would recommend this pattern. It sews up quickly and is a attractive silhouette.
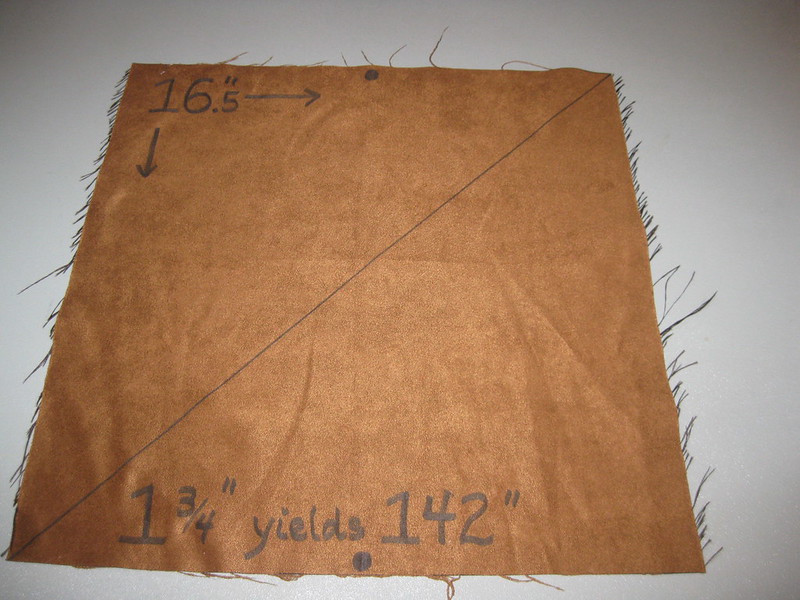
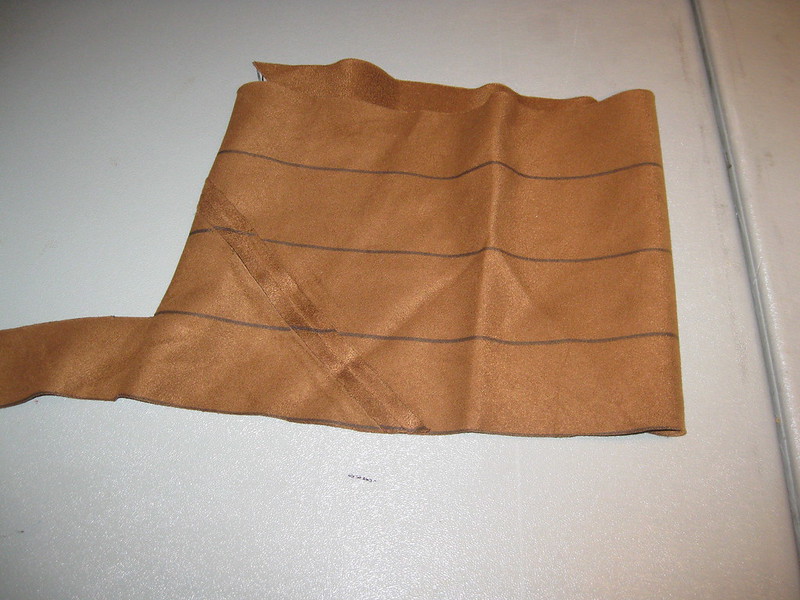
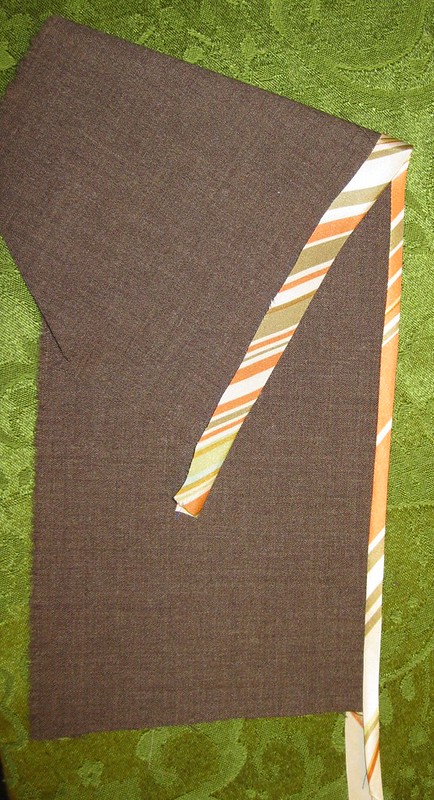
Today I'd like to share a small tutorial on making your own bias tape. It can be used to finish seams, to bind exposed raw edges, at hem lines on sleeves, dresses and skirts. Making your own increases the your option for fabric selection and width of the binding.
Ron Collins demonstrated how at the Power Sewing Retreat. And he bought many of his garments where he used bias tape to finish the seams and/or to add interest or uniqueness to his garment. Of course, we all want that.
Here's how:
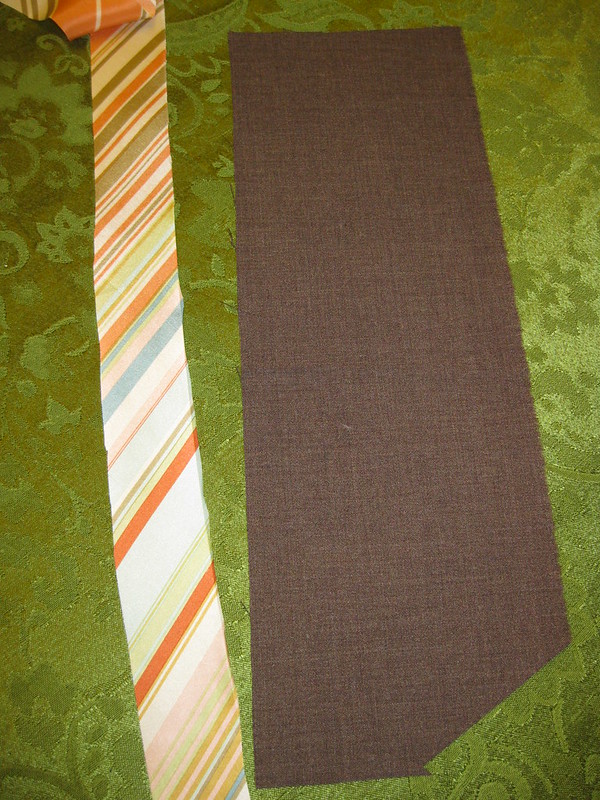
1. Cut a square 16.5” by 16.5”. This will Cut a square 16.5” by 16.5”. This will make 1 ¾” bias tape yields 142”.
2. Draw a diagonal line from one corner to the other.
3. Place a dot in the center of the top and bottom edges.
4. Cut along the diagonal line to make two pieces of fabric.
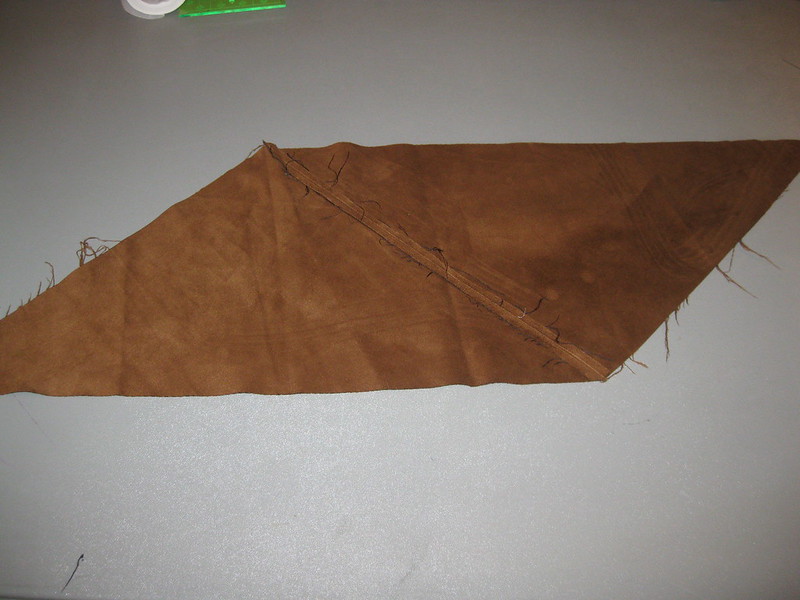
5. Join the two pieces of fabric so the dot are aligned. See the next slide.
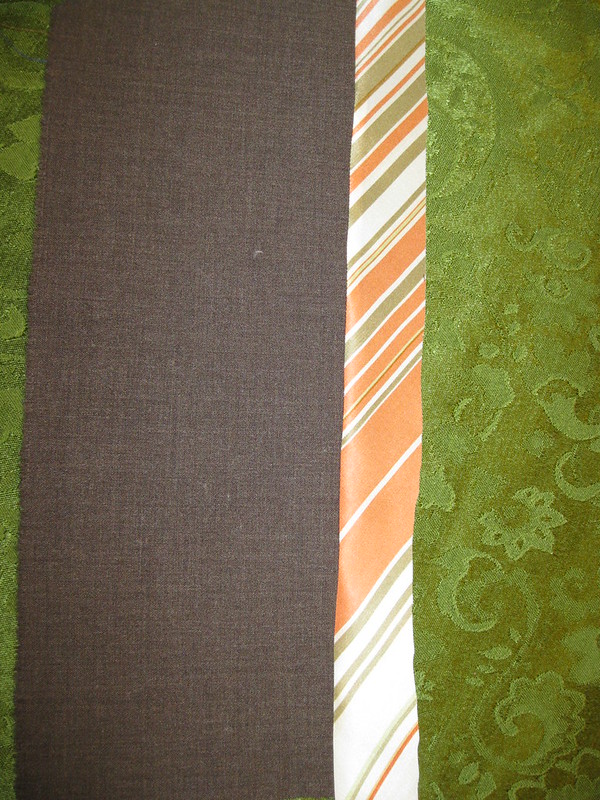
6. Press open seam.
7. From the right side it should look like this.
8. Now, on the wrong side of the fabric, draw lines 1 ¾” apart.
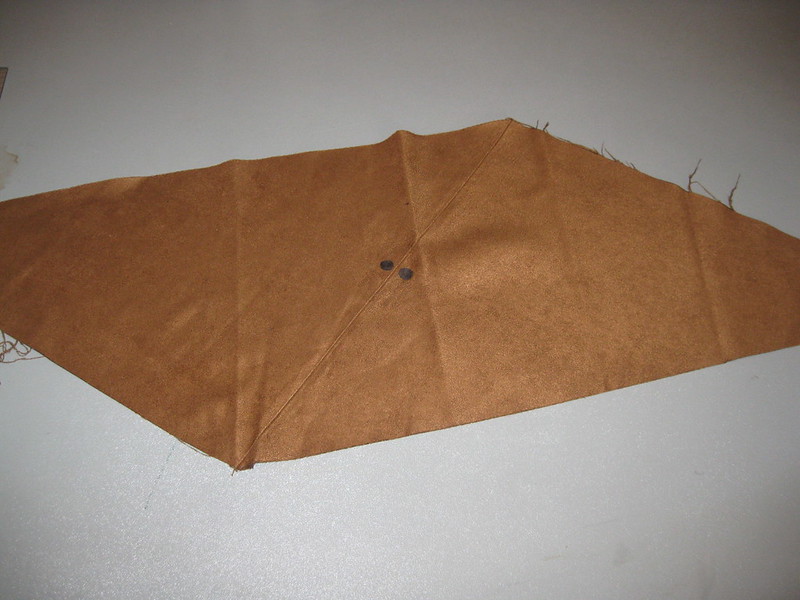
9. Join ends lining up the cutting lines.
10. Cut along line to create the bias tape.
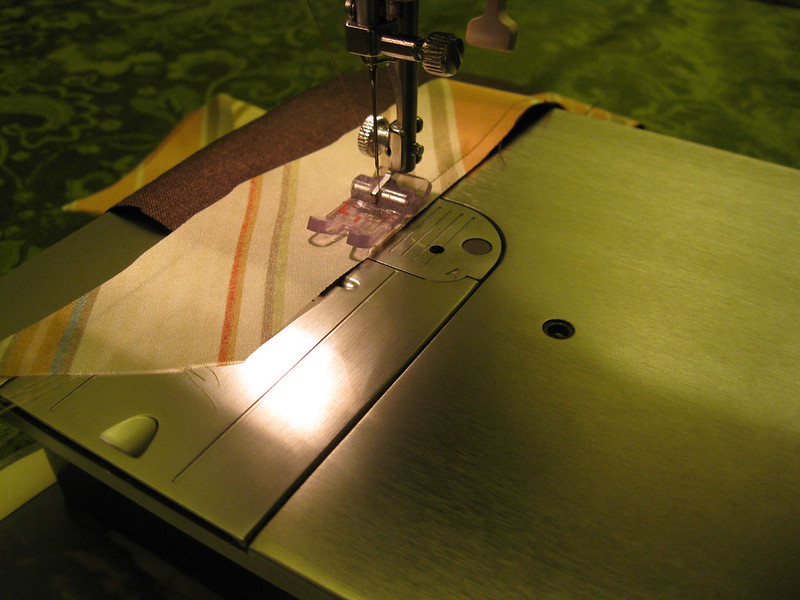
11. Now sew the bias tape to the edge of the seam allowance (about 1/4” seam allowance)
11a. I used the edge of the foot as a guide to measure the width of the seam allowance.
12. Press with seam allowance against the bias tape.
13. Wrap bias tape around the seam allowance.
14. Top stitch the bias tape from the right side of the fabric
The bias tape can be applied before or after the seams of the garment are sewn.
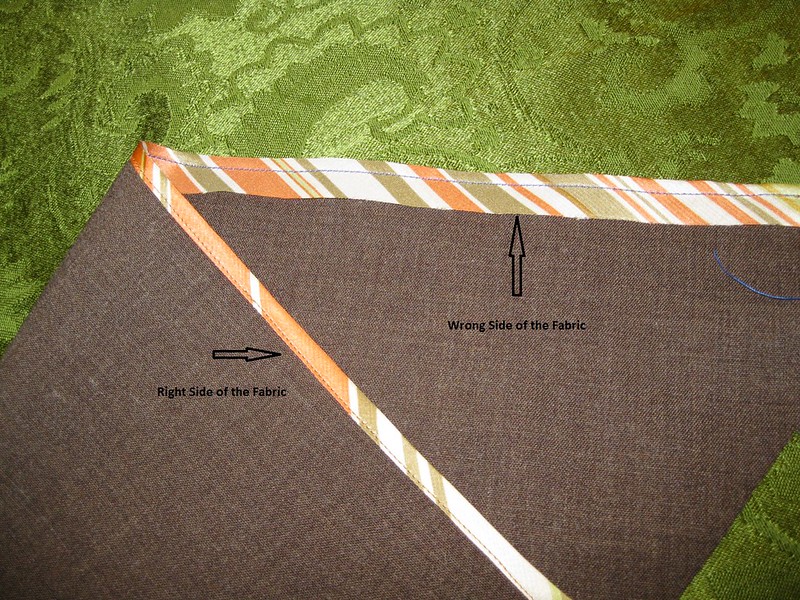
This illustration shows the wrong and right sides of the fabric. The binding from the wrong side has the raw edges exposed. We can trim the excess off or you can fold in the raw edges using a bias tape maker.
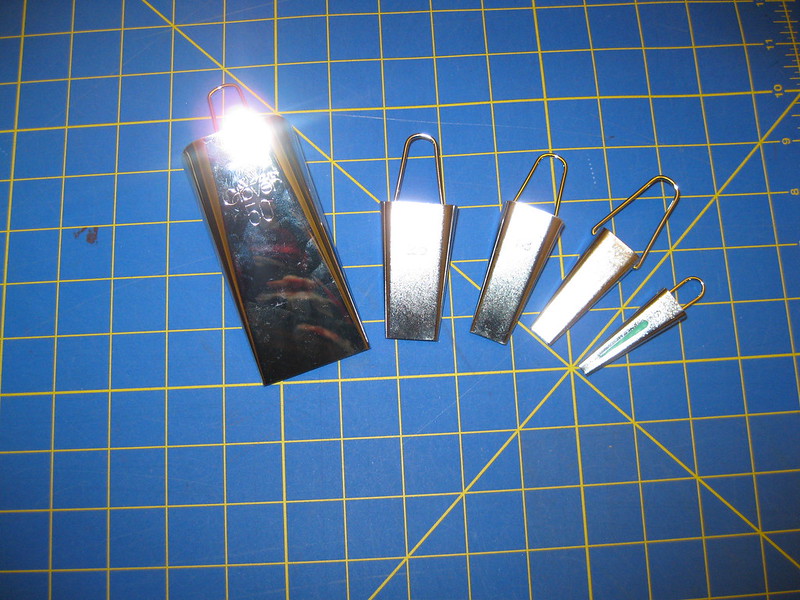
I purchased a set of bias tape makers on eBay a few years ago. The sizes are: 50, 25, 18, 12, and 6. These can make a variety of sized tape for binding seams and making trim.
Simply thread the fabric through the largest opening. Slowly through the fabric through the other end while pressing. It's fast and easy.
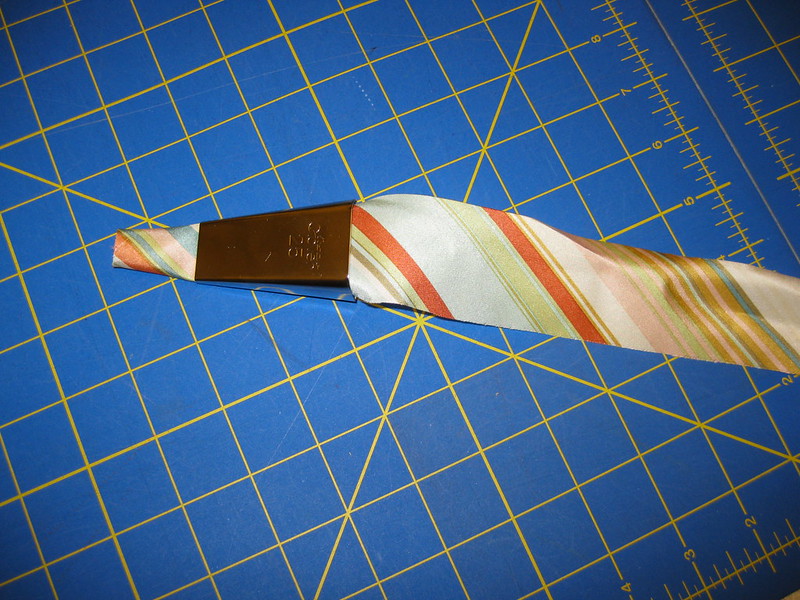
Bias tape made using 18 BT maker. I folded it in half to apply to the raw edge of a seam.
I love the finishing of this unlined jacket made by Ron Collins (Power Sewing Retreat 2012).
Have you ever selected a pattern that was so you and you just had to make it? You make your usual pattern adjustments, every detail perfectly ... but then.., You knew this was coming.
But then.., after pulling it all together. It just didn't work for you. Something went wrong. Maybe a lot did.
Usually, I don't like to blog about projects that went wrong.
Most of the time, I can attribute the "wrong" to myself. Such is the case with Butterick 5707. I started this project several weeks ago. I made my usual pattern adjustments. I didn't make a muslin. My bad. The muslin would have saved me from the dissatisfaction I feel today.
Why did this project fail? A few things. Here's the complete review.
Pattern Description:
MISSES'DRESS AND BELT: Dress has bias yoke and sleeve cut-in-one, shoulder pleat forming neckline drape, fitted bodice, gathered/darted waist, semi-fitted skirt, side zipper and self belt. A: self tie and sleeve darts.
Pattern Sizing:
6 to 22; I used size 16 instead of my usual 14. First, mistake.
Recommended Fabric
Crepes, Cotton, Linen, Woolens.
Unsuitable for obvious diagonals.
Did it look like the photo/drawing on the pattern envelope once you were done sewing with it?
Yes and no. My fabric is crisper then the recommended fabrics. That could be mistake number 2.
Were the instructions easy to follow?
Easy, nothing difficult.
What did you particularly like or dislike about the pattern?
Let's start with the likes.
- Style of the dress; the vintage look. I've seen similar styles worn by actresses in classic movies aired on TCM.
- The darted sleeves.
- Bodice options.
- The self belt.
Now the dislikes:
- The gathers along the waist. Not a good look for me.
- The skirt was too full at the bottom.
- The roominess of the bodice; it looked too big and too wrinkled.
- This one is on me. Poor hemming. I can easily redo.
Fabric Used:
I used silk dupioni. I underlined it with china silk.
Pattern alterations or any design changes you made:
I made a few in additional to my regular fitting adjustments in hopes of making the dress likeable.
- FBA
- Prominent Shoulder blades
- I hated the gathering at the bottom of the bodice. So I made two darts on either side matching them with the darts on the skirt. This helped but didn't completely resolve the fullness issue in the upper portion of the dress.
- I slightly tapered the skirt mid hip to the hem and added a slit to one side. In the end, my hem wasn't good. This can be fixed as well.
Would you sew it again? Would you recommend it to others?
I won't sew it again. Right now, I'm only thinking of making some adjustments to see if I can salvage the dress. I want it to work. This was suppose to be my contribution to the Haute Couture Blue Challenge for the 2013 Fashion Show. I need it to be as close to perfect as I can get it. I do have an alternate dress though.
I would recommend it to others simply because I can't legitimately say this pattern doesn't work because it was poorly drafted. But I do recommend that you make a muslin first.
Conclusion: Try it if you like. Make a muslin before you cut into your fashion fabric. Make sure the style and fit are perfect for you. I still like this silhouette, except for the fullness of the skirt. Finally, I'm still smiling and hopeful that I can save this dress.
I
wanted to take some time to talk about books written by Sandra
Betzina. This first one is the updated edition of her Fabric Savvy
guide for selecting and sewing fabric. This time it's titled, "More
Fabric Savvy". The book provides exactly what's indicated on the cover,
a quick resource guide to selecting and sewing fabric. The book
includes a brief introduction followed
by a list of 101 different fabrics, glossaries, more helpful tips for
handling fabrics, sources, and index.
It is a handy hard cover
book with spiral binding so the book lays flat on the table for hands
free reading. The pages are nice light weight card shock that can
withstand tons of page
turning.
I really like how the book is organized. The fabrics
are listed in alphabetical order with two pages of content devoted to
each one. Each section includes facts about the fabric, what it's
suitable for, and sewing tips. Tips for working with the fabric include
recommendations for preshrinking, marking and cutting, interfacing
selection, the best thread and needles to use, stitching guides, seam
finishings, pressing, and hems. A photograph of a garment made from
each fabric type is included on the fabric fact page to provide a clear
illustration of how the fabric can be used.
You can purchase the book on the Power Sewing website for the reasonable price of
$24.95. I highly recommend this book. The holiday season is upon us and
this would be a nice stocking stuffer for yourself or for your crafty
sewing
friends.
Parting Shots:
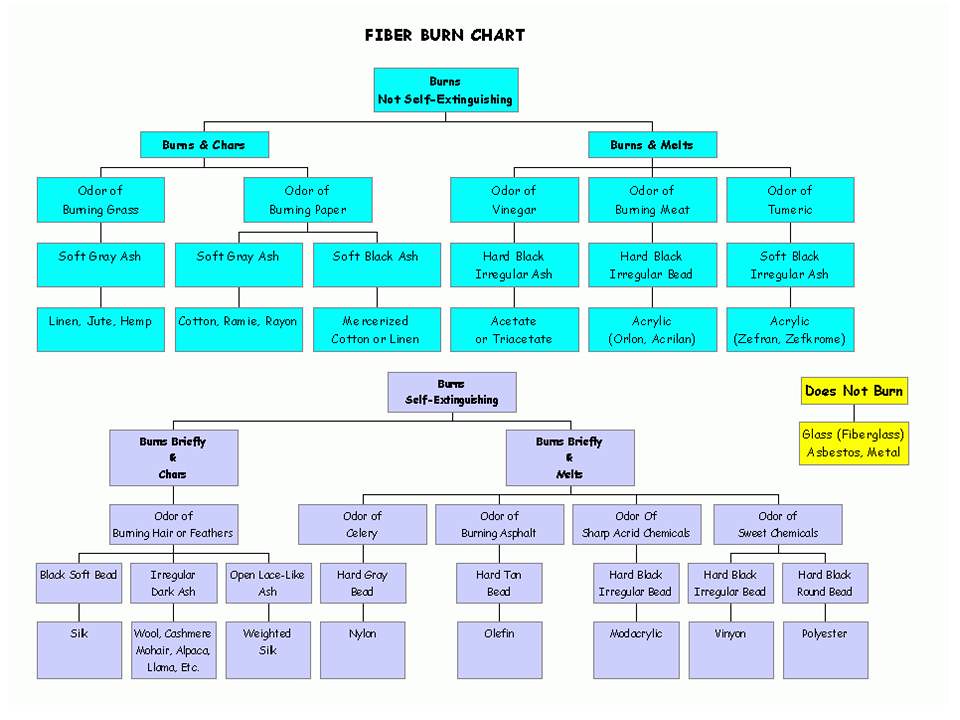
Ron Collins at the September 2012 Power Sewing Retreat demonstrating how to do a burn test.
Also
below is a quick reference sheet for determining fabric fiber content
using the burn test. Caution: hold fabric with tweezers and have a cup
of water to extinguish the flame when conducting your burn test.