Friday, December 31, 2010

Christmas Holiday Sewing - Pt V Mad About Plaid


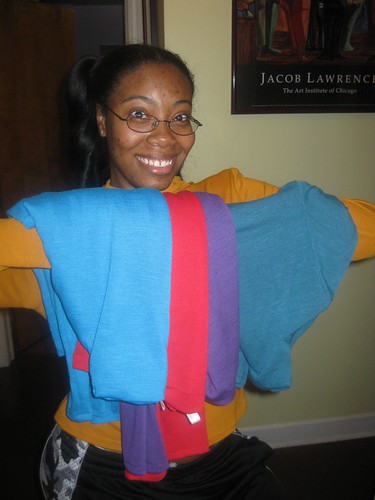
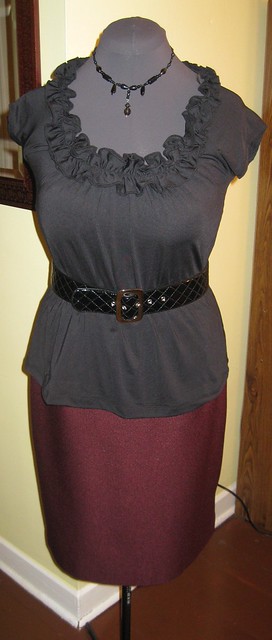
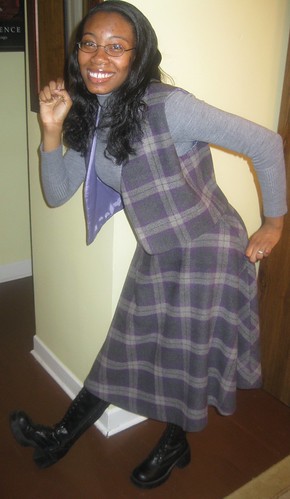
This is the review of my Holiday sewing. This is an easy one. Two Simplicity patterns 2758 and 2310, one outfit. DD and I decided to do a few zany pictures for this review.

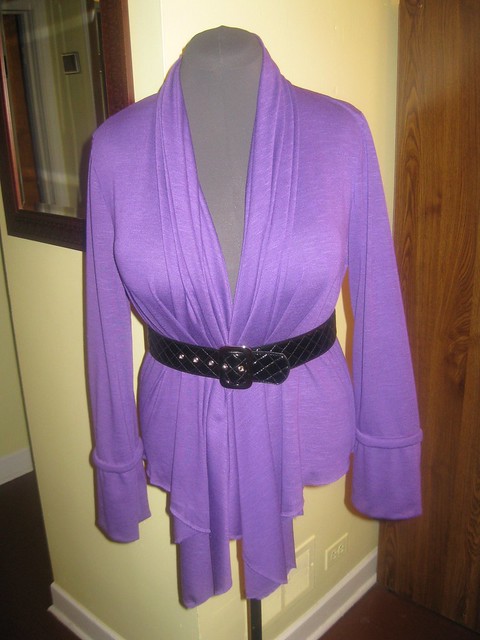
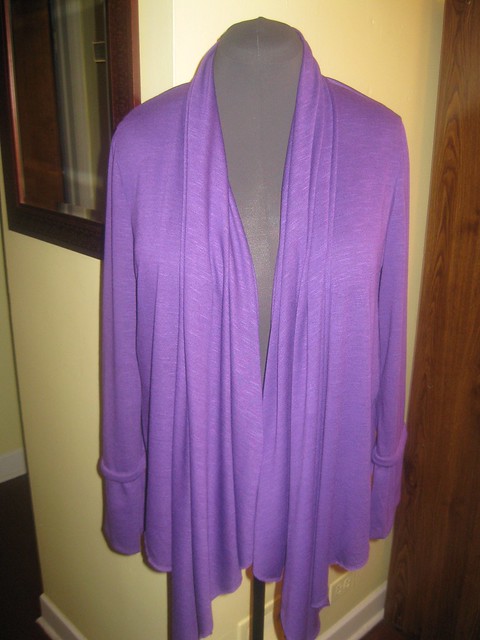
Pattern Description: Vest (2310) Misses' tunic, tie belt and vest. Skirt (2758) Misses' pleated skirt in two lengths, half circle skirt and shirt.

Pattern Sizing: 6- 20. I used 10/12

Did it look like the photo/drawing on the pattern envelope once you were done sewing with it? The vest did. I omitted the pockets and length the skirt.

Were the instructions easy to follow? Yes, No problems.

What did you particularly like or dislike about the pattern? Both patterns selected by DD. For me - The vest is a little too boxy.

Fabric Used: Wool blend from Hancock.

Pattern alterations or any design changes you made:
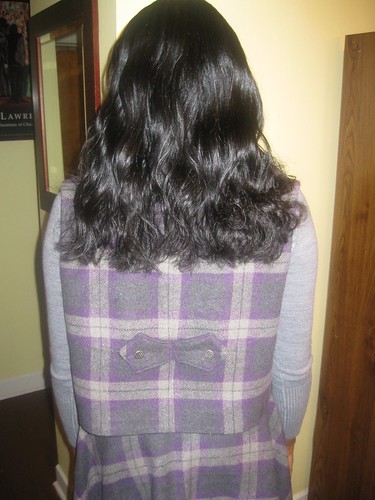
- No changes to the vest.


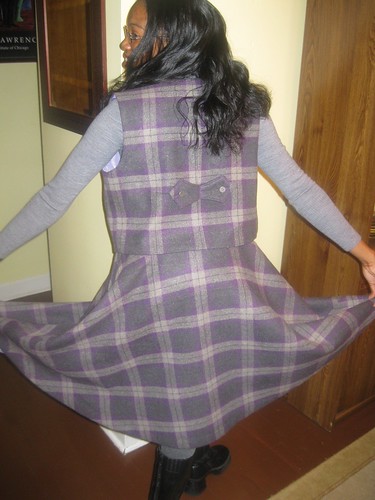
- Omitted the pockets on skirt
- Length the skirt
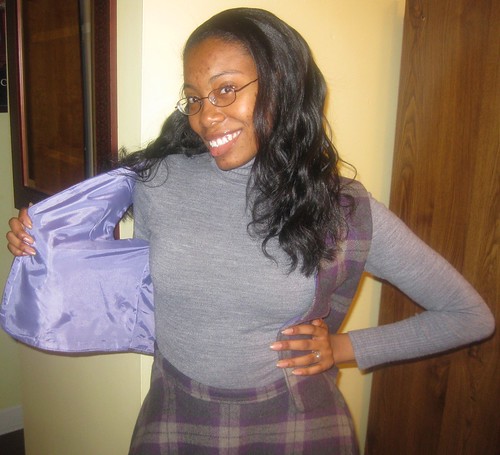
- Added lining to the skirt

Would you sew it again? Would you recommend it to others? Yes and yes.

Conclusion: Both patterns were quite easy to sew. A beginner could sew them with no problems.


Okay, That's it for the Holiday sewing!

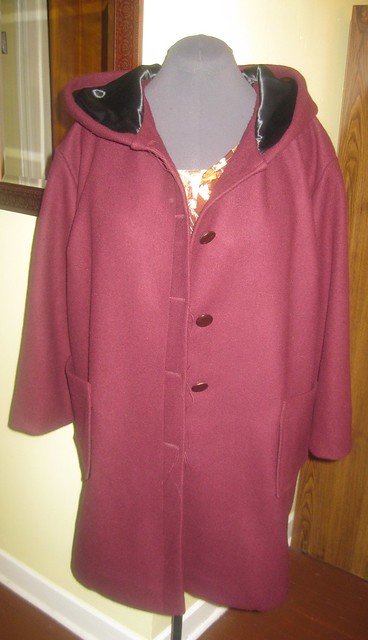
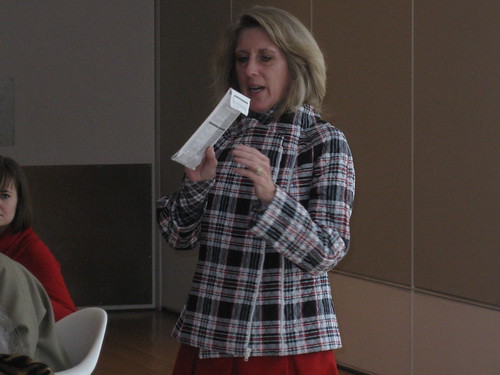
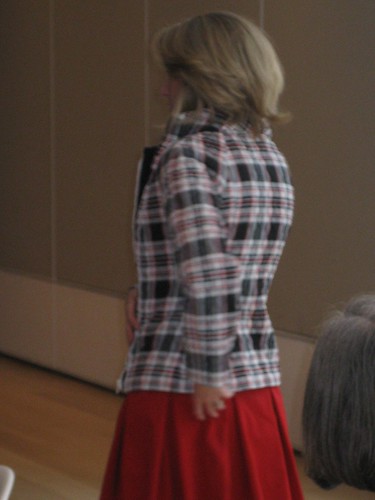
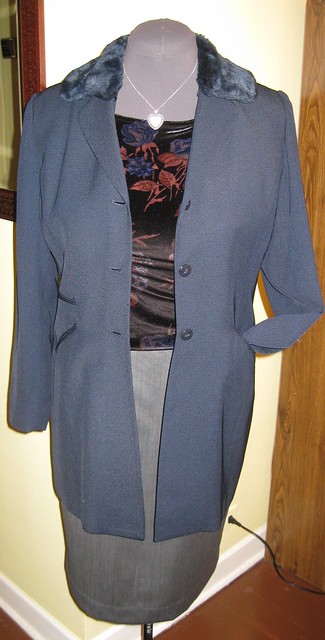
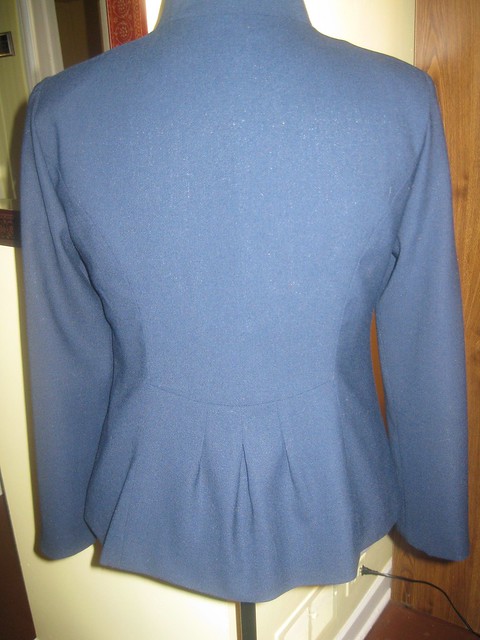
Parting Shot: On Tuesday, I almost finished a Simplicity Jacket 2452A. But I didn't have enough buttons.


Christmas Holiday Sewing - Part IV Burda 7708


Pictured incomplete - I needed to add one more button.

This is the hardest of all the Christmas sewing reviews. I made so many changes, not to mention several "do-overs" as I sewed this coat.

Let me first, speak on how this project came to be. In early March, my sister asked me to make her a coat. We shopped at Fishman's for the coating, beautiful stuff I might add. She had to special order it as they didn't have it on the store.

My DS chose Burda 7708. This pattern is rated easy, but with the many changes it became a bit of a challenge. Due to style changes and weight of the fabric.

Pattern Description: Burda did not provide a lot on the description. It's labelled as loose fitting, ample. Additionally, it is an unlined jacket with collar and hood variations, patch pockets, and darts.

Pattern Sizing: 18-32; I used 18/20.

Did it look like the photo/drawing on the pattern envelope once you were done sewing with it?

No, I made multiple changes using view A. The first was to extend it to coat length.

Were the instructions easy to follow?

Before I started, I did read over the instructions and didn't find anything difficult about them.

What did you particularly like or dislike about the pattern?

This pattern was selected by my sister. It surfice to say she like the design of the jacket and wanted it made into a coat. For me, after seeing Annette's version, I'm thinking about making view C for myself.

No dislikes.


Fabric Used: A very nice wool coating from Fishman's Fabric.

Pattern alterations or any design changes you made: Oh Boy, Here comes the difficult part. There were so many changes. I'm hoping I can explain them all. Let me start with the easiest one:

- Added about seven inches to the length.
- View A called for a few bands (strips of fabric over certain parts of the coat) shoulder and center back.
- Eliminated the "wrong side facing at the center front, pocket, and hood.
- Lined the pockets
- Instead of one button and two snaps. I added 4 more buttons and elminated the snaps.
- Eliminated the top stitches

- This is where it gets interesting; The following changes and alterations were "figure out" as I sew. As a result, I had to rip out and try again before getting it right. The first was the lining of the hood. The fabric was so thick and difficult to sew. Especially multiple layers. For the hood, I eventually attached the lining by sewing it rights sides together around the center front, leaving the neck edge free. Then trimmed the coat seam allowance, pressed it, turned right sides out, pressed hem (1"). Finally machine hem to the inside of the hood to create a polished finish without the bulk of multiple layers of coat fabric.

- Adding lining - Cutting the sleeves, hood, and back was easy. I just cut them the same as the coat. The front was another story. Because I wasn't going to follow the design of View A, I used the front pattern for view C. It includes a facing. To start, I cut the front lining about two inches beyond the end of the facing. Next, I sewed double fold seam binding along the facing of the coat. Then pressed the binding to the underside leaving the center fold visible. Next, I carefully place the lining beneath the facing making sure it was even along the neck edge and the sides of the coat. Then I pinned the facing to it. Finally sewing the facing to the lining (stopping about 1 1/2 inches from the bottom for proper hemming.). From this point I was able to sew the rest of the lining with no problem. It's not my recommendation to practice this "method"; and I plan research and teach myself the "standard method". Whatever that is. But this seemed to work.


Would you sew it again? Would you recommend it to others?

I think I will make View C for myself.

Conclusion:

Although this is a fairly simple coat to make, this was an interesting project for me. I learned a few things; I need to learn a few more. ;-)I hope my sisters enjoys the coat. I think it turned out pretty nice.

Parting Shot: I also made two tops for my DS using Simplicity 4076. Here's one of them.


Thursday, December 30, 2010

Christmas Holiday Sewing - Part III Simplicity 2603 & 4076


The ever so popular drapey cardigan is what I selected to gift my sister Mona. This is one of 2009 favorite patterns. It's been reviewed multiple times on Patternreview.com. And I know why..., it's so attractive and very easy to sew. I have another (chocolate brown) ready to sew for me.

Simplicity 2603

Pattern Description: Misses knit top and cardigan wrap.

Pattern Sizing: XXS to XL. I used XLarge.

Did it look like the photo/drawing on the pattern envelope once you were done sewing with it? Yes, it did.

Were the instructions easy to follow? Simple as 1, 2, 3. It took less than two hours to make.

What did you particularly like or dislike about the pattern? Everything. No dislike. Lately, I'm very pleased with my projects.

Fabric Used: Hatchi Rayon Blend Jersey from Fabric.com

Pattern alterations or any design changes you made: None.

Would you sew it again? Would you recommend it to others? Yes, tomorrow.

Conclusion: This is a great cardigan. I'm also going to try the top. If you haven't try it and this is a style you like, please give this pattern a try.

Christmas Holiday Sewing - Part II Simplicity 9326


The mock turtleneck is much like the mock turtleneck of BWOF 9/10, #121. So I followed the design of the turtleneck to create a clean finish to the 2000 Simplicity version. This pattern fits DD well that made this one easy to make for my sister as well.

Simplicity 9326

Pattern Description: Misses' Jacket or Coat, Pants, Skirt and Knit Top. Fitted pullover knit top A has funnel neck and three-quarter length sleeves. Semi-fitted jacket B or coat C has pointed collar, long sleeves and front Velcro closure. Semi-fitted pants D and skirt E worn 1 inch below waistline have side zipper and side slits. Suitable for Overlock/serger.

Pattern Sizing: 4 - 18. I used 10 - 12.


Did it look like the photo/drawing on the pattern envelope once you were done sewing with it? Pretty much. I added length to sleeves and top. Then I finished the funnel (mock turtleneck) same as Summerset.

Were the instructions easy to follow? Yes. No problems there. I was able to finish one top under an hour.

What did you particularly like or dislike about the pattern? "We" like it. Nothing to dislike.


Fabric Used: I ordered several colors of the Hatchi stretch rayon blend jersey from Fabric.com.

Pattern alterations or any design changes you made: Lengthen or shorten sleeves. Lengthen top. Changed the design of the funnel to resemble the BWOF top.

Would you sew it again? Would you recommend it to others? Yep. This is a great way to build the winter wardrobe. You can wear these nice top with jeans as well as suits.

Conclusion: Both DD and my sister love the tops. And I'm sure they will get a lot of use out of them.


Wednesday, December 29, 2010

Christmas Holiday Sewing - Part I Butterick 3521


This will be the first review of several sewing projects completing during the month of December. Most of them were given as Christmas gifts to my sisters and my DD. It took me forever to decide what to sew for each sister. It is not often that I sew for them. So I wanted with gifts to be a little more than ordinary.

This first review is of a little outfit for my baby sister, Tricey. Here goes.

Butterick 3521


Pattern Description: Misses' Top - Pullover top has neckline variations. A: semi-fitted, long sleeves with slit/elastic hem. A, B, narrow hem B: Bias, halter neck with drape, tie ends. C: collar, collar band, stitched hem, purchased button.

Pattern Sizing: 6 - 22. I used size 12.

Did it look like the photo/drawing on the pattern envelope once you were done sewing with it? Exactly.

Were the instructions easy to follow? The instructions were very simple and easy to follow.

What did you particularly like or dislike about the pattern? Everything about this view is likable. It's fast and easy, two pieces; a stylish classic; and figure flattering. Nothing to dislike.

Fabric Used: I used a stretch velvet from Hancock. I love the hand of it and the deep rich color.

Pattern alterations or any design changes you made: No design changes. But I added a few inches to the length of the top and sleeves. My baby sister is taller than I am.

I had about 3/4 yard left so a made a matching skirt. No pattern used. It's finished with elastic at the top a small hem at the bottom. Simple.


Would you sew it again? Would you recommend it to others? Yes, I will probably sew view A again. This is the third time I've sewn it. So you know I really like it. I'm also considering making view B.

Conclusion: This is a quick, but stylish top that can be made up in a variety of knit fabrics.

Saturday, December 25, 2010

Merry Christmas!


Oh, Hallowed, Hallowed Christmas

Oh, blessed, blessed Christmas,
The stars were shining bright,
But there was one outstanding
Upon that holy night.
Its radiant beams were shining
Upon a lowly manger bed
Wherein there lay the Christ Child,
A pillow of hay for His head.

Oh, glorious, glorious Christmas,
The night of Jesus' birth;
Oh, hallowed, hallowed Christmas
When God came down to earth.
Forever we'll adore Thee...
Christ, the one tru light,
Resting in the promise
Of that most holy night.

by Loise Pinkerton Fritz

Merry Christmas to all. Especially those who read my blog. Thank you and God bless.
Cennetta

Friday, December 17, 2010

It's Beginning to Look alot Like Christmas...,


Warning heavy picture content

On one of the coldest, snowiest days of the year, my family got together for our annual kick off festivities for the Christmas season. The theme of this gathering was "Making Christmas Wreath".

Years ago Martha Stewart did an episode on decorating for Christmas. At that time, I thought it was such a cool idea to make your own decorations. It makes the holiday season extra special. My sister, Rochelle, was the host (not pictured) of this super fun event. We had lots of food, old school music, laughs and loads of fun. Party time: 3:00pm, December 12th.

When we arrived, the air was filled with delicious smells, Mmmm, Mmmm, good home cooked food (I bought a bucket of chicken and sparkling grape juice). In the kitchen, the table was set with all types of goodies to make wreaths. The house was filled with laughter, good cheer, and Lionel Richie and the Commodores in the back ground. What fun.


Everyone, except the young men of the family made wreaths. The overly, energetic young men preferred rough housing in the family room in between eating double portions of all the food.


Christopher Ryan the birthday young man (14)


Wreath Making -

Domino putting it together

Finished


Rochelle's wreath finished

Tricey - The Candy Wreath


Lolo - Kind of Traditional


Me - Fluffing the wreath while thinking about placement of decorations

Finished - Traditional -- Less is More

Testing, testing, 1,2,3 ...,

Finally, some practice videos (Wreath Making) for future sewing tutorials. Enjoy!
C


Thursday, December 9, 2010

The Best Club in Chicago - Haute Couture

Want to know about a source of Great Sewing Inspiration? The Haute Couture Club of Chicago is it. Ladies who live as far as Florida travel to meetings and club events. When I tell you this is a great club; it's true. Each time I'm in the presence of these talented ladies, I feel privileged and thankful that Martha Moser (Club President) invited me to become a member.

Last weekend was our Annual Holiday Luncheon. This time we celebrated at the Terzo Piano Restaurant - The Art Institute of Chicago (Downtown Chicago-Michigan Avenue). It was so fun. During lunch, of course, we discussed club news and activities. Part of our meeting time was used to "show and tell" what you creatively designed/sewed. This is one of the highlights of the meetings. So such inspiration is flowing through the room. Several members wore their designs. I couldn't get photos of most, but managed to take a few not so great shots. By the way, these are "action shots".

First, Ms. Francine is wearing a beautiful dress that she made. She also designed a small handbag to match.


Next, Ms. E and Ms. D.

Ms. E is sporting a Chanel jacket that she recently made. You can always count on Ms. E to participate in show and tell. Last time, she showed a beautiful bomber like jacket (Vogue) made of faux leather with a fleece underside. Outstanding!

Ms. D was certainly dressed to the nine in her lovely silk suit made from a Vogue pattern. This photo is a little grainy and does not do the suit or Ms. D justice; both are beautiful. The suit is impeccably made, great fit and style.


This next lady, I didn't get her name. My apologies. She crafted this lovely suit and was proud to show it off.


Ms. Sandra (Chair lady of the Fashion Show committee) is styling a beautiful dress that she modelled in the April 2010 Fashion show. Ms. Sandra showed and told about the makings of the jazzy top she is holding. This is a copy of an expensive ($200) designer model made for a fraction of the cost. Isn't great to be able to design and sew? She also told us about her February challenge Sewing Workshop San Diego Jacket (I did not get a photo of her version).


Side note - The Sewing Workshop gifted the club several copies of the jacket pattern. Many of members accepted the challenge and will be showing off their creations at the February meeting. I'll try to get good pictures.

Back to the show and tell...,

Finally, Ms. Rhonda (Style Goddess/President 2008-2010) is sporting a jacket that she made the night before the luncheon. Can you believe it? She also wearing a super cute red skirt (her design) and a top which she also made. We celebrated Ms. Rhonda because she is now published in Threads magazine Nov/Dec 2010. She is also featured in the Threads magazine "Teach Yourself to Sew".


What fun!!!

Update - Last meeting our guest speaker was Peach Carr (Project Runway). She is so delightful and super funny not to mention extremely creative. She talked about her life, love of sewing, and Project Runway. She shared some behind the scene tidbits of Project Runway and how being a contestant changed her life. Of course, some things about the Project were off limits. But what she did share had us all on the edge of our seats. Woo Hoo!

Oh well, that's it for now!

Happy Sewing Beautiful Ones!

Wednesday, December 8, 2010

Thanks, Pamela! - Fashion Sewing Supply


A few days before Thanksgiving I received a cute little package that contained several generous interfacing swatches. This was my prize from a drawing held by Pamela Erny, Fashion Sewing Supply. This was the perfect little prize. Last week I used the kit as part of a sewing lesson. The swatches were the perfect size to pass around the table. It gave my students an opportunity to examine the various types of interfacing. Each swatch has a post it affixed describing the type, use and care. This is a neat way to teach students about interfacing and a great way to sample the various interfacings available at FSS. Thanks again, Pamela!

Much appreciated.
C

Friday, December 3, 2010

Starting with the Pencil Skirt of S2452 - The Wardrobe Builder


Grey Skirt with Teal Blouse (JC Penny's)


Grey Skirt with Navy jacket and Stretch Velvet Top (Both RTW)


This is another installment of my Fall 2010 wardrobe builders. Simplicity 2452 is a nice pattern to create a custom wardrobe. The only thing missing is a top/dress to complete the ensemble. The sweet thing about this pattern is it has two jacket styles, view B being the cutest in my opinion. The skirt is typical and can be found in many wardrobe patterns. This version does not have a facing or waistband. Instead the sewist can add twill tape to finish the waist.


Sage Skirt with Faux Snake Skin Jacket (McCall's) and Brown Knit Top (Kohl's)


Well I think I've given you a idea about the description of the pattern. My first review is the skirt. I used it to make three skirts to add to my work wardrobe. It's too simple. Two pieces, front and back with a zipper and vent. The "simplicity" of this skirt gives the sewists many options to add trim to add some interesting details. This round I only added a lining.


Maroon Skirt with Ruffled Knit Top (Walmart)


Part of this review is to show how the skirt can be incorporated into my ever "growing" wardrobe. Styling options included. Review follows:

Pattern Description: Misses' jacket with front variations and skirt. Simplicity sometimes gives vague descriptions of the style of the garment.

Pattern Sizing: 6 - 22.

Did it look like the photo/drawing on the pattern envelope once you were done sewing with it? Yes, But I made a few changes to suit my taste.

Were the instructions easy to follow? For the skirt, I skimmed them. They look pretty standard for this style of skirt.

What did you particularly like or dislike about the pattern? As I stated in the introduction, the jacket, view B. My least favorite waist finishing is to add twill tape.

Fabric Used: Two of the fabrics used were wool remnants from Vogue. Each at about $10.00. And the third is a left over piece (wool also) from a dress I made a few years ago. It was purchased at JoAnn's. Here is a close look at the texture of the fabrics used. Here are a few of the many Vogue fabric tags.

Pattern alterations or any design changes you made: Instead of inserting a side zipper and place it center back: two invisibles and one lapped. The waist was finish by adding 1/4" twill tape to stay the waist. Then I attached the lining, pressed the allowance towards the lining, understitched and finally topstitched the skirt to the lining to finish the waist. Here is a close up of the finished waist. And here is the finished waist and zipper.


Would you sew it again? Would you recommend it to others? I probably won't sew it again. I have many more skirts styles I would like to sew. And yes, I recommend this pattern to others. I already have a jacket cut and ready to sew. But I won't start on it until after completing my holiday gift sewing. But it will be done before the new year.


Conclusion: This is a pretty nice wardrobe pattern. And the skirt is simply enough for a beginner to sew with no problems. I do recommend trying it.

Thursday, December 2, 2010

More Wardrobe Builders with M5818


I knew it wouldn't be long before the cold wintery weather claimed the Chicagoland area. Yes, winter is here to stay. Sadly, I don't think we will have any more 50, 60 degree days until next spring. So in preparation for the bone chilling temperatures, I'm sewing wool pants and skirts to help fight back the cold winds. These are my number staple bottoms for work. Last week, I finished two pairs of pants using ole faithful M5818.

The fabric is a wool blend suiting from JoAnn's. It really nice and easy to sew. Here I've paired the pants with a fuchsia turtleneck (RTW) and with a Simplicity t-shirt and jacket. Pati Palmer's pattern includes a one inch seam allowance. For the top of the waistband I only sew 1/2 inch allowance resulting in a wider waistband which I like a lot. Also I modified the end of the waistband for a slightly different look.


More views of pants made using this pattern here on Flickr.

More later on wardrobe builders (pencil skirts).

Happy Sewing!
C

Parting Shot - November 28th, My cousin Thomas married his childhood sweetheart Linda Kay.

LinkWithin

Blog Widget by LinkWithin