Showing posts with label swayback. Show all posts

Wednesday, July 30, 2025

Easy Simplicity Pullover Top - S9679 in Review


I've had Simplicity S9679 in my pattern collection for a while. I am just getting around to sewing it.  Of course, I had to do my usual fit adjustments; FBA and swayback.  In this review, I paired it with a TNT pants pattern S8389.  It is a go-to for an easy fit and sew coordinate.  


So let's begin the pattern review of Simplicity S9679

Pattern Description:  Misses' knit top with sleeve variations.

Pattern Sizing:  4 - 20; I used size 16 with modifications.  I made view B.

Did it look like the photo/drawing on the pattern envelope once you were done sewing with it?  Yes, it did.  Slight changes to address the adjustments made.

Were the instructions easy to follow?  Yes,  the instructions were typical; nothing difficult or confusing in them.  

Was the construction easy?  Yes, the top went together with ease.  The most tedious part was finishing the opening across the upper chest and back.  This step required you to take your time.  This area is a focal point of the top.  I used some steam a seam to hold everything in place as I sewed.

What did you particularly like or dislike about the pattern?  For this version of the top I have likes and dislikes.
 Likes -
  • The seaming and the opening at the upper body. 
  • The slant of the neck opening.  It adds interest to what would a simple pullover top.
Dislikes -
  • Finishing of the armhole.  I added a binding to finish it.
  • The armhole fit.  I could have created the problem when I slightly rise it.  But this is something that I noticed in other tops that have a sleeveless and sleeved version that used the same front and back pattern.  For my next version I'll try to address that.

Fabric Used:  I used a ribbed knit from Fashion Fabric Fabrics.  I love the chartreuse color of it.  The stretch recovery could be better.

Pattern alterations or any design changes you made:  


  • FBA - I used my molly t-shirt pattern to make it.  You can see where are made changes along the sides and at the lower front armhole.


  • Swayback adjustment - I first cut the lower back into two pattern pieces.  Next, I made the tuck on each pieces and added at the hem.  I added seam allowance to both patterns where they would be joined.   I didn't make a prominent shoulder blade adjustment.  It appears to be okay without it. 
  • I shorten the opening to eliminate any gapping.
  • I cut binding out of the fashion fabric to finish the armhole.

Would you sew it again? Would you recommend it to others?  I plan to sew view C. And yes, I recommend it to others.

Conclusion:  I enjoyed making this pullover top.  It is a change from the typical t-shirt style pullover.  You can dress it up or down.  It's easy to sew for all sewing levels.

Happy Sewing!
C


Monday, June 17, 2024

Soft Crepe Dress Simplicity S9820


Hello Sewing Friends,

I finally have something to share with pictures.  This Simplicity dress was made immediately after I finished my Chicago Frock tails dress.  In fact, I made it the morning before the Frock tails Saturday evening affair.  I really needed something to cleanse my palette.  Because I devoted many hours to making my Frock tails dress which in the end lack luster.  The truth is I made two dresses.  One trashed and the other a substitute for what I really wanted to wear.

Anyway, Simplicity S9820 helped me feel better about all the hours that I spent on the party dress.  To start, I had already made the pattern adjustments.  Anyone who has similar adjustments knows that this takes quite some time with every new pattern to use in a sewing project.  It was so satisfying to go right to the cutting table.  Sewing time was about 3.5 hours plus time to hand stitch the hem.


Pattern Description:  As usual, Simplicity gives the vaguest pattern descriptions.  My description:  Misses's knit dresses and shrug.  View A dress is an A-line mid-calf knit dress with shoulder and neckline drape details.  View B dress is a floor length A-line strapless dress with a front knotted long sleeve shrug.  Both dresses close with an invisible zipper at the back of the dress.


Pattern Sizing:  This pattern is available in  sizes 8 to 26, which is very nice.  I used size 16 with modifications.

Did it look like the photo/drawing on the pattern envelope once you were done sewing with it?  Yes, it did.

Were the instructions easy to follow?  The instructions were typical.  Nothing difficult or confusing in them.  

What did you particularly like or dislike about the pattern?  I love the shoulder and neckline drape.  The A-line silhouette was a plus too.  I was mostly interested in making view A.  But after I finished it, I considered making view B at a later date.


I don't have any real dislikes.

Fabric Used: My fabric is from New Rainbow Fabrics on Roosevelt Road in Chicago,  It is a blush, crepe knit with a soft hand.  The stretch of the fabric is more than 25%.  It has great recovery.  I think it is perfect for this dress.  New Rainbow has this crepe knit in a variety of colors at a very reasonable price of $7.00 per yard.

Pattern alterations or any design changes you made:  I have quite a few changes that I made.  I begin by examining the measurements on the pattern front for the finished dress.  The finished bust measurement is only 34 inches.  


  • FBA - Often, for my size it's around 39 inches.  So, I feel this pattern runs a little on the small size.  Because the front and back patterns are designed sleeveless, I had to think about how to make the FBA adjustment without distorting the shape of the dress.  Below is an illustration of the FBA.  I simply slashed through the neckline down to the bust area continuing the length of the pattern.  This had to be done twice because the front pattern piece was for the entire front body instead of half the width of the body.   This adjustment produce a dart.  I decided to angle the dart slightly.  I hate darts that are straight across from side to apex.


  • Added width to the two back pieces - When I make a FBA, the front is sometimes much wider than the back.  Particularly, below the bust. Often, I end up sewing larger side seams to slim down the rest of the dress.  This sometimes causes the back to be even smaller.  And the side seams are off center along the side.  So to balance things out a bit, I added some width across the back.  Note:  My usual prominent shoulder blade adjustment was not needed because the back of the dress falls well  below the shoulder blades.


  • Swayback - There are two back pattern pieces.  I suspect the reason is not to confuse the sewist with the markings for each shoulder and neckline attachments.  Tucks were made on both pieces.  Note:  the amount of the tuck has to be added back at the hem to balance out the hem.  


  • Marking the Lower dress pattern pieces - I decided to cut the pattern pieces at the hem for view A.  Each piece is label with the respective pattern number plus the letter "B".


  • Front and Back Facings -  I adjusted the width of both to match the adjustment that I made to the front and back.


  • Elastic Around the Top of the Dress -  To stabilize the neckline of the dress, elastic is added.  I measured the elastic by first stretching it to relief any added tension.  Then I measure it like I would to take an upper bust measurement.  This is how I determined the length of my elastic.  Next, I divided it into four sections.  Starting at the right back for section 1.  Sections 2 and 3 for the front.  Finally, section 4 for the left back.  I stretched the elastic to fit each section.  The elastic was attached after the facings were sewn on.
  • Shoulder and Neckline Drape - I added about an inch to each.  I didn't need it.  So, I had to remove the added length to those pieces.

These are my adjustments/changes.  I hope this is clear.


Would you sew it again? Would you recommend it to others?  I think I will make it again.  Probably for a holiday dress.  There is always a holiday party to go to.  And this dress is a quick make with great results.  And, yes I do recommend it to others.  

Conclusion: I am very pleased with how this dress turned out.  It was the perfect antidote for recovery from a "not so great" sewing experience.  Lol

Parting Photos:   Me wearing Simplicity Combo S8735 and S8637.  The pattern review is:   Easy, Breezy Summer Dress.  It is perfect for the 90 degree temps we are experiencing right now.


Thursday, June 30, 2022

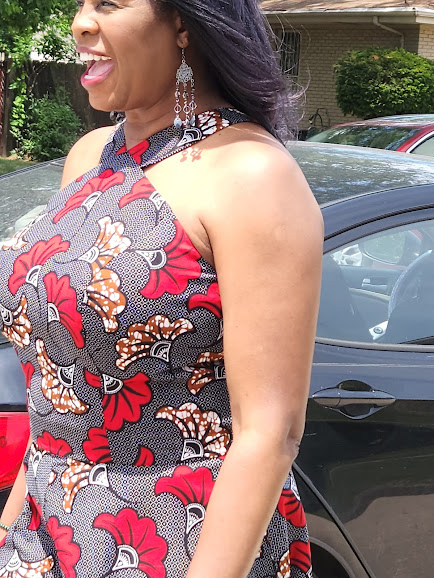
Summertime Fun Dress in Ankara Fabric - Simplicity S8594


Today is the last day of June and it is 98 degrees HOT!  Great time to wear my latest creation, using a red and black, Ankara fabric that I purchased at the Textile Warehouse. I began sewing this dress last Thursday and finished it on Sunday.  

My photographer, DD, was available to take a few pictures of me wearing it this afternoon.   The sun was high and bright.  The heat was on. Lol

This will be a short and sweet review as I don't have pictures of the pattern alterations.  Sorry.  If you check out many of my previous princess fit adjustment makes, you'll get a good idea of the changes I had to make for this pattern. 


Pattern Description:  Misses and Petites with bodice and skirt variations.  The bodice options include a crewneck with slit or a halter, and the skirt can be made straight or flared with pockets.  I made View C with modifications, size 14 graded up. 

Did it look like the photo/drawing on the pattern envelope once you were done sewing with it?  Yes, it did.  Of course, I lengthen the skirt and made a few other changes.

Were the instructions easy to follow?  Sorry, I really didn't read the instructions.  I've made this style dress many, many times before.  At a glance, I guess they were typical.

What did you particularly like or dislike about the pattern? I liked the halter style of the dress.  And I thought it would be a great style for the fabric that I selected.

Fabric Used: I purchased this Ankara fabric from the Textile Warehouse in Chicago on 21st Street.  They have a variety of colors and prints for the reasonable price of about $6.00 per yard.  It is 100 percent cotton.  It also washes and presses very well.  That's something I always appreciate with natural fibers.  I love the print and the vibrant red and black colors.  


Pattern alterations or any design changes you made:  I made a ton of changes.

  • FBA and graded the pattern up.  When I purchased this pattern, the largest size grouping available at the store was size 14. So, I made it work for me.
  • I shortened the straps by 2 inches, much too long for me.
  • NOTE:  I forgot to make a sway back adjustment.  Not too bad though.  If I use this bodice again, I'll be sure to do it to remove the excess fabric at the lower back.
  • Lengthen the skirt.  Also, I barely had enough fabric for my desired length.  On a few of the lower corners of the skirt, I had to "piece" the corners together.  See picture below to see an example.  You can hardly tell. wink, wink.
  • I installed an invisible zipper instead of a regular one, only because I didn't have one in my stash, and I refuse to buy another one. 


Observation:  The bodice is a little low at the underarm.  I'd would bring it up about 1.5 inches for a better fit and look.


Would you sew it again? Would you recommend it to others?  Yes and yes.  I would consider making it again.  This view, view C, which I like the most.  Also, I recommend it to others.  It's a great little summer dress that is not difficult to make.

Conclusion: I am pleased with how this dress turned out.  The fit is almost perfect. and I really like the combination of the fabric and style.  Great little summer dress that beginners and experienced sewists could make with no problem.

Happy Sewing!
C


Saturday, April 23, 2022

Purple Flower Power Dress Revealed - Vogue V1858


It has been almost a whole month since I last posted about this dress.  I had mentioned that I wanted to do something extra.  My "extra" was to add some silk flowers and petals to the dress.  It took me a while to decide how to place the flowers and the petals on it.  I knew I wanted to make a corsage like flower, not detachable.  Also, I thought of putting one flower at the hem.  I still wasn't sold on the placement.  


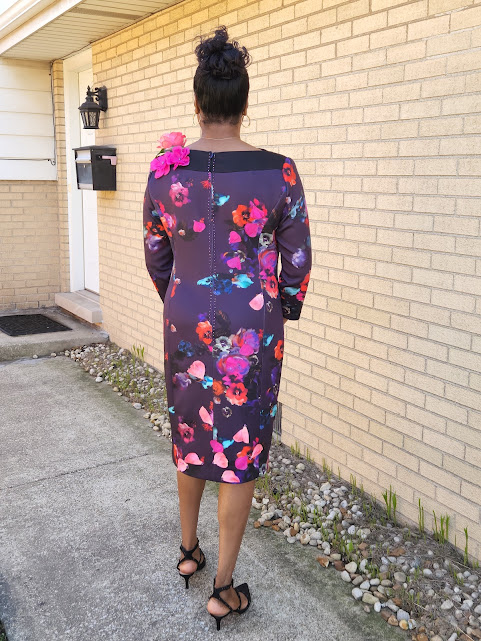
After talking with Rhonda about my idea, she helped me rearrange the flowers and the petals.  So today, finally, I'm sharing how I finished the purple flower power dress.  First, I added three flowers at the top shoulder area.  The one directly on top is a detachable corsage.  I was afraid that it would get mangled if I sewed it onto the dress.  The leaves were the biggest concern.  The remaining two were placed on the back shoulder, kind of in a cluster like a bouquet.  Then I sewed on petals falling down the back of the dress with the majority of them at the hem.  To complement the beaded zipper, I added a few beads to each petal and flower. 


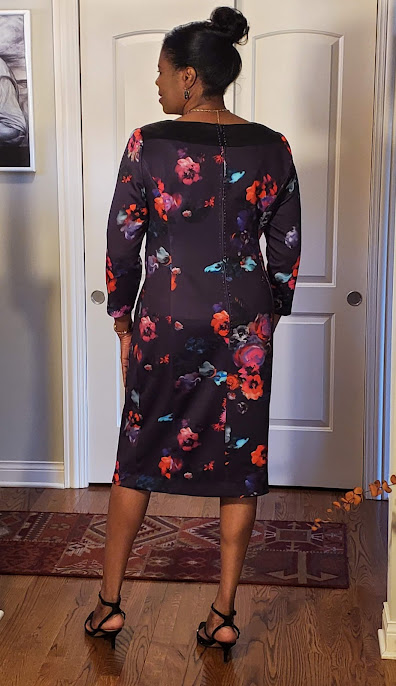
I changed the length of the dress as well.  Initially, I added several inches to it.  After taking a few pictures, I decided to shorten it a bit.  Above are a few photos taken prior to the floral additions and the length adjustment.  So, that's it for now.  

I haven't made anything new since March.  I've been busy with other things.  We will see what the coming warmer season brings.


BTW- This was my Easter dress.  

Happy Sewing!

C

Thursday, March 31, 2022

Notes on a Pattern - Vogue V1858


Today I want to talk about Vogue V1858.  This is one of Vogue's latest pattern releases.  It is basically a princess seam dress with a curve "V" neck front yoke and a back yoke.  Nothing really extra special.  But it has a neckline that I haven't seen.  And that is why a decided to purchase the pattern.  

I considered this to be a relatively easy dress to make.  There is no lining, it has princess seams, and it requires moderate stretch knits.  On the envelope, it indicates a sewing rating of average.  That's okay because there is an invisible zipper and the front yoke may present a little bit of a challenge to get it just right.

Vogue describes the pattern as:  Fitted dress has shaped contrast neck bands, side front and side back seams, three-quarter length set-in sleeves, invisible back zipper, hook and eye closure, stitched hems. 

I made some changes: no invisible zipper and I hand-stitched the hems.  Simple changes.  

But first, as always, I need to make sure the pattern fits.  So, immediately I made my typical adjustments.  Only later to discover that they were a bit too much.  I started by cutting size 16.  I could have used size 14.

Below are my original adjustments.  

The FBA was spot on.  But all of the added width was too much.  


The swayback adjustment was good too.  This time I added the amount removed to the hip area instead of at the hem.  Now this area seems to be a better area to add the length back into the garment.  

Using size 16 in the shoulder area was okay.  But at the very top of the shoulder, an inch or so front and back, was too long.  I adjusted it before setting the sleeves.  So, there was no need to add in the shoulder blade area.  


The overall size selection was a little bit off.  This has happened with other princess seam dresses like Simplicity S1314.  I ended up doing a lot of tweaking to get the best fit in other areas of my body, resulting in huge seam allowances of 1" or more. 

Simplicity 1314

What I like:  the front yoke and princess seam.

Other changes that I made in my dress:  I hand-picked the zipper and added beads instead of installing an invisible zipper;  I added several inches to the length. The dress is on the short side; I hand-stitched the hems.


Right now, I can consider my dress finished.  But I was thinking of adding some more to the dress to make it extra special.  I thought of adding petals of silk flowers:  one at the side bottom hem area and another at the left shoulder.  Or a small panel of lace somewhere.  

This making it extra special feature may not materialize.  It something that I was thinking about. 

These are my notes on this pattern.  I really like the neckline and hope to incorporate it into another dress or top.  We will see. Lol.

Anyway, I hope this information was useful to other sewists who have similar fit adjustments as I do.  

Happy Sewing!

LinkWithin

Blog Widget by LinkWithin