Showing posts with label neutral wardrobe capsule. Show all posts

Monday, March 21, 2022

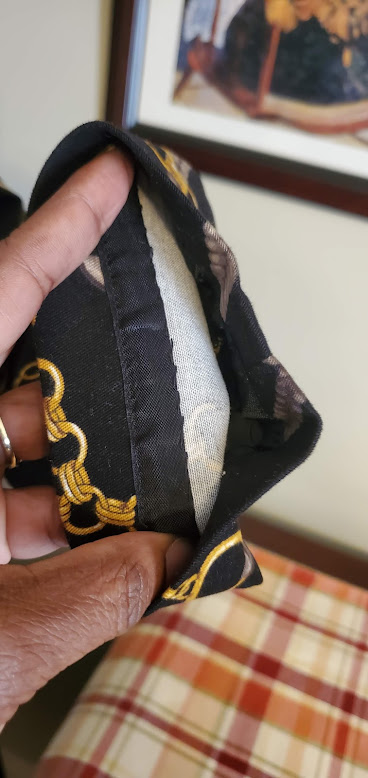
Minerva Fabric - Black Neutral Jacket Simplicity S1781


I finally finished a sewing project.  This one stayed on the table too long.  I started on it in February, and I had hoped to finish it that same month.  I'm glad to move it from the sewing studio to one of my closets.  

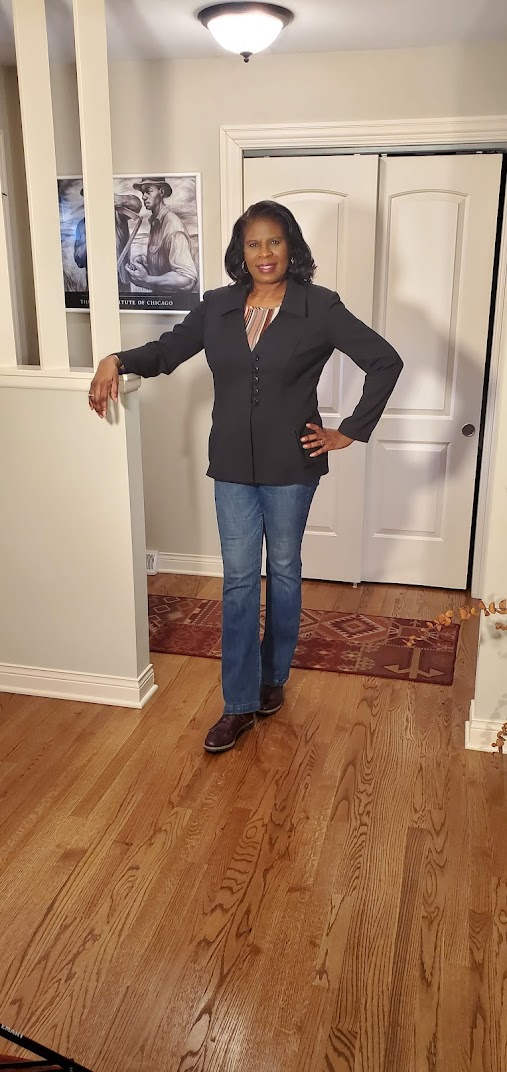
This black jacket will be part of my neutral wardrobe.  Already I know that it will be in high rotation, especially in the coming spring and early summer seasons.  I can dress it up or down.  For these photos I decided to dress it down with jeans and one of my molly tees.


For the review, I will try to be brief; but at the same time provide enough information about the experience just in case someone in the sewing community is planning to make this.  The pattern isn't new, but I don't think there are a lot of reviews online.


Pattern Description:  Misses' jacket in two lengths with front and collar variations.  Closures feature an exposed zipper, hook and eye, or loops and buttons.  Croquis Kit included with each Project Runway pattern allows you to be your own designer.   This is OOP, but you can find a copy of it on Etsy.

Pattern Sizing:  The pattern comes in sizes 6 to 22.   I used size 16 with a lot of modifications beginning with the view.  I really liked the view in the lower righthand corner with the pleated pocket and side back.  But I wanted the length of the red jacket that the model is wearing.  So that is what I decided to make.

Did it look like the photo/drawing on the pattern envelope once you were done sewing with it?  For the most part. my jacket does look like the jacket drawing, except it is longer.


Were the instructions easy to follow?  The instructions were typical and easy to follow.  I changed a few things.  One being I understitched the facing and along the neckline.  I like the way it slightly rolls the edge to the inside of the jacket.

What did you particularly like or dislike about the pattern?  There are many things that I like about the jacket beginning with the princess seams.  This style always makes it a little easier to do the pattern adjustments for an FBA.  The pleated pockets and side back are also favorite design elements.  They help create a balance between my upper and lower body.  They also add some interest to what could be considered a boring classic princess style jacket. I love the two-piece sleeve in a jacket. They look better and are easier to fit.  The buttonhole loops are on my like list too.  Lastly, I like the draft of this pattern.  Even with all of my fit adjustments, it appears to be well drafted.  

No dislikes.


Fabric Used: I chose a recycled polyester suiting from Minerva Fabrics.  This light/medium weight suiting, sewed up without any problems.  It has a "bubble" texture which adds interest to the feel and look of the jacket.  But it does not make it look heavy.

Pattern alterations or any design changes you made:  I made my usual adjustments for an FBA, swayback, prominent shoulder blades, and I added length to the sleeve and the jacket itself.  

Would you sew it again? Would you recommend it to others?  Yes and yes.  I must use the pattern again.  I spent so much time making the adjustments.  It would be somewhat of a waste if I didn't make it at least one more time.  And of course, I love how it turned out.  The side front and back have three sections.  For the side front there are also pockets.  When I made the FBA and swayback adjustments they affected all of the pieces associated with the side front and back.  So I was doing a lot of slashing and taping.

I do recommend it to others.  But make a muslin and take the time to make the pattern fit adjustments.  

Conclusion:  I really like how my jacket turned out.  And I'm glad I finally finished it.  In the coming months I hope to get plenty of wear out of it.  It's comfortable and the fit is pretty good.  I like wearing it with jeans and a t-shirt.  But it would be great to wear with a skirt or dress. 

For a sewing project like this, take the time to make sure the fit is good and make a muslin before you cut into your lovely fashion fabric. Wink, wink.

Happy Sewing!

C


Sunday, January 23, 2022

January 2022 - The Month of Knit Top M8238 Burda Style 6990 M7836


My last post was a pattern review on McCall M7836, View C.  I didn't have any photos of me wearing the top at the time of the view.  Since then, I had an opportunity to take a few photos along with photos of two other knit tops that I made the same week.

Before I talk about the other knit tops I made, here are a few pictures of me wearing M7836, View C.


I'm wearing a pair of McCall 8244 leggings that I made sometime in October, I think.  I didn't bother to review them.  They were super easy. I was just waiting to show them with a new top or tunic.

You know I really try to maximize my use of patterns that I like.  So, my little collection of TNT patterns is growing.  Lol. I made another version of M8238-B and another of Burda Style 6990-D.

M8238-B

I just made a little minor change of making it a little smaller for a closer fit.


Burda Style 6990-D

Minor change to this one too.  I didn't have enough yardage to make the sleeve one piece.  So, I added a cuff like to make my desired length. 


Happy Sewing!

C


Wednesday, January 12, 2022

First Garment of the Year! McCall M7836


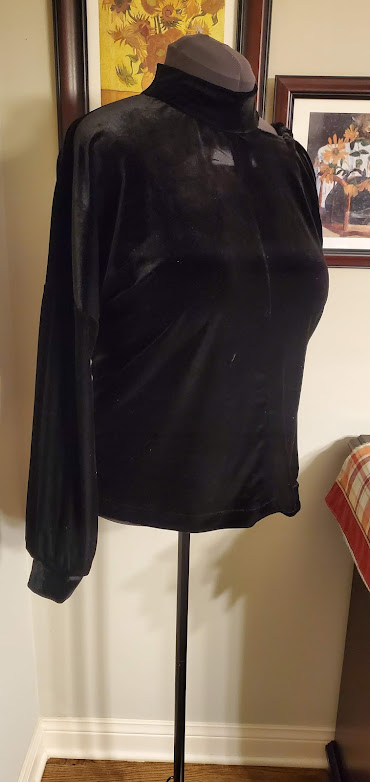
Today I'm sharing my first sewing project for 2022.  This is the third top that I've made from McCall 7836.  The second one hasn't been reviewed yet.  I gave it to my sister early last year and almost forgot I made it.  


My initial plan was to make all the views.  But now I don't think I'll make view D.  My favorites are this view and view A.  I'll probably make them again.

This top was made to wear with a pair of leggings that I made a few months ago (I'll review them later this month.).   

I used size 16 with only a design modification.  The sizing was good for me without making a FBA.

For the most part, my top looks like the top the model is wearing on the envelope.  The top was easy to sew and it went together with no problems.


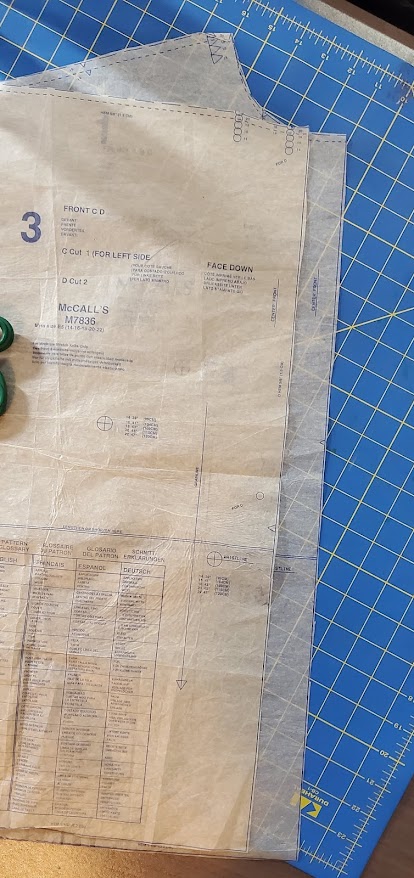
There are a few little things to look out for.  The notches on the two front and two back patterns do not line up.  See photos below.  No biggie, just line up the top and the bottom edges and sew them together.  It comes out even.  There was nothing confusing in the instructions other than that.


My likes:

  • Drop shoulders
  • Mock turtleneck
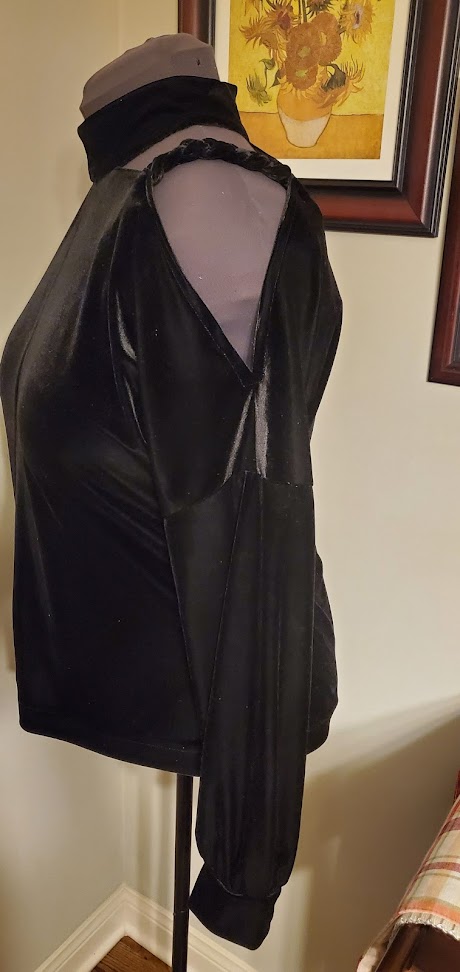
  • Cold shoulder and the drape of the sleeve
Dislikes:
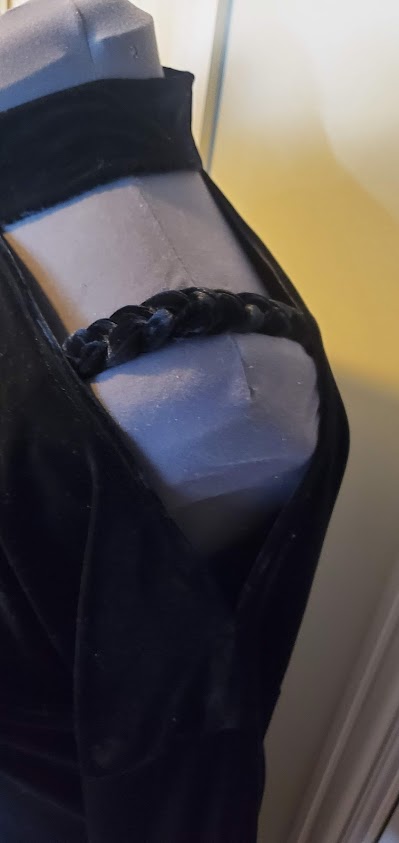
  • Once I finished the top, I didn't like the width of the shoulder opening. It was too wide for me.  So I decided to make a braided strap to kind of control how wide the opening falls and to make it easier to wear with a traditional bra.  I think the strap adds a little more style to the top too.


The fabric I used is a stretch polyester velvet that I purchased at my local JoAnn's Fabric.  It washes and dries beautifully.  And it was also easy to sew.

I will probably make this again.  It's stylish and is a great top to wear with leggings or close-fitting pants.


I do recommend it to others.  This is not a new pattern.  And I think many sewists in the online sewing community have made it.  For sure I will make this one again.

Happy Sewing!
C


Thursday, November 4, 2021

McCall M8238 Converted Into a Pullover Top


I really like to style of the bodice of McCall's M8238.  So I decided to convert it into a pullover top.  The process was so easy.  All I did was use a basic t-shirt front and back pattern combining them with the front and back patterns of M8238.  I didn't even draft new pattern pieces.  I merely pinned both to the fabric and cut.  That's how simple it was. 


I think we all can take advantage of the practice of hacking/splicing pattern designs to come up with our own designs or  designer inspired creations.  It can be as easy as what I described above.  Or something more labor intensive.  I'd probably save a lot of money.  


Anyway, the making of this top was just as easy as constructing the bodice of the McCall's dress. The steps were the same except for longer vertical seams and a hem to finish it off.  To follow some of the basic pattern review protocols, please read the following:

Pattern Description:  Knit keyhole cut-out-fit-and flare dress is a pull-on style with back neck closure, and half, three-quarter and long sleeve options.  My top is most like the bodice of view B with some modifications.

Pattern Sizing:  Groups:  6-14 and 16-24.  I used size 16.

Did it look like the photo/drawing on the pattern envelope once you were done sewing with it?  Yes and no.  Only to the waist.  Top instead of a dress was the goal of this project. The style of the bodice is also the style of the top. 

Were the instructions easy to follow?  The instructions were typical and easy to follow.  Although I did not like the closure at the neck. 

What did you particularly like or dislike about the pattern?  

Likes:
  • Keyhole
  • Cut out upper back and shoulder
  • Center front seam; option for color blocking and slimming affect
Dislike:
  • Closure - I ended up sewing a small strip of velcro to easily close the strap at the neck.

Fabric Used:  I purchased the black penne at JoAnn's.  Perfect for what I had in mind.  The knit has good stretch and good recovery.  I tossed it in the washer for a quick wash.  Then into the dryer.  No problems.

Pattern alterations or any design changes you made:  
  • I changed the closure to velcro
  • For the FBA, at the lower front armscye I graded up to size 18.  Also, along the upper front side I graded up to size 18 tapering back to size 16 five inches down.
  • Spliced t-shirt with bodice to design a pull-over top.

Would you sew it again? Would you recommend it to others?  Yes and Yes.  I plan to make another top.  I also want to make the dress sometime in the near future.

I enjoyed converting this bodice pattern into a pull-over top.  It will be worn with a newly made audacious skirt (V1725), which I'll review soon.  This is another project from a Big 4 pattern company that isn't quite what the designer had in mind. Lol

I do recommend this pattern to sewists of all levels.  It is a nice change from the basic t-shirt style dresses/tops. 

Stay Tuned for more on the skirt I made using V1725.
C


Friday, October 15, 2021

Ready for October with My First Shacket S9388


Just in time! Fall is here! 

On this lovely Fall day temps are in the mid 60's.  It's suppose to be sunny with clear skies. The perfect Fall day.


Also, perfect for sharing my latest sewing project,  my first shacket. 

My last Inspiration post was all about, the now trending, shacket. All of the popular stores are overflowing with shackets. You can find them in a variety of colors, prints, and styles. But I love the idea of designing and creating my very own. 


Simplicity S9388 is the great pattern to customizing your shacket.  My plan is to make a few of these babies over a next few weeks. My first is finished; the second is cut and ready to sew; and the third is a little shacket challenge that Rhonda and I are doing. Please join us if you like. It's a fun project.

Today I'm also sharing my pattern review of S9388.

Button front jackets with yoke, front patch pockets and seam pockets. Long sleeves, button cuffs with pleats. Back yoke with pleat. Lined yokes. Sizes XS to XXL.

I used size medium/large with very little modifications.

It sews up like a typical oversized shirt with a front button placket. My jacket looks like the view B on the envelope. In addition to the patch pockets there are inseam side pockets, that I like.

The instructions were pretty typical too. Nothing difficult. I did change a few of the construction steps though.


There are a few things I like about this pattern:
  • The oversize style. Comfortable and great for layering.
  • Easy to sew
  • Lined yoke
  • Front placket.  Adds stability and nicer detail than the cut-on front facing design.
Dislikes:
  • Some seams were bulky and hard to work buttonholes around. This was due to my fabric selection. So it made it very important to trim some of the seam allowances.  This may also inspire a slight design change to eliminate the front yoke and/or use snaps buttons instead of regular ones.
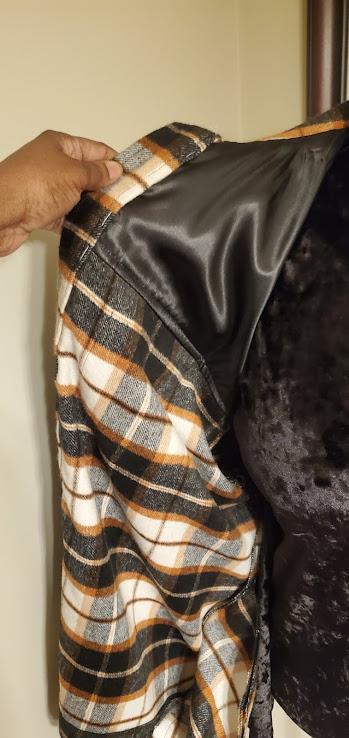
I purchased my fabric from Joann's.  It's a heavy plaid like fannel. They carry it in a few colors.  It's soft and warm, very easy to work with.

I cut between a medium and large, mostly large (upper body). None of my usual fit adjustments were needed. It's extremely over-sized.

Initially,  I added an inch to the sleeve length. Then I had to cut it off plus some. The cuff rests on the upper part of my hand. But that's alright. I I want to be able to wear a hoodie underneath. 

For the underarm curve, I did not trim the seam allowance.  Instead I clipped along the curve to eliminate that plucker look in the armsyce top-stitching. 

My side seam pockets were peeking out at the hem. So I tacked the bottom of the pocket to the hem.

My hem is 1.5 inches.

Note : no serious pattern matching for this project.

I enjoyed making this shacket. It was easy to sew. I recommend this pattern. There are so many style options. 

More to come. Stay tuned.

Happy Sewing!

C


Monday, September 27, 2021

Birthday Dress Reveal! - Vogue V1672


I'm so happy to finally reveal my birthday dress!


Vogue V1672 is a great pattern design.  I love so many things about it.  This is another one I'm going to make again.  ;-)

My Notes on a Pattern post gave you some information about my initial fit adjustments.  And for the most part they were spot on.  For the actual dress, I still needed to make a few little tweaks.  Nothing major though.  And that is why it is so important to make a muslin.  

Today, it feels like summer all over again.  It's 88 degrees and very sunny.  So we took advantage of this beautiful day and decided to do the photo shoot outside.  I have to hand it to my photographer, my DD.  She is always so willing to help me with the picture taking of me actually wearing the things that I make for myself. I am so grateful to have her help me.


Anyway, here is the rest of my review of this lovely dress.

Pattern Description:  This dress is described as: Lined dress with fitted bodice, side seam pockets, back zipper, and sleeve variations.  It is available in two size groupings (4-14 and 14-22).

NOTE:  The pattern envelope indicates that there are side seam pockets and the back view drawings show pockets.  But there is no pocket pattern included.  This is no biggie, you can used a pocket pattern from another design.  Vogue should update this error.


Did it look like the photo/drawing on the pattern envelope once you were done sewing with it?  Yes, my dress does look like the pictures on the envelope.  I didn't to the top stitching as shown in view A, and my sleeves are shorter.  I was aiming for more of a 3/4 length sleeve.

Were the instructions easy to follow?  The instructions were typical.  Nothing in them was confusing or difficult to follow.  I omitted several steps based on how I wanted my dress finished.  I will discuss that in the design changes and alterations.

What did you particularly like or dislike about the pattern?  There is so much I like about this pattern.  It has great bones.  My likes:

  • I love the full skirt.  It is very lady like.  I didn't have to make adjustments to the side on the dress.  Often with this type of skirt, I sometimes need to shorten along the sides of the dress.
  • mock wrap dress.  This is one of my favorite necklines.  And the design/fit of it was perfect, even after my FBA.  No small tuck needed.
  • Lined dress.  One of my usual preference.  
My dislike:
  • I didn't like not being able to easily try on the bodice during the construction process.  I had to base the center back seam (zipper) to see how the fit was coming along.  Nothing else.

Fabric Used:  As stated before, my fabric is from Mood Fabrics.  I purchased it awhile ago and it is no longer available.  It is a cotton/rayon blend I do believe.  Easy to work with, easy to press and soft to the touch.  I tested a piece in the wash.  Just to see if it washes well.  It did.  But I will be sending this dress to the dry cleaners.

Pattern alterations or any design changes you made:  My usual fit adjustments.  See Notes on a Pattern.  Additionally, for the FBA I shortened the Dior dart by half the length.  It looks better.  My design and construction changes:

  • I only lined the bodice.
  • I added hem tape to the hem of the sleeves and skirt.
  • To eliminate the fear of the center front gap or opening, I tacked at the intersection of the front.
  • Shorten the sleeve length
  • Positioned the back shoulder dart on a angle.  It also looks better.  See back bodice adjustments.


Would you sew it again? Would you recommend it to others?  Yes, and yes.  I will probably make a summer version. Also, I may use the bodice and/or the skirt with other designs.  I love this pattern, and recommend it to others.


Conclusion: Love, love making this dress and how it turned out.  The design is classic and I think it looks good on me. ;-)  

Happy Sewing!

C

LinkWithin

Blog Widget by LinkWithin