Showing posts with label practice. Show all posts

Monday, January 24, 2022

Notes On A Pattern - Adding Welt Patterns to Vogue V1294


Goodness, I haven't done a Notes on a Pattern in a while.  Being on Instagram more these days, make it so easy not to come to blogland to surf or post.  

So many of my recent posts have been made well after I've posted on Instagram or to other platforms.  I want to get back to reading blogs and posting on a more consisted basis.  Yeah, I know, I've said that before. 

Anyway, this note is about adding welt pockets to a pair of pants.  One of my goals is to continue to add more welt pockets to my garments.  For these pants, I simply used a welt pocket pattern from another pattern.  Sorry, I can't remember which one.  I made another copy of the pieces and added them to the envelope of Vogue V1294.  I already know I will make these pants again.


I really like the draft of these pants.  There is a "real" fly, and the curved waistband is the best.  Also, the crotch isn't super long.  I didn't have to shorten it.  The width of the pant leg is great too.

Before I added the pockets to the pants, I did a test pocket just to make sure. ;-)  It turned out perfect.  Next, time to add the pockets to the back of my pants.  This was the next step in the construction after I made the darts.

Placement is really important.  From what I've read, the tip of the dart shouldn't extend pass the bottom of the welt. 

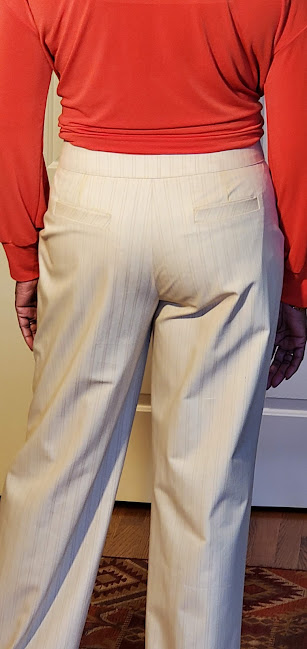
But I notice that my pockets are a little low on the back side.  So, next time, I think I'll add an inch to the top of the waist.  It won't be too much above the waistline as these sit kind of low to begin with.  And with that small change, I can raise the pocket an inch.

More later on the making of my pants.  Stay tuned.

Parting Shot:  View of my pockets with me wearing the pants.  I'll post a full photo after I post to Minerva's website as this is a Minerva sponsored project.




Friday, May 15, 2020

Shirt Making Project Spring/Summer 2020 - Simplicity S1166


Sometime in January, I decided to do another "Shirt Making Project".  To start, I cut out three shirt using Simplicity S1166.  These shirts were in a bag in the UFO bin that I had almost forgotten about.  This week I decided it was about time I made them.  This is a pattern that I used before.  The initial review and project here.

I like the shape of the collar and design of the sleeves.  These details make it a little better than your average button down shirt (to me).  They can  also make or break the project as they are focal points of the garment. Making this batch of shirts was an opportunity to do a lot of top-stitching and paying attention to the simple details and construction processes.

Tip 1:  Construction of the Collar

The collar is large and curvy ending in the typical point on each end.  There are a few approaches to making the point just right.  I posted Sandra Betzina's method of redrafting the collar pattern.  The details:  Part I and Part II


For these shirts I used another method.  Sorry I don't know what it is called.  But, instead of sewing the seam and pivoting at the corner.  I made it "squared" at the corner then I pivoted to continue.  This is done in addition to "not" interfacing the corners of the collar.


The next few steps are critical:  Use a pointer/creaser to help turn the collar inside out using the point to push the tip of the collar out.

Next, this is key:  Pressing.  I made sure I gave that collar a great press.


My last step is the top-stitching.  I use thread at each point to help guide the collar under the needle.  Often, at the corners of a garment it is difficult to get the end to move through the stitching area.


This method is also good for the cuffs.


Tip 2:  Construction of the Buttonholes

These days I'm making a lot of garments that button down the front.  This is another focal point and I want it to look as good as possible.  I've said this many times before.  I test before I do it on my actual project.  And for each shirt, each type of fabric I tested making the buttonholes.

After successful testing, I sew the buttonholes on my garment.  They are not complete without some Dritz Fray Check.  After the buttonholes are constructed, I apply fray check and allow it to completely dry before opening the buttonholes.

So that's it for my tips.  I hope this information is helpful.

Happy Sewing!

C

Wednesday, January 17, 2018

Practice, Practice, Practice - Bound Button Holes


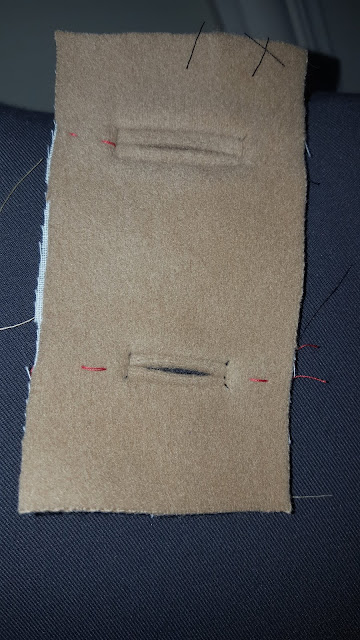
"Practice makes perfect" is a well known buzz-phrase.  It's a phrase that I often use when describing how I intend to build my own skills and confidence.  For 2018 I decided to include "perfecting bound buttonholes".   The image above is my practice test using the coat fabric.  I chose the smaller version for the coat.

Finished Bound Buttonholes on the Coat


You might ask, "Don't you already know how to make them?"  My answer, "Yes, but each time I make them, I need practice like it was the very first time."  I've been working on my first coat of the year, Butterick     .  Instead of regular button holes, I made bound ones.  I'm 75 percent done with my coat and hope to reveal it soon.  But in the meantime, I wanted to share this small sewing goal with you.

On the Wrong Side of the Center Front Coat


There are several online tutorials that give you step-by-step instructions on how to make a bound buttonhole.  Below are a few with the Threads process being very close to how I made mine.  So here goes!

Threads tutorial 

Sewaholic tutorial 

LolitaPatterns tutorial 


Happy Sewing!
C

LinkWithin

Blog Widget by LinkWithin