Showing posts with label welt pockets. Show all posts

Monday, January 24, 2022

Notes On A Pattern - Adding Welt Patterns to Vogue V1294


Goodness, I haven't done a Notes on a Pattern in a while.  Being on Instagram more these days, make it so easy not to come to blogland to surf or post.  

So many of my recent posts have been made well after I've posted on Instagram or to other platforms.  I want to get back to reading blogs and posting on a more consisted basis.  Yeah, I know, I've said that before. 

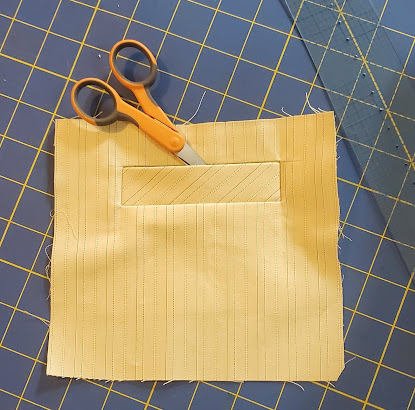
Anyway, this note is about adding welt pockets to a pair of pants.  One of my goals is to continue to add more welt pockets to my garments.  For these pants, I simply used a welt pocket pattern from another pattern.  Sorry, I can't remember which one.  I made another copy of the pieces and added them to the envelope of Vogue V1294.  I already know I will make these pants again.


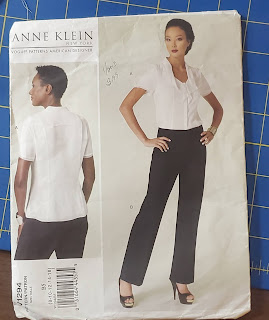
I really like the draft of these pants.  There is a "real" fly, and the curved waistband is the best.  Also, the crotch isn't super long.  I didn't have to shorten it.  The width of the pant leg is great too.

Before I added the pockets to the pants, I did a test pocket just to make sure. ;-)  It turned out perfect.  Next, time to add the pockets to the back of my pants.  This was the next step in the construction after I made the darts.

Placement is really important.  From what I've read, the tip of the dart shouldn't extend pass the bottom of the welt. 

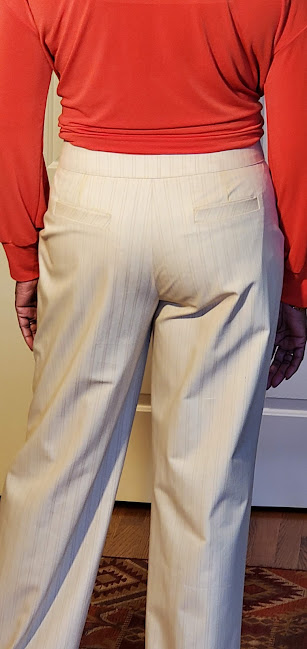
But I notice that my pockets are a little low on the back side.  So, next time, I think I'll add an inch to the top of the waist.  It won't be too much above the waistline as these sit kind of low to begin with.  And with that small change, I can raise the pocket an inch.

More later on the making of my pants.  Stay tuned.

Parting Shot:  View of my pockets with me wearing the pants.  I'll post a full photo after I post to Minerva's website as this is a Minerva sponsored project.


Wednesday, January 29, 2020

New Look NL6013 Finished Jacket Reveal - Not Just One But Two


Finally, I have some pictures of me wearing my new jacket!  Sometimes it is a challenge coordinating my photo shoots with my DD schedule, But we final got it done!


Here is the link to the first post on New Look NL6013 Jacket Project. 


If you read the title of this post, you'll know that I not only finished the first jacket.  But also made a second one.  All of the adjustments were so labor intensive, I decided to go ahead with making another one.


My second version is made with a stretch woven from Fabric Mart.  I bought this fabric last June while attending Sew Camp.  It is like a beefy scuba knit, heavy enough for a coat.  The stretch is maybe 1 or 2 percent, not a lot.  I love the rich color of it and am very glad I bought it.  This fabric caught my eye after I made my big purchase.

The sewing was easy.  No more major adjustments needed.  For this jacket I decided to make it as designed:  no lining or welt pockets added.  I added another inch to the length of the jacket, making it a total of three inches added.  The original jacket length is more like vest length.  With my board shoulders the shorter length makes me look wider than I am.  And that's not good.  The new length is perfect.

I did make one other change: no shoulder pads.  This fabric has a lot of body and holds it's shape very well.


I didn't have enough fabric for the under lapel.  So I used a Marcy Tilton ponte knit remnant.  I was so happy I kept it.  Turns out it was the perfect weight, lighter than the jacket fabric.  A plus as it reduced the bulk along the neckline. Score!


I'm happy with the outcome of both jackets.  The first has a few tailored features and the feel of the natural fibers is wonderful.  I'm very pleased with how the welt pockets turned out. The second jacket is more slenderizing; the fabric a little stiffer but wear well.

So that's it for New Look 6013 jacket for now.  I'm working out my sewing plans for February, which will include a coat and a skirt so far.


Oh I forgot to mention, sewing for January, 2020:  two jackets, two pull over tops, and one pair of pants.  The pants are a waddler. I'm actually wearing them with the first jacket.  All kinds of issues.  More on the January sewing review later.

Happy Sewing!
C

Tuesday, July 16, 2019

Sew Cargo Crazy - The Second Pair Simplicity 5102


Good morning everyone!

I'm a few days late with this post on the second pair of cargo pants.  But nevertheless.., 

It has been so much fun doing the Mood inspired cargo pants challenge with my friend, Rhonda!


We are in week 2 of our little "Sew Cargo" Challenge.  If you have been following my blog, Rhonda and I decided to do a cargo pants sew challenge for the month of July.  This challenge came about during a conversation about a newsletter emailed that we received from Mood featuring a cute pair of cargo pants.  We decided to use Simplicity 5102 to make three pants and one skirt.


Our first pair were featured on our respective blogs last Saturday.  Now, for this week we decided to spice it up a little.  Starting with our fabric.  We both selected stretch cotton twill from Mood:  for Rhonda - #326441-Navy on Arona Blue Bricks Printed Stretch Twill; for me #324496 Moonlight and Traupe Gray Block Printed Stretch Twill.  I love working with this fabric, and it is perfect for cargo pants.  Cargo pants are all about the pockets.  And you can never have too many when your hiking along a sight seeing trail or attending a summer neighborhood festival. Lots of places to store things to keep your hands free.  So why not add a few more pockets.  This time with zippers.  Like the inspiration pair, I also added zippers to the lower center front.  My zippers are functional.  The leg zippers can be unzip for a wider leg or zipped to make them tapered.


Again, I used View C of the pattern making the changes below:
  • Added a waistband
  • Added a front fly
  • Lengthen the pant leg
  • Tapered legs  from the hip to the hem
  • Added 1" to the width of the upper front pocket.  I forget to mention this in my first review.


This cargo pant pattern is a winner!  Did I say that before?  Lol  I love it and will definitely make these again after the challenge is over.

BTW - Mood has truck loads of stretch twill available. 


If you are interested in my process for adding the zippered pockets and the pant leg zippers, check out my blog post, here.

Parting Shots:  It was a beautiful day in Veteran's Park.  Lovely flowers and everything is so lush and green.  The turtles were even sun bathing.


I am very happy with how my second pair of cargo pants turned out. The print of the fabric and the zipper detail make these pants pop.  Another great thing about them, there is secure pockets in the front as well as in the back.   For next week, I'll make a pair of cargo pants for my DD.  So stay turned.

Happy Sewing!
C


Thursday, July 11, 2019

Zipped Pockets and Pant Leg - Sew Cargo Crazy - Tutorial

I wanted to post a little tutorial on how I made the zipped pockets for my second pair of cargo pants.  


Zipped Pockets -


It was so easy to add the pocket zipper detail.  Here's how:  

  • First, I determined the length and width of the pocket and the zipper opening.  It's up to you on the size of the pocket.  I just cut some them and adjusted the width and length according to the area placed on the pants.  The front zipper is 6" and the back is 5".  
  • Next creating the welt pocket window for the zipper.  I drew the rectangle on an interfaced "welt", about 2" longer than the zipper and 2.5" wide.  The height of the window is 1/2" with the cutting line in the middle, at the 1/4" point.
  • I stitched on the drawn stitching line using machine stitch length at 2.  The stitching has to be exact with no back stitching.
  • Slash along cutting line.  Turn the welt to the inside of the pocket. 
  • Pressing is super important.  Open each of the long ends of the welt and press.  Then press the entire welt to the wrong side of the pocket.  You should have a nice rectangle opening for the zipper.  


  • Evenly position the zipper from the wrong side of the pocket and pin it in place.


  • Stitch the zipper in place.  I did two rounds of stitching to show up the contrasting thread.

  • For the back pocket I added a stripe of fabric to the top using the wrong side of the fabric to create a contrast band. This creates the illusion of a top opening pocket.  It's actually stitched all the way around with the zipper being the actual opening.
  • The final step is to secure the zipped pockets to the pants.
  • *Note before I was happy with the opening of the pockets, I practiced a few times just to make sure. ;-)

Front Lower Leg Zipper -

These were added to emulate the inspiration pants.  I like the idea of being able to adjust the width of the pant.  The leg zippers should be placed and sewn before the front and back pant legs are sewn together.

  • First, I had to determine the length of the pants.  To prevent them from bunching up, the hem should be at the ankle or shorter.  The top of the zipper is at the edge of the hem.
  • Next, I marked the front center of the pant leg with pins the length of my zipper.
  • Using the marked front center, starting at the lower edge each zipper tape is placed an inch apart (each 1/2" from the center).  For the opposite end of the zipper, it's is 2" apart (each 1" from the center).  Each side is pinned in place.
  • Finally, sew two rows of stitches to secure zipper to the pants.  Now the front and back pant legs can be sewn together.
I hope this was helpful.  Stay tuned.  My next pair of cargo pants will post soon.

Happy Sewing!
Cennetta

Tuesday, March 26, 2019

Burda Style Boyfriend Coat - Coats in March Part II


Coat number two.  This coat is so for right now.


I'm batting a 100 with my selecting fabrics from Mood.  I've had nothing but success and happiness when I select a textiles and other goodies from Mood.  My coat is made of Mood's Infinity Black and Multi-Color Gray/Black Abstract.  I purchased this about two years ago, but was undecided about what kind of coat to make.  I chose this fabric because of it's unique texture and weave.  I love combining classic styles with interesting fabrics. This one has a lot of body.  It's a looser ropy weave with a slightly rough hand.  When cut, it unravels like a jacquard.  So you need to finish the edges or sew it up quick.  It presses easy and is easy to mold into shape.  If you are so inspired to make a coat, here is a link to some gorgeousness.


The upper collar of my coat is Mood's Faux Black Bear Fur (#312623).  Sorry it's no longer in stock.  But come fall you may be able to see it again at the online store.  It's thick, soft and shiny.  It feels wonderful against my skin.  Here is a link to a variety of Faux Fur. There is so many styles and choices to choose from.


To cut the faux fur, I used a single edge razor blade instead of scissors.  First, I started by trace the pattern onto the wrong side of the fur with tailor chalk.  Then I used the razor to cut out the upper collar.  This method reduces the amount of cut fur.  After sewing the upper and under collars together, I used a straight pin to pick out the fur caught in the stitches.


The lining is Canary/Rose iridescent twill lining.  (#FN26445).  You can't go wrong with Mood's twill lining.  I order it all the time to line coats, dresses, skirts.  You name it.


This is the second coat that I made using Burda Style 6462.  You can find some of the basic pattern details here on my blog.

for this view, I only made a few minor changes:


This pattern is perfect for that desired boyfriend coat that you've been wanting to make.  One of the things that drew me to this pattern was the welt pockets and another opportunity to practice making them.


For the buttonholes, I did two applications per buttonhole to help reduce the chance of fraying.  Then I generously applied Fray Check allowing it to dry over night before cutting the buttonholes open.  It worked like a charm.


I'm going to get a lot of wear out of this beauty.  Starting this spring! ;-)


Happy Sewing!
C


LinkWithin

Blog Widget by LinkWithin