


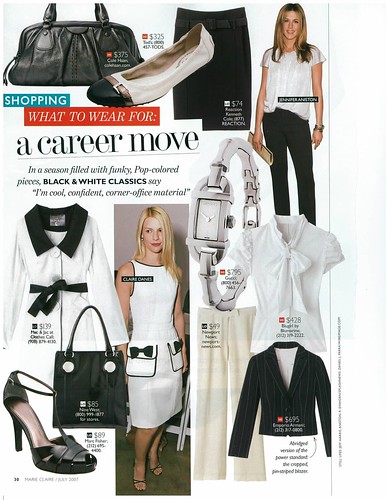
This is one of two dresses my DD modeled in the show. It was inspired by a dress worn by Claire Danes. Her dress is a sheath. But I decided to use a shift dress pattern by Butterick. The goal was to create my own version of the pocket embellished dress.
Review:
Fashion show segment - American Beauty
Pattern Description: Career Casual Wardrobe pattern - shift dress, bias long skirt, princess seam jacket with collar, and slim slacks.
Pattern Sizing: 6- 22. I used size 12.
Did it look like the photo/drawing on the pattern envelope once you were done sewing with it? Yes, except for the pockets and the piping that I added.
Were the instructions easy to follow? Yes, I really didn't use them. I basically followed my own method. I didn't use the facings because I prefer to lining my dresses. So I only used the front and back for my dress. More on that later.
What did you particularly like or dislike about the pattern? This one has been in my collection for over fifteen years. I needed a simple pattern to create the "look" of the inspiration dress. This one fit the bill. No dislikes.
Fabric Used: Wool gabardine for the dress and china silk for the lining, both purchased at New Rainbow Fabric on Roosevelt.
Pattern alterations or any design changes you made:
Alterations - Pigeon chest adjustment
This time I decided to try a pigeon chest adjustment hoping for a better fitting dress. In the past I had a few challenges trying to get the best fit for DD. Last time I measured her, it dawned on me that I should try a pigeon chest adjustment instead of a mini FBA.
Design Changes - Piping was added to the armholes, neckline, and pockets to copy the design elements of the inspiration dress.
I used an invisible zipper instead of a regular one.
The facings were omitted. Instead I used the front and back dress pattern to make the lining.
Pockets:
Here are the steps that I followed to create the pockets.
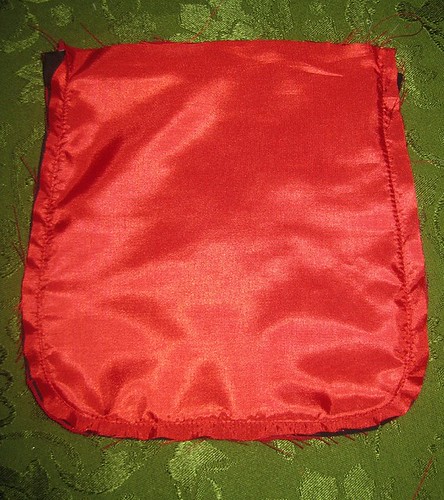
Step 1 - For the pocket, I used the pocket pattern from S2508, pieces 15 and 16. The pattern was scaled down to fit the size of the dress. Here you can see how the piping is pinned to the pocket. At the curves I clipped the allowance of the piping to ease it as I pinned it to the pocket.

Step 2 - I sewed the piping to the pocket using black thread on top and red thread on the bobbin.

Step 3 - I place the lining (cut crosswise) over the pocket. Then stitched. At the upper edge, I slightly pulled the piping to curve it at the seam allowance.
Step 4 - At the top, I stitched the opening about 2 inches on each side leaving an one inch opening to turn the pocket.

Step 5 - Turned pocket.
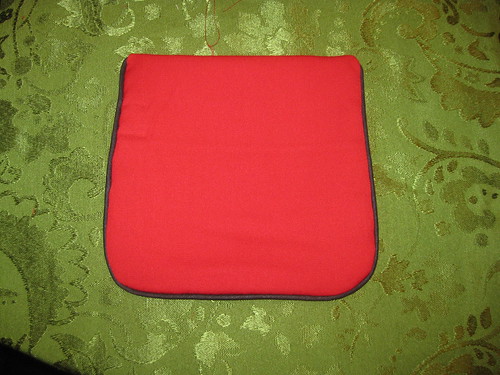
Step 6 - Press the pocket.

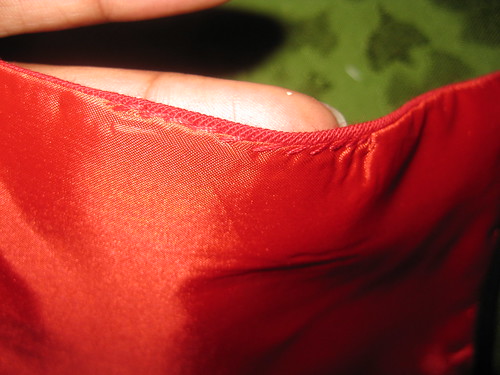
Step 7 - Using a slip stitch and sewed the opening closed.
Step 8 - Make a bow. Fee Style. I didn't use a pattern to make this box. It was sized based on the size of the pocket flap for the dress.
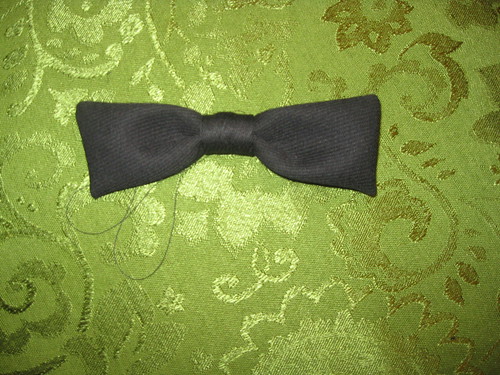
Step 9 - Follow steps 1 through 7 to complete the flap.
Step 10 - Attach bow to flap step 11 - Test positioning flap and pocket on dress. When the position is right, stitch to front of dress.

Would you sew it again? Would you recommend it to others? No. I'm going to make a matching jacket. If others want to recreate the Claire Danes dress, this is one approach. It depends on what the sewist/design wants to create.
Conclusion: I'm satisfied with my copy of the C. Danes dress. So this project worked out well for me. And DD likes the dress. I can't beat that.
Pattern Sizing: 6- 22. I used size 12.
Did it look like the photo/drawing on the pattern envelope once you were done sewing with it? Yes, except for the pockets and the piping that I added.
Were the instructions easy to follow? Yes, I really didn't use them. I basically followed my own method. I didn't use the facings because I prefer to lining my dresses. So I only used the front and back for my dress. More on that later.
What did you particularly like or dislike about the pattern? This one has been in my collection for over fifteen years. I needed a simple pattern to create the "look" of the inspiration dress. This one fit the bill. No dislikes.
Fabric Used: Wool gabardine for the dress and china silk for the lining, both purchased at New Rainbow Fabric on Roosevelt.
Pattern alterations or any design changes you made:
Alterations - Pigeon chest adjustment
This time I decided to try a pigeon chest adjustment hoping for a better fitting dress. In the past I had a few challenges trying to get the best fit for DD. Last time I measured her, it dawned on me that I should try a pigeon chest adjustment instead of a mini FBA.
Design Changes - Piping was added to the armholes, neckline, and pockets to copy the design elements of the inspiration dress.
I used an invisible zipper instead of a regular one.
The facings were omitted. Instead I used the front and back dress pattern to make the lining.
Pockets:
Here are the steps that I followed to create the pockets.
Step 1 - For the pocket, I used the pocket pattern from S2508, pieces 15 and 16. The pattern was scaled down to fit the size of the dress. Here you can see how the piping is pinned to the pocket. At the curves I clipped the allowance of the piping to ease it as I pinned it to the pocket.
Step 2 - I sewed the piping to the pocket using black thread on top and red thread on the bobbin.
Step 3 - I place the lining (cut crosswise) over the pocket. Then stitched. At the upper edge, I slightly pulled the piping to curve it at the seam allowance.
Step 4 - At the top, I stitched the opening about 2 inches on each side leaving an one inch opening to turn the pocket.
Step 5 - Turned pocket.
Step 6 - Press the pocket.
Step 7 - Using a slip stitch and sewed the opening closed.
Step 8 - Make a bow. Fee Style. I didn't use a pattern to make this box. It was sized based on the size of the pocket flap for the dress.
Step 9 - Follow steps 1 through 7 to complete the flap.
Step 10 - Attach bow to flap step 11 - Test positioning flap and pocket on dress. When the position is right, stitch to front of dress.
Would you sew it again? Would you recommend it to others? No. I'm going to make a matching jacket. If others want to recreate the Claire Danes dress, this is one approach. It depends on what the sewist/design wants to create.
Conclusion: I'm satisfied with my copy of the C. Danes dress. So this project worked out well for me. And DD likes the dress. I can't beat that.
Cenetta,
ReplyDeleteI have been drooling over your creations that you made for the fashion show. This is a lovely dress. I love the pocket treatment.
Angela
Love this dress in RED..!!
ReplyDeleteYou know this same picture is hanging on my inspiration board! I can't believe that you've made such an amazingly awesome version! I'm pea green with envy I tell you...pea green!!
ReplyDeleteI adore the pockets~ thanks for showing step by step! I need to copy it! hey, are you going to PR weekend?
ReplyDeleteLove the pockets! They really make the dress. Your DD looks lovely in it!
ReplyDeleteThe trim on the pocketw and neckline really pops that red! Beautiful dress.
ReplyDeleteGirl you are BAD!!! That is the perfect office to evening dress for me! I'd love it in fushia and black!
ReplyDeleteLove the black piping on the red!
ReplyDeleteThis is such a cute dress. Love your choice of color with the black trimming.
ReplyDeleteStunning! I like the silhouette you chose better than the original.
ReplyDeleteJust love this dress. It's adorable.
ReplyDeleteGreat job. The bows are such a nice touch.
ReplyDeleteThis is too adorable! I would wear that in a heartbeat. I am so impressed with your piping, it is not an easy thing to do well.
ReplyDeleteThis is so cute!! And suchk a good match to the original! I love it! You wear it very well.
ReplyDeleteLoOvely dress Cenetta. Can you buy piping ready to use in America or did you make bias strips and make your own? Is there piping oin neckline or a bias trim? Once again you have inspired me.
ReplyDeleteOh, wow, I love this one, too. This is fast becoming my favorite out of all the things you've made for the show.
ReplyDeleteBeautiful dress, love the color and the added touch to the pattern,great job
ReplyDeleteLovely dress, the red and black is very striking.
ReplyDeleteVery cute dress! I sure hope they really showed their appreciation for the beauty of this dress during the show!
ReplyDeleteThanks everyone! Your compliments are always appreciated. MaryMary... I buy my piping ready made.
ReplyDeleteThanks again.
Cennetta
Amazing work!
ReplyDeleteLove this dress! This post is going in my inspiration bookmarks :)
ReplyDeleteThose pockets are DIVINE! Thanks so much for the tute!
ReplyDeleteJust wanted to let you know that we like your version of B4941 so much we posted a link to your blog from our Butterick Patterns Facebook page. Great job!
ReplyDelete