Friday, January 27, 2017

Vogue 1232 - Not Your Typical African Wax Print Skirt


This was a fun project.  I enjoyed researching possible skirt styles and the sewing process.  For months I've thought about making something with an African wax print fabric.  So when I received the e-mail  about the January challenge, it was a welcomed surprise.  Perfect in that it would helped me to decide on a garment to make.

My print, of course, was this beautiful orange, green, and blue clothe with a diamond motif.  The fabric was so easy to work with. It presses with the slightest of ease.  I actually finger pressed the hem as I sewed it with no trouble at all.  The clothe is smooth to the touch and has a lot of body.  Perfect for the drape of the skirt.  There are several beautiful prints and colors to choose from.


I follow a few people on Instagram, who post pictures of all types of garments.  Then one day, I saw a picture of Queen "B" in a printed skirt and a striped cold shoulder top.


I liked it a lot and thought it's not your typical skirt.  Of course, I had to bring the sexy down a bit.  But it's definitely a winner.  So I searched through the many boxes of patterns I own and decided to use the skirt of Vogue 1232.


The pattern is described as:  Close-fitting, lower calf at center back length, lined dress has front darts, front and back princess seams, lapped fronts, shaped lower edge, gathered flounce, armhole overlay, collar with collar band, left side invisible zipper, self-fabric flower with large and small petals and pin back, self-fabric belt and thread belt carriers.  It's out of print, but still available on the website.  For my skirt, I used a straight size 16.  No real fit issues.


 Most of the pattern pieces are from shoulder to lower hip area.  So I cut it at the lengthen and shorten line just above the natural waistline.  I chose this location to give me a little more flexibility in determine where I'd like to where the skirt on or above my natural waistline.  The front overlapping panels are about an inch shorter than the other panels.


The majority of my other changes were centered the construction of the skirt.  I decided to omit the zipper converting it into a wrap skirt closing at the side front.


NOTE: There is an error on the pattern guide sheet.  The illustration has the joining of skirt 17 and 18 in reverse.  I sewed french seams on the skirt for a clean finish on the inside.  After sewing the entire skirt together, I attached the lining where the flounce and yoke are sewn to conceal the seam.  Then I based the lining and the skirt together at the top of the skirt.  Instead of a facing or waistband, I attached petersham ribbon to finish the waist.  To finish it off, I sewed a hook, eye, buttonhole, and button for the closures.


I really like how the skirt turned out.  It is a unique style for an African wax print skirt. I don't know if I will make another skirt.  We will see. ;-)

My likes about the pattern:  the flounce and the fitted yoke.  No dislike, other than the confusing illustration for the skirt construction.

In conclusion, I really enjoyed the process of making this skirt.  I'm thinking about making the dress.  I like the style of the dress.  It would look great in a linen or challis.


Happy Sewing!

C


Thursday, January 26, 2017

Notes of a Patterns - Vogue 9205 Knit Top with Neck Darts


This is just a simple t-shirt pattern with neck darts.  You can probably make it using a t-shirt pattern that you already own.  I guess I could have too, but I didn't want to take the time to make the adjustments.


Anyway, you would think that the darts would add enough through the rest of the top to compensate for other fitting issues that may cause the top to fit too tight around the body.  But when I examined the measurements, I found that it would still be necessary to do a FBA.  I did not to add bust dart given that the top already had six darts for a design element.  Again, I was feeling a little lazy about making more adjustments.  So I made the first one with the bust darts to see how it would look.

The pattern comes in sizes 4 to 26.  It can be used to beef up your wardrobe with staple t-shirts.  And it's not limited to the sleeves that come with it.  You can pair other sleeves with it as well.

One of the things that I like about Vogue simple t-shirt type patterns is that they come with a neckband.  And I've found the fit around the neck is not as wide as some of the other commercial patterns.   For this one I did found the the length of the shoulder seam is too long.  I think I shaved off about 3/4 inch for a better fit.

Below is my FBA on the pattern along with the back adjustments.  I didn't make the adjustment to the shoulder length until after I tried on the top minus the sleeves.  To secure the neck darts, I pull the end threads to the wrong side of the top and tied a knot.  Also, I created a center back seam by just adding seam allowance to the center back.


As you can see the bust dart doesn't look bad.  They provide the needed shaping in the bust area for a good fit.
The sleeves look a little wacky, but they are fine.

This is a super easy top to sew, outside of making sure the neck darts are the same length on left and right sides of the top.  I glanced at the instructions, not spending time to read them.  I will probably make several more of this t-shirt.  It's great under jackets and cardigans or by its self with your favorite pair of jeans.

It's easy and sews up really fast.  I recommend it to beginners to advanced sewists.

Happy Sewing!
C


Wednesday, January 25, 2017

New York, New York!


By now, many of you know that I was in  New York to meet up with a few of my east coast friends.  Carolyn posted about our meet up and shopping day last week. I had a great weekend, but a few days later I came down with a very bad head cold. Today I am still not 100 percent but feeling much better.

When I arrived at the hotel on Friday night (1-13-17), I joined Andrea, Gaylen, and Carolyn for dinner.  We had a wonderful visit and discussed how we would shop the Garment Center on Saturday.  Of course, our first stop would be Mood Fabrics.


This was my first shopping experience in the physical store.  Let me tell you, it is huge.  If your in NY, you should check it out.  My fabric haul was heavy.  So I just had them ship it to me.  Our mini shopping spree also included stops at:  SIL Threads, Chic, Pracific Trimming, and Spandex House were I purchased more fabric and other sewing goodies.  It was a fun day of shopping.  There were many, many stores in the area, but too many to stop by in a short period of time.  Carolyn was so good about mapping out some great spots to hit during our day of shopping.

After a very hard day of work, I mean shopping, we  went to Rosa Mexicano for dinner.  A few more ladies join us:  Sheila and Olgalyn.  We had a fantastic time and I couldn't believe the weekend was nearly over.  I wanted to stay for at least two more days.

We made the trek back to the hotel.  Most of the sewing ladies headed back to the homes.  Andrea and I spent one more night at the hotel.


Then on Sunday morning we palled around New York city.  Andrea and parted our ways as I got into the taxi to head for the airport.  I smiled and chuckled as I reflected on the great time I had with my friends.  A special group of friends that I would have never known.  I first met most of them on the internet through blogging and social media.  A lot of bad can be say about the internet and social media, but there is also a lot of good to be say as well.  What I know for sure, these things have made it possible to establish friendships across vast bodies of water hundreds, thousands of miles away.

Parting Shot:  Me pictured with Eric owner of Mood.  Great Guy!

Happy Sewing!
C

Wednesday, January 11, 2017

Simplicity 4076 - The Pattern That Keeps on Giving


I've used Simplicity 4076 at least ten times making the various views, especially the t-shirt view with the gathered neckline.  This is a pattern that keeps on giving.  My latest top made was a much needed neutral top that could be worn with a few coordinates in my closet.  Here it is pictured with a faux fur vest that I got for Christmas.


Tuesday, January 10, 2017

Color - New Life New Beginnings with Greenery - 2017 Color of the Year


Pantone has named Greenery the color of the year. It symbolizing renewal.  It speaks spring.  Greenery is the new neutral.  Pantone has provided several color combinations from brights to pastels. Surprisingly, there are many color combinations that I didn't imagined would work together.  Luckily enough, many of the palettes contained a few colors from my personal color palette (outlined in red) that will work for me.

Below are the palettes each having a catchy name associated with them.  My favorites are Moody Blooms and Fathomless because they contain many of my favorite colors. What are your favorite combinations?  Will these palettes influence the color fabric, garments, hair you select this year?


Monday, January 9, 2017

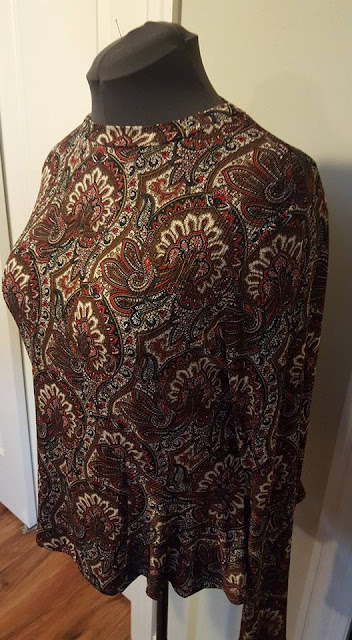
Notes on a Pattern: Vogue 9128


For the most part I don't like to purchase patterns that only provide a drawing of the garment.  I like to see it actually made and shown on a person.  But I thought this one was cute, and I wanted to give it a try.


What I like about it are the flounce hemline and the princess seam.  For the peri-crafters' first January challenge, I chose this top to make.  My first step was to make the pattern fit adjustments starting with a full bust adjustment (FBA).  Typically with knits I don't make the full adjustment as the knit does have some stretch.  This pattern calls for moderate stretch fabric.  My fabric has about 40 percent stretch.  When I make a FBA on a princess garment, I always have excess fabric below the bust through the hemline.    So with this top I knew I will need to eliminate the excess fabric along the sides of the top.  The amount depends on the stretch of the fabric, which I determine after sewing the front and back together at the shoulders.


I did not make any back or shoulder adjustments.  One thing I'd like to point out is the length of the shoulder seam is too long.  I believe this is something that is common in the big four pattern companies.    For me the shoulder seam is about 1/2" too long.  So I just trim that off.  Finally, I lengthen the sleeve about an inch.

The construction was simple and typical.  There is nothing confusing on the guide sheet.  I attached the neckband before sewing the side seams.  Also, I used a twin needle to finished the hem on the sleeve and the flounce.

This was a very easy sewing project.  The top goes together quickly.  I can see a few more of these in my closet.

No pictures of me wearing the top.  I hope to take some soon.

Happy Sewing!
C


Sunday, January 8, 2017

Happy New Year!


Happy New Year!

We are already eight days into the new year.  It is so amazing how fast time is passing.  I'm still wondering what happened to the summer.  It came and went so quickly.

At Christmas, I thought about what I might say on my blog to close out the year 2016.  What could I say about my sewing year and what could I say/share that would start a new year of sewing experiences?  Then my thoughts turned to me preparing to move, moving, shopping, more shopping, working, and other life events.  I concluded; it's been a full and very productive year.  And the low garment production is okay.  I'm happy to be still here, healthy and able to do.

So, I decided not to do a review of last year; nor will I make a "sewing" resolution to sew more or to blog more.  I will take it one day at a time, making the best of it.

I wanted to also say to my followers thank you for continuing to follow and comment on my blog.  It is much appreciated.  I'm always happy when someone comments on my posts.  Also, I hope your year is off to a great start.  God bless and keep on creating beautiful things.  You are an inspiration to me.

Happy New Year!
Cennetta

LinkWithin

Blog Widget by LinkWithin