Showing posts with label prominent shoulder blades. Show all posts

Tuesday, January 25, 2022

Notes On A Pattern - New Look NL6560

Today I wanted to share my pattern fit adjustments of a recent project for Minerva Fabrics.  I actually made these adjustments a few years ago and made a top using New Look 6560, view D.  That top was gifted to my sister, and I didn't think about blogging the details about the project.

This month Minerva is hosting a challenge using New Look patterns.  I decided to use this one because it was ready for use.   My goal is to share the pattern adjustments in case another sewist is planning to try the pattern that may need to make similar fit adjustments. 


FBA


There is a lot going on with these two pattern pieces.  First, I made the FBA on the front rotating the side dart to the gathers above the bust.  Zoom in to see details.  Along the neckline about where the two front pieces intersect, I made a 1/2 inch tuck to reduce gapping at above the bust and in the neckline.  

For the front facing, I added length based on the FBA on the front blouse.  I also made the same tuck to make sure the pieces matched.  As you can see, the lower part of the facing is wider than the upper part.  That's ok.  But you can widen the rest of it as well making sure you do the same to the back facing.


Next, I added the same amount of length to the flounce to make sure it matched up with the front and the facing.


Prominent Shoulder Blades


I simply sliced the pattern from the shoulder seam to the hem to add the desired width.  To true up the shoulder seam, I added a small dart.  The vertical back/waist darts is slightly wider too.  But these can be adjusted as needed.  

I didn't do my usual sway back adjustment because I will wear this top with a belt. 

Note:  This top is really short.  I added about two inches to the bottom of the front, back and front facing.  Check the length to make sure it long enough for you. 

So that's all for the adjustment on this pattern.

Stay tuned!

C


Thursday, October 29, 2020

Notes On A Pattern - Vogue V8627 - Pattern Alterations


I decided to give Vogue 8627 a try.  This pattern has been in my collection for many years.  It is a very simple jacket.  The design lines are basic with an option to sew an asymmetric hem at the back of the jacket.  The front of the jacket has the bust dart rotated to the center front. I pondered how to make a full bust adjustment (FBA) and maintain the integrity of the style lines.  

Today I'm writing a Notes on a Pattern post to explain how I made the adjustments on the pattern to fit me. 


I started the process with just cutting my size, which was not included in this copy.  So I graded the size 14 up to size 16.  Next, I made a muslin just to see what types of changes were needed and to what degree those changes  would need to be made.  My "dream" was not to make a FBA.  HaHaHa.  Just holding the front jacket up to me, I could see that the bust dart needed to be lowered, the center front did not fall where it needed to, and the front waist dart was not in the same location as in the drawing.

I made a muslin using the pattern as is with the size graded up.  As I suspected, the front was too snug and the darts were in the wrong place.  So I definitely needed to make at least a FBA.

Caution - There are many changes to the front jacket.  It may look a mess.  But I'll try to clearly explain all of my adjustments.


Step 1 - I copied the front jacket just in case I "hacked" the pattern incorrectly.
Step 2 - On the copy, I first lowered the center front bust dart by 1".  The area is labelled #1.  This step was pretty painless once I figured out were to cut around the dart to move it down.  I did not want to cut into the area of the collar section.  You can see the slashes around the dart where I avoided the collar/neckline area.  Next, I filled in above where the dart was previously located.
Step 3 - Now, I could start the FBA.  First, I removed the sleeve so I could easily make the FBA.  See #2 slash from the waist up to the apex (which was also moved). The second FBA slash was through the bust dart and the third horizontal slash was made on the lower right side of the first FBA slash. I made a 1" FBA spreading each slash the appropriate amount of space, filling it in and taping it together. This adjustment changed the length and width of the front jacket. Next, the sleeve was reattached.  The FBA created an elongated triangle between the sleeve and the body of the jacket.  Now there is more space between the side of the bust and the arm. 
Step 4 - I didn't adjust the waist dart yet.  Usually that is done during the sewing process of the jacket or the second muslin.  
Step 5 - The sleeve is lengthen an inch or so. 

Below is a picture of the original front jacket placed on top of the adjusted front jacket to show the difference.


Step 6 - The next set of adjustments were made to the lower front and the front edge. These adjustments are made based on the width and length created on the front jacket.  


Step 7 - The final adjustment for the front of the jacket is on the collar.  Sometimes the fullness of the bust creates some gapping in the neckline.  I made a small tuck on the collar and the front jacket where the two are joined.  The small change reduces the possibility of a gapping neckline.


Step 8 - The prominent shoulder blade adjustment was made by slashing through the shoulder and waist darts, spreading the pattern  3/4".  And the sway back adjustment was made by creating a small horizontal tuck across the back as needed.  The added with is also made to the lower back.  The darts on both pieces are adjusted accordingly.  The back sleeve is also lengthen same as the front sleeve.
 

This ends my explanation of my pattern adjustments for this jacket.  Hopefully the next post will be the jacket reveal and my complete review of the project.  Until next time.

Happy Sewing!
C

Tuesday, August 18, 2020

WIP - Garment 4 - Green Wardrobe Capsule - New Look NL6594


Hi everyone,

I'm working on my fourth installment of my Green Wardrobe Capsule, New Look NL6594 . I made the pattern adjustment months ago.  And cut the dress out last week.  The same day severe storms hit the Chicago land area.  Major damage throughout the city and surrounding southern suburban resulting in hundreds of fallen trees and power lines.  My power outage lasted from Monday afternoon until Thursday evening.  Sadly, many are still without power.


Veterans' Park in South Holland


I hope to write my next post in a few days.  It will be a "Notes on a Pattern" post. With a follow up post of my finished dress.  Sewing for myself has been a challenge lately because I'm still making masks, caps, head wraps and bonnets.  My goal this month and the next is to finish the my green wardrobe capsule and to start a new capsule.  One that will coordinate with some of the green garments that I've already made.

Anyway, I wanted to drop in give a little update.   I hope everyone is well and staying safe during this pandemic.


Happy Sewing!

C


Tuesday, May 19, 2020

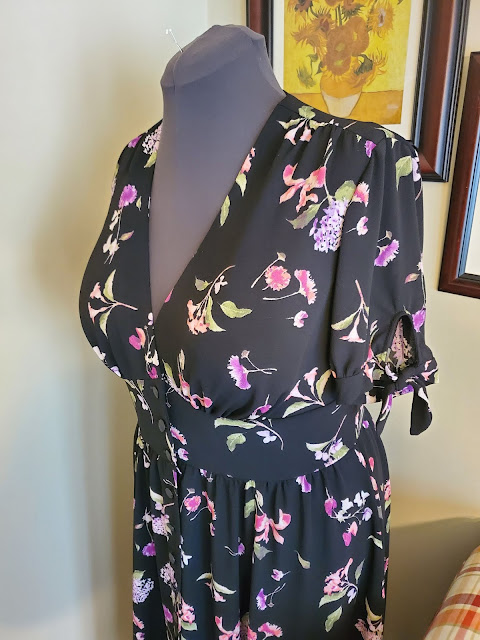
My New Floaty Romantic Dress - McCall M7974 -


This is one of those feel good and pretty dresses that you cherish for years to come.  I love the way it moves.  The floaty fabric dances about you as you walk.   It feels soft and spongy.  The surface has that pebble crepe texture, but it is not rough. 

This is a closeout fabric that I purchased from Mood Fabric last winter.  The fabric was labelled item# 327930 Black Byzantium and Sage Green Polyester Crepe.  Unfortunately, it is no longer available.


This pattern has been made by so many fabulous sewists on Instagram.   All of the beautiful dresses that I saw inspired me to make it too.  I put it on my "To Make List" last year in July soon after I purchased the pattern.  And I think around September I made the pattern adjustments.  I didn't see the need to make a muslin because I'd made dresses with a similar front bodice.  So, I just went from adjusting to laying out the pattern and cutting the dress out. 

I was able to make my own romantic floaty floral dress for which I am very pleased.  So hear is my review.  


The pattern description  given by McCall's  is misses' dresses: buttoned front dress. A, B. C. D has sleeve and length variations, fitted bodice with front midriff, back yoke and gathered skirt with side seam pockets.

It is available in sizes 6 to 22.  I used 16 with modifications.

I made view A with the length between A and C. The skirt takes up a lot of yardage.  I had four yards of the crepe.  It wasn't enough for the length of view C.  

My dress does look like the illustrations.  The bodice is less fitted then I expected.  And that is true for the dress on the model pictured on the envelope.  The "V" neck is deep.  So I am wearing a lace trim full slip underneath.  It's needed for modesty for the dress as a whole because of transparency.  

The instructions were typical.  I've seen these steps in many, many other similar patterns.  There was nothing confusing in them.


My likes for this dress are many:
  • The sleeves of view A and C
  • "V" neckline and midriff
  • The yoke back
  • The fullness of the six panel skirt
  • Buttons instead of zipper.  Nice change
Dislikes:
  • None

I made my usual fit adjustments:


  • FBA -  I started out with a much larger adjustment.  I changed it.  So It might be a little hard to follow what was done.  But here is the photo of the front bodice and the facing.

  • Prominent Shoulder Blades - I added about an inch to the width of the back.  Then gathered the excess for more ease at the shoulder blades.  At the waist, I just gathered at center back.  So it slightly change the design.  Excess could also be taken up with waist darts.  I followed the design with gathers. 
  • I used a bias strip of the fabric to finish the keyhole on the sleeve.  It looks better to me. ;-)
  • Skirt Length Change - I just cut it where I wanted between view A and C.

My chest needs some sun. Tee Hee.


Of course, I have to make it again in a solid color next time. I highly recommend this dress to others.  There are a lot of buttonholes to sew and a lot of gathers to make, but it is worth it.  In the end, you will have a lovely dress.

I  am glad I decided to make it.  I think the sleeves of view A and C are adorable, and I will probably mix and match them with other patterns.   

Happy Sewing!
C


Monday, April 20, 2020

The Pleated Wrap Dress - Butterick B6703


If you follow me on Instagram, you've seen my posts on "My Dress Projects" that I'm currently working on.  I "need" some new ones.  Lol.  Actually, I've been making so many masks.  I need to get back to making other things.

This Butterick wrap dress is relatively new, published 2019.  I haven't made a wrap dress in awhile.  So, I put this one next on my list to sew.


Butterick pattern description:  Wrap dress has semi-fitted bodice with tie closures, front pleats and narrow hem. A: 3/4 sleeve with double-stitched hem, straight skirt with right front pleats. B: 3/4 sleeve with flounce. C: long sleeve with elastic casing. B, C: flared skirt.

I made view A with a ton of adjustments and process changes.  Honestly, I started to write this as two post instead of the one.  But I have some other posts I want to get to this week.

This pattern comes in size groupings (8-16) and (18W- 24W).  I used size 16 with modifications.


The instructions were typical.  Some I didn't follow because there are other construction processes that I like to use.  There is nothing confusing in the instructions.  The pattern is raked: easy; and it was.

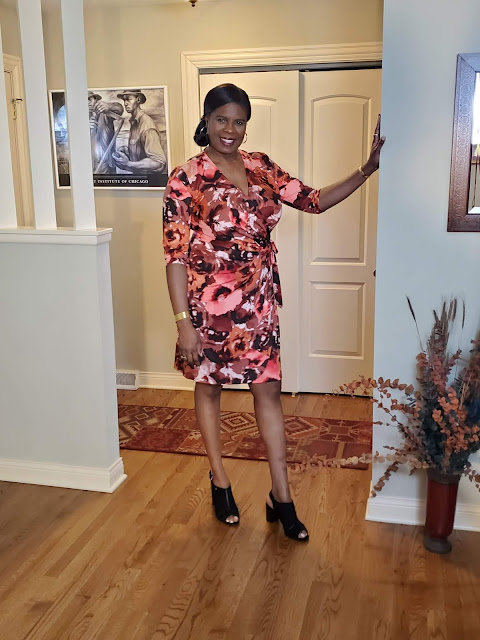
My dress has a lot of changes, but it does look like the dress pictured on the envelope.

There are several things I like about the dress and a few things I disliked about it.  First, my likes: wrap dress, pleats, sleeve variations, skirt-waist dress, and knit comfy.  My dislikes:  I didn't like the way the tie worked and the neckline finishing.

The fabric that I used is from Minerva Fabrics.  It is a very nice jersey knit with about 30% four-way stretch. The John Kaldor Abstract Floral Print Stretch Jersey knit has some of my favorite colors.  Yes, I know it looks a little Fall-ish.  But these colors work well with my skin tone.  I used a sharp sewing machine needle, size 12. The jersey and microtex needles produced a lot of skipped stitches. 

I made numerous pattern alterations and a few construction changes:


  • FBA - this one was huge.  I probably created more work for myself.    Anyway, I began with slashing the front right bodice to add more width and a little more length.  Pictured above.  To eliminate the gapping neckline, I made a small tuck.  With the added width, I had to make an additional pleat at the waist.  The remaining width was removed from the side.  Sorry, it's not pictured here.
  • For the left bodice front, I needed to also add more width and length.  That change resulted in the adjusted above.  Similar to the right side, difference is an additional dart at the waist.  The rest is the same as the right front bodice.

  • Prominent Shoulder Blades, Swayback, forward shoulder Adjustments - First I slashed the back from the shoulder seam to the end of the back (at the waist).  Then I create a small dart at the shoulder so that the shoulder back and front seams are the same length. This change also increase the  width at the waist. I removed the excess at the waist.  Not shown in picture. Next for the swayback I added a tuck starting at the center back and graduating to nothing near the side seam.  Also, I added a center back seam for a better fit.  Finally, for the slightly forward shoulder adjustment I added a little vertical length as needed.  See shoulder seam area.


  • Now for the skirt - almost always I need to lengthen the skirt.  In this case, I only lengthen it by 2".  I could have added more.  I like my skirt to fall at the bottom of my knee.  So next time I'll at 1.5" more.  So lengthening is easy.  With all the changes to the bodice, some changes are needed in the skirt. 
  • Let start with the back skirt.  It's the easiest.  In additional to lengthening the back skirt, I added the tucked amount from the back bodice to the bottom of the skirt.  The compensated for the curved back area.  The left skirt front was lengthen the same as the back.  For the right skirt.  I added width from the waist to the hem to create an additional pleat.  The number of pleats in the skirt, now match the number of pleats in the bodice.  (Note:  This was an after thought. After I noticed that the pleats were off by one.)  Barely noticeable though.  So I had to make adjustments to the top and bottom of the front right skirt.  See picture above.

  • Construction change - 
    • Neck Binding - I preferred to bind with fashion fabric.  So instead of bias tape, I cut a neck band about 22.5" long (3" shorter than the neckline) and 2.25" width.  I folded it in half wrong side together. Pressed. Attached it to neckline easing in the excess.  Then I turned the neck band to the inside and stitched again.  This creates a nice sturdy neckline.
    • Belt - Preference again.  I'm not fond of the twill tape ties on the inside.  I prefer to thread the belt through a slit at the side waist.  So that's what I did.  For the left belt, I made it long enough to wrap around the back to the left side with the length to tie the same as the right belt.  I created a small slit on the right side for the belt to go through.
    • For the narrow hem, I pressed the seam allowance for the hem, applied steam a seam right at the fold line.  Then turned the raw edges in.  At the areas where the belt is attached, I only  turned in the skirt.  Once the hem was finished for the skirt, I secured the belt by making another row of stitches 1/4" away from the edge.
A lot of changes, right?  Whatever it takes. ;-)  With all those changes, I MUST make this dress again.  At least one of the other views.


I like it, and I do recommend it to others.  You might want to make a muslin.  Sorry, I didn't this time. I thought I could wing it.  I think my dress turned out pretty good.  It will be in high rotation when the crisis goes away.


Thank you for stopping by and for reading this very long review.  I truly wanted to include all of the details of "my" sewing experience.  Yours may be different. wink, wink.  Anyway, have a great day!

Happy Sewing!
C


LinkWithin

Blog Widget by LinkWithin