Showing posts with label Green Wardrobe Capsule. Show all posts

Tuesday, March 29, 2022

Simplicity S8992 A Simple Easy Dress


Pattern Description:  Misses' front buttoning dress or cardigan, with options for pattern hacking. Garment length and sleeve length variations. Designed and sized for stretch knit fabrics only. Can be constructed using an overlocker/serger. I used size large with a few modifications. 


Pattern Sizing:  It's contains Sizing XXS to XXL.  I made view A, the dress with belt loops and belt.

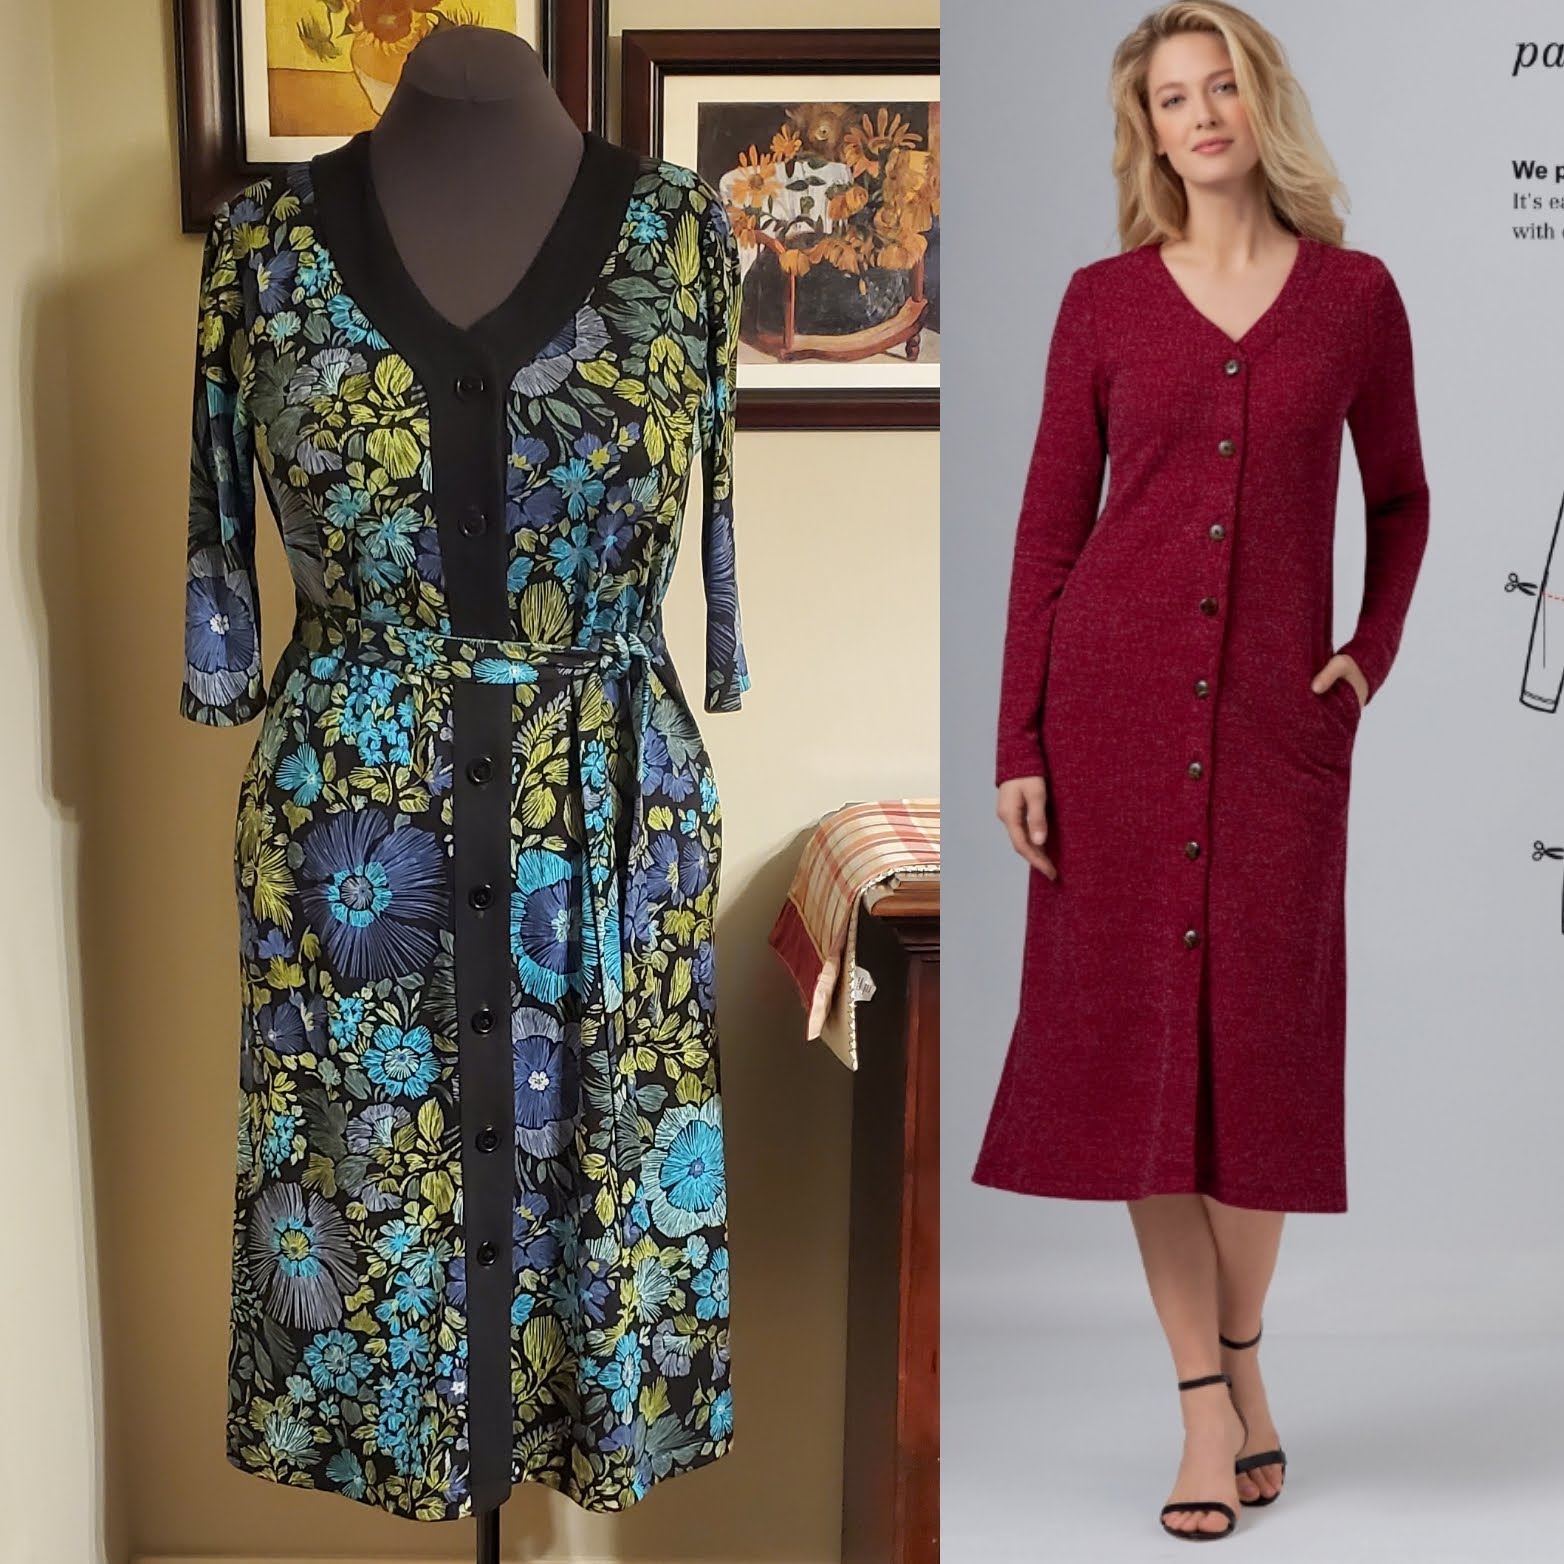
Did it look like the photo/drawing on the pattern envelope once you were done sewing with it?  It does look like the drawing. I decided to contrast the belt and create a contrasting band much like the inspiration dress. Note:  I made two belts: one in the floral knit and the other in the contrasting ribbed knit. 

Were the instructions easy to follow?  The instructions were easy and typical. There was nothing confusing in them. A beginner should be able to make this.

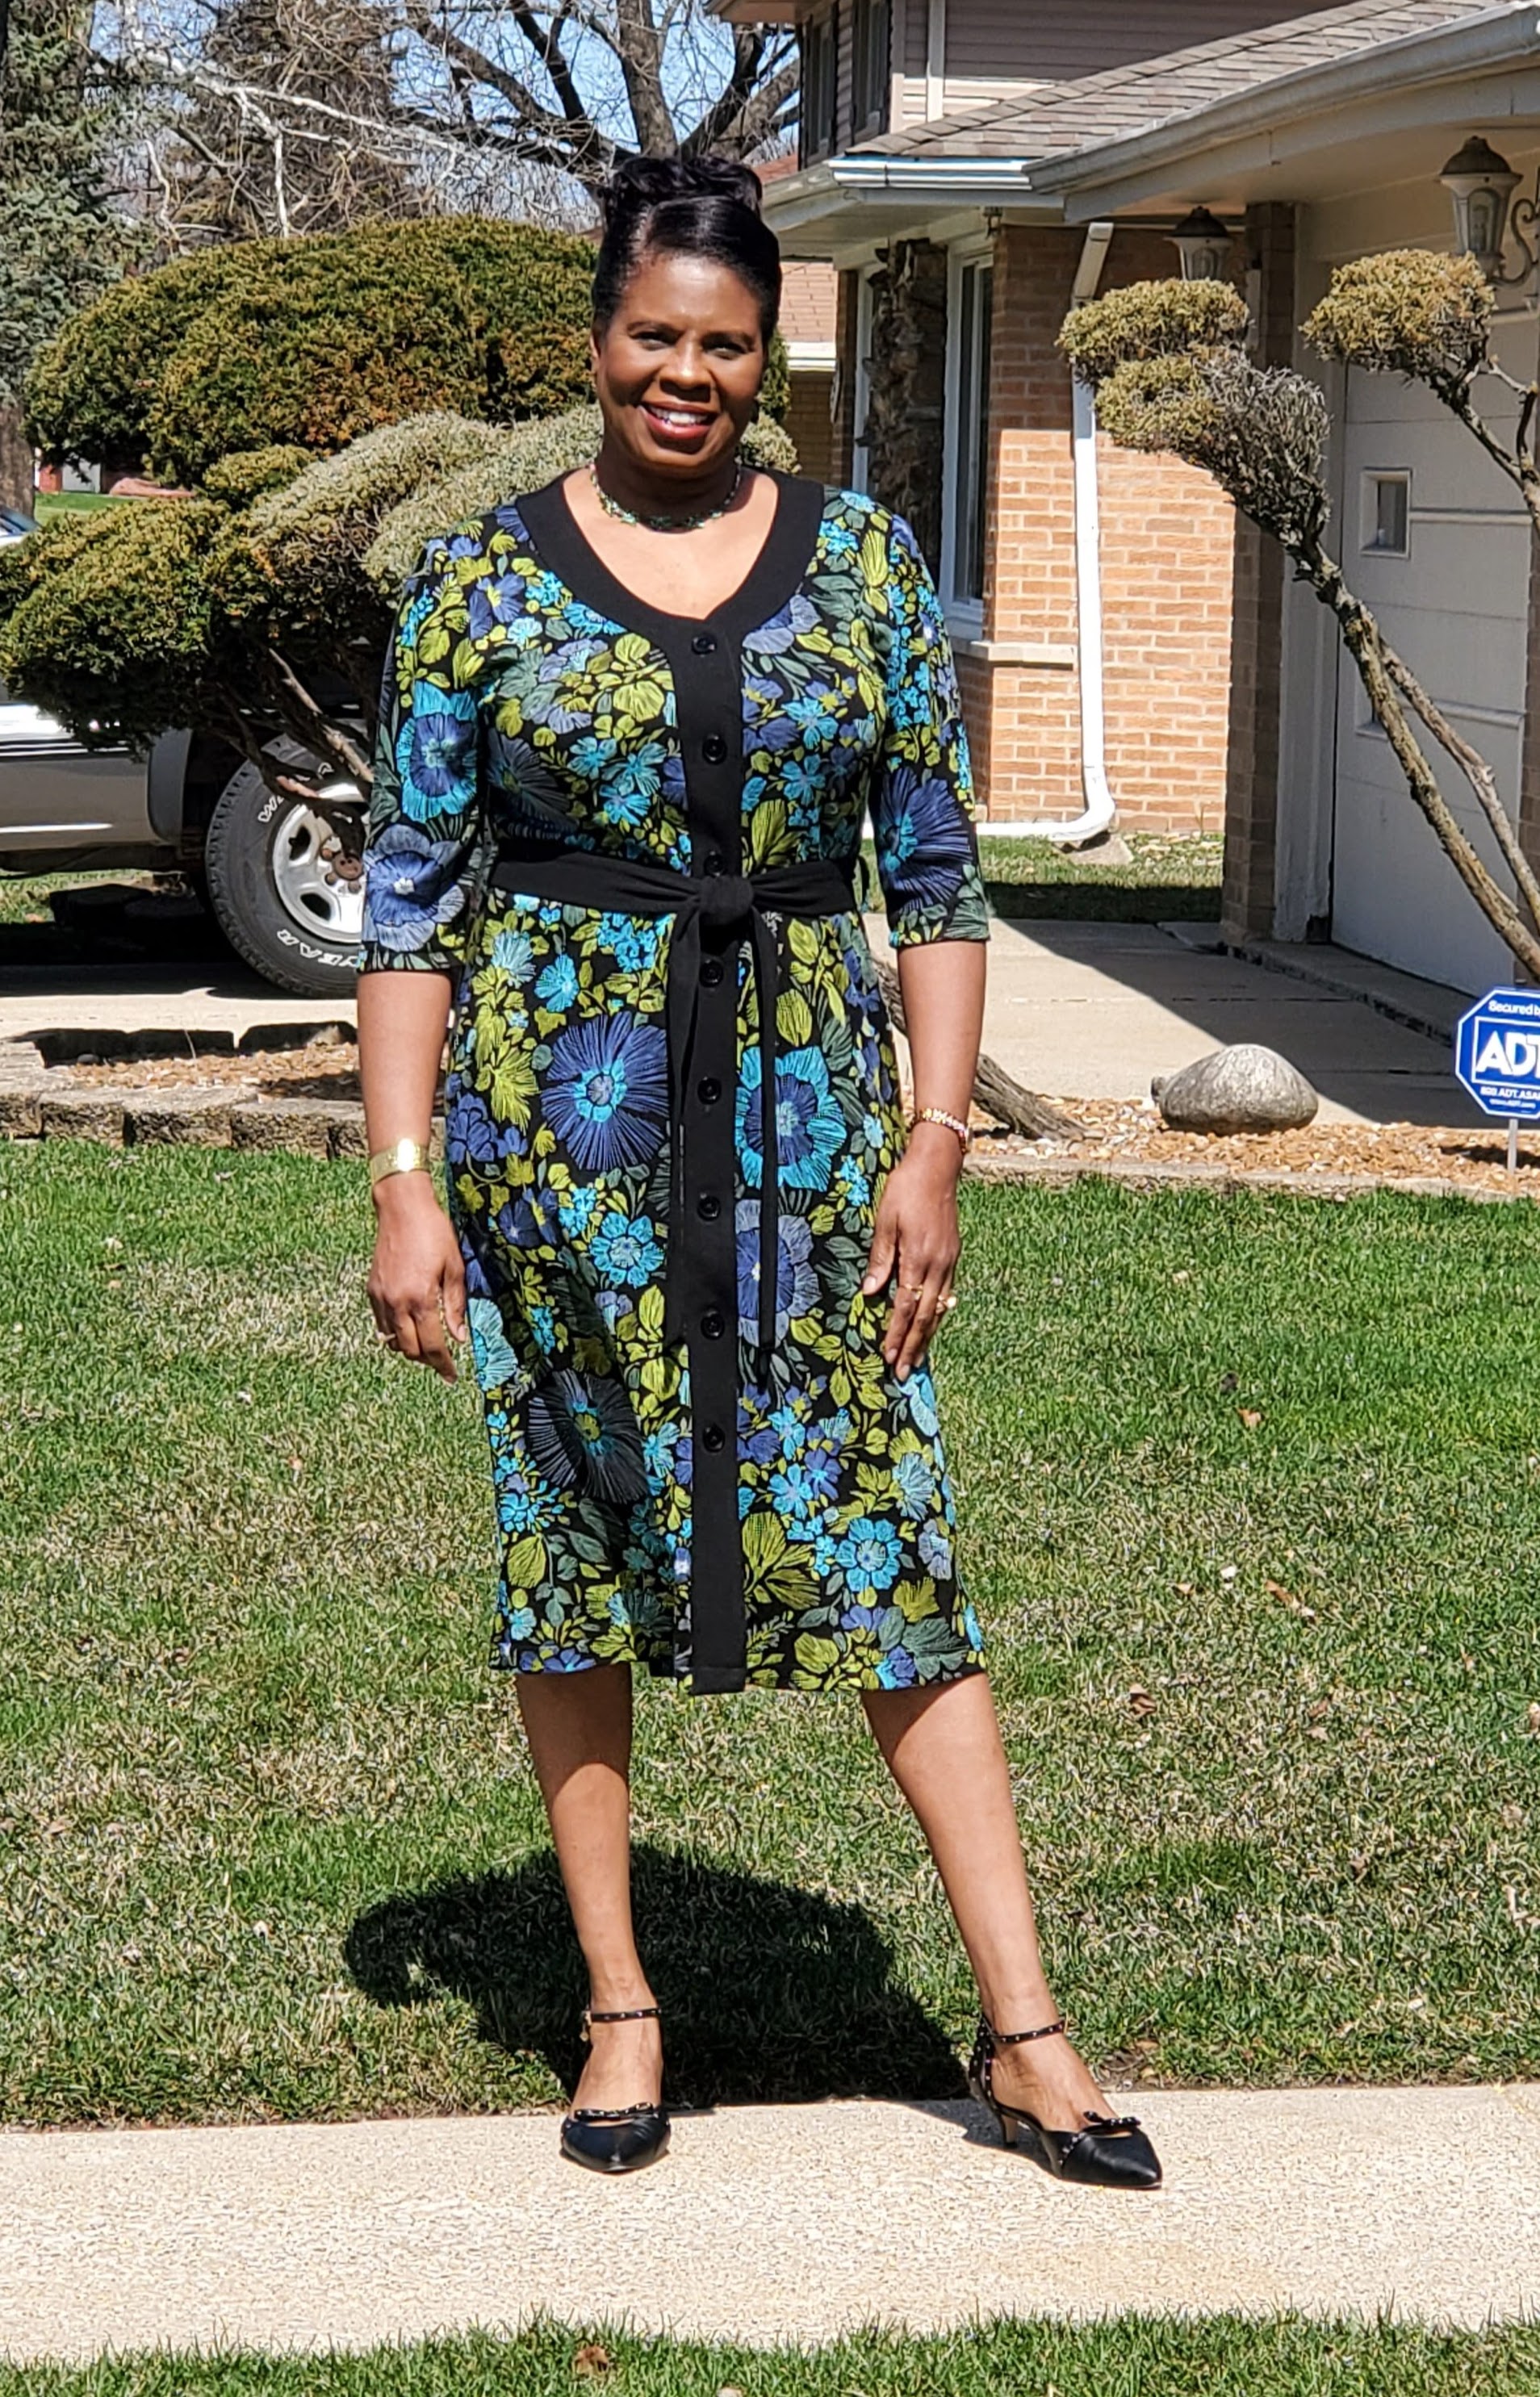
What did you particularly like or dislike about the pattern?  There is much to like about the pattern. It's a great template for designing your own cardigans and button- front knit dresses. That is one of my favorite elements about the pattern  I like the fit and the style of the dress. This is a great silhouette for me, A- line. Third, the in-set pockets and the front and back facings doubling as a band to add some more interest to the dress.  That's what this pattern is about, having the option to create personalized look.


Fabric Used: This ponte roma double knit is from Minerva Fabrics. I love the vibrant colors and the feel of it.  These colors are so me. And who doesn't love a floral print.  It was easy to sew. I prewashed it and it came out of the dryer soft and fluffy. It's a great piece of textual.

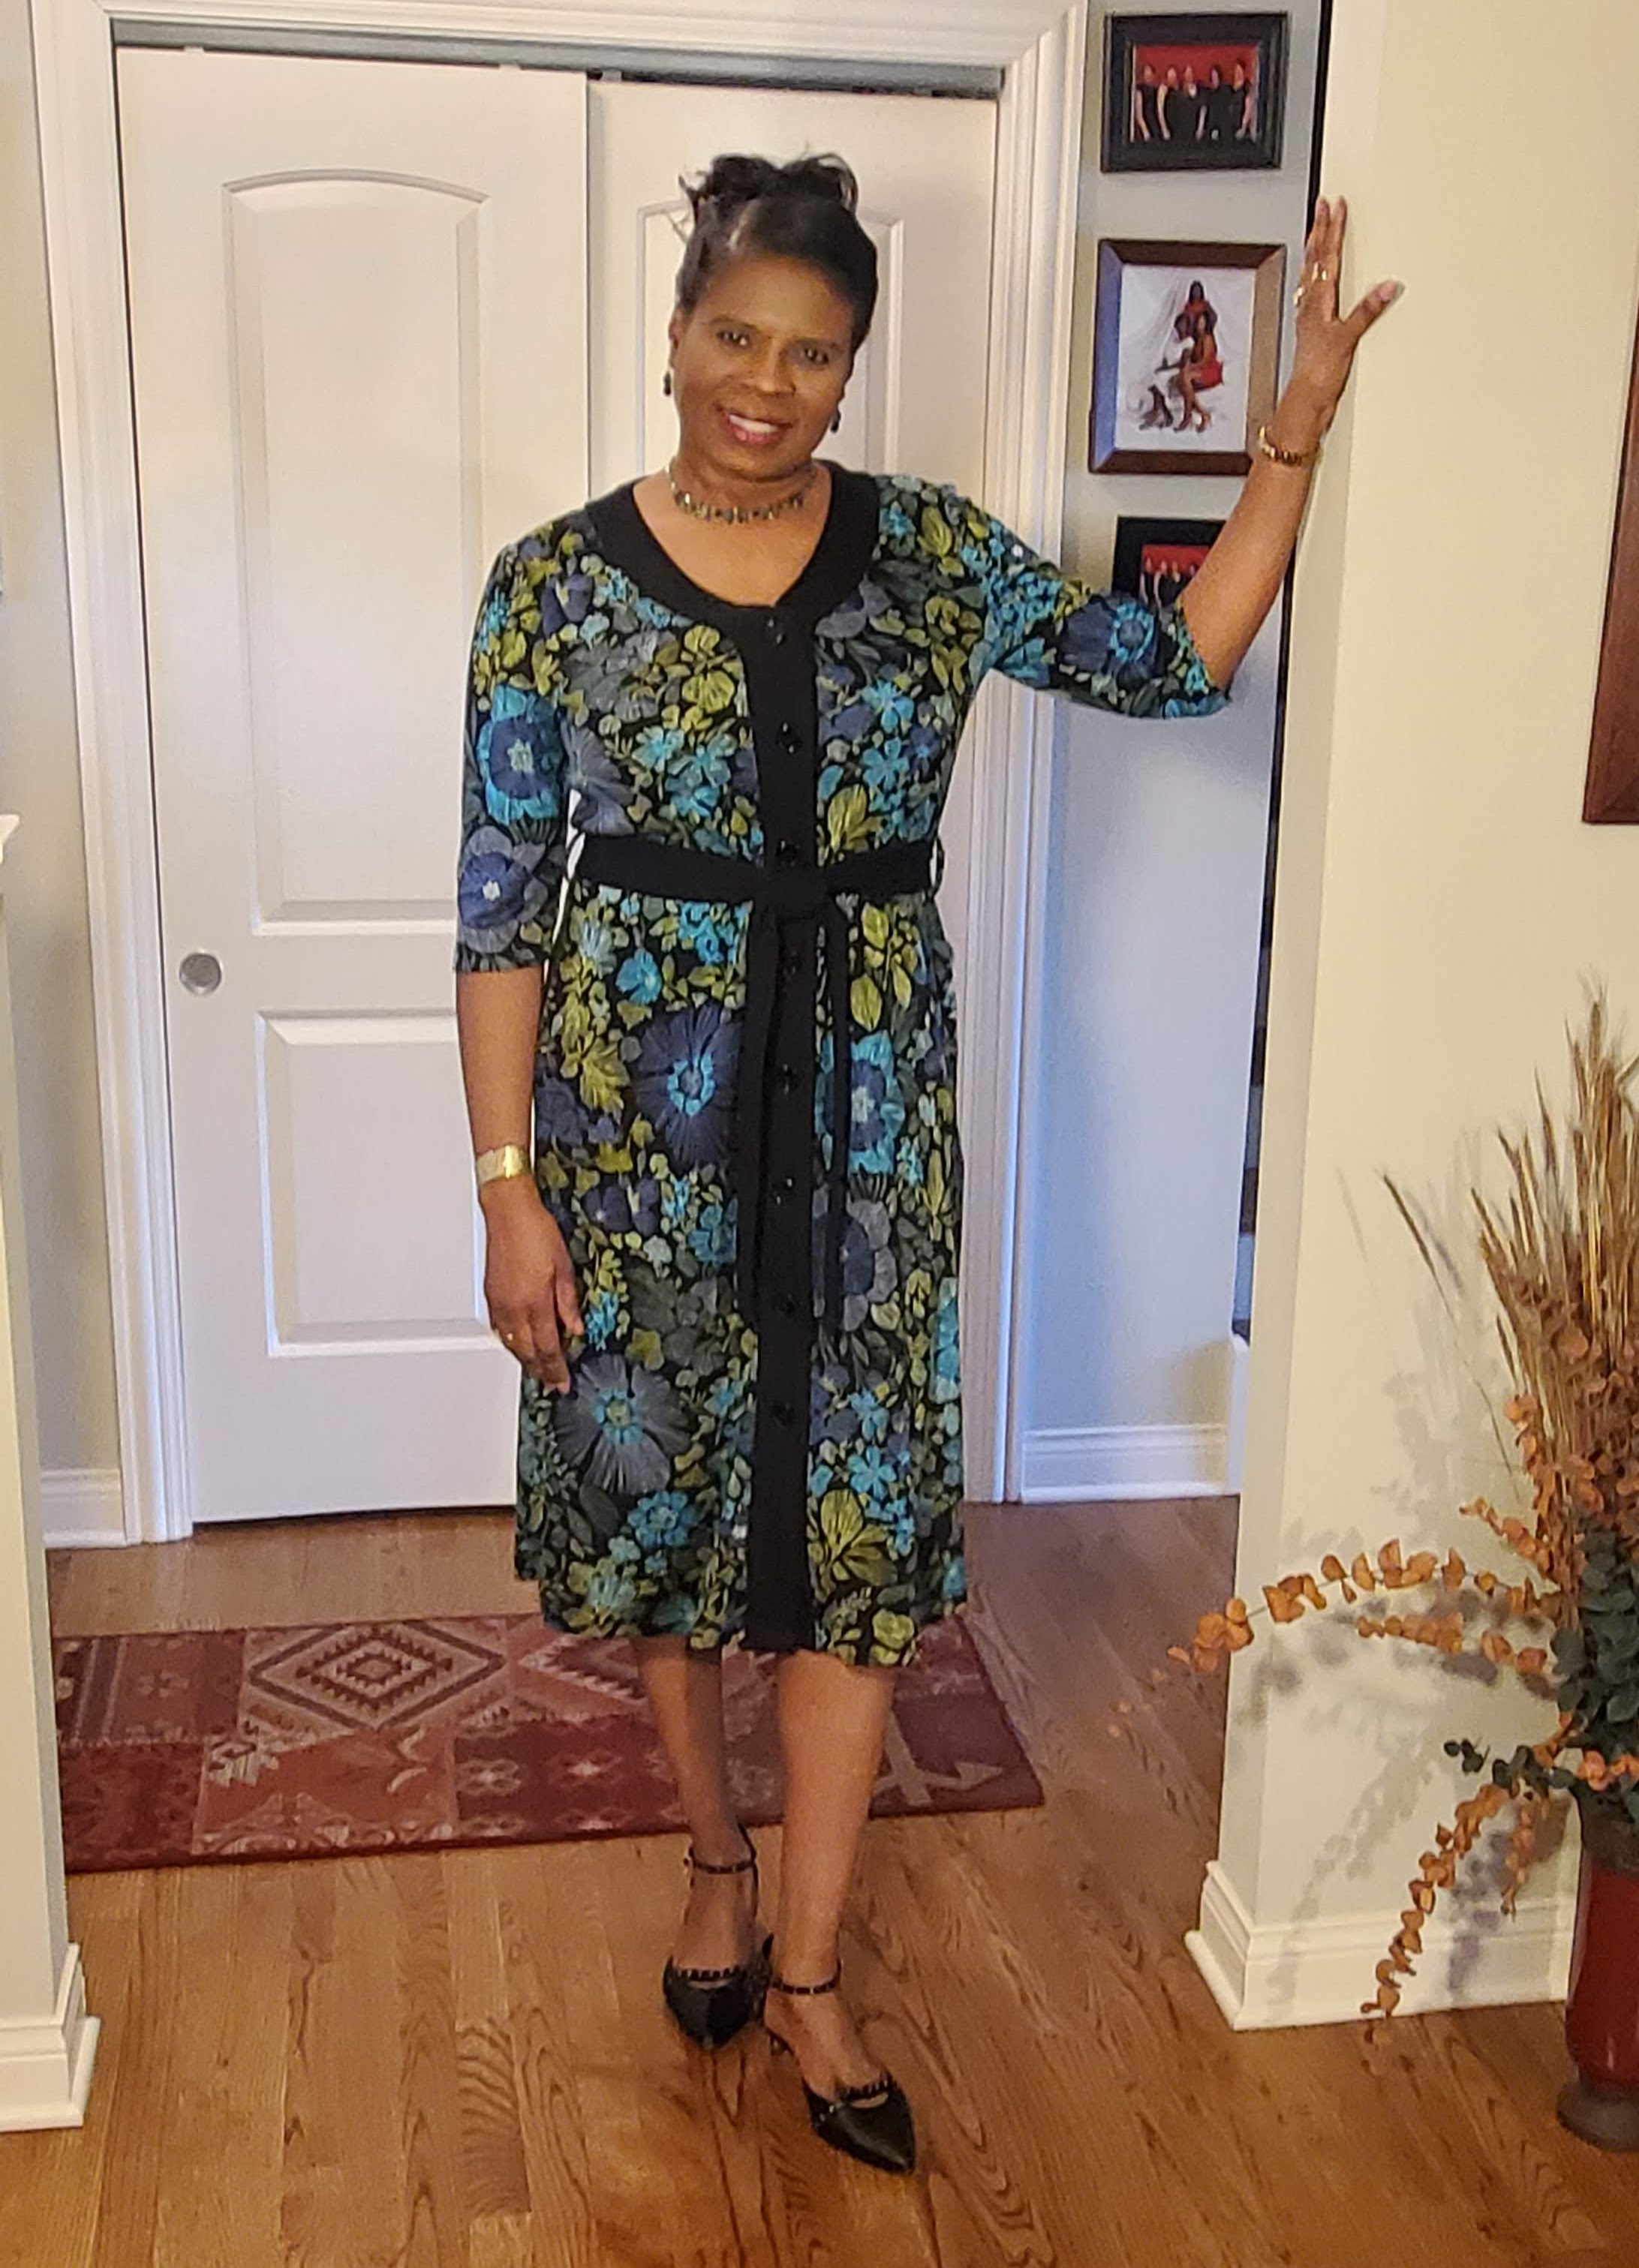
Pattern alterations or any design changes you made:  Lucky for me I didn't have to do major fit adjustments. The fabric had a fair amount of stretch, but it's not stretched out when I'm wearing the dress. It just rest nicely against my body. I only added a small amount of width at the bust area. Nothing more.  I was amazed at how well it fits. My other change was in the design. See previous post for that and a few tips.


Would you sew it again? Would you recommend it to others? Yes and yes. I want to make another dress and a cardigan. This pattern can be used again and again. All level sewists can craft beautiful pieces using this pattern.

Conclusion:  I am very pleased with how my dress turned out.  It sewed together with no problems and it wears like a dream. The colors of the fabric are spot on for me. And the texture of the is lovely.  Happiness.

Happy Sewing!
C


Monday, March 28, 2022

Contrasting Band - Sewing Tips Simplicity S8992


Simplicity S8992


I recently made Simpmicity S8992 with a contrasting band. Today I want to share how it did it with the front and back facings.

Below are the steps. Sorry no illustrations of those steps. When I made it, I didn't think to take pictures.


From facing to band:

I decided to contrast the band. But before I attached it to the dress, I stitched the interfacing together as well as the front and back facing. Next, with right-sides together, I stitched the outer edge, turned and pressed. This created a clean edge on the band. Finally, I stitched the band to the front and neckline with the right-side of the band facing the wrong-side of the dress, turned the band to the right-side of the dress, pressed, and stitched to the dress along the outer edge.


Stabilized Buttonholes:

To sew neat buttonholes, I used stabilizer.  Also, I adjusted the tension of the foot and the feed dog so that the fabric could flow smooth between the two.

I hope these tips are helpful. I will post more on the dress soon.

Happy Sewing!
C

Parting shot: Celebrating one of my sewing students' latest creations. Ms. Bonnie made McCall's 8289 dress ( she used a different skirt pattern - not enough fabric for the one that came in the envelop.)  Dress well done! Two snaps up for Ms. Bonnie 


Tuesday, February 16, 2021

Cute Comfy Top - Simplicity S9182


This morning I woke up to over 12 inches of snow!  Yesterday afternoon we thought we had a head start on clearing it off driveway and the side walk.  But when I peaked out of the window, there it was more of the fluffy white stuff.


Surprised?  Nope.  It is to be expected.  We hoped for a lighter snowfall over night. So, while the mini blizzard was taking place, I spent the evening cooking and sewing up Mimi G.'s Simplicity S9182 top, view A.

I grabbed a copy of the pattern at Hobby Lobby on Saturday for 99 cents.  I couldn't wait to try it.  The the collar and the center front zipper were what that sold me on this one.  So, today I'm reviewing View A.

This pattern includes three views: two tops and a slim skirt.  Simplicity has very little descriptive information.  So here is mine.  Knit tops with center front zipper, dropped sleeves with sleeve bands and large sailor like collar.  The waist is finished with or without a waistband.  The skirt is a pencil skirt with waist darts, center front and back seams.  Large hip pockets with flaps and a center back zipper.  

This pattern is available in sizes 6 to 24.  I used a size 16 with a few modifications.

My "first version" looks like the drawing.  The instructions were typical.  Most of them I followed as stated and others I changed a bit.  Nothing complicated though. 

I used a tie dye french terry knit that I purchased from Sew So English Fabrics.  I ordered this yardage along with a few others months ago.  The same day that I received the fabric, I tossed it in the washer so it would be ready to sew when I decided what to make.  The fabric came from the dryer soft and fluffy ready to sew.   

The few changes are:  


  • The first few steps are related to sewing the zipper to the center front of the top.  This is the major focal point.  So I really wanted to get this right.  First, I marked the cutting lines.  Then, I fused a strip of fusible tricot interfacing to the wrong side where the zipper would be placed.  Next, I stay stitched along the lines where the zipper would be stitched.  Carefully I cut the center front and each side of the triangle where the base of the zipper would rest.  Next, placed the zipper with the right side facing the right side of the top, the bottom of the zipper pointing to the top edge of the top. Stitched horizontal seam. Then flipped the zipper up with the zipper pull at the neck edge.  Using the stay stitching as a guide, I turned the edges in along the vertical sides of the zipper.  Pinned and hand based in place.  Finally, I machine stitched the zipper to the top.  I used this method because I was sure it would work for me.  It was very important that the zipper looked perfectly centered and stitched to the top.


  •  I did a small FBA (,75") for comfort.  This FBA does not result in a bust dart.  Instead I eased in the difference to maintain the original look of the top.  It worked well.  The adjustments added 1.5" to the width of the top.  I eased it in when I attached the waistband as I only need the extra width in the chest area.  I actually could have reduce the length of the band maybe a inch or so.
  • Instruction #15 indicates stitch stretching band to fit.  The sleeve opening is several inches wider than the opening of the sleeve band.  So I decided to gather it instead.  It worked.
  • I lengthen the sleeve two inches.  I have long arms. 
  • After stitching the under collar to the top, I folded the upper collar over the top sandwiching the top between the two collar layers  pinning only to the front neckline.  The rest of the collar was hand stitched to the back.  I like this finish better.


These are my changes.  The first change was the most time consuming.  But not difficult to do.

I want to make this top again for sure.  It came together very well and I like how it looks on me.  When I searched online to see if others made the top.  Only a few post so far.  Don't sleep this one.  It's a great top and it's not difficult to make.  

I enjoyed making this top and will make another soon.  

Parting Shot:  This is my block after the Monday night big snow.  It's a beautiful site.  But to shoveling.., Now that is another story. Lol


Wednesday, October 14, 2020

The Prettiest Blouse That Almost Wasn't Made - McCall M6512


This blouse was a tremendous save.  In the sense that this blouse has been in a bag in the UFO's bind for the longest time.  To be precise, I cut this blouse out shortly are I returned from the Palmer/Pletsch workshop in 2012.  

I can't say why it took me so long to finish it.  But I am very happy that it done and it still fits.  It fits in with my current wardrobe capsule plans.  


Enough on the back ground information.  Here is my pattern review.

Pattern Description:  Misses' Blouses:  Loose-fitting blouses A, B have neck and front bands, yoke, front sleeves (cut on crosswise grain of fabric), no shoulder seams, back pleats and narrow hem.  A:  Pleated pockets with button flaps and short sleeves rolled-up (wrong side shows) with button tab. B: Bias collar extends into tie ends and sleeves gathered into button cuffs with seam opening.


Pattern Sizing: The pattern comes in size groupings from 4 to 18.  I used size 16 with some modifications.


Did it look like the photo/drawing on the pattern envelope once you were done sewing with it? Yes, my finished blouse does look like the illustrations on the pattern envelope. 

Were the instructions easy to follow?  The instructions were typical with the Palmer/Pletsch instructions for adjustments, which are always a plus.  For the most part, I followed them.  I didn't like the suggested construction for the collar/tie and neck band.  My preference is to attach the neck band to the top first.  I like to check and make sure everything lines up as it should.  I also found it strange/different to interface the collar/tie.  In my mind, it should be soft and fluid. So, I hoped that it would be fine as I added the interfacing to the collar/tie.  As it turned out, it's a little stiff but still floaty.

What did you particularly like or dislike about the pattern? There are so many likes about the blouse, and there were a few challenges with the construction.  I start with the many likes.

Likes:

  • The cut on sleeve that continues into the back yoke.
  • The join of the blouse front at the arm hole.
  • The front band and the 3/4 sleeves.
  • The overall style of the blouse with the tie.
  • My selection of fabric.  It's so soft and fluid.


  • The join of the blouse front at the arm hole.

  •  The front band and the 3/4 sleeves. 


  •  The overall style of the blouse with the tie.
  • My selection of fabric.  It's so soft and fluid.

Dislikes/Challenges:

  • The construction of the collar/tie and neck band.
  •  I struggled with the fabric.  The neck band and the front band that I cut eight years ago was a little off.  The fabric is slippery which makes it difficult to cut.  So when I re-cut these pieces (Thank God I had more fabric.), I block fused the interfacing to it before cutting out the pieces.
  • In order to produce good buttonholes, I cut stripes of wax paper placing a piece on top and underneath the buttonhole area. 


Fabric Used: The fabric is a silk chiffon that I purchased during the Palmer/Pletsch workshop way back in 2012.  I purchased it at the Fabric Depot.  It is pretty, soft, and fluid. But difficult to handle.  It slips and slides.  Initially, my plan was to do french seams. Somehow, I forgot all about that after making two seams  (the back sleeve to the back blouse).  No way was I going to rip out the next set of seams.  So, tested the look of the zig zag on the sewing machine.  It didn't look good.  So I finished the rest of the seam with the serger.


Pattern alterations or any design changes you made:  Some changes in construction are above. Additionally, I made a FBA.  No other pattern alterations.  My closure has seven buttons instead of six.


Next time, I'll add a few inches to the length of the sleeve and I don't think I'll add interfacing to the collar/tie.

Would you sew it again? Would you recommend it to others?  Yes, I want to make at least one more.  And yes, I recommend it to others.  My blouse turned out pretty good.  This first one was a very slow sew.  I spent time than I normally spent on a blouse of similar style.  In the end though, it was worth it.  Now, I have one less garment in the UFO bind.  And I'm very happy about that.  


Conclusion:This project was a little challenging, but with patience and perseverance I finished another UFO.  I ended up with one more pretty blouse in my closet.


Happy Sewing!

C

Tuesday, September 8, 2020

New Look N6594 in Review - Green Wardrobe Capsule PTIV


Finally, I posting about the fourth garment in my Green Wardrobe Capsule. It's been three weeks since the last post. My goal was to post a "Notes on a Pattern" next. But because I was "distracted" by so many other things, I never got a chance to post it. So today I decided to go ahead and post a complete pattern review of NL6594 instead. 

This dress took more time than I expected. My adjustments were a little off. Not making a muslin before hand caused a little set back. I ended up making the bodice twice. Thank God I had enough leftover fabric to do so. 

Anyway, this fourth garment completes the first segment of my Green Wardrobe Capsule. Here is the review. 


The pattern description is so unbelievably vague.  My description - Dresses with fitted bodice, front midriff,  and slightly flared skirt; side zipper. The dress comes with multiple length and sleeve variations.  It is available in sizes 8 to 20.  I made view C with shorten skirt and 16 with modifications. 

I used a beautiful kelly green tencel twill from Mood. The fabric is super smooth and easy to work with.   It's also very fluid and light on the body.  

My dress does look like the dress on the envelope.  But I expected it to be a little more flared.  As usual, I did make a few changes for fit and construction.  Those changes didn't change the overall silhouette of the dress.

First, I made several fit adjustments to the tissue pattern.  Those changes include:

  • FBA, little tuck along the neckline for a better fit along the bust area.
  • Swayback
  • Prominent shoulder blades, which produced a little dart in the shoulder seam
  • Length of skirt between view B and view C
  • No darts in the back skirt


After making the changes, I really needed to make a muslin.  Because there were areas where I needed to do a little more tweaking.  These changes weren't identified until after I almost completed the bodice.  You can image I didn't want to pluck all of those seam apart.  I decided to cut a whole new bodice, which in my mind took less time to do then taking the first one apart.

Last thought on that:  Make a muslin.


Construction changes:  

  • Instead of tacking down the facing to the dress,  I machine stitched in the ditch at the front gathered bodice and along the shoulder darts.
  • For the hem, I just serged the raw edges of the sleeves and hem, turned and stitched.
Close to the end of completing this dress I was ready to be finished.  I felt like I spent too much time on a very simple dress.


The instructions provided with the pattern easy, simple and typical.  Nothing confusing in them. 

There are a few things that I like about the style of this pattern:

  • The design and style of the front bodice.  This is a style that I'm fond of.  Partly, because of my body type, inverted triangle.  I think a more fitted "V" bodice looks best on me.  Sometimes I over compensate, which was the case of the initial bodice.  I think I almost got it right.
  • I also like the a-line skirt.  But it doesn't exactly work for me in this dress.  I think a fuller skirt would look much better.


I don't think I really have any serious dislikes. There is one thing I don't like; and that is, side zippers.  I prefer back or front closures.  One of my goals with making this dress was to fit a likeable bodice that I can interchange with other skirt designs.  This one I'll make again. 

A nice little dress that I recommend to others.  It is not a difficult dress to make I'd rate it average.  My dress is good. But I will tweak the bodice just a little more.  Then I make it again with a fuller skirt.  

This completes my review of my fourth garment of my Green Wardrobe Capsule.  I wanted to make one more dress for the summer season.  But, Fall is upon us.  So, I will start a new capsule:  Blues and Reds.  More on that later.

Happy Sewing!

C


Tuesday, August 18, 2020

WIP - Garment 4 - Green Wardrobe Capsule - New Look NL6594


Hi everyone,

I'm working on my fourth installment of my Green Wardrobe Capsule, New Look NL6594 . I made the pattern adjustment months ago.  And cut the dress out last week.  The same day severe storms hit the Chicago land area.  Major damage throughout the city and surrounding southern suburban resulting in hundreds of fallen trees and power lines.  My power outage lasted from Monday afternoon until Thursday evening.  Sadly, many are still without power.


Veterans' Park in South Holland


I hope to write my next post in a few days.  It will be a "Notes on a Pattern" post. With a follow up post of my finished dress.  Sewing for myself has been a challenge lately because I'm still making masks, caps, head wraps and bonnets.  My goal this month and the next is to finish the my green wardrobe capsule and to start a new capsule.  One that will coordinate with some of the green garments that I've already made.

Anyway, I wanted to drop in give a little update.   I hope everyone is well and staying safe during this pandemic.


Happy Sewing!

C


Sunday, July 26, 2020

Second Installment - Green Wardrobe Capsule S8601 and S8389


It's so nice to be able to post my second installment of my green wardrobe capsule.  This set was actually a UFO that I planned to make in 2018 but never got around to it.  Better late than never.  I can always use another summery outfit for social outings or vacation.  For right now though, it's perfect for a stroll in the park on a warm July day.


This set is made using to separate patterns.  I've used both patterns before: S8601 and S8389.  And I'm already planning to make the pants again.  The initial reviews for the patterns are list below:


For this set I used a beautiful rayon challis from FabricMart Fabrics.  It was easy to sew and press.   Lately, I'm drawn to floaty, fluid fabrics.  I really didn't try to match up the print to look continuous over all the sections of the garment.  It wasn't important to me for this project.  The print is busy enough for me to not care.

Since the covid-19 outbreak, I decided to sew at least one UFO per month. This set was the winner for July.  Luckily it fits in with my Green Wardrobe Capsule project.  The construction was fast.  I happily finished both pieces last Saturday night.   And today that I was able to take a pictures of me wearing it.

I was well pleased when I finished it and almost immediately started listing my likes, which are:


  • The color/print of the fabric.  It's also a nice quality of rayon challis.  It feel like a soft cotton.
  • Front tie of the top

  • The flounce of the sleeve.  This was the first time that I sewed this sleeves.  It has four parts:  front and back sleeve; front and back flounce.


  • The waistband on the pants is perfect.  I love the front panel (non-elastic) with the rest of it elasticized. 
  • The inset pockets and the full pant leg.
Showing the top untied.  I prefer it tied.

I can see multiple versions of the top and pants in my wardrobe in the months to come.  I need (I mean) I want more of these easy wearing coordinates.

Note on construction/fit .  There could be a little more room across the upper back on the top.  It's not too small, I would like some more ease.  That is a easy fix for me.


Both patterns are easy to sew and look great together.  I'd recommend them to all level sewists. 

Happy Sewing!
C

LinkWithin

Blog Widget by LinkWithin