Monday, July 27, 2020

Sewing For My Sweet Pea - Simplicity S1803


While looking at fabric options for a sundress for me, guess what happened?  My Sweet Pea enters my sewing room and sees all my possible fabric sections

Conversation:

Sweet Pea - What's up?
Me - Planning my next projects for summer.
Sweet Pea - Oh this is pretty.  Can I get a dress please?
Me - Well, okay.  You sure you want this fabric?
Sweet Pea - Oh yes.
Me - Okay then.  What style would you like?
Sweet Pea - Anything, Mama.  You pick.  Thanks.

Sweet Pea leaves the room.  Me feel like what just happened?  I wanted that fabric for me.  Lol


Anyway, Sweet Pea got a new dress in the middle of me planning a new dress for myself.  Got to appreciate a daughter who allows her mother to pick, choose, and sew clothes for her.

I made it easy on myself.  I selected a pattern that I've used before. Yet again. Lol  Simplicity S1803


For this version, I used a different bodice and sleeve style.  I also lengthen the dress by a few inches.  Unlike before, I kept it simple using the instructions, no beading or tulle.  Just a simple sundress

The fabric is a stretch cotton twill that I ordered from Mood Fabrics several years ago.   This color is not available any longer, but Mood does have a similar print on a white background available, 307111.

Needless to say, she likes it.  What not to like?  Anyway, I made her two matching masks out of the leftover remnants.

So that's it for now.  Short and sweet.

Parting Shots:  Beautiful flowers in Veterans Memorial Park.  This is one of our favorite places to take pictures of my handmade treasures.


Happy Sewing!
C


Sunday, July 26, 2020

Second Installment - Green Wardrobe Capsule S8601 and S8389


It's so nice to be able to post my second installment of my green wardrobe capsule.  This set was actually a UFO that I planned to make in 2018 but never got around to it.  Better late than never.  I can always use another summery outfit for social outings or vacation.  For right now though, it's perfect for a stroll in the park on a warm July day.


This set is made using to separate patterns.  I've used both patterns before: S8601 and S8389.  And I'm already planning to make the pants again.  The initial reviews for the patterns are list below:


For this set I used a beautiful rayon challis from FabricMart Fabrics.  It was easy to sew and press.   Lately, I'm drawn to floaty, fluid fabrics.  I really didn't try to match up the print to look continuous over all the sections of the garment.  It wasn't important to me for this project.  The print is busy enough for me to not care.

Since the covid-19 outbreak, I decided to sew at least one UFO per month. This set was the winner for July.  Luckily it fits in with my Green Wardrobe Capsule project.  The construction was fast.  I happily finished both pieces last Saturday night.   And today that I was able to take a pictures of me wearing it.

I was well pleased when I finished it and almost immediately started listing my likes, which are:


  • The color/print of the fabric.  It's also a nice quality of rayon challis.  It feel like a soft cotton.
  • Front tie of the top

  • The flounce of the sleeve.  This was the first time that I sewed this sleeves.  It has four parts:  front and back sleeve; front and back flounce.


  • The waistband on the pants is perfect.  I love the front panel (non-elastic) with the rest of it elasticized. 
  • The inset pockets and the full pant leg.
Showing the top untied.  I prefer it tied.

I can see multiple versions of the top and pants in my wardrobe in the months to come.  I need (I mean) I want more of these easy wearing coordinates.

Note on construction/fit .  There could be a little more room across the upper back on the top.  It's not too small, I would like some more ease.  That is a easy fix for me.


Both patterns are easy to sew and look great together.  I'd recommend them to all level sewists. 

Happy Sewing!
C

Monday, June 29, 2020

Bold New Lime Green Jacket with McCall 5668 - Pattern Review


Happy Monday everyone,

Today, I'm excited to talk about my bold lime green jacket!  This jacket is the first piece in my green wardrobe capsule that I'm making this summer.  I've been purchasing a variety of green textiles for a few years now.  Green is a good color for me.  So far, I've included two dresses and a top and pants set (UFO's) as part of the capsule.  More on the capsule plan in the weeks to follow.


The pattern, M5668, is one of the Sewing with Nancy patterns designed for people with limited time to sew.  I bought it because I liked the style of the jacket. Also, I selected this as the summer/fall project for one of my sewing students.  This will be the first jacket for her.  So, I wanted to make it a few times before she started on her project.  So expect to see another version of this jacket.  

The pattern is described:  Princess seamed jackets have fold-back wing collar, slits at side seams, three-quarter length lined sleeves with slits and shoulder pads. B: Self-belt with purchased buckle and optional sew-on or iron-on jewels on collar.  

Published in 2008, but it is still available.  It comes in sizes 8 to 20.  I used size 16 with modifications.

My jacket looks pretty much like the drawing on the envelope.  I wanted long sleeve. So I adjusted the length.

The instructions were easy to follow, and also included several tips on cutting, pressing, and interfacing.  The guide sheet includes step-by-step stop and go sewing tips to help sewists maximize their sewing time by breaking the process into 10, 20 and 30 minutes sewing intervals.  I think this is a great jacket pattern for beginners. 

There is a lot to like about this jacket style wise:  the collar and the dart at the roll line; the princess seams helps make fit easier; the slit at the side; and the belted waist to create a more defined waistline.  At least, these are my likes.   I don't have any real dislikes.


The fabric that I selected is from Mood.  It is described as Lime Green Stretch Cotton Crepe.  Sorry it is out of stock.  The texture of it reminds me of a stretch cotton pique.  It pressing well; but like most cottons, it does wrinkle. 

I made several changes:  pattern adjustments, style changes and construction adjustments. BTW- I didn't make a muslin this time. 

  • FBA - l inch initially.  Then during construction I reduced the height of the apex.  The change was transferred to the pattern after I made the change to the jacket.  Below are the initial adjustment to the side front and the final adjustment.

  • Prominent shoulder blade adjustments.  This was a very small adjustment.  I probably could have skipped it as the back of the jacket was wide enough.
  • The length of the shoulder seam was too long.  I reduced the length by 1/2 inch.
  • Swayback adjustment. Same as for other princess seam garments.
  • Sleeve length.  I wanted a long sleeve jacket instead of a 3/4 sleeve.  Next time, I will taper the sleeve a bit.  The sleeves on this jacket are wide.
  • No lining in the sleeve.  I decided to skip that.
  • For the slits.  I didn't follow the instruction #40.  I like mitered corners.

  • I did not add any jewels to the collar.  The color of this jacket is the speaker. 
  • Top-stitching.  I added top-stitching to the belt and the front and collar of the jacket.  It looks better with it.


  • Initially, I was going to go without buttons.  I even started the photo shoot without them pinning the front to keep it closed.  But after a few photos, I decided to add three buttonholes.  Luckily, I bought some earlier.  I decided on only three buttons instead of four because the belt holds the rest of the front in place.

I know these are a lot of changes for a simple jacket pattern.  But they made it better for me.  Now, my next version, will include most of the above changes, plus a little more tweaking.  I want to taper the sleeves and add a little length to the hem of the jacket.  I may or may not line the sleeve.

This was a great basic jacket for all level sewists.  I think there are more design options to explore:  completely lining the jacket, lengthening it,  and adding pockets. 

I'm pleased with how this one turned out.  The next one will be navy. So, if you have the pattern, allow me encourage you to try it.  Style it as you like or use it as a sloper/basic jacket pattern. 

Stay tune.  More to come on my green capsule.

Parting Shot: My little third cousin, London, wearing her Cennetta made Minnie Mouse mask.


Wednesday, June 10, 2020

It's Almost Summer - Still Making Masks, Bonnets and Non-Surgical Caps


Thirteen weeks into the Covid-19 lock down and I'm still making masks.  Last month I added on bonnets and non-surgical caps.  I'm not complaining.  There is a need, and this is my way of helping.  I'm finding out that there are so many more family members, near and far, that are essential and front line workers than I knew of.  Again I'm happy to help. but I must strike a balance between helping and satisfying my personal sewing dreams.

What's interesting is that the production sewing of these protective goods has me thinking of all types of gift ideas and small sewing projects for my sewing students.  So, this experience has been beneficial in more than one way.

Today, I would like to share a few pictures and comments on the bonnets and caps that I made recently.  Folks want to be stylist in this pandemic.  So, many want matching head and face gear.

For the bonnets I used  Simplicity S1020.  Super easy pattern.  Three pieces, one size fits all.  You can easily adjust the elastic for a tighter fit.  This bonnet (made only four so far) sews up quickly.  Other uses:  Chef hat or sleeping bonnet.  These can be worn in general to protect/cover your hair.


Pictured above is Erica, dental assistant for Dr. Irvin B. Watkins.  Her dread locks are very long and this style of cap is perfect for her.  She also has a matching masks.

For the non-surgical caps I used Butterick B4946.  Again, a super easy pattern that sews up quickly, Great for beginners.  Three pieces, one size fits all.  You can use bias hem tape to finish the lower back edge of the cap.  Or you may create your own bias tape to finish it.  I did both.  But I prefer creating my own bias tape in the same fabric.  Also, at the crown I used to different methods to finish them.  For the first set (eight caps), I did something like  a French seam.  For the second set (13 caps) I pressed the seam allowance towards the hat section then I top-stitched it down.  The second method I like better.

Pictured below is Venus, CNA, at Oak Trace. She works at the same facility as my baby sister.  Venus loves the matching cap and mask set.


This month, I'm hoping to finish reviewing other projects that I finished in April and May.  Also, on my cutting table are a few jackets, dresses, and pants.  So as we get to our "new normal" I'll work more on my wardrobe additions and less on protective gear.

Stay safe.

Happy Sewing!
C


Tuesday, May 19, 2020

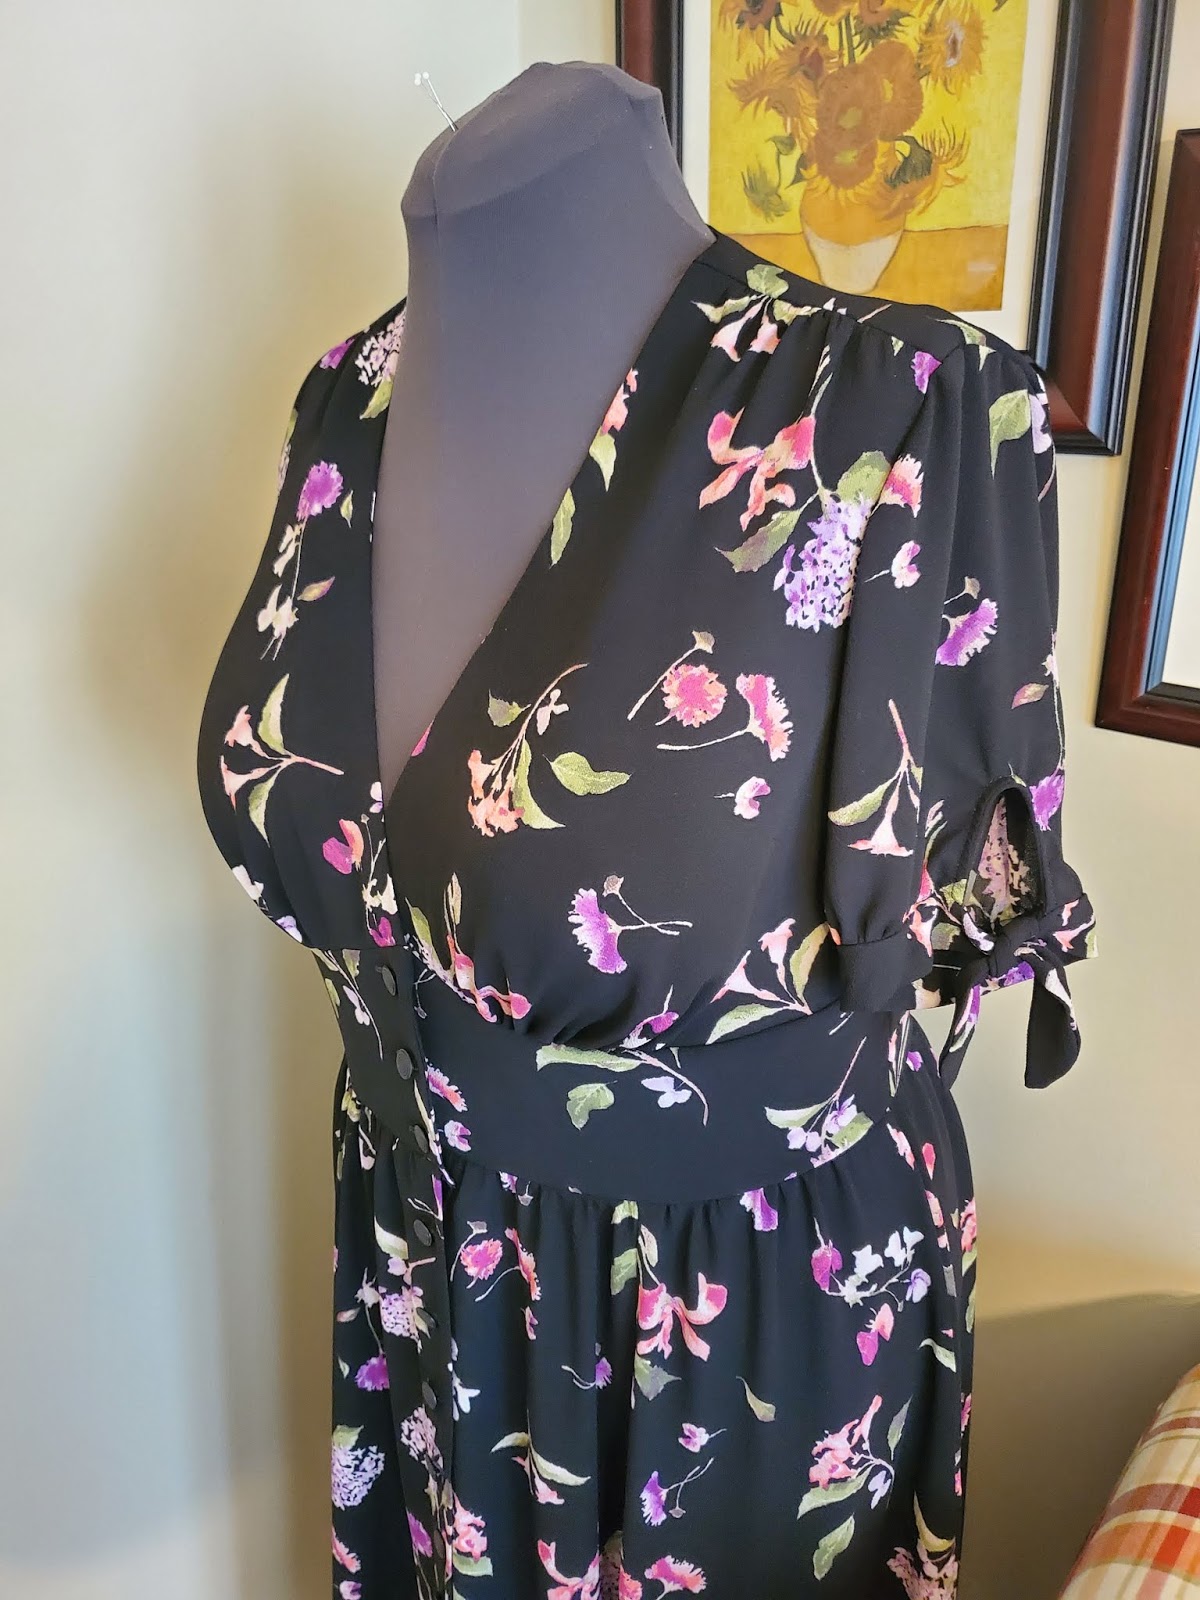
My New Floaty Romantic Dress - McCall M7974 -


This is one of those feel good and pretty dresses that you cherish for years to come.  I love the way it moves.  The floaty fabric dances about you as you walk.   It feels soft and spongy.  The surface has that pebble crepe texture, but it is not rough. 

This is a closeout fabric that I purchased from Mood Fabric last winter.  The fabric was labelled item# 327930 Black Byzantium and Sage Green Polyester Crepe.  Unfortunately, it is no longer available.


This pattern has been made by so many fabulous sewists on Instagram.   All of the beautiful dresses that I saw inspired me to make it too.  I put it on my "To Make List" last year in July soon after I purchased the pattern.  And I think around September I made the pattern adjustments.  I didn't see the need to make a muslin because I'd made dresses with a similar front bodice.  So, I just went from adjusting to laying out the pattern and cutting the dress out. 

I was able to make my own romantic floaty floral dress for which I am very pleased.  So hear is my review.  


The pattern description  given by McCall's  is misses' dresses: buttoned front dress. A, B. C. D has sleeve and length variations, fitted bodice with front midriff, back yoke and gathered skirt with side seam pockets.

It is available in sizes 6 to 22.  I used 16 with modifications.

I made view A with the length between A and C. The skirt takes up a lot of yardage.  I had four yards of the crepe.  It wasn't enough for the length of view C.  

My dress does look like the illustrations.  The bodice is less fitted then I expected.  And that is true for the dress on the model pictured on the envelope.  The "V" neck is deep.  So I am wearing a lace trim full slip underneath.  It's needed for modesty for the dress as a whole because of transparency.  

The instructions were typical.  I've seen these steps in many, many other similar patterns.  There was nothing confusing in them.


My likes for this dress are many:
  • The sleeves of view A and C
  • "V" neckline and midriff
  • The yoke back
  • The fullness of the six panel skirt
  • Buttons instead of zipper.  Nice change
Dislikes:
  • None

I made my usual fit adjustments:


  • FBA -  I started out with a much larger adjustment.  I changed it.  So It might be a little hard to follow what was done.  But here is the photo of the front bodice and the facing.

  • Prominent Shoulder Blades - I added about an inch to the width of the back.  Then gathered the excess for more ease at the shoulder blades.  At the waist, I just gathered at center back.  So it slightly change the design.  Excess could also be taken up with waist darts.  I followed the design with gathers. 
  • I used a bias strip of the fabric to finish the keyhole on the sleeve.  It looks better to me. ;-)
  • Skirt Length Change - I just cut it where I wanted between view A and C.

My chest needs some sun. Tee Hee.


Of course, I have to make it again in a solid color next time. I highly recommend this dress to others.  There are a lot of buttonholes to sew and a lot of gathers to make, but it is worth it.  In the end, you will have a lovely dress.

I  am glad I decided to make it.  I think the sleeves of view A and C are adorable, and I will probably mix and match them with other patterns.   

Happy Sewing!
C


LinkWithin

Blog Widget by LinkWithin