Showing posts with label vest. Show all posts

Thursday, February 3, 2022

Vogue V1515 Pullover Vest and Skirt


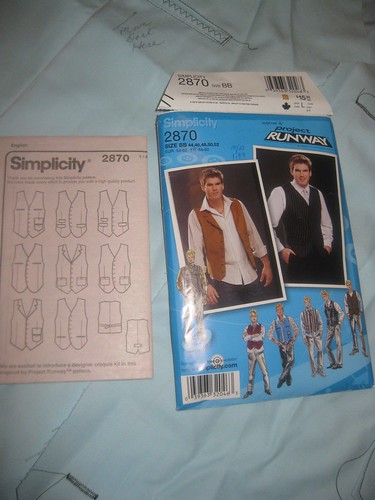
I hesitated awhile before finally deciding to go ahead with posting my pattern review of Sandra Betzina's Vogue V1515 (OOP).  The hesitation is due to my "not being so happy" with how the top/vest looks on me.  I really was hoping that it would be a good look for me.


This is the last garment that I made in January 2022.  I decided I would do end of the month reviews.  And before doing that, I wanted to post this last garment made.  To be clear, the vest is the last garment for January, and the skirt is the last garment for December 2021.

Anyway, as far as the making of it, the construction was fine. There are somethings I could try if I decide to make it again, which I'll mention later in the review.  So, let me get to the specific details of the review.


Pattern Description:  Misses' top and skirts:  Loose fitting, pullover top has elasticized collar, forming ruffle, contrast facings at armhole and lower edges, and topstitching.  Below waist skirts have wide yoke piping cargo pocket, hidden pocket on front yoke facing and shaped hem.  C: Side zipper.


Pattern Sizing: Sandra Betzina uses a different sizing chart from other Vogue pattern designers.  I used size E with very little modifications. Views A and B

Did it look like the photo/drawing on the pattern envelope once you were done sewing with it? I think both garments looked like the photos and drawing for the most part. 


Were the instructions easy to follow? The instructions were pretty easy to follow.  I did have a little issue with the outside cargo pocket (skirt). I mistakenly place the ends too far apart.  So, there is a pull at the top of the pocket.  But other than that, no problems.

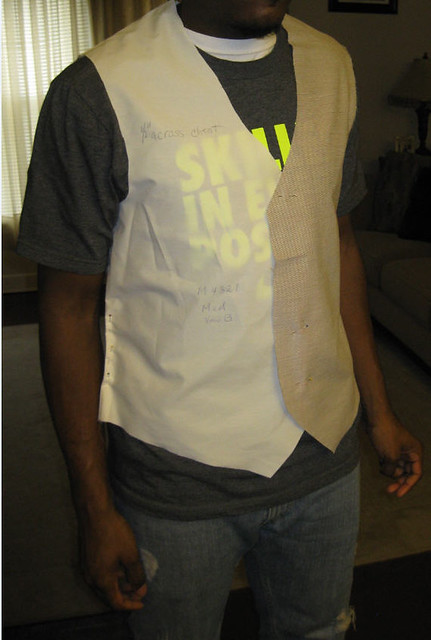
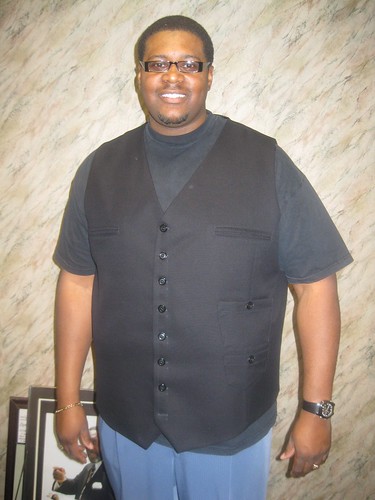
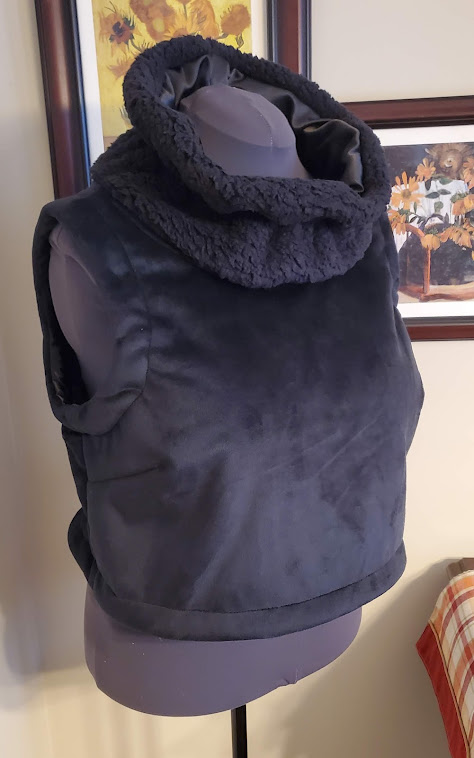
What did you particularly like or dislike about the pattern?  What drew me to this pattern was the pullover top.  (I'm calling my version a pullover vest because of the heaviness of the fabric.)  Unfortunately, I'm not that happy with how it looks on me.  


So here are my likes:

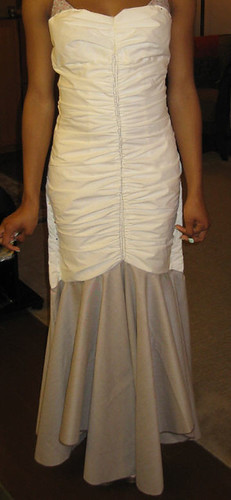
  • The design of both the top and the skirt.  I love the ruffled collar of the pullover as well as the shape of the uneven skirt hem with the cute cargo pocket.
  • Easy to sew project.
  • Yoked skirt.
  • The bust darts were spot on.  I didn't have to lower them.
My dislikes:
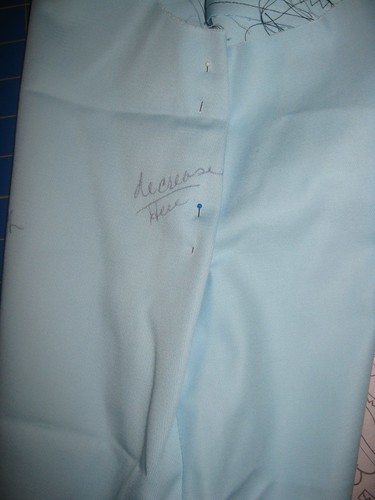
  • The length of the pullover.  I wasn't thinking when I cut it out.   I should have made it a few inches longer and tapered it a bit at the bottom so it wouldn't look so boxy on me.  So I added a piece of elastic to create some shape to the vest.  In turn, create some shape for me.
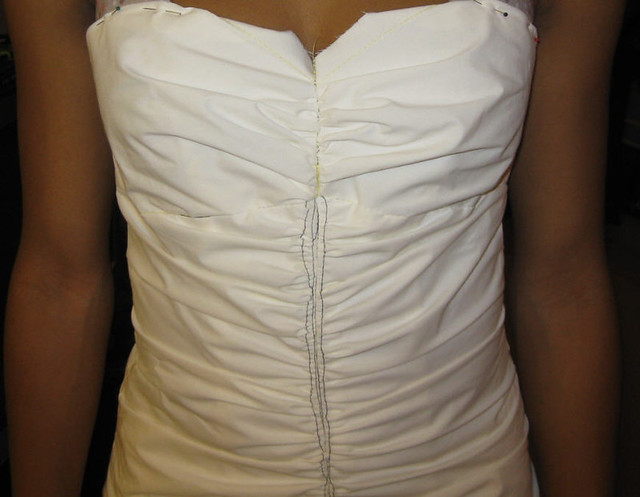
  • The length of the elastic to form the ruffle on the collar.  It's too long.  I would have like it closer to my neck.  

Fabric Used: 
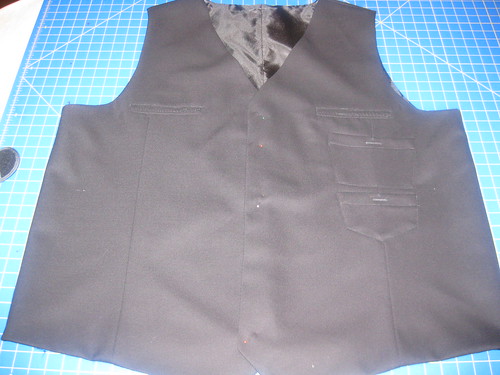
  • Pullover Vest - I used a faux suede with fleece backing from JoAnn's.  I thought this was perfect for the vest.  Only problem, it's a little bulky for me.  Contrast facings - crepe back satin remnant from my fabric collection. 
  • Pullon Skirt - I thought this was a cute jersey knit.  For the life of me I can't remember where I purchased it. BTW- this is a UFO.  It was cut and ready to sew for about two years.  

Pattern alterations or any design changes you made:  I only wish I had made a few adjustments on the vest.  For the skirt, I added the elastic to the waist and omitted the piping.  I made a design change on the vest.  For the collar I used the satin for the inside of the collar.  I actually, divided it in half lengthwise adding an inch to the faux seude outside and subtracting an inch from the inside satin. The original design would call for an all-faux suede collar and that would be too hot in my opinion. No other changes.  

Would you sew it again? Would you recommend it to others? I really like the skirt.  I may make a woven version with the side zipper and adjustment to the width of the yoke to fit better.  The pullover vest, I probably won't try it again.  I think I'm going to gift this one to someone.  


Overall, I like this pattern especially the skirt.  I do recommend it to others.  The rating on the envelope is average.  I think most sewist could make this with no problems.  

PS - I did add the little inside pocket.  I forgot to take a picture of it.

Happy Sewing!
C


Monday, March 6, 2017

McCall 7480 - Super Easy Coat

Holding it close as the wind was very high.


Happy Monday!

It's a great day to be on this side of God's creation.  I'm happy to be alive with a reasonable portion of my health and strength.  I hope everyone is well.  I'd like to also thank those who continue to stop by my blog and leave a comment.    These days, I'm not the blog stalker I used to be because of time limitations.  I hope to get better soon.


My review today is on a very easy McCall vest/coat.  I bought the pattern in the fall to make for winter, and I'm just now getting around to making a coat.  My original plan was to make something close to view B; but after shopping my stash and the new fabric that I purchased in New York,  I decided on a coat similar to view C.


This was a very easy sewing project.  I cut it out several weeks ago along with several other projects.  On Friday evening, instead of watching TV or the TV watching me, I went to "my sewing studio" and made my coat.


It's described as: Misses' vest and coats - loose fitting, unlined wrap vest and coats have length variations.  A:  Raw edges. B:  Welt pockets. C:  Contrast facing and sleeves.  The available sizes are:  XS to XXL.  I used a large, but I could have gotten away with a Medium as it is very loose fitting.  Anyway, I will certainly be able to wear chunky sweaters underneath  on colder days.


The drawings and the photos are spot on with how it suppose to look.  No belt for me today, it's was about 50 degrees, windy with some rain mist and overcast.

The instructions were typical. No confusing parts.  The coat sewed up with no problems.  As a matter of fact, I really didn't use them past sewing the back to the front.  Afterwards I took a look at the entire guide sheet for the sake of the review.

I used a heavy wool ponte knit that was gifted to me last year and a double clothe from Mood Fabrics.  I wish Mood had the double clothe in more colors.  It's really nice.  I picked it up when I was in New York in January.  At first, I was concerned that the marrying of the two fabrics wouldn't be a good one.  But as it turned out, they do complement each other fairly well.  The entire front of the coat and the collar is double the fabric, which creates a heaviness in the front of the coat.  So I decided to add some thickness to the back and sleeves  to balance it out a bit.  For the lining I used some left over crepe back satin.  The back and sleeve linings were cut using those pattern pieces respectively.  Outside of that I really didn't make any alterations.

This is a nice basic, easy coat pattern.  The pieces were sewn with no problems.  There are no real fit issues for me.  It's very over-sized.  I think I will sew it at least one more time for myself.  I want View D in a beige tone with a round collar.

I recommend this pattern to all level sewists.  It's stylish, easy to sew, and no serious fit issues.


Crocheted Hat, Scarf and Fingerless Gloves - 

I crocheted my matching accessories.  This was the first time I made fingerless gloves.  I really like them.  The band has a ribbed affect created using a double crochet and back post stitch.  The entire project was easy.  Most of it was done while showing my favorite TV shows.

That's all for now.  More to come.  Stay tuned.


Happy Sewing!
C

Thursday, November 3, 2016

Comfy/ Stylish Cardigan - Butterick 6389


This is a fairly new pattern.  I like the style lines and saw the potential to beef up my casual fall wardrobe.  The long vest could be easily converted into a cozy sweater with full sleeve and the floaty wide collar.  This was the piece that "encouraged" me to buy this pattern.

I especially like the view of the model wearing the vest belted on the envelope.  The armhole falls about three inches below the base of my arm.  Perfect for wearing chunky sweater for the cool days.  It is very versatile and has the potential to be converted into a light weight coat.  So many patterns can be used for multiple purposes.  I'm always mixing and matching pattern pieces.

Butterick describes this pattern as: loose fitting vest has shawl collar and shaped hemline.  Top and tunic have turtleneck with back exposed zipper and raglan sleeves.  Pull-on pants have elastic at back waistline and side-front pockets.   It comes in sizes 4 to 26.  I used size 14 straight out of the envelope.

Minus the sleeves, my sweater does look like the drawing and modeled long vest on the envelope.  I used the sleeve from McCall's vintage pattern, M3025.  Easy fit for the loose fitting vest.


The instructions were easy to follow.  I changed a few of the construction techniques.   For the collar, I did a french seam  and sew it down instead of a flat fell seam.  I followed the same process to attach the collar to the vest.  To complete the hem, I used stitch witchery to hold it in place before sewing the hem.

I like the short and long vest as well as the mock turtleneck top.  No dislikes.  The pocket placement is  a little low.  So test the placement before you sew them to the vest.

The fabric that I used came from JoAnn's.  It's a medium weight sweater that has purple and lavender threads, which creates a purple heather color.  It's soft and appears to have good recovery.

Excuse the frown; the sun was in my eyes.


The great thing about this pattern is it is loose fitting.  I was able to make it without doing any real fit alterations.  I think I added maybe an inch or two to the length.  The most time consuming part of the process was sewing the french seams and the hem.  It was quite an easy project.

A beginner should be able to make this vest.  The flat fell seams may take some time, but doable.  I just didn't want to do them for this project.  I may sew it another, maybe..,


Anyway if this is your style, try it.

Happy Sewing!
C


Wednesday, May 30, 2012

Vogue 8190 - The Finale Prom 2012

Now it's time for the finale on Vogue 8190. The prom was last Friday; but before writing the review, I needed a breather from all the activities surrounding the event. This year I had to finish two prom dresses within a four week period because of competing activities. Just a little bit of stress. The good thing, I'm pleased with the outcome of both gowns and relieved that it's all over.

My services including making six pieces for Traci's (2nd cousin) big day. So this review will encompass some mini reviews (linked) on the accessories that I made for this prom event. Yes, this review is long, but I think the details are important to cover. Let's start with the dress. I posted a few blog entries so I would not forget the alterations and design changes. So instead of repeating all of that I will refer to those posts at the appropriate time.


Here goes.., We actually started discussing this gown early March. My first shop day was March 24th, with many to following (mostly for notions). I logged 32 hours on this project. That includes: shopping, cutting, sewing (muslins and garments), cutting mistakes, sewing mistakes and adjustments, and ripping out mistakes and adjustments. A lot of hours. Compared to Vogue 2931 this dress was a bigger challenge. Vogue rating this one (8190) average and Vogue 2931 as advanced. I think they are both advanced.


Pattern Description:

MISSES’/MISSES’ PETITE DRESS: Strapless, lined, fitted, mid-calf or floor length flared dress has front and back gathers, built-in foundation with boning, flounce variation and back zipper. A: shaped flounce (wrong side of fabric will show). B: dress and flounce contrasting overlay. C: purchased trim.  

Pattern Sizing:
8 to 18. I started with size 12, but ending with a combination of sizes 8, and 10, and 12, depending on the area of the body.

Did it look like the photo/drawing on the pattern envelope once you were done sewing with it?
For the most part. There were a few design changes that made the finished dress slightly different.

Were the instructions easy to follow?
Yes. I had no problems following any of them. Standard, but very time consuming.

What did you particularly like or dislike about the pattern?
Traci gave me a sketch of how she wanted her dress to look, I picked this pattern because it closely resembled want she had envisioned.

My likes: ruching and the flounce. It's very attractive and figure flattering. Traci, as is Dominique, is lend and shapely. Almost zero fat.

I really don't have any dislikes about this dress. Because the time consuming elements are well worth it. The outcome is splendid. The pattern design and layout are excellent.

Fabric Used:
Silk Dupioni, bemberg lining, and bridal lace from Fishman's Fabrics in Chicago.

Pattern alterations or any design changes you made:
Some of the alterations and design changes can be found here and here.

The rest are;

Lace adorned bodice - The lace was sewn together and attached to the dress bodice by hand. I used the bodice lining pattern and drafted a bodice back to create the lace overlay. The beautiful embroidered, beaded lace had small floral appliques sewn to it. I carefully removed them when they fell on the seam allowance. After the overlay was sewn together, I reattached the appliques where appropriate.


Straps - I added straps for comfort. Traci probably didn't use them. But I added them just in case. A lady has to have options. ;-)


Foundation bias tape - I made my own using the silk dupioni. I thought it would look better. And it did.


Graduated Flounce - You should make sure your fabric is wide enough to make the fabric flounce. Because the fabric was only 45" wide, I had to make the flounce (View C) shorter than the design. In this photo, you can see the front flounce is higher than the back. At the final fitting, I cut the tulle a little shorter in the front to match the curve of the fabric flounce. This was done after this photo.


Omitted the lace trim at the upper edge of the dress.

 Accessories

 Purse - I used the same purse pattern as before (many times). It's reviewed here. Details on how to enlarge on Flickr.

Garter - I've designed many. Here is a link to my tutorial on Flickr. There are tons of ideas for prom garters here.

 Stole - (sorry no pictures) But it looks like this one.


Would you sew it again? Would you recommend it to others?
Only if I make it for someone else. I don't think I'll need a dress like this. Then maybe I will. :-). I highly recommend it to others. If you have the body for it, this is a gorgeous dress to show it off in. Beware it's labor intensive.


All pictures are on Flickr.

Conclusion: This was a great dress to sew with excellent results. I love how it turned out. And more importantly, Traci and her mom were very pleased with it.

Prom 2012 - Do Gentlemen Wear Coral?.., M4321

          This is one of the best photos available to me. 

I usual stay away from making anything related to the gentlemen who escort the princesses to the prom.  This time I gave the nod to make the vest and bow tie for my cousin's date.

I selected McCall's 4321.  The vest has a clean sophisticated look. It's a great complement to most tuxedo jacket.  The bow tie looked simple and easy to make.  Perfect for completing the gentleman's evening attire.

In review:
Pattern Description:
Men's Lined Vests, Bow Tie and Cummerbund: Vest A and B have collar and back belt; vest B has contrast collar; vest C and D have welts, shawl collar, front button closure, adjustable back neck button closure and back elastic with clip; bow tie E has two sections and back clasp; cummerbund F has pleated front, back lining and back elastic with clasp.

Pattern Sizing:
Small - XX-Large; I used size medium with modifications. Views A and E
Did it look like the photo/drawing on the pattern envelope once you were done sewing with it?
Yes.  Except for the omission of the collar on the vest.

Were the instructions easy to follow?
A piece of cake with the exception of stitching the back (3) and stopping at the circle. The circle was about two inches from the edge. I didn't get that.  So I stop about 5/8" from the bottom of the edge of the center back seam.


What did you particularly like or dislike about the pattern?
I like the fact that the design was clean and would not take away from the style or design of the jacket. I didn't know what style of tux the young man would wear. So this pattern was simple enough to complement most styles. And it sewed up quickly. This is the first time I've sewn a bow tie. No pain there either.

Fabric Used:
silk dupioni and bemberg lining.

Pattern alterations or any design changes you made:
View A - Vest. At first I thought I needed to do a prominent shoulder blade (PSB) adjustment. But the gaping at the armholes didn't quite match with the PSB adjustment. So I looked through my Palmer/Pletsch fit book for the correct solution. And ended up doing a round back adjustment. Additionally, I needed to trim about a 1/4 inch from the side seams, and I omitted the collar. View E - Bow Tie. I searched at a few stores trying to find the hook, eye and slide for it. Finally, I went to Vogue (Roosevelt Rd). They only had 1/4", 1/2" and 3/4". The tie was about 1" wide. So I had to trim it to make it fit through the closures.

Would you sew it again? Would you recommend it to others?
I will sew both again. And yes I do recommend this pattern to others.

All photos on the vest and bow tie are here.
 
Conclusion: This was an easy pattern to sew. The pieces went together with no problem. The clean look of the vest is a great complement to evening attire. The bow tie literally took less than an hour to sew.

Monday, May 14, 2012

Fitting Vogue 8190 and McCall 4321

It's such a blessing to have clients with minor fitting issues.  I'm in the process of making the second prom dress.  This one is for my cousin (second) Traci.  The only fit issues are:  slightly too big in the bust area.  All is needed is a reduction is the width of the bodice.  And slightly to big below the hip area.  Simple.  (Yes the skirt is uneven due to lack of width of the muslin fabric.)


I'm using Vogue 8190, View C, for this dress.  The design changes are minor too.  Traci does not want the tulle exposed at the bottom so the overlay will be the same length.  A beautiful embroidered, beaded lace will adorn the top of the dress.  She wanted the bottom detachable; but I said nothing doing.  That takes too much time.  


Traci's date will wear a matching vest and bow tie.  I'm using McCall's 4321.  His muslin fitting was just as painless with adjustments along the upper back and the side seams.  I'm thankful.


Next week, I will reveal the finished gown and vest.  Meanwhile, the reveal of my niece's prom dress is scheduled for this Friday night. 

Stay tuned and Happy Sewing!
Cennetta

Tuesday, January 11, 2011

Vest 1 for Mike D - Simplicity 2870


Like I said, I finished the first vest for Mike D on Saturday night. The final fitting went well on Sunday afternoon. Mike D is a happy camper. I'm glad.

Review - Vest 1

Pattern Description: Men's lined vest with pocket variations.

Pattern Sizing: 34 to 52. I had to scale the pattern up to size 58.

Did it look like the photo/drawing on the pattern envelope once you were done sewing with it? Yes, I had to make a few adjustments based on sizing.

Were the instructions easy to follow? The instructions were easy. I didn't like the instructions for the welt pockets. I followed Debbie Cook's method. Everything else was pretty easy to follow.

What did you particularly like or dislike about the pattern? I like this pattern. It was one of five that I showed to Mike as possible choices for a vest. This is the one he selected. No dislikes.


Fabric Used: I purchased a very nice wool gabardine from Vogue Fabrics. polyester lining and interfacing are from my stash.


Pattern alterations or any design changes you made: Several alterations were made. See previous post. No design changes. This Project Runway pattern offers a lot of variations for mixing and matching pockets, tabs and collars.

Pictures are wonderful. After the final fitting, I looked at the front and back photos and noticed that the back can be taken in just a little more. Not a big deal, but it's something that I noticed and will make that suggestions to Mike next time around.

Would you sew it again? Would you recommend it to others? Yes. Mike would like a red vest. And yes I do recommend it to others. Once you have the sizing and fitting down pat, this is a simple pattern to follow with great results.

Conclusion: This is a great pattern to try.

Sunday, January 9, 2011

First Client Project 2011- Simplicity 2870 Vest


Michael Davis has forever asked me about sewing for him. And my 'timid' response has been, "Well I don't really do sewing for men. I do 'lady' stuff. There is a whole other set of measuring/fitting requirements for men that I'm not accustom to." Well, in December, I finally broke down and decided to give sewing for men a try.

Michael asked if I could try sewing a vest. I said, "okay." So I looked through my pattern collections. Can you believe it, I had about four patterns for shirts and vests. Then I made a trip to JoAnn's to pick up the pattern that I selected to make Michael's vest.

For starters, I measured Mike. He's really big guy. He may be 7' tall. Really. I bought the largest size available and still needed to scale it up five sizes, about 58.

So I made a muslin that included pockets and back tab.


The fitting of the muslin was pretty good. Just a little tweaking needed.

The front darts needed to be moved over about 1 inch.


When I graded the pattern up, I added 3 inches at the waist to add length to it. It wasn't enough. After the fitting 3 more inches were added. Can you believe it?
At middle chest, starting at the armhole I decreased the wideth about 1 1/4 inch.


Then at center front I added about 1/2 inch.

I transferred all these changes to the pattern and came up with this. Still making sure the fitting was okay, I left the side lining complete. (not shown here). Now, I have only a few things to complete: understitching at the armholes and lower edge of the back, sewing buttonholes, buttons, sew side seam of lining and the final press. Done.


Update: I finished the vest Saturday night. Hopefully Mike will allow me to take a few pictures to post. Oops! I noticed that the two patch pockets are too high. The adjustments are in the now finished vest.

That's all for now!

Happy Sewing!
C

LinkWithin

Blog Widget by LinkWithin