Showing posts with label vintage pattern. Show all posts

Friday, May 15, 2020

Shirt Making Project Spring/Summer 2020 - Simplicity S1166


Sometime in January, I decided to do another "Shirt Making Project".  To start, I cut out three shirt using Simplicity S1166.  These shirts were in a bag in the UFO bin that I had almost forgotten about.  This week I decided it was about time I made them.  This is a pattern that I used before.  The initial review and project here.

I like the shape of the collar and design of the sleeves.  These details make it a little better than your average button down shirt (to me).  They can  also make or break the project as they are focal points of the garment. Making this batch of shirts was an opportunity to do a lot of top-stitching and paying attention to the simple details and construction processes.

Tip 1:  Construction of the Collar

The collar is large and curvy ending in the typical point on each end.  There are a few approaches to making the point just right.  I posted Sandra Betzina's method of redrafting the collar pattern.  The details:  Part I and Part II


For these shirts I used another method.  Sorry I don't know what it is called.  But, instead of sewing the seam and pivoting at the corner.  I made it "squared" at the corner then I pivoted to continue.  This is done in addition to "not" interfacing the corners of the collar.


The next few steps are critical:  Use a pointer/creaser to help turn the collar inside out using the point to push the tip of the collar out.

Next, this is key:  Pressing.  I made sure I gave that collar a great press.


My last step is the top-stitching.  I use thread at each point to help guide the collar under the needle.  Often, at the corners of a garment it is difficult to get the end to move through the stitching area.


This method is also good for the cuffs.


Tip 2:  Construction of the Buttonholes

These days I'm making a lot of garments that button down the front.  This is another focal point and I want it to look as good as possible.  I've said this many times before.  I test before I do it on my actual project.  And for each shirt, each type of fabric I tested making the buttonholes.

After successful testing, I sew the buttonholes on my garment.  They are not complete without some Dritz Fray Check.  After the buttonholes are constructed, I apply fray check and allow it to completely dry before opening the buttonholes.

So that's it for my tips.  I hope this information is helpful.

Happy Sewing!

C

Monday, March 14, 2016

Notes on a Pattern - Butterick 5605 Ms. Paulette Bell's Dress


Good afternoon everyone,

It's been ages since I did a "Notes on a Pattern".  Today's post is on a vintage pattern that I'm using for Ms. Paulette Bell's annual dress.


The illustration clearly shows the princess seam bodice with cut on sleeves, which is different from most of the vintage pattern that I've seen with cut on sleeves.  This design element makes it easy to do a full bust adjustment.    Also, noted from the diagram is that the side front and side back are gores where the bodice is attached to the sleeve.   There may be a bit of a challenge to get all side bodices peaks the same.  Making a muslin is a great way to practice inserting the side front and back.


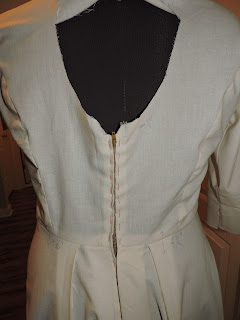
But with careful measuring, marking and sewing it can be achieved.   Other challenge may be the back opening.  It gapped mid-back on Ms. Paulette.  I would recommend that you make a muslin before attempting to make the dress out of your nice fashion fabric.

There was no way I would skip the muslin fitting.  Even though I've made a similar dress for her a few years ago without one.  On Saturday, Ms. Paulette came by for her muslin fitting.  There are several adjustments needed.

There are:
  • Lower the front neckline about 1/2".  This change is a matter of preference.

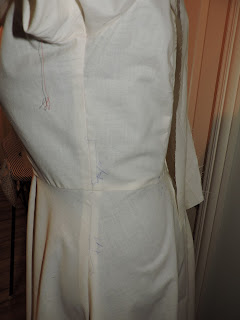
  • Right under arm, slight pull - may be resolved with adding  1/2" to the front underarm section.


  • Swayback adjustment 1/4" near side seam to 1/2" torwards middle of lower back.  (Note: incorrectly marked on muslin as adding 1".) 
  • Decrease back opening by 1"; gapping at top of zipper.

  • A little snug at outer shoulder and upper arm - add 1/8" to 1/2" along this area.


  • Add 1/2" back of skirt to compensate for the swayback tuck.
  • Side seam bodice, lower section add 1/8" to 1" at waist.

  • Side seam skirt, upper section add 1" to 1/8" along the side.
There was no problem with the construction process.  The markings were spot on.

Stay tuned.  More later on Ms. Pauletter's dress, but after the event.

Happy Sewing!
C


Wednesday, November 7, 2012

Butterick 5707 - The Beauty and The Beast

Have you ever selected a pattern that was so you and you just had to make it? You make your usual pattern adjustments, every detail perfectly ... but then.., You knew this was coming. But then.., after pulling it all together. It just didn't work for you. Something went wrong. Maybe a lot did. Usually, I don't like to blog about projects that went wrong.

Most of the time, I can attribute the "wrong" to myself. Such is the case with Butterick 5707. I started this project several weeks ago. I made my usual pattern adjustments. I didn't make a muslin. My bad. The muslin would have saved me from the dissatisfaction I feel today. Why did this project fail? A few things. Here's the complete review.  

Pattern Description:
MISSES'DRESS AND BELT: Dress has bias yoke and sleeve cut-in-one, shoulder pleat forming neckline drape, fitted bodice, gathered/darted waist, semi-fitted skirt, side zipper and self belt. A: self tie and sleeve darts.

Pattern Sizing:
6 to 22; I used size 16 instead of my usual 14. First, mistake.

Recommended Fabric
Crepes, Cotton, Linen, Woolens. Unsuitable for obvious diagonals.

Did it look like the photo/drawing on the pattern envelope once you were done sewing with it?
Yes and no. My fabric is crisper then the recommended fabrics. That could be mistake number 2.

Were the instructions easy to follow?
Easy, nothing difficult.

What did you particularly like or dislike about the pattern?
Let's start with the likes. - Style of the dress; the vintage look. I've seen similar styles worn by actresses in classic movies aired on TCM.
- The darted sleeves. - Bodice options.
- The self belt.


 Now the dislikes:
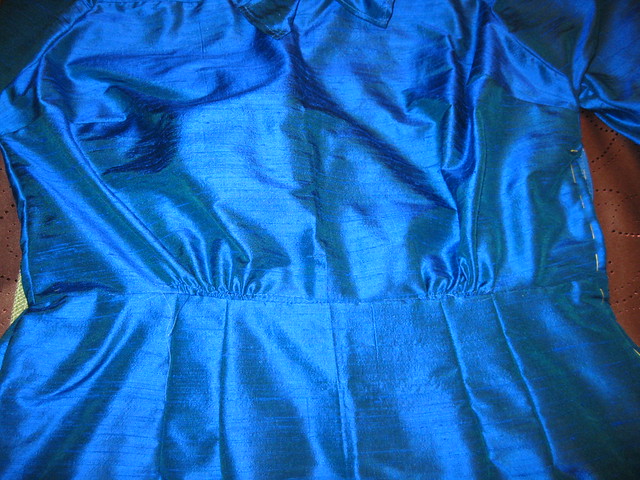
- The gathers along the waist. Not a good look for me. - The skirt was too full at the bottom. - The roominess of the bodice; it looked too big and too wrinkled. - This one is on me. Poor hemming. I can easily redo.

Fabric Used:
I used silk dupioni. I underlined it with china silk.

Pattern alterations or any design changes you made:
I made a few in additional to my regular fitting adjustments in hopes of making the dress likeable.
- FBA
- Prominent Shoulder blades
- I hated the gathering at the bottom of the bodice. So I made two darts on either side matching them with the darts on the skirt. This helped but didn't completely resolve the fullness issue in the upper portion of the dress.
- I slightly tapered the skirt mid hip to the hem and added a slit to one side. In the end, my hem wasn't good. This can be fixed as well.

Would you sew it again? Would you recommend it to others?
I won't sew it again. Right now, I'm only thinking of making some adjustments to see if I can salvage the dress. I want it to work. This was suppose to be my contribution to the Haute Couture Blue Challenge for the 2013 Fashion Show. I need it to be as close to perfect as I can get it. I do have an alternate dress though. I would recommend it to others simply because I can't legitimately say this pattern doesn't work because it was poorly drafted. But I do recommend that you make a muslin first.


Conclusion: Try it if you like. Make a muslin before you cut into your fashion fabric. Make sure the style and fit are perfect for you. I still like this silhouette, except for the fullness of the skirt. Finally, I'm still smiling and hopeful that I can save this dress.  

Parting video Mastering Silk with Sandra Betzina.

Happy Sewing! C

LinkWithin

Blog Widget by LinkWithin