Showing posts with label Brown Wardrobe Capsule. Show all posts

Tuesday, July 19, 2022

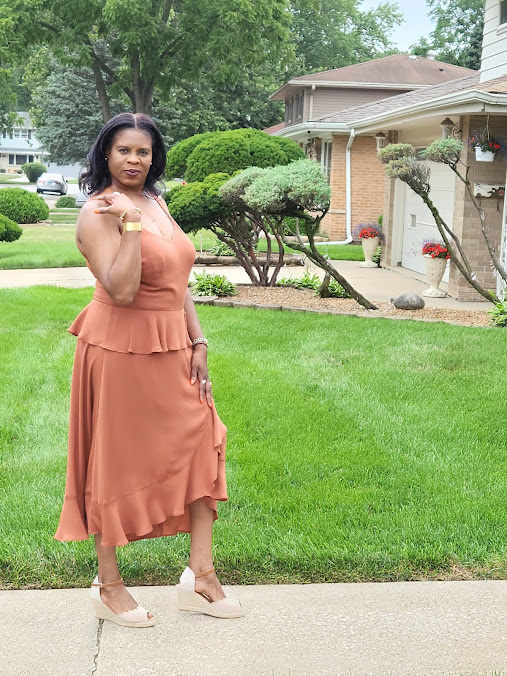
Daisy Dress McCall M8103


Summertime is in full affect here in the mid-west, and it can be challenging to look polished, cool, and comfortable when temperatures are in the upper 90's and the humidity is 95 percent. It feels like a sauna.  So, the best thing is to go with the flow, look your best, and enjoy the summer months while they are here. In no time at all, it will be September, which will usher in another season for us.

My comfort look is soft and floaty. It provides comfort and style for the season. And that is how I feel wearing my latest summer dress.


I used McCall Daisy M8103 to make my latest summer dress.  With the slightest breeze, the skirt dances in the wind.  That is one of the things I love about it.

I purchased the fabric from Joann's a few months ago. They may still have it in stock. It's a cocoa brown guaze type viscose fabric. It is very soft and easy to handle.  There is one small draw back though. It is very loosely woven and has the tendency to "grow" throughout the project. So be careful.

I used size 16 with modifications.  This pattern comes with multiple cups sizes for the upper front. This may save a little time for most sewists. For me I used the D cup. But I hate the one huge dart. It never turns out like intended.  So, I tweaked the pattern a bit and created three darts in the upper front bodice.

There are many qualities that I like about this pattern.  The one that drew me to the pattern is the flounces. Love them.  They do take a lot of time to finish.  I devoted one sewing segment to finishing the hem and attaching the flounces to the waist and hem of the skirt. Another like is how the skirt is attached to the bodice. The faux wrap crosses over the entire front of the body. So there is no worry of "exposure". Wink, wink.  The separate cup size pattern pieces are a plus too. All of these things, in addition to the floaty fabric, made this a loveable sewing experience.

Now, I do have a few dislikes. The expansion of the fabric during the entire project was annoying. I had to keep making adjustments as I went along. Oh yeah, I did make a muslin. The fabric that I used was tightly woven and didn't present the challenge that I experienced with my fashion fabric.  It would be wise to do some stay stitching on some pieces to hold the shape. 

Other changes I made:

  • Adjusted the shoulder straps
  • Raised the upper front and back armsyce.


I did not lengthen the skirt. But compared to the photo, my skirt is longer on me than the one on the model. Overall, I think my dress looks like the dress on the envelope.  

I'm happy to have this new edition to my wardrobe. And with some restrictions being lifted, I also have something new to wear to upcoming events. Happiness.

This is a great summer dress pattern to try. Be ready to spend some time constructing and finishing the flounces. Other than the fitting this is where I spend the most concentrated time. 

I may make it again. But in the meantime, there are several other dresses I planned to sew this summer. Til next time, enjoy your summer, and I hope you are able to make something that you love.

C

Sunday, April 11, 2021

Is All That Top Stitching Worth It?- V9304


Is all that top stitching worth it?  Of course it is.   There are so many functional and decorative reasons to add topstitching to a garment.  For this particular pair of pants, it is mostly used as a decorative design element.   Just looking at the pattern envelope, the eye is drawn to two things:  The topstitching and the pockets.  In this case, it is a beautiful way to showcase the design lines of this "cargo" pants.

For sewists, we know that topstitching has many functional benefits too.  It helps keep edges flat creating a crisp edge around the pockets, necklines, cuffs and other areas of a garment.  Topstitching also makes seams strong and holds fabric layers together.  Quite a bit of all of these benefits are in these pants due to the enormous amount of topstitching.


There are two things needed in doing all of this topstitching:  time and patience.  It probably took me three times as long to make these pants because of it.  Every seam has one or two rows of topstitching.  

Making good stitching for me is a matter of taking my time and patience.  I have at least two sewing machine feet designed to help make the stitches.  But I never use them.  I rely on the edge of the Satin foot and the placement of the needle position, I guess I could start using the other feet more, but it's easy for me to use the same ole method I've used for decades.  So in the end, I just take my time and guide the fabric with the same amount of pressure to produce nice, even stitching. It is a nice design element.  


That being said, here is more on the review of the pattern, Vogue V9304, designed by Kathryn Brenne.

The pattern description is:  Misses pants semi-fitted, pull-on pants have elasticized waist, drawstring, yokes, and pocket variations.  Fabric to be used should be two-way stretch knits (50% cross grain) like double knits, ponte.

The pattern is available in sizes 6 to 22.  I used 16 with a few modifications.

My pants look like the drawing and photos of the pants. I made view A.  I wanted to really test making them before I tried the back pockets and the little stitched slashes at the back of the knee.  Pockets are one of the design elements that I am focusing on this year.   


Often I stray away from following instructions to the letter.  But for these pants, I did.  Particularly the instructions for the pockets.  I wanted to make sure they turned out right.  The instructions seemed a little weird.  It was like making the pockets wrong side out. literally.  The finished pockets do show raw edges on the outside of the pants.  


My likes:
  • All of that time and patience to topstitch.  The nerd in me thinks this is so fun. 
  • The seaming of the pants.
  • The method for forming the pockets.
  • The yoke and elastic casing.
Dislikes:
  • Really, my dislike is on me.  I needed to adjust the crotch seam.  The front is a little too long (1") and the back crotch seam a little too short (1.5").  I was so busy thinking and working on all the rest, I fail to make these small adjustments.  They are not a deal breaker for the pants.  These adjustments would provide slightly better look and comfort.


The fabric that I used is a ponte knit from So Sew Fabrics.  It's of the same quality as the ponte knit that I've purchased from Mood.  So both are good sources for ponte knit.

My two little adjustments are:  lengthen the pant legs and use a slightly deeper seam allowance at the center front seam below the yoke.


I like how these pants turned out.  I will make at least one more pair, view B.  I do recommend this pattern to other sewists.  I was surprised to see not many people tried this pattern yet. The copyright is 2018.  Maybe is because of all that top stitching or the construction of the pockets.  All you need is a little time and patience,  And it's done.

Anyway, I do recommend the pattern.  You'll have a unique pair of pants that are comfortable and stylish,

Happy Sewing!
C

Friday, March 12, 2021

Sweater Knits - A Difference In Sizing Burda Style 6990


Of course,  you all already know that all knits are not alike.  Sometimes I have to remind myself. Especially when I'm making multiple versions of a given pattern.  Way back in January, I made two turtleneck tops using sweater knits from So Sew Fabrics.  The graduated color knit is just a basic weave sweater knit with a slightly course hand and about 30 percent stretch.  While the tan ribbed sweater knit is very soft and has about 60 percent stretch.


My original plan was to make the Burda Style 6990 turtleneck top for me and my daughter.  I traced off size large for me and medium for DD.  Of course, I wanted the brown knit for myself; and DD gladly took the tan ribbed knit.  As it turned out, my top was perfect.  But when DD tried on her top, it looked like she was wearing my top. Lol


So I tried it on. It fits me almost perfectly.  The armsyce needed a little adjustment.  I ended up with two new turtleneck tops.  Unfortunate for DD. Lol  I'll make her something later.

These new turtlenecks fit into my brown wardrobe capsule.  They go well with pull-on pants and jeans.  I'm pictured wearing the brown top with my TNT Vogue V8859 pull-on pants.  I love this pattern.

No pictures of me wearing the second top yet.  I hope to post that soon.

Notes on the pattern -

This was a very easy top to sew.  I especially like the cut on the sleeve.  It fit well under the arm and looks good in the shoulder area.  This pattern does have great bones.  I could make a hundred of these.

There is nothing complicated or confusing about the construction of the top.  And it has three other views that look great too.  I think I will also try the shawl collar view.

Parting Shots:  Because it was a sunny day, we wanted to take some pictures outside.  But it was windy and cold.  Anyway, we tried.  I couldn't keep a straight face or hold a good pose.  So here are a few fun/silly shots.


Happy Sewing!

C


Tuesday, February 16, 2021

Cute Comfy Top - Simplicity S9182


This morning I woke up to over 12 inches of snow!  Yesterday afternoon we thought we had a head start on clearing it off driveway and the side walk.  But when I peaked out of the window, there it was more of the fluffy white stuff.


Surprised?  Nope.  It is to be expected.  We hoped for a lighter snowfall over night. So, while the mini blizzard was taking place, I spent the evening cooking and sewing up Mimi G.'s Simplicity S9182 top, view A.

I grabbed a copy of the pattern at Hobby Lobby on Saturday for 99 cents.  I couldn't wait to try it.  The the collar and the center front zipper were what that sold me on this one.  So, today I'm reviewing View A.

This pattern includes three views: two tops and a slim skirt.  Simplicity has very little descriptive information.  So here is mine.  Knit tops with center front zipper, dropped sleeves with sleeve bands and large sailor like collar.  The waist is finished with or without a waistband.  The skirt is a pencil skirt with waist darts, center front and back seams.  Large hip pockets with flaps and a center back zipper.  

This pattern is available in sizes 6 to 24.  I used a size 16 with a few modifications.

My "first version" looks like the drawing.  The instructions were typical.  Most of them I followed as stated and others I changed a bit.  Nothing complicated though. 

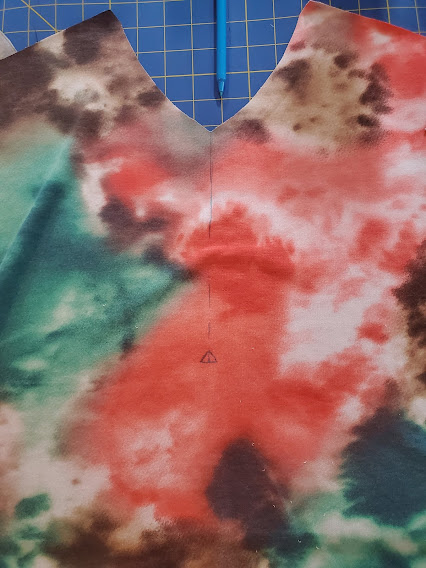
I used a tie dye french terry knit that I purchased from Sew So English Fabrics.  I ordered this yardage along with a few others months ago.  The same day that I received the fabric, I tossed it in the washer so it would be ready to sew when I decided what to make.  The fabric came from the dryer soft and fluffy ready to sew.   

The few changes are:  


  • The first few steps are related to sewing the zipper to the center front of the top.  This is the major focal point.  So I really wanted to get this right.  First, I marked the cutting lines.  Then, I fused a strip of fusible tricot interfacing to the wrong side where the zipper would be placed.  Next, I stay stitched along the lines where the zipper would be stitched.  Carefully I cut the center front and each side of the triangle where the base of the zipper would rest.  Next, placed the zipper with the right side facing the right side of the top, the bottom of the zipper pointing to the top edge of the top. Stitched horizontal seam. Then flipped the zipper up with the zipper pull at the neck edge.  Using the stay stitching as a guide, I turned the edges in along the vertical sides of the zipper.  Pinned and hand based in place.  Finally, I machine stitched the zipper to the top.  I used this method because I was sure it would work for me.  It was very important that the zipper looked perfectly centered and stitched to the top.


  •  I did a small FBA (,75") for comfort.  This FBA does not result in a bust dart.  Instead I eased in the difference to maintain the original look of the top.  It worked well.  The adjustments added 1.5" to the width of the top.  I eased it in when I attached the waistband as I only need the extra width in the chest area.  I actually could have reduce the length of the band maybe a inch or so.
  • Instruction #15 indicates stitch stretching band to fit.  The sleeve opening is several inches wider than the opening of the sleeve band.  So I decided to gather it instead.  It worked.
  • I lengthen the sleeve two inches.  I have long arms. 
  • After stitching the under collar to the top, I folded the upper collar over the top sandwiching the top between the two collar layers  pinning only to the front neckline.  The rest of the collar was hand stitched to the back.  I like this finish better.


These are my changes.  The first change was the most time consuming.  But not difficult to do.

I want to make this top again for sure.  It came together very well and I like how it looks on me.  When I searched online to see if others made the top.  Only a few post so far.  Don't sleep this one.  It's a great top and it's not difficult to make.  

I enjoyed making this top and will make another soon.  

Parting Shot:  This is my block after the Monday night big snow.  It's a beautiful site.  But to shoveling.., Now that is another story. Lol


LinkWithin

Blog Widget by LinkWithin