Showing posts with label brocade. Show all posts

Wednesday, June 25, 2025

The Brocade Makes The Jacket - Butterick B6915


A little over a year ago, I briefly mentioned my work on the muslin for the jacket of this pattern.  Since that time, I did more tweaking of the pattern and decided to use a beautiful brocade that I purchased from Mood Fabrics several years ago during a visit to New York.  

I thought the style of the jacket was the perfect match for the brocade.  Granted I did want to reduce any chance of something going wrong or turning out wonky before I cut into my fabric.  I really love the fabric and wanted to make something special with it.   


We are now in the hot, muggy days of summer.  It was 94 degrees when I took the photos of me wearing my outfit.  Though the coloration of my new suit is bright and cheery, it is perfect for the fall/winter season.  

Pattern Description:  Classic two-piece suit with a twist.  Lined jacket draws asymmetrically across the body and fastens with three buttons.  Jacket features flap detail at front.  Pants come in ankle length and includes invisible zipper on the side.  View C are wide leg pants.  I made view A and B.


Pattern Sizing:  It comes in two size groups (8 - 16) and (18 - 26) I used size 16 with modifications.

Did it look like the photo/drawing on the pattern envelope once you were done sewing with it?  Yes, my outfit does look like the drawing and the suit that the model is wearing.  

Were the instructions easy to follow?  The instructions were typical and easy to follow.  There was nothing confusing about them.

What did you particularly like or dislike about the pattern?  

Likes -

  • The asymmetrical style line of the jacket.
  • The pleats at the neckline of the jacket
  • The princess seam.
Dislikes -
  • The one piece sleeve.  I prefer a two piece sleeve for a suit jacket.  These sleeves were snug and there was too much in the sleeve cap for my fabric.  When I made the muslin the amount of ease in the sleeve cap was easy to work into the armhole.  But in the brocade it was slightly difficult.  I had to set the sleeve three times.


Fabric Used:  My fabrics were purchased at Mood Fabrics during a trip to met up with several sewing friends (Carolyn, Andrea, Gaylen)  in New York.  My jacket fabric is a silk brocade and the pants is a medium weight polyester satin.  

 
Pattern alterations or any design changes you made:  I made several pattern adjustments beginning with the full bust adjustment and my usual back adjustments.  I also lengthen the sleeves and added an inch width to the upper arm area.  For the pants I had to lengthen the leg and crotch.  Sorry no photo of that adjustment.


After making the adjustments and a muslin, I still needed to make a few tweaks as I sewed.  Below is a photo of me fitting the lower half of the jacket along side of photo of the finished outfit.  See the difference in the flare of the peplum.  I ripped it all out and reduced the peplum along the sides. 


Would you sew it again? Would you recommend it to others?  I think once is enough.  But, I do recommend this pattern to others.  You should make a muslin before cutting into your fashion fabric.

Conclusion: I'm pleased with how this suit turned out.  I'll probably wear it the first chance I get when cooler weather returns.  This pattern is not difficult to sew. It's time consuming and you should take your time and enjoy the process.


Thursday, November 11, 2021

Brocade Holiday Skirt - Vogue V1725


I started this project with the idea of making the dress, Vogue 1725, View B.  After struggling with trying to make a FBA, I decided to make a skirt to wear with a top of a different fabric.  See previous post. The bodice of the dress after the adjustment, just wasn't flattering.  


The skirt of the dress did not call for a lining.  I added one because the brocade is not completely opaque.  The lining was cut about 2.5" shorter than the skirt even along the curved high section.  I didn't want it to show.  The skinny waistband is about 2.5" wide and completely interfaced.  And I omitted the pockets.

What I liked about the skirt is the fullness of it and the high/low style.  That's actually why I purchased the pattern.  For this version, the brocade makes it extra special and perfect for a holiday or special event outfit.


My fabric is from Minerva Fabrics UK.  It is a lovely brocade that either side of the fabric can be used.   It all depends on whether you want more gold or more black in your outfit. I chose more black. 


I'm glad I was able to get something out of the pattern despite the unflattering altered bodice.  In hindsight, I could have used another bodice already tried and true (TNT).  Anyway, I was able to get a nice  outfit.

So, what are you planning to make for the holiday season?

Happy Sewing!
C

P.S.
Sorry the pictures are a little grainy and dark.  


Thursday, March 2, 2017

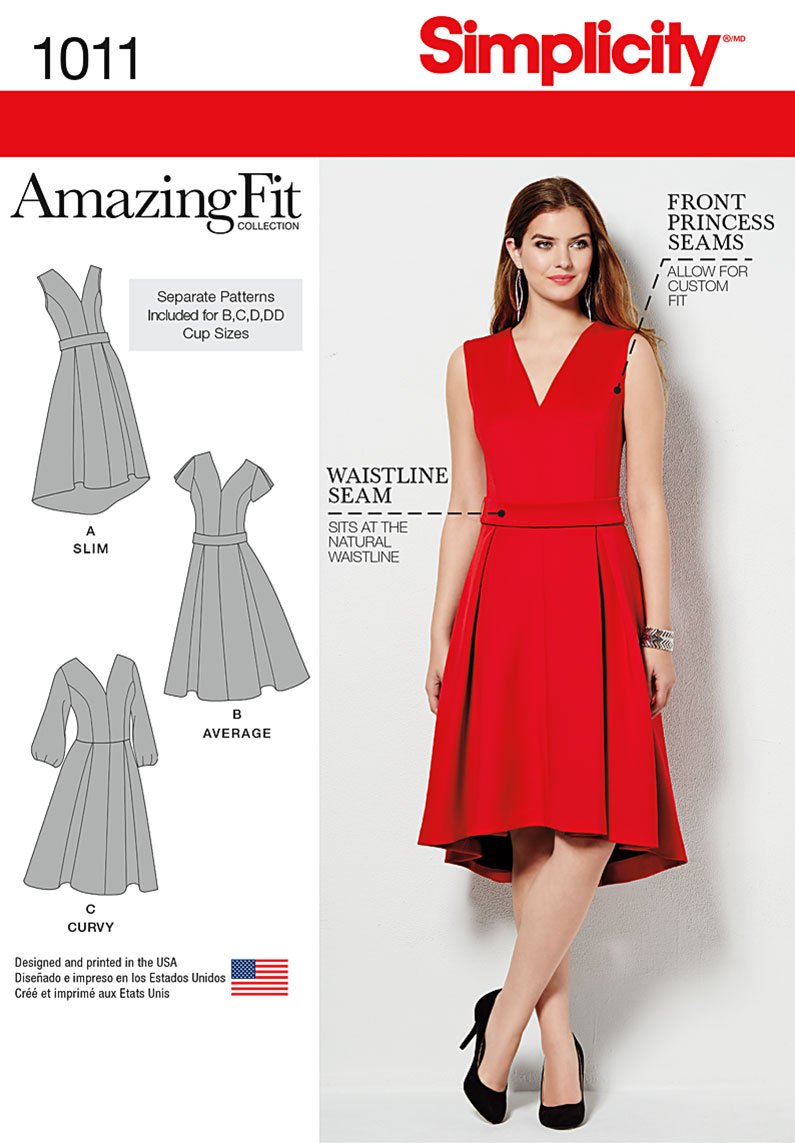
Valentino Inspired Dress - Fancy Mood Floral Roses Jacquard and Simplicity 1011


Plain and simple:  there is nothing like a beautiful piece of fabric.  Just the mere fact that it is gorgeous makes you imagine how proud you feel to wear something made of it. This is the case with Mood's Black Malaga Floral Roses Jacquard and Eggplant Polyester Lining.  The pairing of these two fabrics was a winning combination for my latest dress.   This jacquard is rich and luxurious, the pattern is intricately woven with a glossy under tone.  It has a smooth hand, unlike most brocades, but just as radiant.  The lining is perfect for it.  It is very smooth and has similar movement as the jacquard.

My inspiration for this dress comes from one of my favorite designers, Valentino.  I'm always dreaming about making something spectacular drawing from the simplest details in hopes of translating them into my very own creations.  The vertical lines that are seen throughout Valentino's Fall 2016 collection is were I drew my inspiration for this dress.  I posted a few pictures on my blog.  


Pattern Description:

Simplicity never really spends anytime given good descriptions of the pattern.  So, here's my description:  princess seam "V" neck bodice with individual pattern pieces for B, C, D,and DD cup sizes.  The four panel high-low skirt of the dress has four inverted pleats: two in the front and two in the back.  The dress includes two sleeve options or can be made sleeveless with a belt that is attached to the back with two buttons.  The pattern is available in sizes 10 to 28W.

My dress does look like the photo/drawing on the pattern envelope with the exception of my "small" design changes.

There were no confusing steps in the instructions.  Like all the amazing fit patterns, Simplicity include instructions on how to fine tune the fit as you sew.

My Likes -

There are a lot of reasons why I like and chose this pattern:

  • It included my cup size and I wanted to test it to see if it would fit with minimum fit changes.
  • Princess bodice, easier to fit, if the "Amazing Fit" bust size didn't fit.
  • low-high skirt.
  • "V" neckline
  • Lantern style sleeve, five darts, makes for an interest sleeve detail. I only wish it was a little more pronounced.
I have no serious dislikes.  


Fit Changes -

I decided to use Simplicity Amazing Fit S1011 in hopes of limiting the amount of fit adjustments that I normally make.  Surprisingly, that was the case with this pattern.  I used size 14, DD cup, with only a few tweaks.


After making the muslin, I determined that a few small changes would produce a better fit:
  • Add 1/4 at the fullness of the bust area to the side front and front.
  • Add 1/2 width to the back, creating a neck dart.
  • Make a swayback adjustment.
  • Add an inch to the length of the bodice.  In hind-sight, I think that was too much.
  • Add an inch or two to the length of the skirt so that the hem would fall at my knee.
  • Add an inch to the belt, for good measure, didn't need it.
It seems like many changes, but these were mostly small tweaks, unlike the full process of making a FBA that I normally make.  There is one more tweak I should have made, and that is to the length of the shoulder seam.  It's too long.  Next time I'll reduce it by 1/2 inch.


Design and Construction Changes -
  •  I lined the entire dress.  The pattern only gives instructions on lining the skirt of the dress. 
  • To emphasize the vertical lines, I added a floral trim with a Medallion style motif along the front and back seems of the bodice.  Luckily, I had buttons with a similar design to hold the belt in place.
  • Added hem tape to the skirt of the dress.  It looks nicer.
  • The instructions (#4) has you to form the pleat by bringing folds to broken lines.  I simply bring the lines together, basting to form the pleats.  It's easier.
  • Step 1b, I didn't follow.  I prefer to stay-stitch along the front and back; then slashing the seam allowances to fit the curve of the side front and side back.
I like how my dress turned out.  And I will definitely use the bodice again for another dress and as a sloper.  This is a good basic dress pattern that can be used to create a variety of looks and styles.

It's a little chilly and windy outside.  Resting my coat for a five minute photo shoot.

Happy Sewing!
C


Sunday, September 21, 2014

McCall 6464 - Notes on a Pattern My Peacock Dress


Today is my 52 birthday.  I'm very thankful to be in the land of the living. This year has been  challenging for me for many reasons.  But I will not go into that now.

This post is about the birthday dress (Peacock dress) that I had planned to finished by today.  I like Rhonda's idea of naming her creations.  (I think I need a matching fascinator.) So I took a tip from her and decided to name this dress, the Peacock dress.  The colors of the fabric are vibrant like the feathers of a male peacock.


I'm using McCall 6464, the 3/4 sleeve with the straight skirt.  The good thing is I've already made the bodice adjustments that I require.

FBA:  I may need to relocate the dart, but I'll determine where once I start to sew the dress.


Swayback and Prominent Shoulder Blades:

I forgot to make the tuck on the side back pattern before taking the picture.  But you can see where I made the tuck.  Palmer/Pletsch includes the lines, which is very helpful.  You can increase the depth if needed.  The adjustment for the prominent shoulder blades adds width throughout the back pattern.  I only need it in the upper back area.  It's not needed below the bust area.  The excess can be removed by increasing the depth of the seams where needed.


That's it for this post.  Enjoy your day!
Cennetta

LinkWithin

Blog Widget by LinkWithin