Showing posts with label UFO. Show all posts

Thursday, February 3, 2022

Vogue V1515 Pullover Vest and Skirt


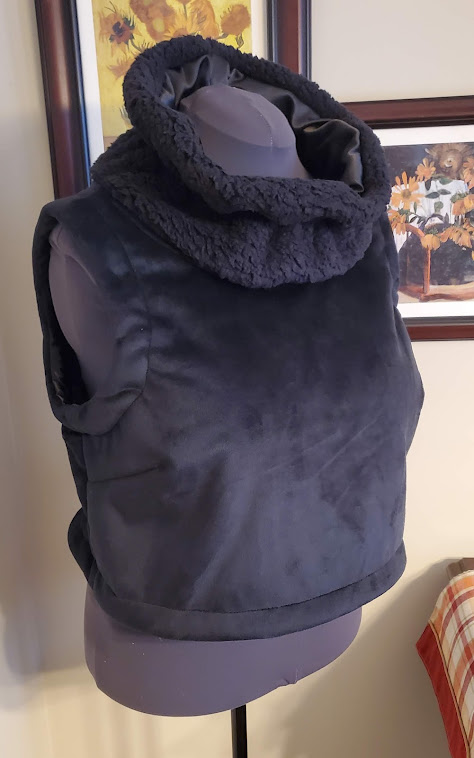
I hesitated awhile before finally deciding to go ahead with posting my pattern review of Sandra Betzina's Vogue V1515 (OOP).  The hesitation is due to my "not being so happy" with how the top/vest looks on me.  I really was hoping that it would be a good look for me.


This is the last garment that I made in January 2022.  I decided I would do end of the month reviews.  And before doing that, I wanted to post this last garment made.  To be clear, the vest is the last garment for January, and the skirt is the last garment for December 2021.

Anyway, as far as the making of it, the construction was fine. There are somethings I could try if I decide to make it again, which I'll mention later in the review.  So, let me get to the specific details of the review.


Pattern Description:  Misses' top and skirts:  Loose fitting, pullover top has elasticized collar, forming ruffle, contrast facings at armhole and lower edges, and topstitching.  Below waist skirts have wide yoke piping cargo pocket, hidden pocket on front yoke facing and shaped hem.  C: Side zipper.


Pattern Sizing: Sandra Betzina uses a different sizing chart from other Vogue pattern designers.  I used size E with very little modifications. Views A and B

Did it look like the photo/drawing on the pattern envelope once you were done sewing with it? I think both garments looked like the photos and drawing for the most part. 


Were the instructions easy to follow? The instructions were pretty easy to follow.  I did have a little issue with the outside cargo pocket (skirt). I mistakenly place the ends too far apart.  So, there is a pull at the top of the pocket.  But other than that, no problems.

What did you particularly like or dislike about the pattern?  What drew me to this pattern was the pullover top.  (I'm calling my version a pullover vest because of the heaviness of the fabric.)  Unfortunately, I'm not that happy with how it looks on me.  


So here are my likes:

  • The design of both the top and the skirt.  I love the ruffled collar of the pullover as well as the shape of the uneven skirt hem with the cute cargo pocket.
  • Easy to sew project.
  • Yoked skirt.
  • The bust darts were spot on.  I didn't have to lower them.
My dislikes:
  • The length of the pullover.  I wasn't thinking when I cut it out.   I should have made it a few inches longer and tapered it a bit at the bottom so it wouldn't look so boxy on me.  So I added a piece of elastic to create some shape to the vest.  In turn, create some shape for me.
  • The length of the elastic to form the ruffle on the collar.  It's too long.  I would have like it closer to my neck.  

Fabric Used: 
  • Pullover Vest - I used a faux suede with fleece backing from JoAnn's.  I thought this was perfect for the vest.  Only problem, it's a little bulky for me.  Contrast facings - crepe back satin remnant from my fabric collection. 
  • Pullon Skirt - I thought this was a cute jersey knit.  For the life of me I can't remember where I purchased it. BTW- this is a UFO.  It was cut and ready to sew for about two years.  

Pattern alterations or any design changes you made:  I only wish I had made a few adjustments on the vest.  For the skirt, I added the elastic to the waist and omitted the piping.  I made a design change on the vest.  For the collar I used the satin for the inside of the collar.  I actually, divided it in half lengthwise adding an inch to the faux seude outside and subtracting an inch from the inside satin. The original design would call for an all-faux suede collar and that would be too hot in my opinion. No other changes.  

Would you sew it again? Would you recommend it to others? I really like the skirt.  I may make a woven version with the side zipper and adjustment to the width of the yoke to fit better.  The pullover vest, I probably won't try it again.  I think I'm going to gift this one to someone.  


Overall, I like this pattern especially the skirt.  I do recommend it to others.  The rating on the envelope is average.  I think most sewist could make this with no problems.  

PS - I did add the little inside pocket.  I forgot to take a picture of it.
Happy Sewing!
C


Thursday, May 13, 2021

Red Sequins Maxi-Dress - M7119


I couldn't tell you why it took me so long to finish this maxi-dress.  It was in a bag in a box with ten other UFO's that I had cut and made ready to sew.  I was beyond happy when I finally finished it last week.  2018 is actually when I had planned to make the dress.  That's a long time to leave this beauty undone.


 Ranata of The Twilight Stitcher hosted a little red dress challenge (Instragram) in December 2020.  I didn't even start sewing it together.  Christmas gifts took up all my sewing time. Before I knew it, February had rolled around and gone.  Next target month was March; then finally April for the Maxi-Dress Mother's Day challenge hosted by Crystal Sews and Stuff and Crumpets Tea and Sewing, both on Instragam.  So I made it this time!

With that said, here is my review.  In hindsight, I should have done a "Notes on a Pattern" for the fit adjustments.


McCall M7119

This pattern is OOP.  Many have made it.  There are quite a few photos posted on the net.  Anyway, the pattern description:  Misses' Dresses:  Wrap dresses have bands, fitted bodice, gathered back, neckline, tie ends, skirt (semi-fitted through the hips) variations, and narrow hem.  A, B: Bias armhole facings B: Shaped hemline, wrong side shows. C: short sleeves. D: Elasticized sleeve. C, D:  Gathered sleeve cap.

Pattern sizing are 6 to 22.  I used 16 with modifications.  Lots of modifications. Lol.

I really love how this dress turned out. My version is a cross between views C and D. Basically, it is view C with long sleeves. The instructions were typical, but easy to follow.  Nothing in them confusing.

There are so many things I like about this style of this dress.  They are:

  • Wrap dresses are flattering for my figure. ;-) 
  • The gathering at the neckline and the sleeves
  • Skirt waist.  It defines my waist or lack there of. Lol
  • The neckband.  Makes it easy to adjust the neckline. No gapping.
  • So easy to make and it looks great.
Dislikes - None

The fabric is from Mood Fabrics, item #319054.  They may or may not still have it if you are interested.  It's a moderate stretch knit with sequins rectangles throughout the fabric.  


My pattern adjustments were mainly to the bodice.  This is were my greatest fit challenges are.  Truth be told, this one felt like I redrafted the entire front bodice.  The adjustments are:
  • Full bust adjustment, which created a waist dart.
  • Moved the bust dart down about 2 inches.
  • Two small tucks to keep the neckline from gapping, done to both front bodice and neckband.
  • Lengthen the bodice by about an inch or so.  I wanted to make sure it came to my waist.
  • Prominent shoulder blades adjustment to the back bodice.
  • Lengthen the skirt by a few inches.
I will definitely make this dress again.  It sewed up in about five hours.  No buttons or zipper.  Easy.  I also, recommend it to others.  It is a great little dress for all seasons and occasions depending on your fabric choice.


I'm so pleased with how it turned out, it is one more UFO finished!  

Happy Sewing!
Cennetta

P.S. - My necklace and earrings are made by my DD. ;-)


Wednesday, October 14, 2020

The Prettiest Blouse That Almost Wasn't Made - McCall M6512


This blouse was a tremendous save.  In the sense that this blouse has been in a bag in the UFO's bind for the longest time.  To be precise, I cut this blouse out shortly are I returned from the Palmer/Pletsch workshop in 2012.  

I can't say why it took me so long to finish it.  But I am very happy that it done and it still fits.  It fits in with my current wardrobe capsule plans.  


Enough on the back ground information.  Here is my pattern review.

Pattern Description:  Misses' Blouses:  Loose-fitting blouses A, B have neck and front bands, yoke, front sleeves (cut on crosswise grain of fabric), no shoulder seams, back pleats and narrow hem.  A:  Pleated pockets with button flaps and short sleeves rolled-up (wrong side shows) with button tab. B: Bias collar extends into tie ends and sleeves gathered into button cuffs with seam opening.


Pattern Sizing: The pattern comes in size groupings from 4 to 18.  I used size 16 with some modifications.


Did it look like the photo/drawing on the pattern envelope once you were done sewing with it? Yes, my finished blouse does look like the illustrations on the pattern envelope. 

Were the instructions easy to follow?  The instructions were typical with the Palmer/Pletsch instructions for adjustments, which are always a plus.  For the most part, I followed them.  I didn't like the suggested construction for the collar/tie and neck band.  My preference is to attach the neck band to the top first.  I like to check and make sure everything lines up as it should.  I also found it strange/different to interface the collar/tie.  In my mind, it should be soft and fluid. So, I hoped that it would be fine as I added the interfacing to the collar/tie.  As it turned out, it's a little stiff but still floaty.

What did you particularly like or dislike about the pattern? There are so many likes about the blouse, and there were a few challenges with the construction.  I start with the many likes.

Likes:

  • The cut on sleeve that continues into the back yoke.
  • The join of the blouse front at the arm hole.
  • The front band and the 3/4 sleeves.
  • The overall style of the blouse with the tie.
  • My selection of fabric.  It's so soft and fluid.


  • The join of the blouse front at the arm hole.

  •  The front band and the 3/4 sleeves. 


  •  The overall style of the blouse with the tie.
  • My selection of fabric.  It's so soft and fluid.

Dislikes/Challenges:

  • The construction of the collar/tie and neck band.
  •  I struggled with the fabric.  The neck band and the front band that I cut eight years ago was a little off.  The fabric is slippery which makes it difficult to cut.  So when I re-cut these pieces (Thank God I had more fabric.), I block fused the interfacing to it before cutting out the pieces.
  • In order to produce good buttonholes, I cut stripes of wax paper placing a piece on top and underneath the buttonhole area. 


Fabric Used: The fabric is a silk chiffon that I purchased during the Palmer/Pletsch workshop way back in 2012.  I purchased it at the Fabric Depot.  It is pretty, soft, and fluid. But difficult to handle.  It slips and slides.  Initially, my plan was to do french seams. Somehow, I forgot all about that after making two seams  (the back sleeve to the back blouse).  No way was I going to rip out the next set of seams.  So, tested the look of the zig zag on the sewing machine.  It didn't look good.  So I finished the rest of the seam with the serger.


Pattern alterations or any design changes you made:  Some changes in construction are above. Additionally, I made a FBA.  No other pattern alterations.  My closure has seven buttons instead of six.


Next time, I'll add a few inches to the length of the sleeve and I don't think I'll add interfacing to the collar/tie.

Would you sew it again? Would you recommend it to others?  Yes, I want to make at least one more.  And yes, I recommend it to others.  My blouse turned out pretty good.  This first one was a very slow sew.  I spent time than I normally spent on a blouse of similar style.  In the end though, it was worth it.  Now, I have one less garment in the UFO bind.  And I'm very happy about that.  


Conclusion:This project was a little challenging, but with patience and perseverance I finished another UFO.  I ended up with one more pretty blouse in my closet.


Happy Sewing!

C

Wednesday, February 6, 2019

Notes on a Pattern - McCall M7254 Sweater Cardigan


Sunday afternoon I was sitting in my sewing room thinking about what to make next.  I was really leaning toward cutting out a new project.  While sitting there, I thought about the great month of sewing I just had.   All in all I was feeling pretty good about my sewing success thus far.

So, I got up and began to look through my bag of projects to sew in 2019.    But before I could decide on what next, my thoughts turned to the box of UFO's that I need to address.  I asked myself new project or finish something already cut out?  This time I chose to go with the already cut out.

Surprisingly, I couldn't remember why I put this one aside other than the season changed before I finished it.  Anyway, I'd like to share some of the details on the pattern and the fit adjustments that I had to make it "my size".

This pattern is described as:  Unlined cardigans are close-fitting. A, and armholes B, D: Narrow hem. B: Contrast panels. D: Purchased toggle closing and sleeveless. B, C, D, E: Self-lined front (extends into shawl collar variations) and back peplum. A, C, E: Stitched hem on sleeves. Note: No provisions provided for above waist adjustment.

It's available in Multi-size groups (XS, S, M) and (L, XL, XXL).  I used medium with modifications.  On the McCall website, the sizing is indicated as 4- 22.


The instructions were typical.  Nothing confusing in them. Before cutting my cardigan/jacket, I made my usual pattern adjustments starting with the FBA on the side front.  Then adjusting the front to ensure a smooth joining of the two.  Lastly, I made a swayback adjustment with a center back seam.


The cardigan/jacket went together with no problems.  In the bust area I eased in more of the excess at the curve to allow for enough wearing ease across the bust.

My fabric is a quilted coating from Mood Fabrics and black knit coating remnant from this coat project.  I love the combination of the two.  It makes my cardigan/jacket more structured.


I like this pattern for the collar, front, and peplum look.  The sleeve are very narrow, especially below the elbow.  So if you're planning to make this, make sure you measure the circumference of the sleeve to ensure you have enough room.

My jacket is almost finished.  I decided to add a lining.  So once that's done, the jacket will be completed.

It's possible that I will make it again.  And I do recommend it to sewists.

Happy Sewing!
C


Tuesday, October 9, 2018

DD's Swimsuit - No Longer A UFO! Butterick 6358 and McCall 7578


I'm so happy to finally post my first swimsuit ever.  I cut this suit out early LAST year for my daughter.  While organizing my September projects, I found this on top of one of my "to make" bags of sewing projects.  Mentally, I'm shook my head and said, "This does not make any sense."  Sew this up today.  And I did.  It was literally the first project that I finished in September.


My DD wanted a bikini and selected the top of McCall-view A M7578 and bottom Butterick-view B  B6358.  Of course, anything for the kid, I mean almost anything. Wink, wink.  We went to JoAnn's to get the fabric.  They have a fairly large selection of activewear fabrics.  For this suit, we didn't need I lot. 

I used a Schwertz microtex sewing needle, size 12


So, let me start with the bikini pants.  B6358 - Lined swimsuits are close-fitting, cut on crosswise grain, and elasticized.  B: Tie ends.  I used size 12.

I loved making these.  This was a fun project that turnout very well.  The fit was spot on.  The cute little tie and the peep hole add interest to a common bikini style.  Sorry no pictures of her wearing the suit.  I tried.., she said, "No, photo shoot for me." 

I followed the instruction and had no problems.  They really went together in no time at all.  They are completely lined with a white swim knit. I used a 3/8" cotton elastic for the legs and the center back section.  To finish the elasticized seams, I used a stretch zigzag stitch.  I finished the waistband on the serger.  That's it.  No time at all to make them.


Next, for the bra I used McCall 7578, view A.  It's really a workout top (to me anyway); my DD wanted to use it instead of the bikini bra that is include with Butterick 6358. 


M7578 -  It's described as close-fitting lined pullover bra with front and back princess seams.  I contracted the front and back to match the bikini pants.  Again, I used size 12, with modifications this time.

The bra was also easy to sew and is fully lined.  I just followed the instructions and had no problems.  Once I sewed the outer shell together, she tried it on.  Unlike the bikini pants it was too large in the bust area.  I simply increase the depth of the seams to get a better fit.  For the front and the neckbands I could have used size 10 instead. 

All in all both projects went together very quickly with minimal adjustments needed.  This experience has encouraged me to try a few more swimsuit projects.

Stay Tune!
C


LinkWithin

Blog Widget by LinkWithin