Showing posts with label Rhonda Buss Designs. Show all posts

Friday, December 6, 2019

Rhonda's Shirred Wrist Sleeve Hacked Into A Shirred Forearm Sleeve - Notes on a Pattern - M8003 Part II


Happy to post about my little experiment with Rhonda's shirred wrist sleeve.  I decided to hack it into a shirred forearm sleeve.  It turned out beautifully. 


This was so easy to design/hack.  I made a shirred wrist sleeve for another McCall's m6964 knit top a few years ago.  That post is here.

Rhonda give you step by step instructions on how to make the shirring.  It's really up to you on how far you want to go with it.

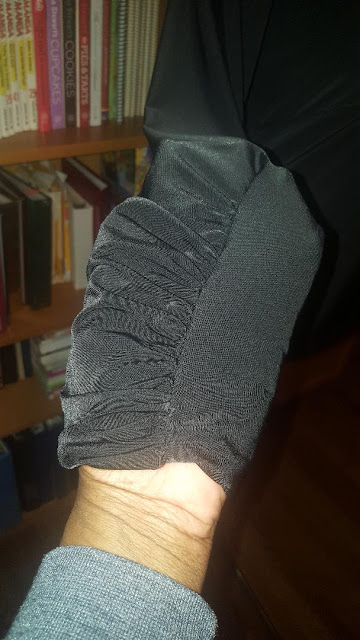
I will use this sleeve again.  It adds style to a regular ole plain sleeve.  Below is how it looks just hanging.


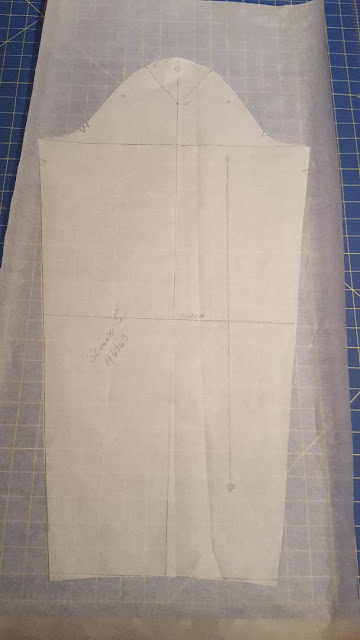
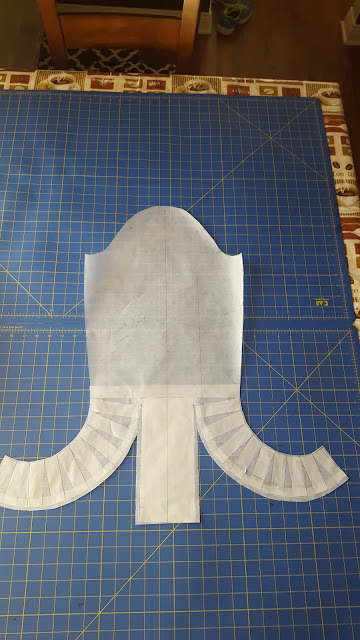
Here are my tissue patterns for both sleeve designs:  shirred wrist and shirred forearm.  Try it; you'll like it.

shirred wrist sleeve

Shirred Forearm sleeve

Happy Sewing!
C


Notes on a Pattern - McCall M8003


Have you ever been so excited about a pattern so much that you envisioned wearing the finished garment with enormous confidence? Or have you ever worked so hard with resolving a fit issue that in the end still did not meet your standards?  Or have you found it too hard to just give up on making it just right for you?  Well, it happened to me.  AGAIN...,

This time with McCall's M8003.  The process started out as always.  I liked the pattern. I cut it out.  I made my pattern adjustments, so I thought. I cut out the bodysuit (at least that's what we used to call them in the 70's).  I put it together feeling like I'd followed all the steps just right.

Now, It's time to try it on minus the neckband, sleeves, and closure.  Multiple issues...,

UGH..,

Okay, Okay, let me give you some of the basic information about the pattern before I continue.

The Pattern Description from McCall's website.  Close fitting tops, or pullover with snap closing, mock collar or neck band, has length variations. B: Contrast yoke.  Sizes:  6-22 in two size groupings.


I used a ITY polyester/lycra knit from Fabric Mart Fabrics.  Love this fabric.  I purchased multiple yards in multiple colors.  Anyway, it was perfect for this bodysuit.

The instructions were clear and very easy to follow and so was the construction techniques.


After I examined my top and noted all of the issues, I looked back at the top modeled on the envelope and saw some of the very same issues.  My initial thoughts were, I didn't allow enough for the FBA.  But the model doesn't appear to need an FBA; yet the issue exist for her as well.

My first and most visible problem was the yoke.  I had adjusted it to include a partial FBA.  When I tried it on, it didn't fit across the upper chest.  My initial adjustment is below.

Yoke over the front top to show adjustment for FBA
 So, I ripped out the yoke.  Removed the adjustment from the yoke pattern, then cut another. To guarantee no gapping, I added clear elastic along the hem edge of the yoke before hemming.  That seemed to work.


Below is a picture of the modeled top on the envelop.  Take a look at the hem of the yoke.  So, it might be good  idea to add the elastic to help keep the shape of the yoke.  Again, another solution, may be to to lengthen it.  Maybe that will resolve the issue.


Next, I have vertical drag lines pointing to the shoulder.  My thought was the FBA and not enough length along the torso could be the cause.  Again, the modeled top has the same issue when the arm is in a relaxed state.

 
On my dress form the bodysuit looks perfect.  But on me a different story. I was talking to my friend, Rhonda, about the fit issues.  She suggested, cutting it off below the waist and then adding a new panty section with a little extra length.  Testing the adjustment to see if that works.  Well, I had already gifted this one to my sister.  She came over, tried it on, and it fit her with no problem. 


Sorry this is not a happy review.  I struggled with this one.  It took me hours to get it to a better state.  And I was still not totally pleased with the results of my efforts.  To complete the adjustment section of this post, my other adjustments are below:  FBA, prominent shoulder blades, and slightly forward shoulder.  No swayback or center back seam added.  It's a bodysuit and will be held close to the body.


I used the Sandra Betzina's FBA (no dart method).

I did make one design change, which I am very pleased. I used Rhonda's shirred wrist design to create a shirred forearm.  It looks great.  That will be the very next post.

I've put a lot of time into the bodysuit already, but I feel like giving it one more try!

Parting Shot:  I was gifted this snap fastener tape over fifteen years ago.  Never knew how I would use it.  So, instead of placing individual snaps on the closure, I used the tape.  Perfect.


Happy Sewing!
C
Saturday, October 14, 2017

Rhonda's Draped Cowl Sleeve - A Few Notes and Pictures


All summer it's when a challenge to schedule photo shoots with my daughter photographer due to work schedules and other activities. But slowly and surely I'm trying to catch up with posting pictures of the garments that I've made this year.


Today I want to show Rhonda's draped cowl sleeve dress and top as I would wear them. For my dress, I used Vogue 1314. My fabric is from a shop that was going out of business in New York. I bought all that was left. This is a polyester crushed velvet knit. When I bought it home, immediately I flew it in the washer and the dryer. It washing beautifully. This was an excellent purchase. So here I'm wearing it in the park near my home. My earlier post of making the draped cowl sleeve is here.


Next, I'm wearing my paisley draped cowl sleeve top (McCall 6963) with Simplicity pants (Simplicity 8389). The fabric is a crepy two tone chocolate knit from Vogue Fabrics in Evanston. It's very stretchy. So instead on making the waistband using the same fabric, it's a smooth lycra black knit. I omitted the belt.

This is the end of my current showcase of my Rhonda Draped Cowl sleeve projects. More on the other sleeves later.


 Thanks for stopping by!
C

Wednesday, September 27, 2017

Shirred Wrist Sleeve and McCall 6964


This is the second sleeve drafting project that I've done using one of Rhonda's "free sleeve Saturday" patterns.


What I like about this one is that it draws attention to your forearm without a lot of fabric.  That is, not to say that I don't like flounces.  It's just a different type of attention-getter.  I decided to take the shirring higher up my arm. You can see that in the pattern below.


This sleeve was just as easy to draft as the "Draped Cowl Sleeve" but it requires more time to slash and spread the small sections.

Black tops are scarce in my wardrobe.  This new one will be great to wear with jeans, slacks, and skirts.  For cooler days a nice 3/4 sleeve kimono jacket is the perfect topper to add warmth and still show off the cute sleeves.

Again, I won't repeat the tutorial for this sleeve.  Get the instructions from Rhonda's blog here.

Thanks and Happy Sewing!
C
Tuesday, September 26, 2017

Rhonda's Draped Cowl Sleeve with Vogue 1314 and McCall 6963


I'm delighted to post this blog.  Personally, I think my drafting experience was a success.  This weekend, I made two garments with Rhonda's Draped Cowl sleeve:  McCall 6963 drape neck top and Vogue 1314 dress.  As stated previously, the drafting process was so easy.  It took about an half hour to complete.  I posted the pictures on Instagram and Rhonda kindly indicated that if I wanted more drape, spread the top of the sleeve more.  For these garments I just cut it wider as seen in the photo below.


For the velvet dress, I used the lining pattern, front and back, of Vogue 1314 and the dress neck band.  For the sleeve, I used McCall's 6963 designed by Palmer/Pletsch.  My crushed velvet fabric was purchased in New York City during my little shopping spree with Carolyn and Andrea.


This Vogue pattern has already been reviewed on my blog here.  The construction of the sleeve was super easy.  I serged the edge of the top of the sleeve and the hem.   Then I sewed the long seam.  Next, I folded the facing under to the wrong side.  At the shoulder seam, the facing is slightly overlapped and the rest of the sleeve is attached to the armscye in the usual manner.


Paisley Draped Cowl Top

I wanted to emulate Rhonda's top.  So I decided deciding on a paisley print.  This fabric came from Fabric Mart.  It is a lycra knit with glitter and mylar dots on it.  I took a chance on buying this one, hoping that the glitter would not come off on everything and it does not.  But the mylar dots can be hard to sew on.  So I used waxed paper to help make the sewing easy and it did. ;-) This top is also a part of a blog tour sponsored by "Coats Thread".  So more on that later.


Finally, I used McCall's 6963 to make my draped neck and sleeve top.  This basic pattern has great bones and can be used as a sloper for creating other designs.  My another adjustments are the usual:  swayback and FBA.

Special thanks to Rhonda for your generosity.  Her instructions for this sleeve can be found here.

So that's all for now!

Happy Sewing!
C

Saturday, September 23, 2017

Draped Cowl Sleeve - Rhonda Buss Sleeve

Top made by Rhonda Buss


Early summer I posted a blog on four sleeves designed by Rhonda Buss that I want to try.  This week I started with drafting the draped cowl sleeve.  I want to make a dress and top with this sleeve.  Rhonda makes it so easy to do.  I was able to complete my first attempt in less than an hour from coping a basic sleeve using McCall 6963.  I'll use the draped front to following the design of Rhonda's top.


I'm not going to trouble you with repeating the steps that Rhonda shared in her tutorial.  So here is the link to it.  

In pictures, here is how I did it.


I posted my test on Instagram and Rhonda gave me a helpful tip on enhancing the drape by spreading the cap of the sleeve.  I will to do that.  But for now, this is my first attempt.


Happy Sleeve Drafting!
C

Thursday, August 24, 2017

Oops, I've Been Too Quiet Again!


Sorry, I know it seems like I've taken a hiatus from sewing. Really, I haven't. Actually, I've sewn several garments over the past two months; but it's been difficult finding the time to take pictures or the photos shoot ends up not so good. What is becoming more and more difficult to do is to blog on a regular basis. I took a part-time job in a dental office. It's nothing like my former career in IT at the University, where I could key out a post with no problems. There is almost zero time during my off days to actually sit down at my laptop or desktop to type out a blog.

More and more I'm viewing Instagram and Facebook instead. Both are quick ways to stay connected. I still feel, though, that blogging is a better way to journal my sewing journal, share my experiences, and learn from others. So, it's an effort that I hope to continue.

Currently, I have multiple projects going at the same time. One is the "Shirt Project". Early this summer, I decided to practice making button-down or button-up shirts. My goal is to learn to fit and sew them well. Currently, I've made five shirts. My quest got the attention of the HCC President and the Program Director; they asked if I would do a presentation on my shirts. Of course, I said yes. But it meant that I would need to make more shirts to show different design and style elements. The process also gives me a chance to identify some tips and techniques that may be helpful to others. In the coming weeks, I hope to post a few more shirts.


Secondly, I'm working with one client, Pastor Jenetta Ross, who I've made several clergy robes for. This time the commission is for two robes: white and gold (already finished and delivered) and a red and black robe. Both made using Simplicity 5386. The white and gold was basically made the same as the blue one pictured here


Thirdly, there are several things on the sewing table for my DD. Starting with a few dresses, a swimsuit (I know summer is almost over, but there is always vacation.), a coat and a few shirts. 

Finally, other things for myself I will make several knit tops that include sleeve designs created by Rhonda Buss. Sleeves are so very big these days. I've selected a few designs that are trendy as well as classic, if that makes sense. Part of my goal is to continue to try different things to enhance my sewing skills and to jazz up my classic style. Also, I hope to share my thoughts on some fall/winter mini wardrobes. In all of this will emerge my entries for the HCC Fashion Show 2018. That's may sewing "catch up" post. Next up I'll share some "Notes on a Pattern".


Thanks and Happy Sewing!

Cennetta

LinkWithin

Blog Widget by LinkWithin