Wednesday, July 30, 2014

Notes of a Pattern - McCall 4076


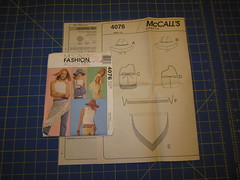
Today's post is on McCall 4076.  This is has been in my collection for quite some time now.  I trimmed the pattern many years old, but never laid out the fabric to cut a single view.  Well, while I was searching through magazines and websites looking for wearable fringe by my standards, I thought about this pattern.  I like the hat, belt and purse.  Those views are what encouraged me to buy the pattern in the first place.

BTW- I have not forgotten about the bomber with the lace overlay.   I'll talk about that later. Back to my fringe inspired project..,


Taking a look at them today, I still like them.  The hat and belt as they are, but the purse I feel needs a little more umph to it.  The fringe is okay.  I'd like to modify the opening, losing the tie all together to be replaced by a zipper closure and a fringed lap.  That's what I have in mind.

Those are my thoughts on it.  That's all for this installment of Notes on a Pattern.

Happy Sewing!
C


Tuesday, July 29, 2014

Simplicity 1650 In Review


Good afternoon,

Today, I am reviewing Simplicity 1650. This was released last year. I few sewists/stylists have already created some snazzy little dresses using this pattern.  I finished this outfit a few weeks ago, but needed a few more pictures before reviewing it.

To get a little more mileage out of this outfit, I decided to make a top and skirt.  Each garment can be worn with other separates.


Simplicity describes this pattern as: Misses', miss petite shift dress in below or above knee length with back zipper and back vent has scoop neckline with optional notch detail, flared or pleated peplum and sleeve variations. Croquis Kit™ included with each Project Runway pattern allows you to be your own designer. I used the scoop neck bodice with the gathered cap sleeves and the flared peplum. For the skirt I used the shorter version tapering from the hips to the hemline and used the facing from a similar skirt to finish the waistline.


It is available in sizes 4 to 22. I used sizes 14 and 16 with modifications.

My coordinates looked similar to the illustrations, but were two separate garments in contrasting fabrics.  The instructions were not difficult to follow and should not pose any problems for a beginner.

I like the versatility of the project runway patterns. This one gives options to mix and match various tops and bottom to create a dress to your liking. You also have the option of creating separates as I did for this outfit. On style: I like having two peplum options. These pieces can be used with other dress, top, or skirt patterns. There is nothing to dislike.


I used remnants from this dress and this jacket. Both fabrics are stretch woven. The black with white cherries is a cotton sateen blend and the white is a pique blend.

Of course, I made changes for fit and style preference;
  • FitThe usual: FBA, swayback, prominent shoulder blades, a few inches to the length of the skirt.
  • Style - The skirt was a little too wide for my taste.  I tapered in a bit below the hips to the hem.  I installed an exposed zipper in the top.
  • Construction - Because I made two separate garments, I needed to finish the skirt with a facing (used a facing from another pattern). I did not use bias tape to finish the armholes or a rolled hem on the facing; I just serged all edges.
Here again I tried using size 16.  I more of a 14 with modifications.  Some seam allowances are more than 1 inch.


I plan to use the bodice A and the peplums in future projects.  I hope the peplum stays on trend for a while.  I helps create a balance between my torso and hip areas.  I do recommend this patter to others.  It was a lot of style options and is easy to sew.

All pictures are here

Happy Sewing!
C


Sunday, July 13, 2014

The Brightness of Princeton Orange Silk and McCall's 6794

Bold color choices are great any season!  I'm so lucky that they dominant my personal color palette.  Bright oranges, greens, purples and blues are the perfect match for my skin tone.  Lucky me Mood has such an extensive range of colors and fabrics available at their online store.

The spring color trends included celosia orange, a perfect shade for me.  I found Princeton Orange Silk Twill.  It's a deeper and softer orange color that is perfect for any time of year. This fabric may be used to make tops and dresses.   Any garment you choose to make will lighten up the room no matter what season it is.  If you are a little shy when it comes to being in the spotlight, it's great as a lining for a jacket or coat.  You may also pair it with neutral colors.  I decided to make McCall 6794, a cute high low top that can be dressed up or down.  For this review I'm wearing it with jeans for a casual look.

McCall's describes this pattern as misses' tops and tunics: very loose-fitting, pullover tops and tunics have neckline variations, front gathered into midriff, attached tie ends, and narrow hem.  A:  gathered sleeves and sleeves and bands.  C: shaped back hemline, wrong side shows.  It's available in sizes XS to XXL.  I used medium with modifications.

I made view C.  For the most part, it did look like the top worn by the model.  My version appears to be slightly shorter.  Next time I will add an inch or so to the length of the bodice front and the back, and I will make the tie a few inches longer because I like to bringing the tie to the front center like I'm wearing it here.  I think a few more inches will look better.

The instructions were easy to follow, but I'm always taking the liberty to change a few steps.  In this case, I did not finish the hem of the armholes and bottom of top as recommended.  I finished the edges using my serger and only turned the allowance under once.

I bought this pattern for view C.  I liked the high low top and thought it would be a good choice for my body shape.  My sister showed my a dress that she'd like me to make with similar design lines.  So I will use it for that as well.

It took me a while to complete this top because of some fitting adjustments. I finished it, distributing the gathers as recommended. There was some pooling of fabric at the center front. So I ripped out the side seams, removed the midriff lining, and detached the front bodice from the midriff. Then reattached it with no gathers at the center front to see if that made a difference. Not much difference. In the before and after modification photo, you can see that now the fabric forms a "U" shape at center front. I think if I add a little length to the bodice it will look better. This is only my first go round with this pattern. I will see how my changes effect the next version. More about that in a future post on my blog.

Alterations include FBA and prominent shoulder blades. I made a similar adjustment for this dress.  Sorry no picture of this the McCall's top.  But I think this picture explains how I made it.  For the shoulder blades I added a little width across the back.  I did experience some difficulty with getting a smooth finish around the neckline, but it's not too bad.  Could be a simple matter of a great press, which it will get at the cleaners.

The fabric and pattern are a good match.  I hope you will give both the fabric and the pattern a try.

Friday, July 11, 2014

Yellow Dot, Blue Dot Sandra Betzina Top of Vogue 1333


I think it is about time I posted this top made almost a year ago. It was part of my vacation wardrobe in October 2013. Yep, 2013. It has been touch and go with my reviews over the past several months. For weeks I've been shifting through hundreds of photos for multiple project, trying to determine the best out of the set.

Today, I finally settled on a few pictures to put on display for this review. You'd think at this point I would have forgotten specifics about what works and did not work with this pattern by now. The good thing is, I jotted down a few notes on the pattern. So I can at least share a few highlights. Another good thing is, There wasn't too much to make note of. I didn't make a FBA or a swayback adjustment.  I made it without any of my usual pattern adjustments.  But I cut the upper body at size E and the rest at size D.

So with that said, here is the review.

Vogue 1333

Pattern Description: MISSES' BLOUSE AND SKIRT: Blouse, loose-fitting through bust, has front and back extending into shaped sleeve (forming underarm drape) and front button closing. Loose-fitting skirt has elasticized waistband, and single layer, tucked drape (cut on crosswise grain), wrong side shows. Both have narrow hem.

Pattern Sizing: A to J; I used E and D.


Did it look like the photo/drawing on the pattern envelope once you were done sewing with it?  Yes, for the most part.   I did notice that the darts stopped at the apex of the bust on the drawing, couldn't tell on the model because the top is black.  The drawing on the back of the envelope looked the same as the front drawing.  I followed the stitching line on the pattern and got the same look as the drawings.  If I make it again, I will bring the darts down an inch or so.


Were the instructions easy to follow? No problems with the instruction or construction of this top.  It's actually pretty simple to make and sew up in no time at all.

What did you particularly like or dislike about the pattern? The sleeves are what I like most about the pattern.  The darts offer more opportunities fitting around the waist and through the hip area which I like because I smaller on bottom than on top. I liked the skirt because of the overlay piece with the side pleats, hip illusion.


Fabric Used:  I used a stable knit purchased from Vogue Fabrics. 


Pattern alterations or any design changes you made:  No alterations made other than using size E for the upper body and D for the rest.  I used six buttons instead of seven. 

Would you sew it again? Would you recommend it to others?  I would like to try the top again and plan to make the skirt.  Yes, I do recommend it to others. 


Conclusion: This is a fairly easy pattern to sew.  The design is very forgiving and you can adjust the depth of the darts as needed. 

Happy Sewing!
C

Tuesday, July 8, 2014

Alabama Chanin - July Inspiration

Several weeks ago Andrea and I were chatting about our favorite hobby, sewing. In our conversation she talked about doing an "Alabama Chanin" project. I vaguely heard of it, but wanted to know more about it. So of course, I searched for websites that featured Alabama Chanin.

 Here are a few pictures of beautifully hand sewn garments, Alabama Chanin style.


In closing, here is a little video on Alabama Chanin.


Monday, July 7, 2014

Summer Dress in Lime Cotton Poplin - Simplicity 2894


Light weight cotton poplin is a great fabric for summer clothing.  In July, Chi-town is super hot and sticky. So it's best to dress in something easy breezy and made of a breathable fiber. In my hunt to find great summer wearable fabrics, I found a slew of them at the Mood online fabric store.  There are at least ten yummy poplin type textiles that I'd love to have in my possession.  But for this post I want to direct your attention to this beautiful lime cotton poplin, perfect for comfortable summer dresses and camp shirts.  Love it.  Oh, did I tell you it sews like a dream?


The project that I chose to make is Simplicity 2894.  This was fitted at the Palmer/Pletsch workshop in 2012.  It is described as misses' dress or tunic and pants or shorts.  Not the best description.  For the dress is A-line with pleating below the front and back yokes.  It includes two sleeve variations for the dress or tunic.  The sizing ranges from 10 to 28W.

I wanted to maintain the style of the dress.  So I rotated the resulting bust to the pleats beneath the front yoke.  And the added width across the shoulder blade was eased at the shoulder seam


There are several things that I like about the dress:
  - Easy to make
  - Pleating and notched collar
  - Sleeve variations (the cut on cap sleeve I like to best.)
  - The pockets

This was another easy project.  After cutting it out, I was able to sew it up in less than four hours.  No buttons, zippers, or hand sewing required.  The instructions were easy to follow with no difficult construction techniques needed.  The only changes I made were the fit adjustments mentioned above, plus adding a few inches to the length of the dress and making my own bias facing to finish the armholes.  I just used the leftover poplin for that.

I think this is a great summer dress that is flattering on any figure. My favorite way to wear it is belted.  I tried it a couple different belts just it see what looks best on me.   I like it a lot and can see myself making it again. 

I recommend you try this one with some Mood poplin or poplin like fabric.  You can't go wrong.

Happy Sewing!
C


Tuesday, July 1, 2014

Butterick 5601 + Simplicity 2692 = New Maxi Dress


Hi!

Last week I decided I wanted to make another maxi dress. You can never have to many. Can you? wink, wink. And you do know you can create a maxi using almost any dress pattern. For this dress, I spliced Butterick 5601 (bodice) with the skirt of Simplicity 2692.    This is the first time  I've used Butterick 5601.  It's been in the collection for a couple years and it was already out of print.

Butterick describes this dress as: Misses' dress close-fitting, straight, above mid-knee dresses A, B have lined yoke, bodice and back zipper. A: back self-fabric loop and button at neck. B: back straps worn twisted and buttoned on inside of yoke. Topstitch trim. I used the bodice for view A. The simplicity skirt for 2692 has two lengths; I used the long version for a maxi. This is the second time I used it. I made a maxi dress about three years ago, view D.

Both patterns are multi-sized. For the bodice I started with size 16 ending up scaling back to a size 14 in every area except for the bust and shoulder blades. This has been common with my recent use of size 16. So I'm rethinking the whole pattern adjustment process again.

What I liked about the Butterick pattern is the back options. The open triangle back and the twist strap back; both are cute and can be used for other dresses. The skirt is a typical pencil skirt. My likes for the simplicity dress is recorded in my June, 2010 review of that pattern mentioned above.


For this review I concentrating more on the construction steps and pattern adjustments needed for the Butterick bodice. This pattern is rated as easy. It is; there is nothing difficult about making it. The instructions were typical and I saw nothing confusing in them.

I used a polyester blend print from Vogue Fabrics. The photos do not do it justice. It a very vibrant print and perfect for summer dresses and skirts.

The alterations of the bodice is here. I'll start with the alterations to the back first. I added 3/4" through the back yoke and bodice. I added a shoulder dart to the yoke and a waist dart to the bodice. The only place I needed the width was in my shoulder area. For the front. I made the required FBA on the bodice and slashed the yoke to make the appropriate adjustment where the bodice and yoke are joined. The front bodice waist dart needed to be moved 3/4" toward the center front. For the side seams, I ended up sewing 1 inch side seams almost the entire length of the bodice. After the dress was done, I still could have taken it in a little more. But it's all right. In the muslin, I noticed gapping around the shoulders. So I sewed them at size 14. That was better. But I neglected to observe the placement of the bust dart. I needed to move it down about an inch. The print camouflages the flaw, but it is definitely something that needs to be addressed for future use of the bodice.

Other changes made:

 - Used an invisible zipper.
 - Added a few inches to the bottom of the skirt.
 - Topstitched the seam along the two legs of the triangle that are joined by a loop and button. I   couldn't seem to do very good under stitching in this area.
- Before attaching the bodice to the skirt, I serged the fashion and lining fabric as one along the center back seam and waist. Both the bodice and skirt skirt and versatile components of a skirt waist dress that could be used to create other dresses.

I will probably use view B of Butterick 5601 and more than likely I will use the skirt of Simplicity 2692 again. If you have either pattern, I do recommend them. Trying different bodices and skirts to create your own designs can be fun. Be adventurous and try it. All photos are here.

Happy Sewing!
C

PS
Today I was able to take a few more pictures of my new maxi dress. I was hoping this new set would be better then the last. Well.., they weren't. Unbeknownst to me, my DD changed the setting on the camera in hopes of improving the quality of the pictures. After the second shoot,I asked her to switch back to the previous setting. But by then I was not in the mood to do it again, I picked the best from the two sets. Some of them are a little blurry, My apologies.
LinkWithin

Blog Widget by LinkWithin