Showing posts with label pattern hacking. Show all posts

Saturday, October 26, 2024

Inspiration Strikes Again - Burda Style 6322 Dress


Good evening everyone,

I hope everyone is enjoying this lovely weekend.  It has been sunny and the air is crisp.  I love this time of year.  

Yesterday afternoon I was finally able to get some photos of me wearing my first dress of the fall season.  It's becoming more and more difficult these days to get photos of me wearing my newly sewn garments.  My daughter is my photographer, and our schedules don't always allow for photo shoots.  I'm lucky when our schedules do.

I love my new pony print dress.  Early summer, I saw this photo of Vivica A. Fox on Instagram wearing a cute little dress.   Her outfit inspired me to make this dress.  Of course, Ms. Fox's dress is a whole lot sexier than my version.  Lol.  So, let me start with my review of the process of constructing my inspiration dress.


Pattern Description:  Burda's description is just as poor as their instructions at times. Lol.  So, I'll give my little two cents of a description.  A shift dress with cut-on sleeves (long or short).  It has a high scoop neck.  The dress has a center back seam with invisible zipper.  View A has a slit and belt.  This pattern is rated super easy. 


Pattern Sizing:  8 to 18.  I used 16 with modifications.


Did it look like the photo/drawing on the pattern envelope once you were done sewing with it? The silhouette looked like the dress.  I did make several changes so that it looked more like the inspiration dress.

Were the instructions easy to follow?  This pattern is exactly as stated, "super easy."  And the instructions were easy to follow.

What did you particularly like or dislike about the pattern? I have several likes and only one dislike.  First the likes.

 Likes -

  • The silhouette was perfect for the inspiration dress.  
  • The dress pattern was only five pattern pieces and a quick sew.
  • The pattern is versatile.  Once I finished my dress, I started dreaming about other projects and uses for the patter.  I plan to make a tunic and top.  
  • All the design changes that I added to make this dress special.

Dislikes -

  • The scoop neck is a little too wide for me.  I will adjust it for the next project.


Fabric Used:  This year I purchased a lot of fabric from Hobby Lobby.  They have a 40% off sale nearly every other week.  Anyway, My fabric is a polyester pony print fabric that has the hand of faux suede.  I pre-washed and dried it before I cut out my dress.

Pattern alterations or any design changes you made:  Here's is where the review gets lengthy.  I made several changes.  But here again, I didn't make a FBA, swayback, or broad shoulder adjustment.  Below is what I did change:


  • Center Front Seam - The easiest change was to add the center front seam.  All was needed was to add seam allowance instead of cutting on the fold.


  • Re-Draft Front Facing - The front facing was extended and also has a center front seam.  After I tried the dress on with the belt, I realized that the front facing was just a little too long.  This is easily corrected.
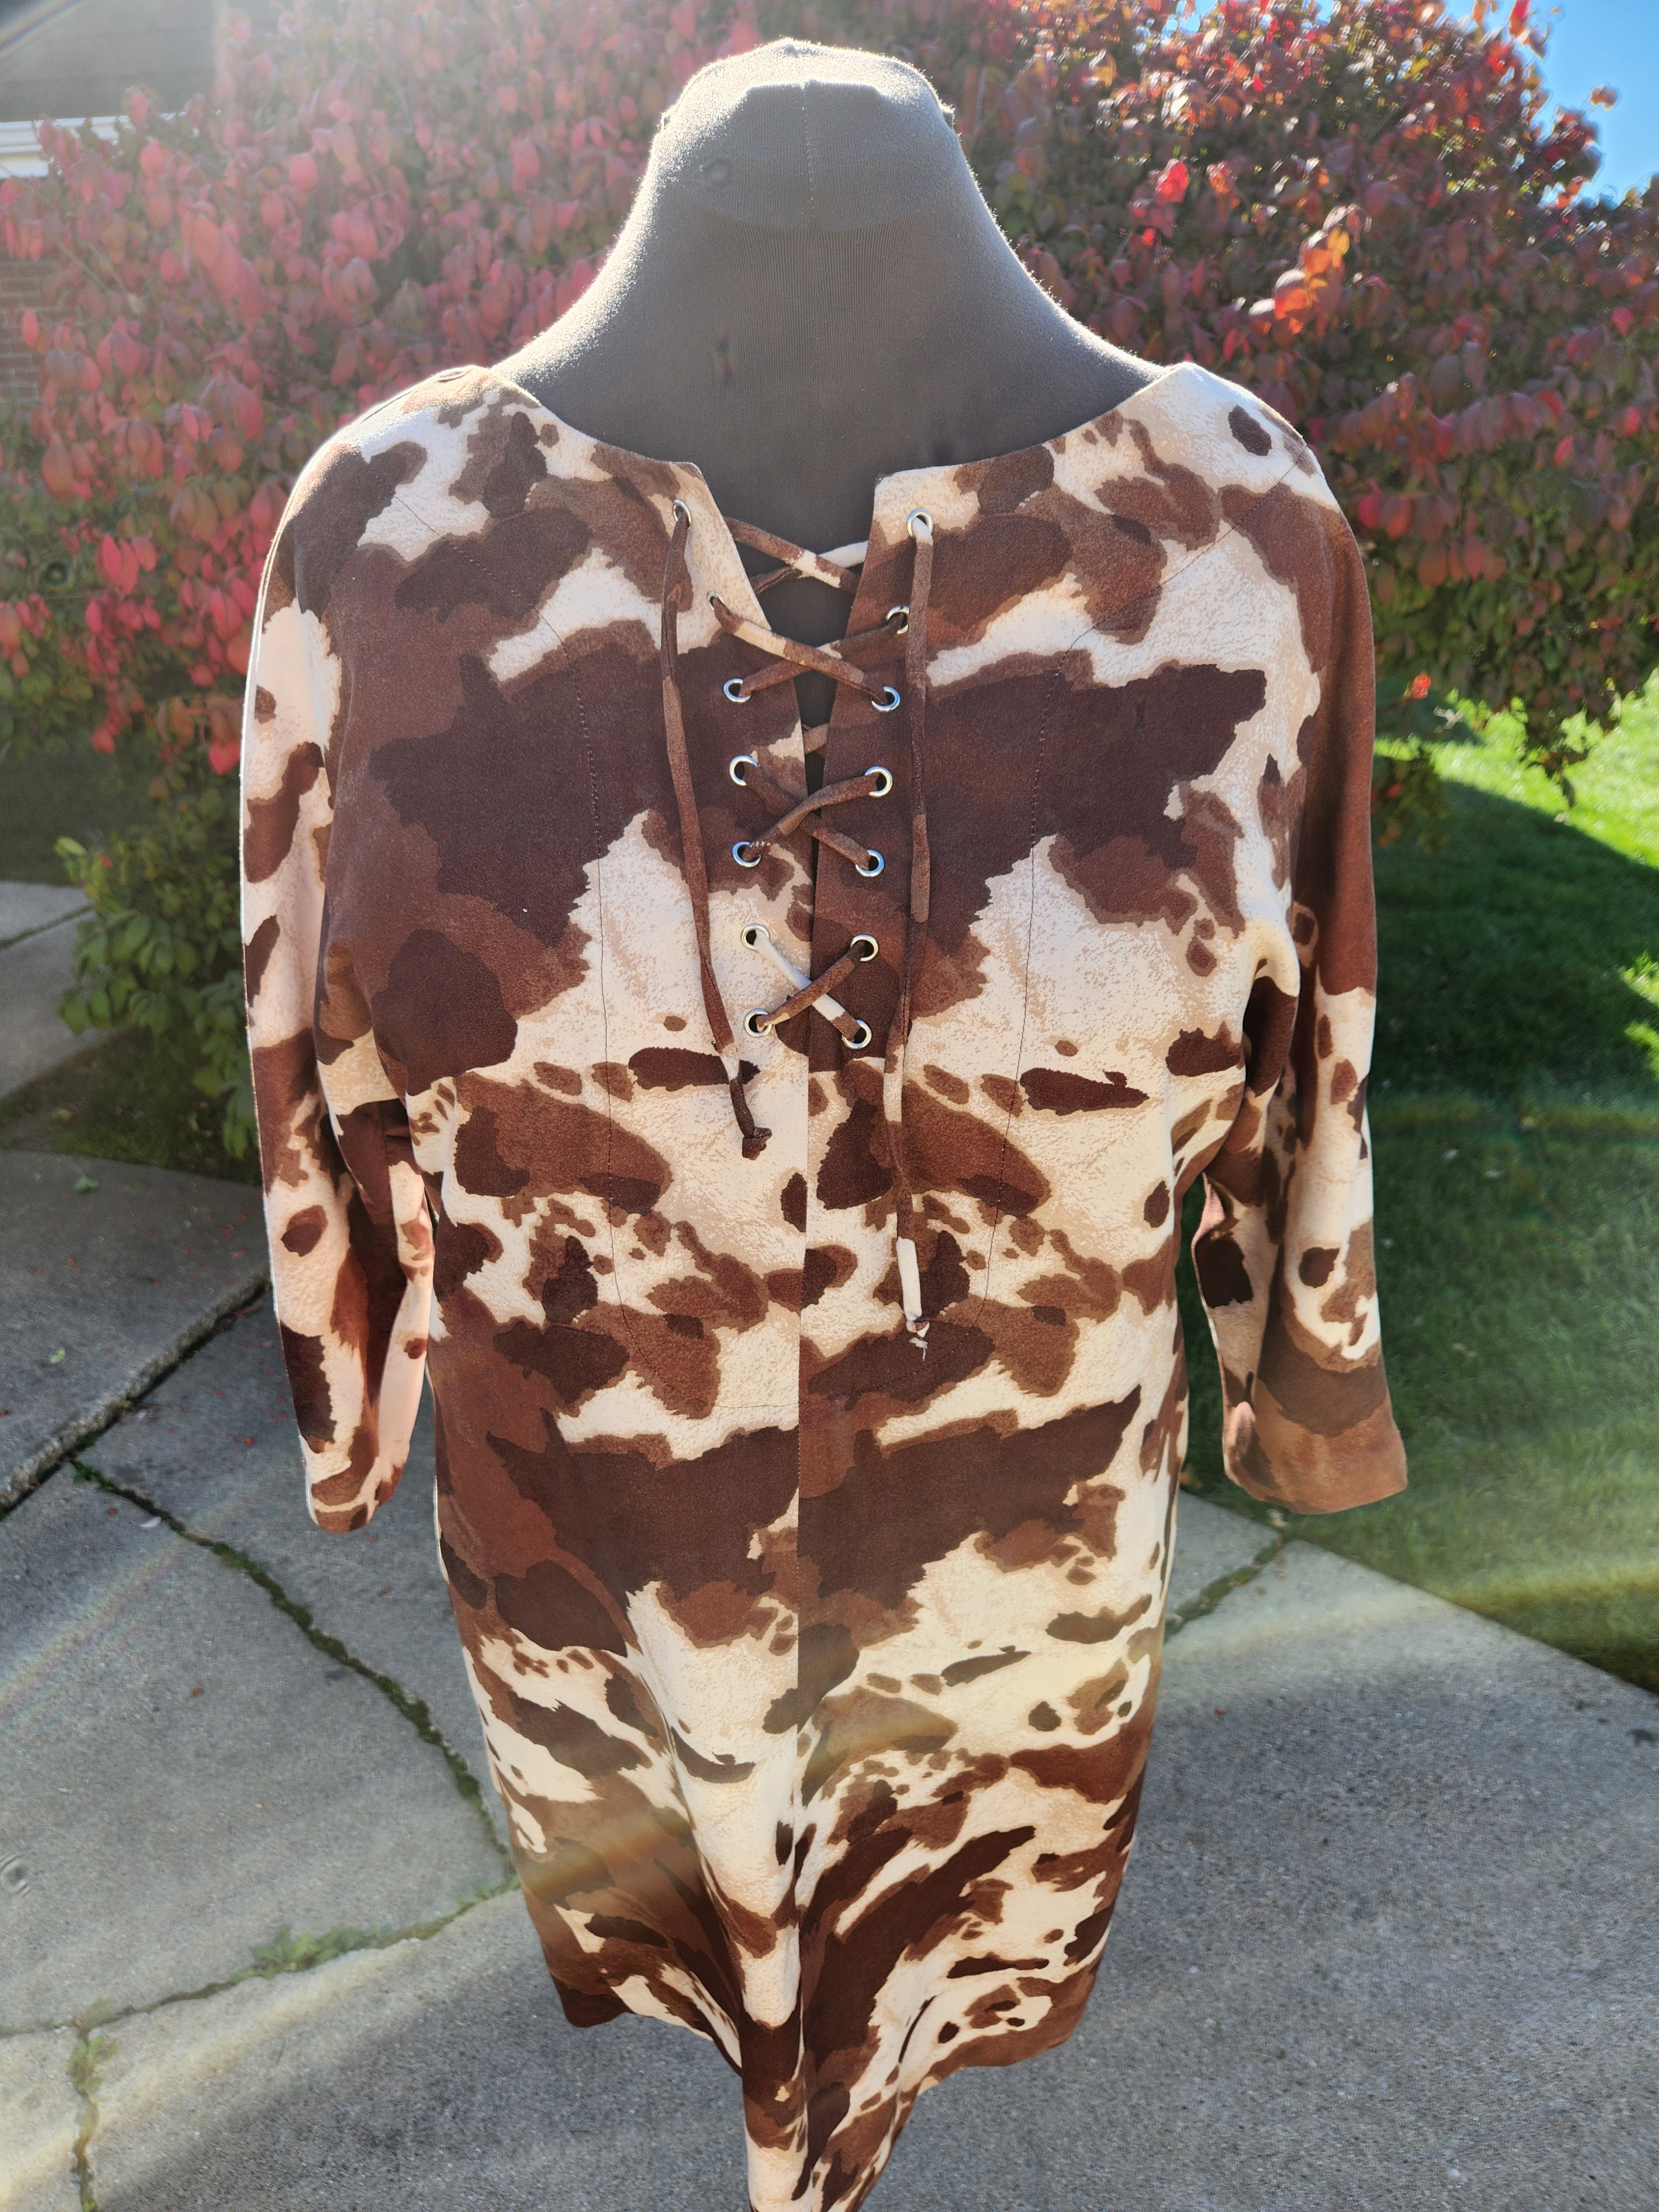
  • Eyelets were added to the front of the dress to copy the design of the inspiration dress.
  • Drawstring was added to the front of the dress.

Application Process - Eyelets

Every time I add buttonholes, eyelets, snaps, etc., to any finished garment, my hands get a little sweaty. Lol  I get nervous.  I’m scared of ruining the entire project.  So I must do a test before I do anything.


1.     Test applying an eyelet on a piece of scrap fabric.


2.     Measure the length of the area where the eyelets will be applied.  Determine the distance between each eyelet based on the length and number of eyelets to be applied.

3.     Mark the placement for each on both sides.

4.     Punch the holes.


5.     Carefully, install each eyelet as directed.


6.     All done.


Dress Belted

Would you sew it again? Would you recommend it to others?  Yes and yes.  I will sew this pattern again.  This is a good pattern for beginners as well as other level sewists.

Conclusion: I'm really happy with how my dress turned out.  Though it isn't exactly like the inspiration dress, it is how I envisioned it for my life style.  The dress was very easy to sew and I got exactly what I wanted out of this project.


Happy Sewing!

C


Friday, December 20, 2019

Client Holiday Skirt - Burda 6390


Hi Everyone,

Christmas is just a few days away. With parties, celebrations, and quite a bit of sewing going on in my world, no time for blogging and very little time for Instagraming.  But I just had to post this picture of Alesa, my dear friend's daughter holiday skirt that I made two weeks ago.

Burda 6390 dress pattern is what I used to make it.  I'm not sure if this is a true pattern hack.  I simply used the skirt portion of the dress, added a lining with tulle and a waistband.  That's it!


I simply put it together like any other seven gored skirt with a zipper back and waistband.  To show off the fullness of the skirt, I added a lining that I sewed on two tiers of gathered tulle.  The tulle is between the lining and the skirt.  The front of the waistband is about 3 inches wide tapering to 1.5 inches wide in the back.

She chose this audacious, eye popping, African or Ankara print fabric that she purchased at a local store on west 95th street in the Chicago Beverly area.  This no fuss cotton fabric sewed up quickly and the finished press was nice and crisp.

Alesa received loads of compliments, and she was over-joyed with her "holiday outfit".  After her event, she reminded me that this would not be the last skirt I'd make for her. ;-)

Pattern Ready!

Happiest of Holiday!
Cennetta

Wednesday, November 27, 2019

Just A Little Fun with Pattern Hacking - Simplicity S8982


Good morning everyone,

Just for fun, I decided to do a little pattern hacking  on Simplicity S8982.   So for the next top, I decided to add a keyhole. 


To make it, I simply traced my adjusted front pattern of view C.  Then, I determined the size of my keyhole. Transferred that to my copied pattern and cut the shape away.


Next, I cut a facing to finish the area.  The dimensions are:  1.5" by 12".  My length is based on the size of the hole.  Measure it and add a few inches for safety.


Next, fold the facing in half lengthwise and press.  attach the folded facing to the right side of the front.  Then, press and fold to the inside of the front.  Stitch it in place.  Now continue the construction as instructed by the guide sheet.  That's it.  Pretty easy.

BTW- I still plan to post pictures of me wearing the first outfit using this pattern.  It's a Mood post.  So I'm waiting for it to appear on their website first.  Anyway, below is a picture of the third top that I made.


Happy Sewing!

C

Tuesday, February 19, 2019

Little Black Dress with A Little Textured Novelty Knit - Christine Jonson Funnel Neck Top and Mc7386 Skirt


I think I want a few more yards of Mood's Black Stretch Viscose Nylon Novelty knit.  I love this fabric.  It is a beefy textured knit that falls away from the body, creating a stiff drape.  The hand is not as smooth as a rayon knit, but it's not hard or scratchy either.  It wears like a comfortable sweatshirt knit.  I can also see it used to make a fall/spring knit coat.


When the box arrived at my door, I immediately started working on this dress project. I spliced Christine Jonson's funnel neck knit top, travel trio 1204 with Mc7386 skirt.  CJ's funnel neck top is quickly becoming one of my favorite tops.  It's easy,stylish, and comfortable.


This year I decided to give myself a little challenge to see how many different looks I could come up with using a few patterns.  This month, I'm using CJ's Travel Trio.


To create this dress, I simply overlaid the skirt pattern where the waistline is indicated and marked my desired length.  That's it!  Of course, I had to do some tweaking on the curve of the skirt.  But that wasn't difficult and only took a few cycles of trying the dress on, pinning, and making the adjustments.  I was finished in just a few hours.


I really like how this dress turned out.  A simple little black dress with a few interesting details.  Perfect for me!

Using the beefier textured knit for the top and the skirt does change the intended drape.  First the funnel:  It stands up!  But, when made in a jersey knit, it fall about the neck creating folds.  The same affect for the hem of the skirt.  It stands out instead of falling close to the body.  I love it!  Something different!


So far so good with this segment of my little challenge.  The fabric and style are a perfect match.  One that I will certainly use again.


Happy Sewing!
C

PS - My complete review on the funnel neck top is my blog here.


Thursday, August 23, 2018

Rayon Challis Summer Dress - Hacked Dress Vogue 9260


I wore this dress to church on Sunday.  It's the forth of five projects I plan to complete for this month.


I mentioned that I would probably use Vogue 9260 again way back in June.  Lol  Isn't the summer going by super fast?  I actually thought I made the jumpsuit in July; but when I looked back in my archives, it was June 11 when I posted the review.  More on my initial review is here.


The top of the dress is made exactly like the original pattern, but the skirt of it is a easy, easy self drafted skirt.  With the remaining water colored challis, I decided to make a skirt.  So I cut it into two pieces (front and back).   Then with some black challis, I cut two more pieces  for the lower skirt.

Just a few wrinkles across the back.  Pictures taken after church on Sunday.


For the construction, I sewed the water colored challis together along the sides and gathered it to fit the bodice.  Next, I cut the black challis  the same width also sewing them together at the side to form a circle.  Next, I folded it in half with the wrong side facing.  Then I attached the lower skirt to the upper skirt.  No hem required as all edges are sewn together and serged.


A few wrinkles; pictures taken after church Sunday.

That's it.  Just a easy skirt attached to the bodice of the original pattern.

Happy Sewing!

C


Thursday, June 29, 2017

Sleeves, Sleeves and More Sleeves


This spring there has been an explosion for sleeve designs to hit the garment market and the garment sewing market.  From cold shoulder designs to ruffles and multiple layer flounces, both marketplaces are saturated with interesting sleeve designs.  

Of course, this didn't just start.  I begin to noticed the focus on sleeves about five years ago.  One of my first recollection was when Rhonda Buss begin to post "Sleeves on Saturday".  Immediately, I was intrigued and wanted to try my hand at it; but felt a little intimated by the whole process.  So, I downloaded the instructed and stored them on the bookshelf for safe keeping.  I started feeling a little courageous a few days ago, I decided to take another look at what Rhonda posted in 2012. 

I belong to two groups on Facebook called:  "Pericrafters" and "SewMuchTalent".  For the month of June, our challenge is to hack McCall M6886.  Usually, I start early in the month deciding what I'd create for the challenge.  This month, I did not because there is such a saturation of sleeve design options available.  So why hack as if sleeves are the only thing to hack.  Anyway.


This brings my back to Ms. Rhonda.  She has created some very interesting sleeves.  Perfect for any sleeve hacking you or I may want to do. And I haven't seen her designs in any patterns yet.
Butterfly Sleeve

Rhonda - Cowl Draped Sleeve

Rhonda - Cowl Sleeve

Rhonda - Shirred Wrist Sleeve

So to share with all of you, here are a few sleeve options from her series that I am considering. No date in sight for doing these. I do plan to try at least one of them.  Join me if you please. ;-)

Happy Sewing!
C


LinkWithin

Blog Widget by LinkWithin