Showing posts with label neutral. Show all posts

Wednesday, August 6, 2025

Summer Linen and Cotton Blend Gingham - S8389 and S9894


Finally, I have some photos of me wearing some of my recent sewing projects.  For this posts I'm showing Simplicity Bustier S9894 and S8389 pants/shorts (TNT).  All can be paired with other summer coordinates.  Love the neutral tones.


My initial post is here.


Happy Sewing!

C


Monday, March 21, 2022

Minerva Fabric - Black Neutral Jacket Simplicity S1781


I finally finished a sewing project.  This one stayed on the table too long.  I started on it in February, and I had hoped to finish it that same month.  I'm glad to move it from the sewing studio to one of my closets.  

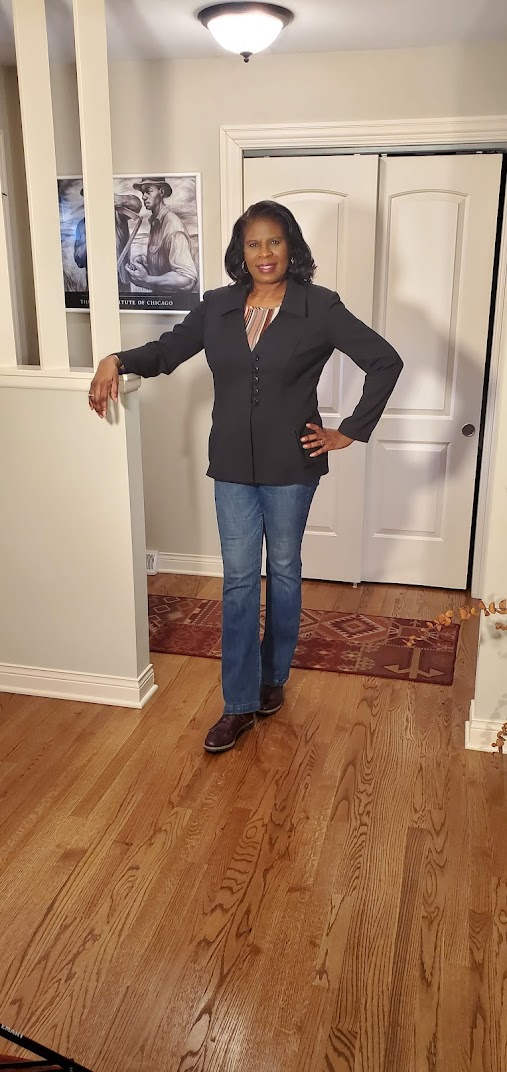
This black jacket will be part of my neutral wardrobe.  Already I know that it will be in high rotation, especially in the coming spring and early summer seasons.  I can dress it up or down.  For these photos I decided to dress it down with jeans and one of my molly tees.


For the review, I will try to be brief; but at the same time provide enough information about the experience just in case someone in the sewing community is planning to make this.  The pattern isn't new, but I don't think there are a lot of reviews online.


Pattern Description:  Misses' jacket in two lengths with front and collar variations.  Closures feature an exposed zipper, hook and eye, or loops and buttons.  Croquis Kit included with each Project Runway pattern allows you to be your own designer.   This is OOP, but you can find a copy of it on Etsy.

Pattern Sizing:  The pattern comes in sizes 6 to 22.   I used size 16 with a lot of modifications beginning with the view.  I really liked the view in the lower righthand corner with the pleated pocket and side back.  But I wanted the length of the red jacket that the model is wearing.  So that is what I decided to make.

Did it look like the photo/drawing on the pattern envelope once you were done sewing with it?  For the most part. my jacket does look like the jacket drawing, except it is longer.


Were the instructions easy to follow?  The instructions were typical and easy to follow.  I changed a few things.  One being I understitched the facing and along the neckline.  I like the way it slightly rolls the edge to the inside of the jacket.

What did you particularly like or dislike about the pattern?  There are many things that I like about the jacket beginning with the princess seams.  This style always makes it a little easier to do the pattern adjustments for an FBA.  The pleated pockets and side back are also favorite design elements.  They help create a balance between my upper and lower body.  They also add some interest to what could be considered a boring classic princess style jacket. I love the two-piece sleeve in a jacket. They look better and are easier to fit.  The buttonhole loops are on my like list too.  Lastly, I like the draft of this pattern.  Even with all of my fit adjustments, it appears to be well drafted.  

No dislikes.


Fabric Used: I chose a recycled polyester suiting from Minerva Fabrics.  This light/medium weight suiting, sewed up without any problems.  It has a "bubble" texture which adds interest to the feel and look of the jacket.  But it does not make it look heavy.

Pattern alterations or any design changes you made:  I made my usual adjustments for an FBA, swayback, prominent shoulder blades, and I added length to the sleeve and the jacket itself.  

Would you sew it again? Would you recommend it to others?  Yes and yes.  I must use the pattern again.  I spent so much time making the adjustments.  It would be somewhat of a waste if I didn't make it at least one more time.  And of course, I love how it turned out.  The side front and back have three sections.  For the side front there are also pockets.  When I made the FBA and swayback adjustments they affected all of the pieces associated with the side front and back.  So I was doing a lot of slashing and taping.

I do recommend it to others.  But make a muslin and take the time to make the pattern fit adjustments.  

Conclusion:  I really like how my jacket turned out.  And I'm glad I finally finished it.  In the coming months I hope to get plenty of wear out of it.  It's comfortable and the fit is pretty good.  I like wearing it with jeans and a t-shirt.  But it would be great to wear with a skirt or dress. 

For a sewing project like this, take the time to make sure the fit is good and make a muslin before you cut into your lovely fashion fabric. Wink, wink.

Happy Sewing!

C


Thursday, August 29, 2019

Fall Dress - Butterick B6621


Finally, I'm writing my pattern review for B6621.  It's been one solid month since I made this dress.
Time waits for no one.  It seems like the summer started yesterday.  But now September is two away.  One good thing is I now have two fall like or transitional dresses in my closet.


For this second dress, I was lucky enough to get a few good pictures on me wearing it. 

Anyway, dresses are my favorite to make.  This one is very popular in the sewing community.  Butterick describes the dresses as:  Close-fitting knit dress has front, neckline and sleeve variations and double-stitched hems.  B, C ties are single thickness, wrong side of fabric may show.  I'd like to add:  view A, the dress I made, also has a twist front just above the waist and the back for all views has a center back seam.  (Lately, the Big-4 pattern companies are designing the back of tops and dresses to have a center back seam.)  All dresses are A-line.


The size range is 6-22, which is great.  I used size 14-16 with modifications.

My dress does look like the drawing on the envelope with the exception of the sleeve length.  I had enough fabric for the long sleeve so why waste the fabric.

The instructions were typical.  Nothing difficult about them though.


This dress was simple to make and easy to wear.   Those were the first things that draw me to the pattern.  Next, I thought the twist front would save me on the FBA.  And it did.  I actually, cut the neck and shoulders at size 14, gradually cutting up to 16 along the front armhole through the hem.  Pretty much cutting the back the same way.  I did make my usual sway back adjustment and added a little belt across the back to give the dress some definition along the my waist.  Lastly, I lengthen the sleeves 1.5 inches.The adjustment that I forgot to do was lengthen the dress a few inches.

This lovely poke-a dot ITY knit came from Fabric Mart Fabrics.  I purchased it during my Sew Camp retreat. It was the end of the bulk measuring about 2 yards, 58" wide.


I might make it again.  Between the two twist front dresses that I've made, my favorite is the McCall's (M7429) red and black dress that I made a few years ago.  But I do recommend this pattern (B6621)   to others.  It's a quick sewing project that yields great results.  I like my new dress.  It suits me.


Parting Shots:  I wanted to take this opportunity to showcase one of my sewing students.  Bonnie B. has been taking lessons from me about a year and a half.  When she first came, all she wanted to learn was how to make darts.  Well, since that first dart making sessions the list of sewing technique achievements is about a page long.  I'm happy that she is sewing a large variety of projects.  She wearing McCall M7356.


Thursday, August 15, 2019

Black and White Vogue 1250 Dress - All Time Favorite Knit Dress


Vogue 1250 is one of my all time favorite TNT knit dresses. It sews up very fast. I can make it in about two hours. My latest version is made up of an ivory and black print with the back color-blocked in a black jersey. Both fabrics are from FabricMart Fabrics.


Earlier this year, I blogged about neutrals and how they can be mixed and matched with bold colors. On purpose, I buy a lot black and white fabrics to complement my favorite bold and bright fabrics and wardrobe pieces.


After cargo challenge, I decided to make two quick knit dress projects. Both dresses were made the same day with this one being the first.  This is the fifth dress made using Vogue 1250. The last one  started looking worn. So I trashed it.  This new dress is it's replacement. ;-)

My initial review is here.  And below are my versions of this popular TNT dress:


Happy Sewing!
C

Wednesday, May 29, 2019

Simplicity 8891 - Warm Beige and Ivory Bengal Striped Stretch Twill


It is my pleasure to final post my first spring dress, made just for me!  Happy to show off Simplicity 8891 dress in Mood's Warm Beige and Ivory Bengal Striped Stretch Twill.  This dress was draped on my form for nearly two weeks before I was able to take a few pictures.


The mid-west has been like a tropical rain forest 80% of the time.  It rained hours before the photo shoot.  So me and my "photographer" raced to location before the next band of torrential wave hit the south suburbs. 

Anyway.., My review:

My fabric is fabulous!  I think by now, everyone knows I'm love a great striped textiles.  So when I saw it online, immediately I ordered four yards not having anything special in mind.  I just wanted to make sure I got some of it before it had a red sold out stamp on it.  Yes, there are 61 yards still available.  The details on the weight, fibers, and possible garment styles are on the website:  Warm Beige and Ivory Bengal Striped Stretch Twill. 


My pattern of choice is Simplicity 8891.  I just had to have it too.  Early May I posted on my blog my pattern notes.  It focuses on the fit adjustments.  The pattern also includes pants, shorts, and a top.  It's a simple wardrobe pattern that you can create a great little summer mini wardrobe from.  And I will probably make the top and pants too.  When I was finishing up my dress, I saw that Erica B had made the top and short.  It's a super cute outfit. Check it out on her blog if you haven't already.   I think we are the first to post outfits made using this new Simplicity pattern.

I started with size 16 modifying the tissue pattern, adjustments continuing as I constructed the dress. The sewing was very easy and steady. I practically finished the dress in one sewing session.   The instructions were typical.  No problems in them.

My dress looks much like the photographed dress on the envelope.  I only made minor changes that probably will go unnoticed. They are:

  • Placement of the buttons.  At the waist I added two close together.  The rest are evenly spaced as I desired.  So I didn't use the button guide at all.
  • On the shoulder, I added a little tiny dart where I added width for my prominent shoulder blades.  Initially, I thought maybe I'll ease in the excess.  But truth be told, I don't really like the effect of easing at the shoulder.
  • I added a few inches to the length of the belt.

My likes:

  • Button Front
  • Pleating at the waist
  • Lower band at the hem
  • Sleeve finishing
My dislikes:
  • The neck is a little wider than I like for this style.
  • Pocket placement is a little high

I've added the top and pants to my ever growing "Things to Make" list.  This is a super cute summer mini wardrobe pattern that I think fellow sewists will enjoy making and wearing.  Let's not forget to grab a few yards of this lovely Bengal Striped Stretch Twill.  I still have 1.5 yards to make something else. ;-)

Happy Sewing!
C


Tuesday, February 6, 2018

The Neutral Staple Coat -- Italian Tan Angora Wool Coating B6385


I have wanted a tan, wool coat since forever.   Last year I decided to move this coat to the top of the list after I stumbled upon this gorgeous Italian Tan Angora Wool Coating.  It is exquisite.  Perfect for the classic silhouettes as well as the oversized boyfriend coat.  I wish Mood had this coating in every colors.


Please forgive the frown, the sun was very high.

The surface is super soft with a brush-like hand.  The drape is a little stiff; but no matter, it is the perfect match for Butterick 6385. 


Tan is the perfect  neutral to wear with anything.  I wanted a simple, softly tailored everyday coat that was warm, soft, and beautiful, coat that could stand up to the harshness of the strong winds that jet across lake Michigan.

By no means should this neutral be restricted to a "tailored" look.  You can pair it with many styles:  wide lapels, double breasted, or a flirty peplum on your styled coat.  All would showcase the beauty of this Italian wool.

My journey to make this coat was a long one.  I started working on how to fashion it  December 7, 2017.  In the beginning, I was slow to start.  There were many things to consider.  First, the pattern to be used.  Then, how closely I would actually follow the pattern's style and construction.

Once I decided, I was good to go, ready to see if my plan would work.  Let me start with my pattern description and why I chose it.   It is fitted, with princess seams, back yoke with forward shoulder seams, two piece sleeve, collar and pocket variations.  I closely followed the style of view B.  I wanted to make minimum pattern adjustments.  This one included separate pieces for A/B, C, and D cup sizes, a big help with reducing fit time.  It comes in sizes 6 to 22.  I used sizes 14 and 16 with additional modifications.

My modifications did not change the overall style lines of the coat.  So my coat looks similar to the picture/diagram.  I made several changes to the construction of the coat with my standard fit adjustments.

Fit Changes:
  • Skipped the FBA.  I added 1/2" to the length of the center front.  I don't like the marked distance from the edge to the button hole.  I like a little more room across the center front.
  • Lengthened the sleeve by 1".  Most coat sleeve are not long enough for me.  I always add a inch or so to make sure the edge of the sleeve covers my wrist bone.
  • Lengthened the body of the coat by 3".  I wanted it to fall below my knees.
  • Lowered the pocket 1.5".  They were at an uncomfortable height for resting my hand in the pocket.
  • Lowered the bust dart 1.5".  Too high in my opinion.
  • Swayback adjustment.  I tucked about 1/2" access at the lower back.  But I don't think it was enough, though.
  • The shortened the length of the shoulder seam.  I actually didn't cut the excess away.  It helped form the roundness of the sleeve cap.
Construction Changes:
  •  Bound Buttonholes instead of regular ones.  Six button holes instead of five.  It took my a long time to decide on the size of the buttonhole lips.  BTW- bound buttonholes are on my goals list for 2018.  I've made them several times before, but each time I nervous about how they will turn out.  I always do a practice test before making them on the garment.  Such was the case with this coat.


  • I interfaced the entire coat except for the sleeve.  I only interfaced the upper portion and the last 3" of the sleeve.


  • I made my own shoulder pads. 3/4" instead of 1/2".  The sleeve fits easily around and under my arm.  

Even though I changed a lot of the construction of the coat.  I did read the instructions.  They are typical and I saw nothing confusing in them.  For #17  edgestitch and topstitch ends of flap to side front was difficult to do because of the thickness of the fabric.  I hand stitched the flaps to the side front.

I'm very pleased with how my coat turned out.  I must admit when it came time to finish the inside of the bound buttonholes, I decided to sew something else to give me a break.  That is, three something elses.  ;-)   


Oh yeah, I almost forgot.  I have a million buttons.  When it came to finding the "right" buttons from my stash, I only had sets of four or five.  So initially, I sewed some round button on the coat.  Nope..,  no go.  So I made a trip to a local store to get yet another set of buttons.

So let me point out my likes:
  • Sleeves
  • Princess seam and back yoke
  • Buttonholes
  • The tan angora wool
My dislikes:
  •  The excess fabric above the bust area on the side front.  I tried eliminating it.  No luck.
I'm planning to make a coat for my daughter using the same pattern, but view A.

Overall, I am very pleased with my new tan (neutral) coat.  A perfect winter staple for the mid-west.  

Happy Sewing!
C

LinkWithin

Blog Widget by LinkWithin