Showing posts with label silk. Show all posts

Thursday, September 7, 2017

Simplicity 8416 In Review - The Shirt Project


I hope everyone had a great holiday weekend.  Happily I spent sometime in my sewing room where I made two shirts, Simplicity 8416 views B and D.


 I can't believe it!  Fall is almost here!

A twist on a classic shirt design.  The shirt design is loose fitting like a camp shirt, but it has long sleeves, cuffs, and a collar band.   There is no center front band. Back options include vent with ties or lace, pleated back with or without tab. It can be worn like a camp shirt with jeans unbuttoned with a tank top or T-shirt underneath.  Of course, you can button it, tuck or tie the shirt tails.


These two shirts wrap up my shirt making project for the summer.  Initially, I planned to only make a few during the summer; then later make more.  But when Sue and Rhonda asked me to do a presentation, I needed a few more shirts to show and talk about.  My goal was to practice and learn, hone  my skills.  I chose this pattern to test sizing, fit, and drape trying to determine if it was loose enough to eliminate my normal fit adjustments.  At first sight, I was interested in trying some of the back variations.  So this one quickly fell into my shopping basket with several other Simplicity patterns during a JoAnn's pattern sale.

I made my usual size and determined that a slight FBA is still needed.  The sides seams are not perfectly perpendicular to the floor.

I also noticed that the cuff is longer and the spacing of the button is wider, beige shirt on the pattern envelope. The armhole seam starts below the ball of the shoulder. These observations are not a big deal, just things I noticed.

Of course I changed a few things.
  • I squared the collar band at the end
  • Plaid - I turned the edge to the right side of the center back hem then pressed.  Next the lace was stitched along the folded edge, then I sewed another row just before the scalloped edge of the lace to secure it.  This created a clean finish.
  • Plaid - I added 1" to the length of the shirt.

  • Plaid - I made the loops for the back closure instead of using elastic.  I simply cut a bias strip, sewed, turned, cut desired length, and apply to edge of instructed.  To make the loops narrower, I sewed a few stitching to hold the ends together.
Adding a little something, something -


  • White - I copied the contracting design element from a article in "Threads" magazine.  The contracting fabric adds some color to what would be a plain white over sized shirt.
I literally made almost no fit adjustments.  The neck is a little too big for me (hardly noticeable).  When I tried the shirt on, I noticed the shoulder seam was not completely vertical from neck to shoulder.  At the ball of my arm, it is off centered.  So for the plaid version, I added 3/4" to the height at the end of the yoke and the subtracted that same amount from the front.  That resolved the issue.  You may not need the same adjustment.  Check it before you cut into your fashion fabric.

Fabric -

White - I used a tissue weight cotton from Mood Fabrics and a cotton blend print gifted to me by Andrea Birkan (Haute Couture Club member).

Plaid - A lightweight silk that I was gifted over 25 years ago.  The lace came from JoAnn's.
My dislikes -


  • The construction process for creating the finished opening above the cuff.
  • The lack of a front band. It's a little more work but worth it. 
 Finally, a few tips for making your own shirts.

  • Press, press, and press throughout the construction process.  It makes the sewing easier.
  • Trim (3/8") seam allowances of the collar and collar band.  It eliminates bulk, making the top stitching easier.
  • Basing - I prefer basing over pinning before top stitching and finishing bands and cuffs.  Another option is to use glue sticks.
  • One collar piece.  I like Sandra Betzina one piece collar method.  It can be found in her "Tool Kit" book.  My tutorial is here.
  • Don't be afraid to change it up a bit.  Surf the internet and magazine for ideas.
Note: I'm no expert.  This is only my explanation on how I made Simplicity 8416.  Sorry no pictures yet. later..,


Parting Shot:  Last book read:  "The Alchemist" by Paulo Coelho .  This is a powerful little book.  Check it out.


Happy Sewing!

C


Thursday, June 22, 2017

Pretty Toppers - Inspiration


I just wanted to share some more toppers that I like. There are a few design elements that I hope to incorporate into some of my future sewing projects.


Enjoy!
Cennetta

Saturday, April 23, 2016

Princely purple silk Faille with sparkling black jersey knit – Vogue 8980 and Vogue 1314


There is something magical about the color purple.  Yes, it’s noticeable, vibrant, and regal.  It’s a royal color worn by noble throughout the ages. The color purple is also associated with power, ambition, luxury, wealth, dignity, grandeur, peace, independence, and wisdom.  
 
So, you can understand why I am drawn to the color. It symbolizing many qualities that I am or hope to be.  Simply, it is beautiful and I love the many shades of it.  I paired this mysterioso purple silk faille with an audience high-low full skirt, Vogue 8980.

 
It’s not your typical box pleat skirt.  It is made of circles: full and half circles. I like how to circles come together to create beautiful drape and shape.  There are a few small pleats about the waist, but the majority of the fullness is formed by the cut of the circle.  To sum it up, this skirt is huge.  It took about 5 yards to make it.
. 
I only added a few inches to the length. Additionally, I used tulle to underline it and completely lined the skirt attaching it at the hem.

I could have used a stiffer interfacing in the waistband though.  There was some creases across the small of my back.  Not too, too bad as the cropped top covers it.
 
For my sparkling top I used  glamourous poly-lycra jersey with star burst all over it.  Very pretty, but the glitter was a little messy.  So I shake, shake, shook it until most of the glitter fell off leaving me with enough sparkle to make the top unique compared to the typical t-shirt cropped tops.  Underneath all the glitz is a lovely texture knit that has a fair amount of stretch. 


Initially, I thought I would complete the look with Butterick 6285, but after making it I didn’t like the outcome of it.  I ended up using Vogue1314 to create a little cropped t-shirt styled top.  It’s not what I originally envisioned for the fabric, but it was doable.  I did notice, though, some winkles in the bust area.  This knit does have more stretch than the previously used knit for this pattern.  I will see if I can tweak it a bit to remove the winkles. 

Overall, the outfit is very good.  It was my last garment modeled for the Haute Couture Club of Chicago fashion show 2016.  Although it’s not what I originally envisioned; it works and I will wear it.


Parting Shot:  One of my favorite music artists, Prince Roger Nelson, made his transition yesterday (April 21, 2016).  He was only 57 years old.  The world has lost a great musical genius.


Happy Sewing!
C

"I think it pisses God off if you walk by the color purple in a field somewhere and don't notice it.  People think pleasing God is all God cares about. But any fool living in the world can see He's always trying to please us back."

Alice Walker, "The Color Purple"


Monday, March 14, 2016

Notes on a Pattern - Butterick 5605 Ms. Paulette Bell's Dress


Good afternoon everyone,

It's been ages since I did a "Notes on a Pattern".  Today's post is on a vintage pattern that I'm using for Ms. Paulette Bell's annual dress.


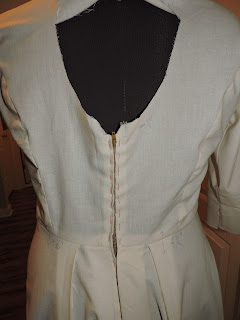
The illustration clearly shows the princess seam bodice with cut on sleeves, which is different from most of the vintage pattern that I've seen with cut on sleeves.  This design element makes it easy to do a full bust adjustment.    Also, noted from the diagram is that the side front and side back are gores where the bodice is attached to the sleeve.   There may be a bit of a challenge to get all side bodices peaks the same.  Making a muslin is a great way to practice inserting the side front and back.


But with careful measuring, marking and sewing it can be achieved.   Other challenge may be the back opening.  It gapped mid-back on Ms. Paulette.  I would recommend that you make a muslin before attempting to make the dress out of your nice fashion fabric.

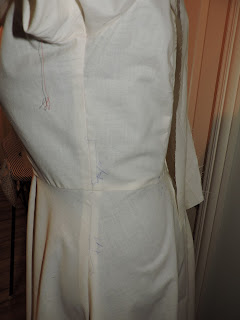
There was no way I would skip the muslin fitting.  Even though I've made a similar dress for her a few years ago without one.  On Saturday, Ms. Paulette came by for her muslin fitting.  There are several adjustments needed.

There are:
  • Lower the front neckline about 1/2".  This change is a matter of preference.

  • Right under arm, slight pull - may be resolved with adding  1/2" to the front underarm section.


  • Swayback adjustment 1/4" near side seam to 1/2" torwards middle of lower back.  (Note: incorrectly marked on muslin as adding 1".) 
  • Decrease back opening by 1"; gapping at top of zipper.

  • A little snug at outer shoulder and upper arm - add 1/8" to 1/2" along this area.


  • Add 1/2" back of skirt to compensate for the swayback tuck.
  • Side seam bodice, lower section add 1/8" to 1" at waist.

  • Side seam skirt, upper section add 1" to 1/8" along the side.
There was no problem with the construction process.  The markings were spot on.

Stay tuned.  More later on Ms. Pauletter's dress, but after the event.

Happy Sewing!
C


Monday, May 11, 2015

Paulette Bell of the Ball in Butterick 5557


Good evening all,

It's good to finally blog.  The Haute Couture Club of Chicago fashion show was May 3rd.  I'm happy to say it was a great show.  The show was at a different venue this year:  Fountain Blue Banquet facility in Rosemont, Illinois.  In January we had to form a fashion show committee to replace the removed show chair.  So I will stop at that; the story is too long.  Anyway, today I'd like to review Paulette's pastoral annual dinner dress.  I used Butterick 5557 .

Here is my review:


Pattern Description:
MISSES' TOP AND SKIRT: Fitted, lined tops A, B have neckband, below elbow kimono sleeves and back zipper. A: sleeve and lower bands, self-fabric bow. Semi-fitted, straight, lined skirts A, B, mid-calf, have waistband and side zipper.

Pattern Sizing:
6-20 I used size 18 with lots of modifications.

Did it look like the photo/drawing on the pattern envelope once you were done sewing with it? For the most part.  The pattern was true to the line drawing and pictures on the envelope.

Were the instructions easy to follow?   There is nothing difficult or confusing about the the construction techniques or the instructions.

What did you particularly like or dislike about the pattern? This was a pattern selected by Paulette.  She loves vintage and usually picks a vintage style for the pastoral annual dinner.  Paulette likes the style lines of the top, but wanted to add a inch or two to the length of it.  The skirt of most vintage patterns that I have worked with tend to be on slightly on the "A" shape.  Paulette preferred a tapered skirt. 

I thought the style was okay too.  But I probably would not select it for myself.

Fabric Used: Paulette and I made our usual trip to Fishman's Fabric near downtown Chicago.  The fabric is a red stretch shantung blend; the lining is ambiance.

Pattern alterations or any design changes you made:  There were a lot of changes with this one.  For starters I made two muslins trying to get the fit right and to incorporate any style changes.  Even after the two muslins there were more changes after the second garment fitting.

Alterations:   This is a fitted two pieces dress.  I should have started with size 18 upper body and size 20 for the rest.
  - Decreased the back neckline at the center by 1".  It was too big at the center back neckline.  My fix was not perfect.  After the change, I noticed a few drag lines.
  - Added 2" to 4" at waist and high hip on the top.
  - Added 2" to 4" through the waist and hip areas.
  - Tapered the skirt from the below the hip to the hem.
  - Added side slit to skirt.
  - I used the longer version top and added a 2" lower band.


Would you sew it again? Would you recommend it to others? I probably would not sew it again as it was a client project.  I do recommend it to others.  This pattern has nice style lines.  But you should make a muslin before cutting into your fashion fabric.


Conclusion:  With a little extra work, I was able to make a beautiful two piece dress for Ms. Paulette.

Parting Shots:  This is the vintage dress made for last year's annual dinner.  Paulette was so kind to model it at the Haute Couture Club of Chicago annual fashion show on May 3rd.  She was a hit on and off the runway.  It was so funny when she said to me, "People know me."  I chuckled and replied, "Some of the members read my blog." 


Sunday, July 13, 2014

The Brightness of Princeton Orange Silk and McCall's 6794

Bold color choices are great any season!  I'm so lucky that they dominant my personal color palette.  Bright oranges, greens, purples and blues are the perfect match for my skin tone.  Lucky me Mood has such an extensive range of colors and fabrics available at their online store.

The spring color trends included celosia orange, a perfect shade for me.  I found Princeton Orange Silk Twill.  It's a deeper and softer orange color that is perfect for any time of year. This fabric may be used to make tops and dresses.   Any garment you choose to make will lighten up the room no matter what season it is.  If you are a little shy when it comes to being in the spotlight, it's great as a lining for a jacket or coat.  You may also pair it with neutral colors.  I decided to make McCall 6794, a cute high low top that can be dressed up or down.  For this review I'm wearing it with jeans for a casual look.

McCall's describes this pattern as misses' tops and tunics: very loose-fitting, pullover tops and tunics have neckline variations, front gathered into midriff, attached tie ends, and narrow hem.  A:  gathered sleeves and sleeves and bands.  C: shaped back hemline, wrong side shows.  It's available in sizes XS to XXL.  I used medium with modifications.

I made view C.  For the most part, it did look like the top worn by the model.  My version appears to be slightly shorter.  Next time I will add an inch or so to the length of the bodice front and the back, and I will make the tie a few inches longer because I like to bringing the tie to the front center like I'm wearing it here.  I think a few more inches will look better.

The instructions were easy to follow, but I'm always taking the liberty to change a few steps.  In this case, I did not finish the hem of the armholes and bottom of top as recommended.  I finished the edges using my serger and only turned the allowance under once.

I bought this pattern for view C.  I liked the high low top and thought it would be a good choice for my body shape.  My sister showed my a dress that she'd like me to make with similar design lines.  So I will use it for that as well.

It took me a while to complete this top because of some fitting adjustments. I finished it, distributing the gathers as recommended. There was some pooling of fabric at the center front. So I ripped out the side seams, removed the midriff lining, and detached the front bodice from the midriff. Then reattached it with no gathers at the center front to see if that made a difference. Not much difference. In the before and after modification photo, you can see that now the fabric forms a "U" shape at center front. I think if I add a little length to the bodice it will look better. This is only my first go round with this pattern. I will see how my changes effect the next version. More about that in a future post on my blog.

Alterations include FBA and prominent shoulder blades. I made a similar adjustment for this dress.  Sorry no picture of this the McCall's top.  But I think this picture explains how I made it.  For the shoulder blades I added a little width across the back.  I did experience some difficulty with getting a smooth finish around the neckline, but it's not too bad.  Could be a simple matter of a great press, which it will get at the cleaners.

The fabric and pattern are a good match.  I hope you will give both the fabric and the pattern a try.

LinkWithin

Blog Widget by LinkWithin