Showing posts with label collection. Show all posts

Monday, January 19, 2009

Two UFO's Done! - Simplicity 3690 for DD


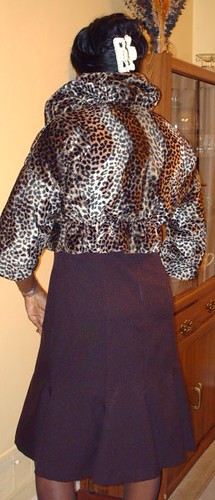
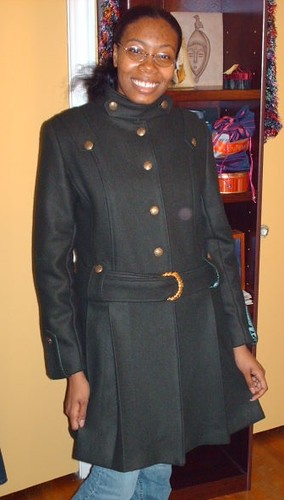
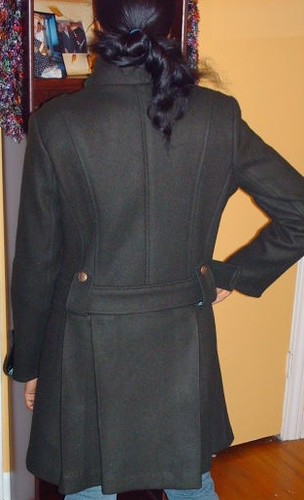
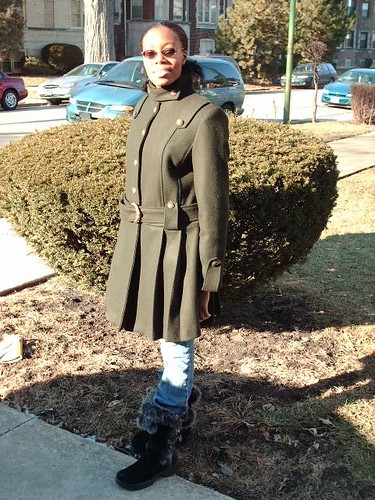
These UFO's are from the Urban College Girl Collection 2007. After I finished DD's coat I started working on dresses for me. Good thing she hasn't expanded in the last year. lol

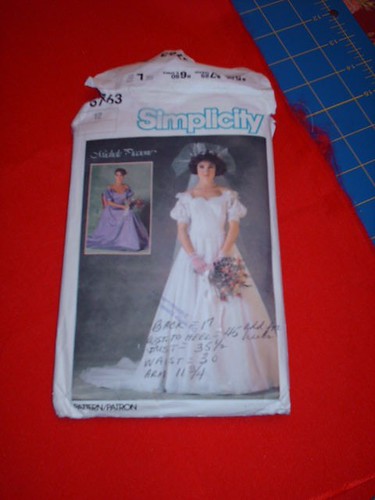
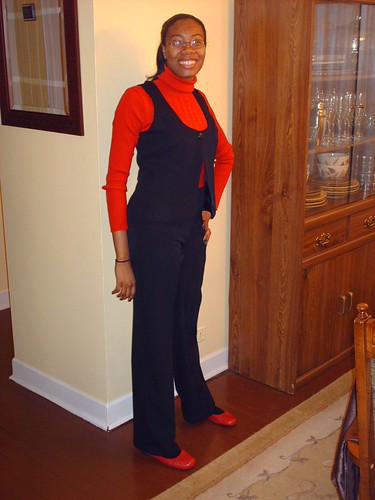
Pattern Description: Misses' Top, vest in two lengths and pants or shorts. I made views A and D.


Pattern Sizing: 4 - 20. I made size 8 for DD.

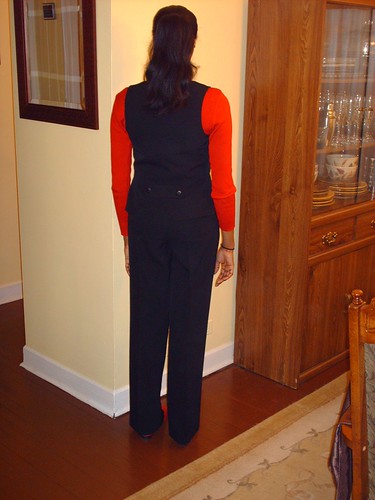
Did it look like the photo/drawing on the pattern envelope once you were done sewing with it? Yes. I added a couple of pockets: one the right back and one left front and of the pants. Other than that it looked like the photo and drawing.

Were the instructions easy to follow? Yes. I looked over them and added under stitches to the construction of the vest.

What did you particularly like or dislike about the pattern?

Like: DD and I liked the style. And I like that the coordinates were simple pieces that I could sew up pretty fast.

Dislike: What appeared to be a simple pattern for the vest, turned out to be a little wonky. This was a surprise given my DD is very easy to sew for when it comes to alterations.

I read a few reviews after making it to see if anyone else had issues with the vest. Ann (Gorgeous Things) had some problems with the neckline and bust area; and she recommended that you make a muslin, which I didn't. It's not bad, but I noticed a little gaping at the neckline (back) and a little winkle at the bust line. I needed to do a sway back alteration.


Fabric Used: Wool blend from the Textile Discount Warehouse.

Pattern Alterations or any design changes you made:

Vest: I didn't make any fitting alterations, but I did under stitch the vest around the neckline, front, and bottom were the lining attaches to the vest.

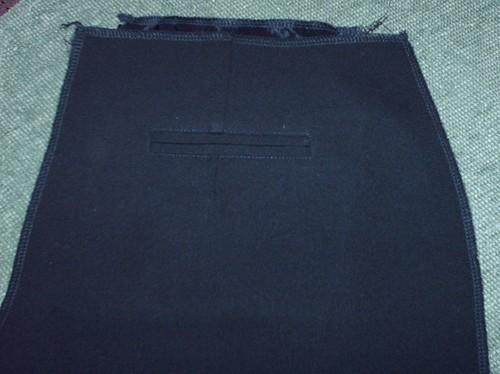
Pants: No fitting alterations. I added a coin pocket and a welt pocket.

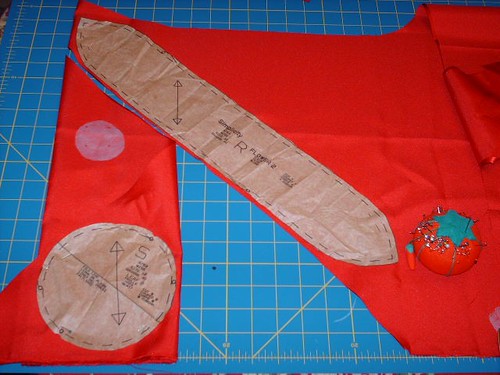
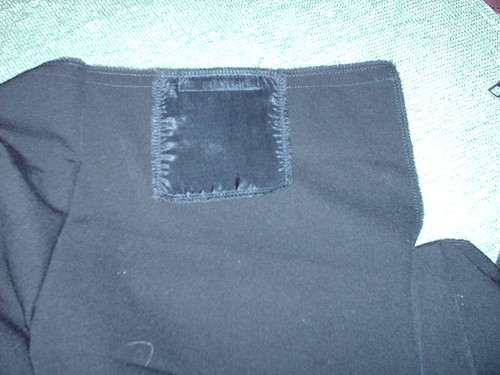
Coin pocket was added to the seam on the left front were the yoke is sewn to the waistline of the pant. To create a coin pocket, I cut one lining and one fashion fabric pocket 4X4 square.

The lining is placed on the desired location for the pocket on the right side of the pants. It is attached at the seam allowance starting at the 3/4 inch point. Sewing from the edge, pivot, and then along the upper stitching line ending at 3 1/4 point, pivot and stitch to the top of the seam allowance. On an angle the pant and the lining are slash to the corner of the stitched seam.


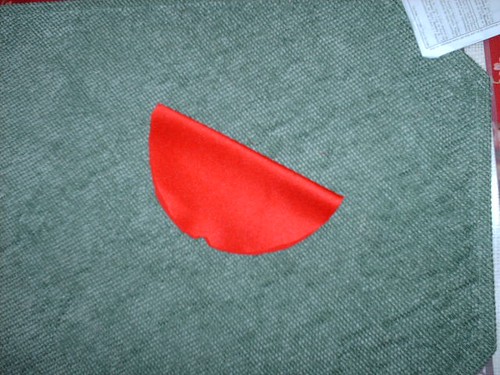
Turn the lining to the inside and press.


View from the wrong side.


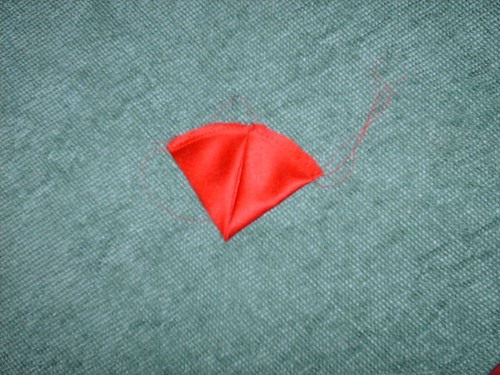
Place the pocket evenly over the lining. Stitch 1/2 half seam allowance along the two vertical sides and the lower width. Sewn pocket.


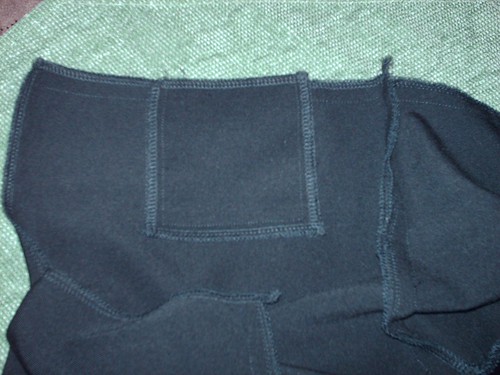
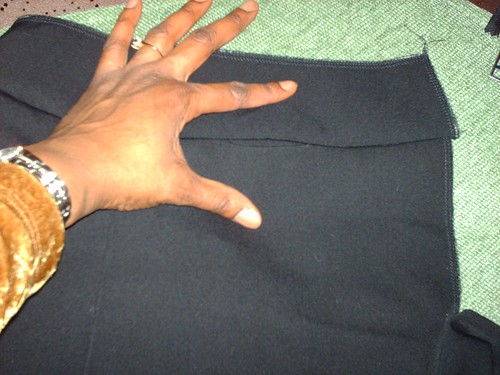
Turn to the right side baste the pocket to the upper edge of the pants.Then attach the yoke to the waist of the pant.


Finished coin pocket.


I followed Debbie Cook's method of making double welt pockets.


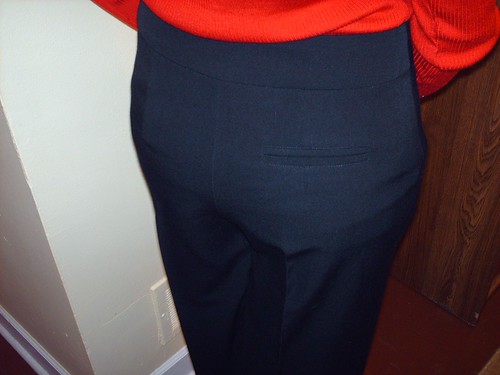
Would you sew it again? Would you recommend it to others? Yes, but I probably won't sew the vest again. DD wants a few more pants made from this pattern. Of course with pockets. Yes, I would recommend it to others. But make sure you make a muslin for the vest before cutting into your fashion fabric.

Conclusion: This is a fairly decent pattern with the expectation of the "wonkiness" in the vest. DD really likes the pants. She says that they fit perfectly.

Tuesday, April 15, 2008

Last Dress of the Fall Collection 2007 - S3673


This is the very last dress sewn for the fall/winter 2007 collection and is my least favorite dress out of the seven. It's not the best choice for my body shape. View C would have been better for me. I made view A minus the bow/buckle at the waist.

Pattern Description: Misses dresses or jumpers with skirt variations

Pattern Sizing: 8 to 22. I made size 14 with alterations.


The finished dress looked like the pattern illustration except in eliminated the bow and buckle at the waist and used black for the band.

The instructions were easy to follow.

Likes and Dislikes: Initially I like the retro look of the jumper and thought it would be good addition to my work wardrobe. This view is not flattering on me.

Fabric Used:wool blend from JoAnn's

Pattern Alterations or any design changes you made:FBA and broad back. I probably needed to a little more move in the top of this dress as it is snug through the bodice area.

I won't sew this view again. But I would recommend it to others. Several people at PR had great success with this pattern and style of this dress.

Conclusion: This is a fairly deceit pattern. I have already worn this dress. I will wear it, but probably with a jacket.

Thursday, March 27, 2008

Vogue 8411


Last year I was so inspired to design my own collection for the Fall. It was too difficult for me to select a few pieces as there is so much I want to sew and create. So I decided to do a dress collection instead. This particular dress caught my eye in Summer 2007. JoAnn's was having their usual sale on Vogue patterns ($3.99), I thought the dress was cute, and so I bought the pattern.

I made a muslin first, because of my typical upper body alterations. Posted it here hoping to get some viewer comments. At first sight, my DD said, "It looks like a night gown." So I put a belt around it and posted the photo on the blog. It recieved mixed reviews, but I thought the belt version in a nice fabric would dispell the notion that this dress looks like a night gown. Linda ,Danvillegirl, suggested that I contact Dawn, Secret Pocket, for some assistance with making this dress. Dawn made some very good points on how to handle putting this dress together. Thank you Dawn and Linda.

Pattern Description: MISSES’ DRESS AND SASH: Loose-fitting dresses have pleated front with topstitching details and sash. A: above-knee length, two-piece sleeves with elastic casings. B, C: mid-knee length with topstitched hems. B: three-quarter length, gathered, bound sleeves. C: long sleeves with elastic casing.

Pattern Sizing: 6-20, I made between size 12 and 14. View C and the sash.

Did it look like the photo/drawing on the pattern envelope once you were done sewing with it? Yes.

Were the instructions easy to follow? As other reviewers noted, the instructions on how to form the pleats was a little on the vague side. I tried to follow the recommended technique #4 but had a difficult forming the pleats. It may be easier with a woven fabric. After second try and being on the verge of chewing nails, I decided to sew each pleat at the fold line on the wrong side. Then I top stitched each to stablize them.

What did you particularly like or dislike about the pattern? I like the pleats and the square neck.

Fabric Used: Ponte de Roma Knit from JoAnn's Fabrics

Pattern Alterations or any design changes you made: From the muslin, I noticed some drag in the bust area. Dawn recommended adding one pleat to the front (also widening the straight yoke part beneath them), and add the rest at the side of the pleats. I followed adding more wideth to the pleated area, but I incorporated the additional wideth into the 20 or so pleats of the design. When I made the yoke wider it was too wide for me. This looked better, but I still noticed some drag.

I changed the depth of the hem only turning under one inch then topstitching. I did not have enough fabric to add the necessary length for my height and do a 4" hem.


Would you sew it again? Would you recommend it to others? Not for myself. I guess I would recommend it to others but with modifications on how to form the pleats and stablizing them. This pattern should have been rated intermediate. The pleats along requires skills above beginner and the patience of Job.

Conclusion: I like my dress; it doesn't look like a night gown, but it is very comfortable.

Tuesday, March 11, 2008

Weekend Sewing!

I was able to get a bit of sewing completed last weekend. I still have four items from fall/winter that I didn't finish during the Christmas holiday season. I'm almost done with V8411 and S3673. I finished the edges of S3690, views A and D for my DD. As commented by other PR members, V8411 is not easy. It took me a while to get the pleats done. I tried a couple ways, but ended up follow my own method to make them look decent.

There are a few patterns I'm anxious to try this spring but I'm compelled to finish these garments before I start something new. (exception: few pieces for the spa weekend. lol) I already have too many UFO's. lol

I have a few clients this spring, friends of course. Last weekend I went shopping with Ms. PB for fabric. She wants me to sewing V8355. We did a muslin fitting on Sunday. This patterns appears to have a little more ease then she/I expected. Ms PB prefers a more fitted garment. I have to make a lot of changes: bust adjustment, sleeves shorten, skirt shorten, and reduce ease in the skirt and lower jacket. Ms. PB has not given permission to post photos of the fitting as of yet. I'll check with her again.

Second project is for Ms. DD. I have made Neue Mode 22928(oop) at least 10 times with various modifications: pocket here or there; waistband or facing. She has given me two bags of fabric. Out of which, five cuts for pants and two pieces for swing jackets.

Happy Sewing!

Saturday, January 12, 2008

What's Next? - Finishing Up The Fall Collection

Two more dresses (V8411-C and S3673-A) for me and the final pieces (S3690)of the UCG Fall Collection 2007 for DD. I really pondered making these next two dresses. Linda (Danvillegirl) suggested that I ask Dawn (Secret Pocket) for a possible fitting solution for V8411, and Ann (Gorgeous Things) suggested that I take a look at Summerset's blog on S3673 for a better understanding on the sizing of this pattern. Thanks everyone. Both dresses will be cut at size 14. These will be the last two dresses for a while. I want finish up some of my UFO's and try a few pieces from the November 2007 Burda Magazine. As for DD, she wants View D and A (S3690). I think I'll add a pocket to the pants. DD is entering the second semester of her junior year and is starting to prepare for the internship program. She will probably use this as an interview outfit. I have some black wool crepe that will be perfect for this.

Wednesday, January 9, 2008

Dress M5269


I had no special occasion in mind when I decided to make this dress. I was inspired to try this pattern after reading Ann's, Gorgeous Things, review on PR. Ann is so creative. She made an exquisite couture garment from this simple pattern. For me, I stuck with the basic design for making my version of this dress.

Pattern Description: MISSES’/MISS PETITE DRESS: Straight, fitted, lined dress, below mid-knee has princess seams, yoke front, back zipper and cap sleeves with pleats; dress A has back slit; dress B has flounce; dress C has ruffle with stay forming bubble. I made view A.

Pattern Sizing: 4 - 18, I made size 14.

Did it look like the photo/drawing on the pattern envelope once you were done sewing with it?Yes.


Were the instructions easy to follow? There was nothing complicated or confusing about the instructions.

What did you particularly like or dislike about the pattern? I liked the style of the dress. At first, I thought about making view B but decided to make view A because I tend to gravitate towards dresses/skirts with a flounce or fullness at the bottom.

Fabric Used:Polyester satin and lining from TDW.

Pattern Alterations or any design changes you made: Yes. I did my usual alterations: FBA, broad shoulders, sway back, and added two inches to the length. I inserted an invisible zipper instead of a regular one.

Added accessory: I made an belt (optional) to wear with this dress and another that I plan to make for the summer. The making of the belt is in the previous post.

Would you sew it again? Would you recommend it to others? Maybe view C. Yes I would recommend it to others.

Conclusion This dress is classic, but stylish. It's easy to wear.

Belt for Dress M5269


One of the things I've been trying to do lately is feature out ways to use remnants from previous sewing projects. Over the years, I have accumulated several boxes. So with this project I decided to make a belt. The inspiration for making this belt comes from Cadena Fashion magazine. This is one of my absolute favorite inspiration mags.


Here's the dress belt combo.
I used S6763 to create the roses for it.
I added a finish piece to concile the raw edges of the flowers and leaves.


The Process:

Belt - To make the belt I cut two stripes of fabrice 4 inches wide 35 inches long. I fused interfacing of the same size to each piece. Then I sew them together leaving a 4 inch opening in the middle of one of the long seams. Turned the belt to the right side, pressed and stitched the opening closed. Three Hooks and Eyes are sewn on for closure.

Roses and stems - I cut three roses, four leaves, four stems, and three finishers. The leaf is a circle piece of fabric with four notches separating four even quarters of the circle.


Fold the circle in half.

Bring the outer ends to the middle of the half circle. Baste along the curve edge twice for gathering.

Fold the flower piece in half and stitch for gathering. Baste the finish piece and pull the thread to slightly turn the raw edge to the wrong side of the fabric.

Prepared flower pieces for assembling.

The pattern instructions only suggest rolling the flower onto itself to form the rose. I'm always afraid it will come undone without securing it with stitches. So as I roll I stitch the outer fabric to the forming rose. Then I stitch the formed leaves to the rose in the same manner.


Once the leaves are attached to the rose, I slip stitch the finishing piece to the base of the flower.

The finished roses are then assembled and attached to the belt as desired.


I added stems after the photographed process. They can be created using basic spaghetti strap construction.

The Sewing Divas recently posted An Alternative for Real Buttons: Make a Dior Rose.

Purse M4679


I had about 1 yard of material after cutting out my dress. So I decided to test drive this bag .

M4679.

Pattern Description:
SOFT HANDBAGS: Package includes patterns and instructions to make lined handbags bag A, B - 16" W × 12" H; bag C - 14" W × 10" H; bag D - 6" W × 4" H; bag E, F - 17" W × 10" H; all measurements are approximate and exclude handles or straps; bag A, C, D, F have contrast sections; bag B has purchased handles; bag A, B, C, E, F have inside pocket.

Did it look like the photo/drawing on the pattern envelope once you were done sewing with it? Pretty much. I omitted the tassel and used one fabric color.

Were the instructions easy to follow? Basically. I had a trouble getting the zipper stop section at the top of the purse toto roll out evenly.

What did you particularly like or dislike about the pattern? I like the style of this purse. Clutch bags are popular these days. Nothing to dislike. Linda, Danvillegirl, has a similar bag pictured on her Wists list on the homepage of her blog.

Fabric Used: Leftover polyester satin and lining purchased from the TDW.


Pattern Alterations or any design changes you made: I made no changes.

Would you sew it again? Would you recommend it to others?Yes, This is my prototype for making a leather version of this purse. This year I want to practice making some leather accessories.

Conclusion
I like this bag and would recommend it to others.

Tuesday, January 8, 2008

Jacket M5530

<
I made this jacket help spruce up the dress made from M4930.
After I completed it, I didn't like the jacket with the dress. My sister came over yesterday; saw the jacket; and decided that I should make one for her. She is not a fan of animal print a solid purple, red, or black fabric will do. While she had it on, I took pictures. As far as fit, it's a little big for her; but this jacket is more suited for her body shape than mine. Here is my review:


Pattern Description: MISSES’ LINED JACKETS: Jackets A, B have princess seams, collar and sleeve length variations, topstitching and button closure; jacket A has collar ends slipped through loop and three-quarter length sleeves; jacket B has stand-up collar and long sleeves; jacket C is lined to edge with front princess seams, front and back elastic, gathered collar and button closure. I made view C.

Pattern Sizing: 4 - 18. I made a 14 with alterations.

Did it look like the photo/drawing on the pattern envelope once you were done sewing with it? Yes.

Were the instructions easy to follow? The instruction were easy to follow. The pattern pieces went together with no problems. I omitted the top stitching at the neckline. I didn't want to risk ruining the finished neckline with uneven top stitching.

What did you particularly like or dislike about the pattern? I like the style of this jacket. The combination of the fabric (faux far) and the collar is what I like the most. My dislike is that it doesn't quite suit my body shape. I'm a little top heavy and short waisted. It makes me look bulky on top. Other than that nothing to dislike.

Fabric Used: I purchased the faux fur from Jo Ann's last year February/March. The lining is polyester lining purchased at the Textile Discount Warehouse.

Pattern Alterations or any design changes you made: I did a FBA and length the jacket by one inch.


Would you sew it again? Would you recommend it to others? Yes, I plan to make view C for my sister and try some variation of view A for myself.

Here are a few pictures of me wearing my jacket with M4930:


Conclusion This is a stylish jacket that can be made up in a variety of fabrics. I would recommend it to beginners.

Dress M4930


This dress was made from a Palmer/Pletsch teaching pattern M4930.

Pattern Description: MISSES’ LINED JACKET, DRESS AND PANTS: Hip length jacket has front darts, side princess seams, pockets in front princess seam and two-piece sleeves with buttonhole and button; knee length dress has princess seams, back zipper and extended armholes; pants have fly front, front pleats, back darts and side seam pockets.

Pattern Sizing: Sizes 8 to 22. I made a size 14 with alterations.

Did it look like the photo/drawing on the pattern envelope once you were done sewing with it? Pretty much.

Were the instructions easy to follow? The pattern pieces included cutting lines to make various alterations to achieve the "perfect classic fit". But the instructions didn't include directions on how the make the adjustments. Also included is an order from for the reference books at a discount price. I guess this is they way of encouraging people to purchase the books.


This is one of five dresses that I made muslins for in October 2007. I chose it for the simplicity of the design and the trumpet shaped skirt. I found that the more pieces required for the upper body, the easier it is for me to achieve a good fit. Like most of us I do not fit a pattern straight out of the envelope. I have to do a sway back, broad shoulder, and full bust adjustments. Over the passed few years, my weight has fluctuated five to twenty pounds. With each metamorphosis of weight gain or loss, it's redistributed differently. Getting the right fit can be a moving target. But this pattern helps address that issue.

Fabric Used: Polyester gaberdine from Jo Ann's and the polyester lining from the Textile Discount Warehouse.

Pattern Alterations or any design changes you made:I made the three adjustment mentioned above. I also added two inches to the length of the dress; I'm tall. This dress did not call for a lining; so I underlined it to add some body. And finally I lower the center neckline by 3/4 inch and added trim to it.


Would you sew it again? Would you recommend it to others?
I will probably make some of the other pieces to this pattern. I have other dresses that I would like to try.


Conclusion This is a good teaching pattern. This dress is simple and offers the sewer an opportunity to test other sewing techniques.

Thursday, December 27, 2007

Inspiration Coat and McCall's 5247 - Final Chapter


I finished DD's coat on December 23rd, but didn't get a chance to post my final review of the process until now.

Making this coat has certainly been an adventure. Last Summer, DD and I spotted this coat at the Nordstrom online store. Immediately she requested that I make it for her. I agreed, but needed to find a pattern to follow. Then to add to the challenge, I decided that I wanted to "think like a designer" and create a fall collection for myself and DD. Well, I been successful with creating DD's collection, with only two pieces to go. But as for me, The challenge was too great. I only came up with three dresses so far. Back to the coat...,


I really wanted to have the coat made by Christmas; and it was, December 23rd. My version is slightly longer than the inspiration coat. It green (loden) instead of black. DD was very happy with the results.

Over the past few weeks, I have documented my process on creating this coat on my blog. I will refer to those posts throughout this review as not to rewrite the process. There goes.

Pattern Description: McCall's 5247
MISSES’/MISS PETITE LINED COATS: Fitted coat, mid-knee length has princess seams with topstitching trim, side seam pockets, mock flaps, back button-on band and vent; coats A and B have stand-up collar; coat A has purchased trim; coat B has contrast collar and cuffs; coat C has notched collar.
Pattern Sizing:
6-22. I used a size 8.

Did it look like the photo/drawing on the pattern envelope once you were done sewing with it? The top portion of the coat is similar to the original coat; the bottom is totally different. More on that below.

The instructions were pretty clear, but I ended up developing my own method of putting the coat together. I spent some time studying the pictures inspiration coat and the pattern pieces. I also studied the construction of some of my ready to wear coats to get an idea of how to attach the lining at the bottom of the coat.
Starting the Process

Fabric Used: I purchased the coating from Ann's Gorgeous Fabrics
Polyester Satin Lining in winter green from JoAnn's Fabrics.
I found the buttons at Vogue Fabrics. In the notions sections Vogue has sale items placed on the counter near the register. One of the on going sales items is a box of buttons. So the customer can fill a cup with buttons, which is provided by Vogue. Each cup sells for $2.00. Well I stood there and selected each button to go into my cup making sure I had enough for the coat.
Buckle was hard to find. So I went to the thrift store to see what I could find there. Found the buckle for $1.60 attached to a belt.


Pattern Alterations or any design changes you made: I started the process of redrafting the pattern the Tuesday before Christmas.
Redrafting, Fitting and Muslin

Second Fitting

Making more adjustments

Would you sew it again? I probably will not sew this particular version of the coat again. But I will certainly challenge myself with more interesting projects in the years to come. It was a great experience.

Conclusion It was a challenging experience with good results. I made my DD happy.

LinkWithin

Blog Widget by LinkWithin