Tuesday, February 6, 2018

The Neutral Staple Coat -- Italian Tan Angora Wool Coating B6385


I have wanted a tan, wool coat since forever.   Last year I decided to move this coat to the top of the list after I stumbled upon this gorgeous Italian Tan Angora Wool Coating.  It is exquisite.  Perfect for the classic silhouettes as well as the oversized boyfriend coat.  I wish Mood had this coating in every colors.


Please forgive the frown, the sun was very high.

The surface is super soft with a brush-like hand.  The drape is a little stiff; but no matter, it is the perfect match for Butterick 6385. 


Tan is the perfect  neutral to wear with anything.  I wanted a simple, softly tailored everyday coat that was warm, soft, and beautiful, coat that could stand up to the harshness of the strong winds that jet across lake Michigan.

By no means should this neutral be restricted to a "tailored" look.  You can pair it with many styles:  wide lapels, double breasted, or a flirty peplum on your styled coat.  All would showcase the beauty of this Italian wool.

My journey to make this coat was a long one.  I started working on how to fashion it  December 7, 2017.  In the beginning, I was slow to start.  There were many things to consider.  First, the pattern to be used.  Then, how closely I would actually follow the pattern's style and construction.

Once I decided, I was good to go, ready to see if my plan would work.  Let me start with my pattern description and why I chose it.   It is fitted, with princess seams, back yoke with forward shoulder seams, two piece sleeve, collar and pocket variations.  I closely followed the style of view B.  I wanted to make minimum pattern adjustments.  This one included separate pieces for A/B, C, and D cup sizes, a big help with reducing fit time.  It comes in sizes 6 to 22.  I used sizes 14 and 16 with additional modifications.

My modifications did not change the overall style lines of the coat.  So my coat looks similar to the picture/diagram.  I made several changes to the construction of the coat with my standard fit adjustments.

Fit Changes:
  • Skipped the FBA.  I added 1/2" to the length of the center front.  I don't like the marked distance from the edge to the button hole.  I like a little more room across the center front.
  • Lengthened the sleeve by 1".  Most coat sleeve are not long enough for me.  I always add a inch or so to make sure the edge of the sleeve covers my wrist bone.
  • Lengthened the body of the coat by 3".  I wanted it to fall below my knees.
  • Lowered the pocket 1.5".  They were at an uncomfortable height for resting my hand in the pocket.
  • Lowered the bust dart 1.5".  Too high in my opinion.
  • Swayback adjustment.  I tucked about 1/2" access at the lower back.  But I don't think it was enough, though.
  • The shortened the length of the shoulder seam.  I actually didn't cut the excess away.  It helped form the roundness of the sleeve cap.
Construction Changes:
  •  Bound Buttonholes instead of regular ones.  Six button holes instead of five.  It took my a long time to decide on the size of the buttonhole lips.  BTW- bound buttonholes are on my goals list for 2018.  I've made them several times before, but each time I nervous about how they will turn out.  I always do a practice test before making them on the garment.  Such was the case with this coat.


  • I interfaced the entire coat except for the sleeve.  I only interfaced the upper portion and the last 3" of the sleeve.


  • I made my own shoulder pads. 3/4" instead of 1/2".  The sleeve fits easily around and under my arm.  

Even though I changed a lot of the construction of the coat.  I did read the instructions.  They are typical and I saw nothing confusing in them.  For #17  edgestitch and topstitch ends of flap to side front was difficult to do because of the thickness of the fabric.  I hand stitched the flaps to the side front.

I'm very pleased with how my coat turned out.  I must admit when it came time to finish the inside of the bound buttonholes, I decided to sew something else to give me a break.  That is, three something elses.  ;-)   


Oh yeah, I almost forgot.  I have a million buttons.  When it came to finding the "right" buttons from my stash, I only had sets of four or five.  So initially, I sewed some round button on the coat.  Nope..,  no go.  So I made a trip to a local store to get yet another set of buttons.

So let me point out my likes:
  • Sleeves
  • Princess seam and back yoke
  • Buttonholes
  • The tan angora wool
My dislikes:
  •  The excess fabric above the bust area on the side front.  I tried eliminating it.  No luck.
I'm planning to make a coat for my daughter using the same pattern, but view A.

Overall, I am very pleased with my new tan (neutral) coat.  A perfect winter staple for the mid-west.  

Happy Sewing!
C

Monday, February 5, 2018

Nappa Cabbage Ox Tail Stew

There is nothing like comfort food in the winter time.  This morning when I woke up it was -4 degrees.  This has truly been one of the coolest winters in a great while.  We are known for heavy snow falls.  But this year we have gotten a heavy dose of bone chilling temperatures for the month of January.  Today, February 5th, it was 14 degrees at high noon.  

Back in the day, my mom made the best soups and stews (She still does. ;-)) One of her famous stews is Ox Tail Strew.  It loaded with root vegetables, oxtails, and a hearty tomatoes broth.  I love it.  This is one of the easiest stews to make.  This time I added nappa cabbage just to change it up a bit.


Ingredients:

Approximately a 2lb Package of Oxtails (make sure there is some marbling)
One Small Nappa Cabbage 
Carrots (baby carrots or diced large ones)
Potatoes (diced)
Medium Onion (diced) 
Tomatoes (baby tomatoes or sliced large ones)
Lawry Seasoning Salt to your taste
Salt and Pepper to your taste
Bay Leaves (3 or 4)
Parsley to your taste
Small Can of Tomatoes Paste
Small Can of Tomatoes Sauce

Start by washing oxtails thoroughly and place in a large pot.  Season with salt, pepper, and Lawry's.  Add diced onion to the pot.  Fill pot with water, a few inches above meat.  Cover and place on stove, bring to boil medium high heat.  Cook until meat is tender.  Remove pot from flame to cool.

Now, prepare the other vegetables.  Wash and cut nappa cabbage into pieces, about 2" long.  Put it to the side.  Next, clean and/or peel the other vegetables as needed.


Optional: Next, I remove meat from bones, returning the meat to the pot.


Add potatoes, tomatoes, and carrots. Then add the parsley and bay leaves. 


Bring mixture to a boil.  Add tomato paste and sauce stir until completely mixed into the other liquid. Cover and let cook until potatoes are almost done. 


Add nappa cabbage last.  Cover and cook until tender.


Ready to eat.  We usually serve stew with cornbread or some type of garlic bread. 


Stay warm and eat good! C

Friday, January 19, 2018

TNT's Patterns Are My Favorites - Vogue 1314


My first "finished" project of 2018.  I needed something fast and easy to make on Monday afternoon.


Vogue 1314 is one of my go to knit dress pattern because it is quick, easy, and already to go.   It's a simple four piece pattern to is a bind right next to my table.  Perfect for a mid-western, cold as the North Pole, January day.  I first used it a few years back.  After making the necessary adjustments, it was immediately place in the TNT bind.  I use the front and back lining for the dress along with the neck band and sleeve.

The possibilities are many.  It can be used as a sloper to adjust similar style patterns.  Last year I used it with other sleeve patterns.  This basic pattern can lend itself to be morphed into a totally different dress.  The possibilities are endless.

My previous reviews are here:

Vogue 1314 The Third Time's The Charm

Getting the Most Out of Your Pattern Vogue 1314 and McCall 7542

Vogue 1314 Striped Knit Top

Oops The Wrong Fabric Choice

Self Drafted Sleeve - Vogue 1314

Sparkle Top with Bold Full Skirt

There are all of the versions of Vogue 1314 that I've had over the years.


Happy Sewing!
C


Wednesday, January 17, 2018

Practice, Practice, Practice - Bound Button Holes


"Practice makes perfect" is a well known buzz-phrase.  It's a phrase that I often use when describing how I intend to build my own skills and confidence.  For 2018 I decided to include "perfecting bound buttonholes".   The image above is my practice test using the coat fabric.  I chose the smaller version for the coat.

Finished Bound Buttonholes on the Coat


You might ask, "Don't you already know how to make them?"  My answer, "Yes, but each time I make them, I need practice like it was the very first time."  I've been working on my first coat of the year, Butterick     .  Instead of regular button holes, I made bound ones.  I'm 75 percent done with my coat and hope to reveal it soon.  But in the meantime, I wanted to share this small sewing goal with you.

On the Wrong Side of the Center Front Coat


There are several online tutorials that give you step-by-step instructions on how to make a bound buttonhole.  Below are a few with the Threads process being very close to how I made mine.  So here goes!

Threads tutorial 

Sewaholic tutorial 

LolitaPatterns tutorial 


Happy Sewing!
C

Saturday, January 6, 2018

Vogue 1525 - In Review and Not the Look for Me


I seriously debated this Rebecca Vallance outfit, Vogue 1525.  When the pattern was first published, I thought about purchasing it.  But then I thought; "No this isn't the look for me."  After seeing it made by others, I thought maybe it will work for me.

Well, throughout the entire process, I had doubts about the look on me.  In hind sight, I realized I should have simply made a muslin.  It would have told me a lot about how this outfit would look on me.

Over the weekend, I tried it on again.  I think it's the crispness of the fabric.  It has body and it falls away from my frame.  This affect makes me "thick" and I the outfit a lot on the maternity side. :-(


I think the fabric combined with the style is not a good match.

Anyway, this Chinese Red Stretch Blended Double Cloth would have been better used in a dress or jacket and skirt.  The fabric is medium weight with a crisp hand.    The good thing is I do have enough left to get a nice skirt.  Maybe I'll try that next. ;-)


As far as reviewing the pattern, it was easy to construct the garment.  It is available in sizes 6 to 22.
 
It's described as:  loose-fitting top has back invisible zipper closure, shaped front and back side panels, and long sleeves with in-seam invisible zippers. Semi-fitted pants have front pleats, back invisible zipper closure and side pockets.

There were no difficult or confusing instructions.  Pretty typical and easy to follow.

With looking at the pattern, my likes were/are:
  • The side panels of the top
  • The close or high neckline
  • Multiple cup sizes, reduced time in making adjustments
  • Style of the pants 
Dislikes:
  • How it looks on me in this fabric
The alterations/changes made:
  • Lengthen the pant
  • Omitted the invisible zippers on the sleeves
  • Reduced the length of the shoulder seam
  • Adjusted the crotch of the pants
 As far as a sewing the pattern, it's not difficult and there are no confusing steps or construction techniques to follow.  And if this style appeals to you, go for it!  Be careful with sectioning the appropriate fabric type.  Double cloth is not for this outfit.


Again, my issue is with how it looks on me and the drape of the fabric with this outfit.  What was I thinking?


Happy Sewing!  My next project is a few weeks away.
C


Wednesday, January 3, 2018

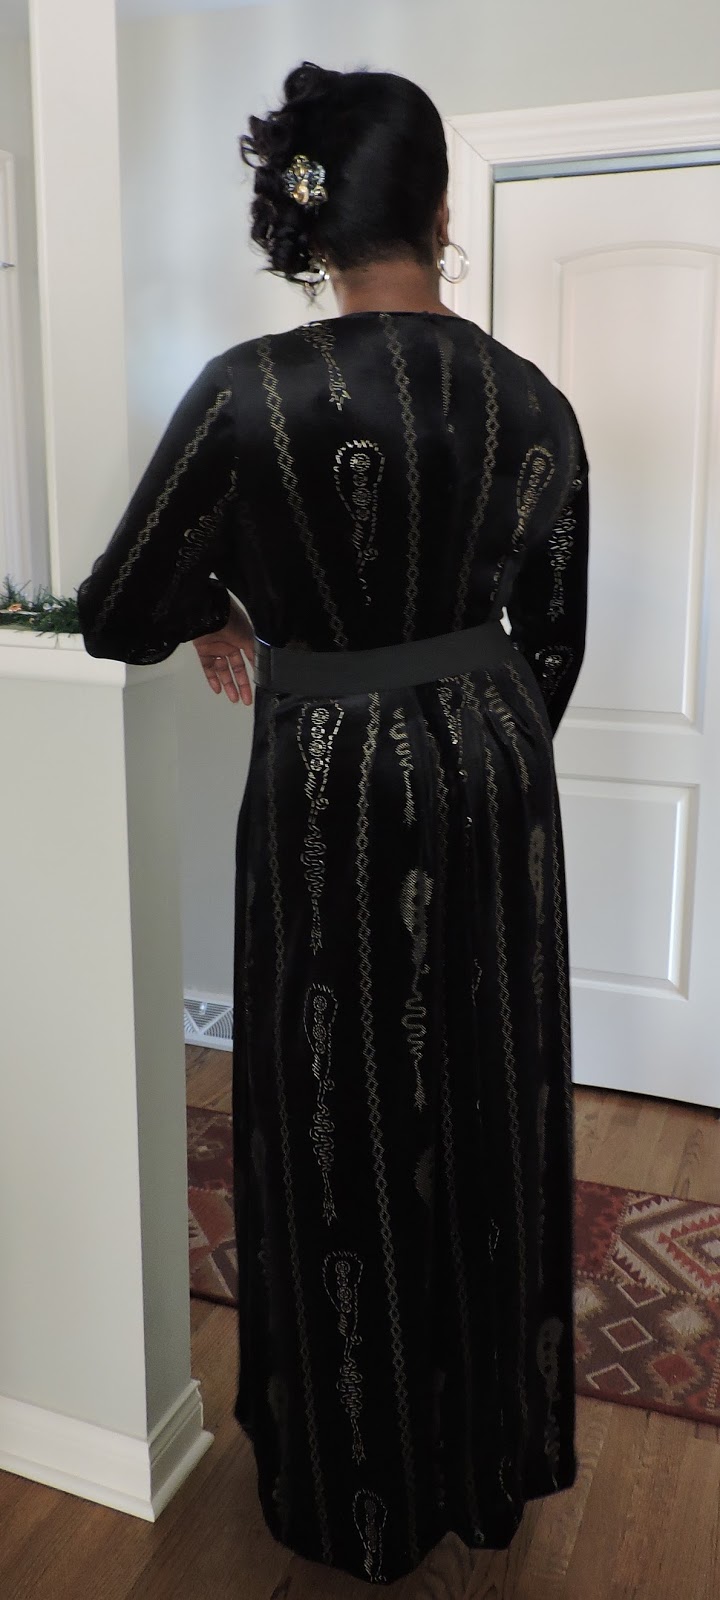
Vogue 8921 In Black-Metallic Gold Foil African-Inspired Stretch Velour


This is one of four projects that I'd hoped to finish before the end of 2017.  I barely made it finishing the hem on December 30th around mid-night.   This fabric is definitely the speaker.  No need for a lot of details to show it off.  So I decided to make another version of  Vogue 8921, view C, the first time I used this pattern was in 2014.


Forgive if the photo quality is not the best.  It is brutally cold in Illinois.  So no outdoor picture.  No way, no how.

My goal was to have this dress finished before Thanksgiving, in time for the holiday season.  But luck would have it, I missed the mark on making sure the pattern was consist on both side of the front bodice.  So last month I had to order another yard to re-cut the front bodice.  What was suppose to be quick and easy, turned into some tedious ripping out and replacing.  Once it was all done, it was a piece of cake. ;-)

First front bodice
Mood still has the fabric available on the website:  Black and Metallic Gold Foil African-Inspired Stretch Velour.  If you decide to try it, you won't be disappointed.  It has a soft and fuzzy hand.  The glossy finish speaks elegance.  You can make a super easy dress or some fancy pants.  Both will be a very easy sewing project.  My dress wears like my best pj's.  Easy on the skin and it lays gently against the body.


I did post a few pictures before my review.  First, because I wanted to include this dress in Moods LBD2017 Instagram challenge.  So this is one of two reviews that I will do this month for the network.  This black velour is a beautiful textile that should not go unnoticed.  So I did not to miss this chance to share my project and write a review.  


I had my usual adjustments with the addition of rising the front neckline about three inches and installing the invisible zipper closure at the edge of the center back of the neckline.  No hook and eye needed.  Because the zipper has inter-locking teeth, it does not roll down.

It was a bit of a challenge to get the print placement the same on both sides of the front.  I really think it is uneven as far as the spacing.  But the new front bodice halves are close to a mirror image and that was good enough for me this time. ;-)

I'm happy I finally finished the dress.  It is hanging in my closet, ready for the next appropriate social event to wear it.

That's all for now.

Happy Sewing!
C


Tuesday, January 2, 2018

Happy New Year!


Happy New Year!

It's going to be a great year! There are so many things I want to share about my thoughts and plans for the coming year. It is my desire to be more present on my blog.

There were so many projects of 2017 that didn't get posted last year. I decided that I will post a few of the fall projects to jump start my blogging again. As I sat at the computer looking at the many project photos, I decided to also include some of my least favorite projects to stay true to the reality that all projects don't turn out as expected or don't look at flattering as envisioned.

There will be no long reflective posts for the year. I consider this the worst year of blogging since I started in 2007. Although Instagram and Facebook made it easy for me to neglect my first loved social media platform. The instant posts, five seconds or less to like or ignore, took far more hours than I anticipated.

One of the challenges I set for myself is to participate in Sarah Gunn's "RTW Fast 2018".  Currently, I buy very little RTW.  I'll see if I can do it for a year.  Anyway, this is suppose to be just a short post for starting the new year.

This week I will post two reviews:  Vogue 8921 and Vogue 1525.  Both outfits finished the last weekend of the year 2017.

Happy Sewing!
C


LinkWithin

Blog Widget by LinkWithin