Showing posts with label faux leather. Show all posts

Friday, April 14, 2017

Hearts on Hearts - Mood Playful Jersey Knit Kwik Sew K4028

Worn with Simplicity faux leather leggings S1372


Today I'd like to showcase a lovely light weight jersey knit, Charcoal Hearts Poly Jersey Gray/White Hearts.  The print is exactly as it's name states.   It's perfect for a fun, funky top or a cute little summer wrap dress.  The hand is smooth and soft, the drape has a little more body than what you'd expect in a light-weight.

I can't take credit for picking this one. It's quick and easy to sew and looks great.  My daughter asked for it and those Kwik Sew Knit Top K4028, View B.  This was an extremely easy sewing project.  I was done in less than an hour.  Super easy.  The top is a great wardrobe builder.  My daughter already says she can use about two or three more of these.

Both of us only have likes for it.   Kwik Sew describes the tops as:  close fitting, pullover tops have scoop necklines, extended shoulder seams and stitched hems.  View A has cowl collar, shoulders extend into cap sleeves.  View B has draped collar and long sleeves.

The top does look like the drawing.


For modesty I brought the front neckline up about 2 inches and reduced the length of the cowl by a few inches as well.  I used between sizes small and medium.  I always happy when my DD is happy with something that I've sewn for her.


This is a very easy top that can be made by all level sewist.  As for the fabric the online photo does not do it justice.  It's a basic jersey knit with a great funky print.

Happy Sewing!
C

Sunday, March 1, 2015

Bags in My Clutches - Clutch Modified


Last week I posted a tutorial on  a DIY faux fur and leather clutch.  In my stash I have several remnants of faux leather and fur.  So on Thursday afternoon I decided to further explore possible variations of the initial bag.


This bottom edge looks crooked, but it's actually straight.  I was afraid to press it.

Here is what I came up with.  I made a few clutch purses and some tech/portfolio bags.  The possibilities are endless.  You basically cut two rectangles for the purse and two rectangles for the lining.  Create an interesting finished edge. The hardest part of the construction process is installing the zipper.

Happy Sewing!
C
 

Monday, February 16, 2015

DIY - Faux Fur/Leather Clutch


Over the weekend I was so happy to finally complete some of the many, many sewing projects on my list.  I must admit that it has been a bit of a challenge to organize projects and to think about the next phase of my sewing and creative life.


At the Christmas luncheon, Rhonda Buss, carried a super cute fur clutch.  The minute I saw it, I wanted it and made a mental note to add making a faux fur clutch to my list.  This was an easy, simple project.  And luckily, all of the supplies were already in my stash.

To make it you'll need:


Faux fur (Mine's was leftover from this jacket project.  The scraps were too nice to trash.  So I kept them in a bin along with several other remnants.)
Faux leather (or genuine leather)
Lining (remnant)
Felt
Zipper
Pellon #805 Wonder Under Fusible Web
Thread and other basic sewing tools

Steps:
  • Determine the size purse you would like to make
  • Cut the faux fur, leather, and lining based on the dimensions you chose.  Add seam allowances. (Mine was 13.5" X 11" plus seam allowances.)
  • Fuse one side of the wonder under fusible web to the wrong side of the faux fur.
  • Let cool.

  • Remove the wax paper backing and fuse the felt to the other side of the Wonder Under.  The wrong side of the faux fur is now felt.  This adds body to the faux fur.  The faux leather already had a felt backing.

  • Cut a 2" X 1.25" strip of leather.  Fold it in half the long way.  Edge stitch about 1/8" away from the edge.  This strip will be use to cover the zipper stop.
  • Sew the strip to the zipper tape.

  • Sew the faux fur and leather to the zipper tape.
  • Sew the lining to the zipper tape.  The zipper tape on each side should be sandwiched between the lining and the fabric.


  • Edge stitch the lining near the zipper teeth so that it will not get catch in the zipper when you open and close the purse.
  • Put the right sides of the purse together.  Sew the remaining three sides together.
  • Do the same for the lining, leaving a six inch opening at the bottom to turn the purse inside out.
  • Turn the purse inside out and finger press the seams.

  • Stitch the remaining lining together.
  • You're done!


  • You can use it as a purse or a tech case.  The choice is yours. 


Parting Shot:  Rhonda Buss gave a talk on sleeves at the Chicago Chapter American Sewing Guild meeting Friday evening.  The sleeves on this coat are spectacular.


Happy Sewing!
C

Friday, September 19, 2014

Trendy Embossed Faux Leather Skirt - McCall's 6842-A In Review


Today's post is on trend with a little circle embossed faux leather skirt for my daughter. She loves McCall 6842 and has been asking for a skirt since I purchased this pattern several months ago. These days we are seeing fuller skirts in all types of textures and lengths. Also on trend for this fall are embossed leather minis. So for this project I decided to combination the two trends and came up with an embossed faux leather mini circle skirt. My DD is well pleased with the skirt and has already asked for another.
This isn't the first time I reviewed this pattern. I made it for myself last winter. So I won't take time to described it again. That information can be found in my first post. What I'd like to review is the sewing process and how I handled the faux leather. I purchased the fabric at Vogue about a month ago, thinking it would be a great fabric to make my daughter a skirt. It looks like some of the embossed leathers I've seen in stores. The feel is smooth and supple. The wrong side is knit. So the fabric has some stretch to it.


When sewing with the two wrong sides on the outside, I had no problems. But any sewing with the right side out was a challenge. I do not have a teflon foot. So I used waxed paper when sewing on the right side of the fabric. This made it easy to sew. Any holes made in the fabric are permanent. So it is important to take your time and know precisely where want to stitch.  Work out all fitting issues before starting.


When sewing the zipper, I used very fine straight pins to anchor the zipper until I sewed it to the fabric.  The pins were strategically placed where I would make the final stitching. It worked and there is no evidence of additional holes along the zipper. When top stitching with the right sides against plate and the foot, I sandwiched the skirt between two pieces of waxed paper having the edges even with the edge of the skirt.

Only minor changes were made: I used a size 12 (size 10 at waist) only adding 1.5" to the length of it. To minimize the stitching, I didn't stay stitch the upper edge of the circle. I carefully made 3/8" clippings along the edge as needed. I top stitched the waist for added security. No pressing; but I thought about top stitching where the yoke and circle are joined. No hem; I've seem this treatment on garments made with neoprene as well as other RTW faux leather garments. Besides I thought it would be a bear trying to hem this fabric in the circle.

This is a great project to start my fall sewing. The pattern is easy and the embossed faux leather adds a little interest to it. My daughter loves the new skirt. My too! ;-) I'm sure this will be a favorite skirt for fall 2014.

Happy Sewing and Have a Fantastic Weekend!
Cennetta

PS - I'm still reviewing some summer garments.

Wednesday, March 26, 2014

Simple Pattern Meets Audacious Fabric - McCall 3830


On Pinterest you can always find runway photos of outrageous fashion designs with over the top embellishment or over the top fabric manipulation.  The designer's runway is the perfect place for inspiration to make garments for the "real way" or "real life".   

My sister asked me to make her a special garment, a skirt.  We went to one of the major textile stores in Chicago to see what we could find.  We walked out with three yards of a "simple finely woven mesh" with strips of faux leather and ribbon/sequins sewn to it.  My sister just wanted a simple skirt made out of it.  She bought enough so that I could get one too, plus a bunch of other fabrics.  ;-)

So this is where the marrying of  simple McCall 3830 and the audacious faux leather/lace skirt began.  The pattern pieces used where the front and back skirt.  I had to figure out how to eliminate the transparency.  So I underlined it with another layer of mesh fabric and lined the skirt with black tricot.


The skirt:  Simple, right?  Not so simple with this fabric.  The challenge was to line up the faux leather strips and the lace so that it matched all the way around.  This was accomplished by aligning the notches of the front and back skirt.  Also, checking the bottom edge to make sure it was even.  As a safety precaution, I added three inches just in case. After carefully cutting the front and back skirt pieces, I underlined it with the mesh.  JuliaBobbin has a tutorial on how to underline lace fabric here. Also, I did a similar process on a lace dress here.

Next obstacle was to determine the curve of the darts to eliminate inconsistency in the fabric.  This was a little tricky. I changed the curve and end point of the dart to avoid sewing the floating circles.

Finally to hem the skirt, I simply measured where the hem should be; removed the faux leather strips; and cut both layers of the mesh about a 1/2" below the last row of the faux leather.

The lining:  I used the skirt pattern for the lining.  I sewed it to the waist of the skirt after the zipper (invisible) was installed and the stay tape was sewn to the waist.  The hem of the lining stops about 1 1/2" above the hem of the skirt.

I'm happy with the results and so was my sister.  So, using the very simple pattern with a standout fabric makes this skirt special.  The project was not hard to do, it just took a little time to figure out how to achieve it.


Happy Sewing!
C


Friday, February 3, 2012

Mixed Materials - Burda Style 7303


Today, is the first time in a long time I was able to get some blogging done. I've missed going to my favorite places for inspiration and motivation. So I am grateful to have a few hours to post about a few projects that were finished in January.

This first one, I contemplated throwing in the trash. I had a few fitting issues and construction woes. Then on Monday, I decided to remove the hem of the jacket, for the third time, hoping to get it to lie flat. It's better, but still not 100 percent. I think part of the problem may be due to the loose weave of the fabric and how I attached the lining to the armhole of the sleeve. That's my best guess.

So on Wednesday, I decided to wear my trendy, mix media outfit to work. Here's how I wore it.


Burda Style 7303 - complete review:

Pattern Description: Collarless princess seam jacket with pocket welts and sleeve variation. An almost A-line skirt with center seam option.

Pattern Sizing: This pattern comes in sizes 10 to 20. I used a size 14 with modifications.

Did it look like the photo/drawing on the pattern envelope once you were done sewing with it? It does look like the photo minus the trimming.

Were the instructions easy to follow? There is nothing confusing in them. I don't like attaching the interfacing to the lining. I skipped that. It didn't really need it; the skirt is faux leather. I did, however, add seam binding to the waist of the skirt for stability.

What did you particularly like or dislike about the pattern? I like the classic style of the suit, and I thought it would be a good pattern to try my first mix materials garment. No serious dislikes.

Fabric Used: remnant boucle from Vogue, faux leather from Hancock's, red polyester lining from my stash, and black polyester charmeuse from Rainbow Fabrics.

Pattern alterations or any design changes you made:


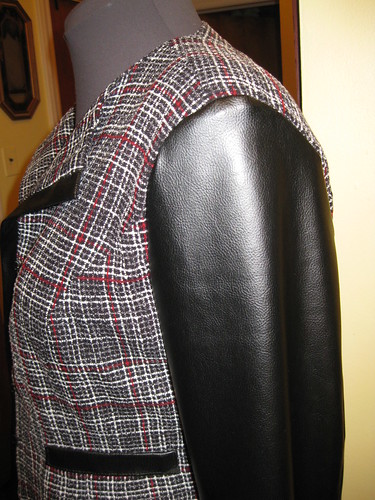
Of course I made my usual adjustments: FBA, prominent shoulder blades, and lengthened the skirt a few inches. I also took most of the ease out of the sleeve cap, but later realized I should have left it in. The faux leather does not have much give and is snug around the upper part of my arm.


My design changes include:
- faux leather sleeves and pocket welts for the jacket.
- exposed zipper on the skirt.
- I like the front center open with the front facing folder down. It's the opposite of how the model is wearing the jacket.

Mishap #1 - While trying to get that final press before wearing the outfit, I touched to faux leather welt with the iron. So it lost some of the shine and "plastic" too. lol


Mishap #2 - I used a pressing clothe, but there are some areas of the faux leather that lost it's shaping and some luster. I probably had the iron too hot. So this is a point that you should consider if you plan to make a faux leather garment.

Would you sew it again? Would you recommend it to others? Not sure. I have many patterns to try. But I do recommend it.

Conclusion: Although I had a few mishaps with this sewing project, I received a lot of compliments. It's not hard to sew. And I think the jacket is good for making a Chanel style jacket.

All photos can be found here.


Saturday, December 17, 2011

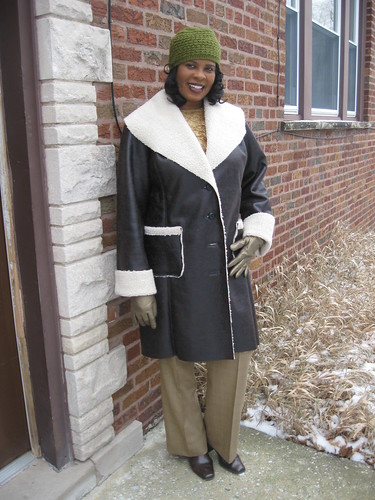
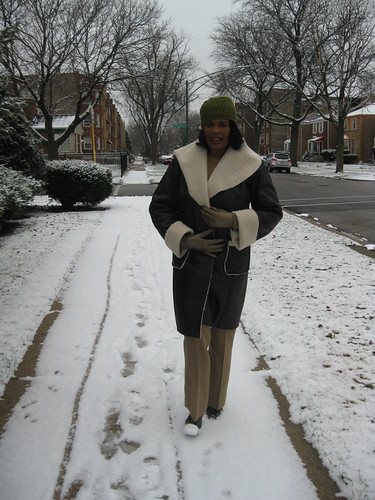
Faux leather/shearling and Simplicity 4356 - A Perfect Match


I've wanted a faux leather/shearling coat for over two years. I thought about making Vogue 1198, but that wasn't quite the look I was thinking when I first envisioned a faux leather/shearling as part of my winter arsenal. So I started researching online stores and found a few that I liked at Nordstorm. Once I found the inspiration coat, purchasing the fabric was easy. Vogue (Roosevelt Rd.) has a large section of faux suede and faux leather shearling many colors. I went with this rugged texture.


I didn't necessarily want to replicate the Nordstorm coat, but to find a silhouette that match the pattern I was thinking about using hoping the design would be a good match for the fabric.

This morning I woke up to snow which I could do without for another twelve months.  The blizzard of 2011 was enough to last me a lonnnngg time.


Simplicity 4356

There is not a lot of descriptive information on the pattern envelope.  But I described this view as a shawl collar princess seam coat with patch pocket and cuffs.  It comes in sizes 6 - 22. This pattern has been around for a while. I used it to make view C for my sister in 2006.
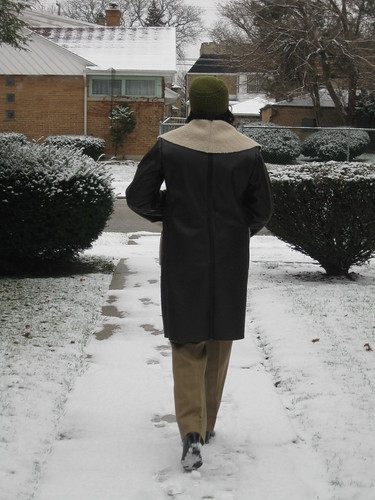

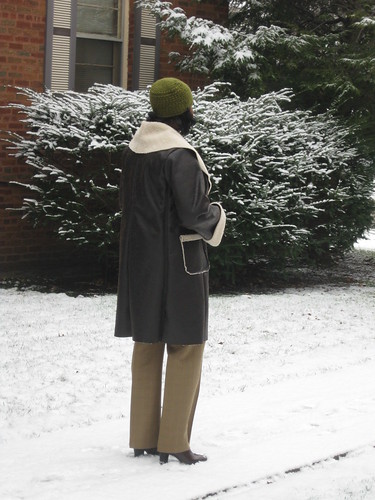
My coat has the basic silhouette of View A, but I made many changes to create the look I was going for. Most of the instruction were skipped because of way I wanted to use the fabric. But the basic construction method were the same as described in the sewing directions. This pattern is good basic shawl collar jacket/coat pattern. It's a keeper. I didn't have any dislike for it.


My changes were many -
  • I omitted the front facing and the use of the block for binding.
  • The pocket were finished by turning the shearling to the right side of it; then stitched.  Next, I attached the pocket to the coat with the raw edges exposed.
  • To finish the center back of the collar, I following the same instructions for the cuff on the sleeve (#11 and #12).
  • I made a FBA and prominent shoulder blade adjustment.  The fabric has almost zero give.  So I cut the coat one size bigger to make sure I had enough wearing ease.
  • I eliminated most of the ease of the sleeve cap because of the bulky,stiff fabric.
  • None of the raw edges were finished.  
  • Added about an inch to the center front; made buttonholes.
  • I lengthen the coat about two inches.
I can't say that I will or will not sew the coat again.  I do like the purse and may make it using the leftover fabric from this project.  This pattern is versatile and can be used as the basis for designing your own coat or jacket.  I recommend it to other sewists.  It not a difficult coat to sew.  And the instructions for adding the binding are not hard. 

More pictures can be found here on Flickr.
This is a fairly easy pattern to sew that will produce good result.  I love my new coat and I will get a lot of use out of it.   I'm wearing a Butterick top made years before I started blogging and Simplicity pants 2860 made October 2008


LinkWithin

Blog Widget by LinkWithin