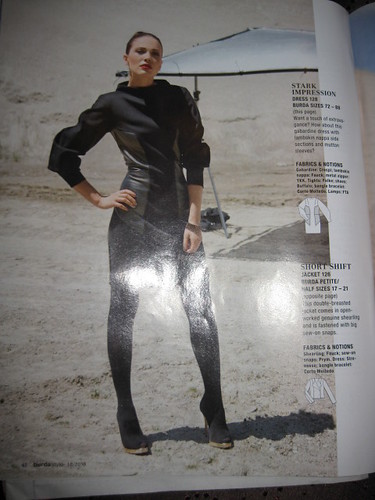
Last year my sister and I looked through Burda magazine and decided that this would be a good dress put in the fashion show.
At the time, I didn't really think about the design lines and how they would impact fitting. My sister is easy to fit; she is tall and slim. I just have to make it long enough.
There are some adjustments needed. This dress designed for tall women. I traced off the size 12/84. After cutting out the pattern, I laid the front, back, and side panels out to see how they would fit together. I noticed that the upper and lower side panels do not meet evenly; they overlap by about two inches. That was the first red flag. So I logged onto the net to see if anyone had made this dress. ... not a soul. Back to the measuring board. I rechecked the pieces. They didn't come togehter. Still I thought, "this might not be too bad." I can always trim off the extra fabric.
So I proceed to cut out the dress. (Good thing is, I have enough of the contrasting fabric to cut the side panels again.) Tuesday, was the first fitting. I didn't want to sew it; so I pinned it together.
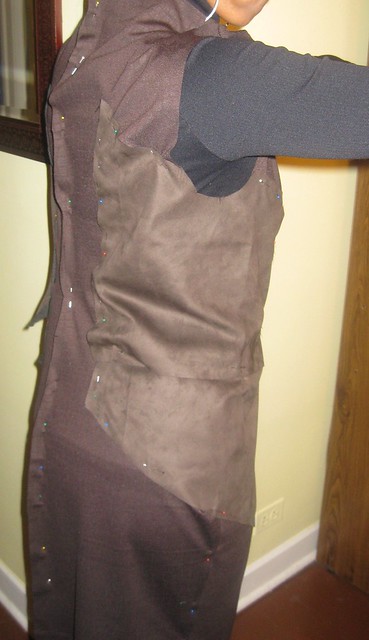
Lo and behold the panels overlapped and did not fit the curve of the body.
Pictures are worth a thousand words. I noticed that the lower section of the armhole is too low. Moving the upper side panel would eliminate the overlap at the waistline. Now the seam allowance at the top of the panel is huge.
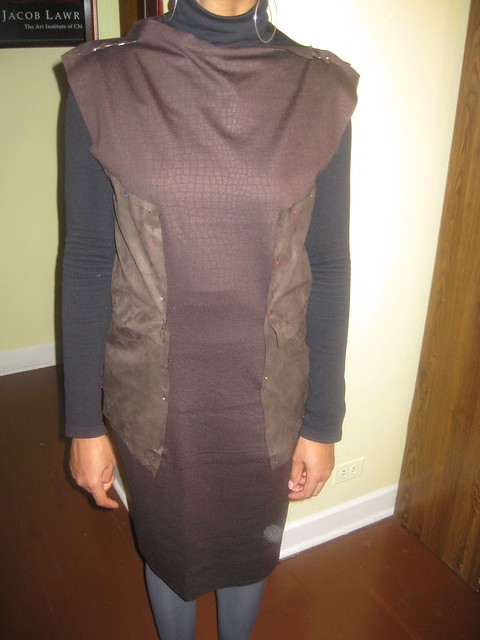
The dress on the model curves to her body. The drawing in the magazine is boxy. And the dress is boxy on DS.
After seeing the shapeless dress on her, I felt a little like Winney the Pooh when he is faced with a dilemma..., "Think, think, think"... Then I came up with two possible solutions: redraft the side panels and cut them again or cut the panels (current) in half to create four pieces upper front, upper back, lower, front and lower back. Then reshape those pieces to fit the curve of her body.
So to get a visual, I pinned out the excess fabric along the sides.
Next observation: size 12/84 is too big for her. She fits size 12 (big four pattern companies); but this size 12 is a few inches above her size. Size 80/10 would have been closer to her size.
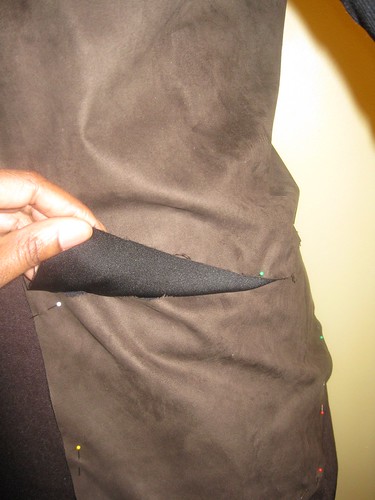
Final observation: Both the front and back have four points where the panels are joined to the front and back of the dress. These areas must be perfectly aligned to look good. (I think I picked a "good" one with a few challenges.)
The instructions state: "Lay front and back pieces on seam allowances of the side pieces, with wrong side facing right side and stitch." The instructions didn't say anything about turning under the seam allowance of the panels.
What do you think? Any suggestions/advice would be greatly appreciated.


When I saw your link on my blog, I thought goody I've been dying for someone to make this dress. What a disappointment and so unlike Burda to fit so badly. My first thinking is that aside from being to big on her, is that her waist is just not where Burda has it. You seem to be going in the right direction though. I think that I'd figure out where her waist is in relation to the patterns and shorten that piece to match. I'd alter it at the waist or you'll never get it to fit together. I also think that the shoulder is too wide? Hard to tell without the sleeves in.
ReplyDeleteThanks Nancy K
ReplyDeleteI try to fit the waist first. I didn't pin out the darts at the inner shoulders. I will sew them before the next fitting.
Thanks again!
Perhaps an idea to re-rip all the pieces and place them flat on the table, then draw the patterns of dress again but in a smaller size, place these above parts and re-cut dress ...
ReplyDeleteWhat is the same ... beginning a new dress in a size less.
I have sewn a lifetime with Burda and always I have to get a size less than my share, I asked other sewistas and happens all the same.
Don't know that I have anything more to offer than what's been said already. I do hope that you manage to tame the pattern. That's one interestin dress!
ReplyDeleteI agree that this dress would be stunning on your sister. I read through the pattern instructions and here is my interpretation. They are assuming you are using leather for the side inset pieces. And the method they tell you to use to attach the leather side pieces to the dress is a technique often used for leather or fabrics that don't fray. It looks like you are using faux suede for the side insets. This will look fantastic, but it is softer than leather and may affect fit of dress in waist area. And you will need to decide if you can use the sewing technique they suggest. 5/8“ seam allowances should have been added to all edges of the pattern pieces (except hems) when the garment pieces were cut out of the dress fabric and the leather/suede. But now they tell you to trim off the seam allowances (vertical and horizontal) of all section seams of front and back pieces. To me that means trim off all seam allowances of the front and back dress pieces (1&4) around the opening where the side pieces will be sewn.
ReplyDeleteSide pieces 2&3 should have been cut with a seam allowance added to the pattern edge too. This is where the instruction say the opposite of what I would have expected. The instructions tell you to overlap the trimmed edges of the front and back dress pieces over the seam allowances of the leather side inserts and top stitch 3/16 (very close) from the raw edge. I would have expected the instructions to have the leather placed on top of the dress fabric and topstitched, because the leather won't fray. You could use traditional seaming when inserting the side pieces ( assuming you haven't cut off the seam allowances yet), but you will have 4 inset corners to sew. Other thoughts..,if you raise the panels to decrease the size of the armholes, you will affect the arm hole opening the sleeve is sewn into, and putting a side seam in the side panels might make it easier to make the dress more fitted. I know this must be frustrating, but based on the other wonderful garments you have made, I am convinced you will make this work. Hope this helps.
I'd guess that the dress is being held together with a laundry clip in the model photo, and that's why it appears to fit so well! But, to the fray...
ReplyDeleteYou might wish to at least pin the shoulder darts together before fitting lower down, as they'll change the orientation of the fabric's drape.
Secondly, you'll probably find the side panels will fit much better if you DO sew them together first - there's a curve built into that waist seam that makes the panel flare at the top and bottom (I looked at my Burda) - AHA! yep, that's why they're built out of two pieces and not a single one. Then, once sewn into a single side panel, you'll be free to align it to your DS's waistline - the CF and CB panels have NO waist seams! The large overlap is likely there to ensure some fitting room.
Finally, if you still think there's too much room in the waist, those side panels could easily be tucked a little closer to CF & CB as needed.
Me, I'd sew these side panels in with right sides together - it would make for a much prettier finish. I think Burda avoided that so as not to put off people who are leery of sewing corners, but you could cope with them easily, I'm sure.
Good luck!
Thanks ladies. Very helpful information. Your suggestions are taken into consideration. I think I can figure out how to bring it all together without pulling my hair out.
ReplyDeleteC
Looks like you're on the right track with the fitting. My take on the seams is that Burda is having you do a lapped seam with the leather inserts. Because the leather is thicker and stiffer, it will not inset as well as a fabric would. It is easier to make the lapped seam and just topstitch the two pieces together. Inset corners are hard enough in regular fabric, let alone leather which you can not take out and restitch.
ReplyDelete