Tuesday, May 19, 2020

My New Floaty Romantic Dress - McCall M7974 -


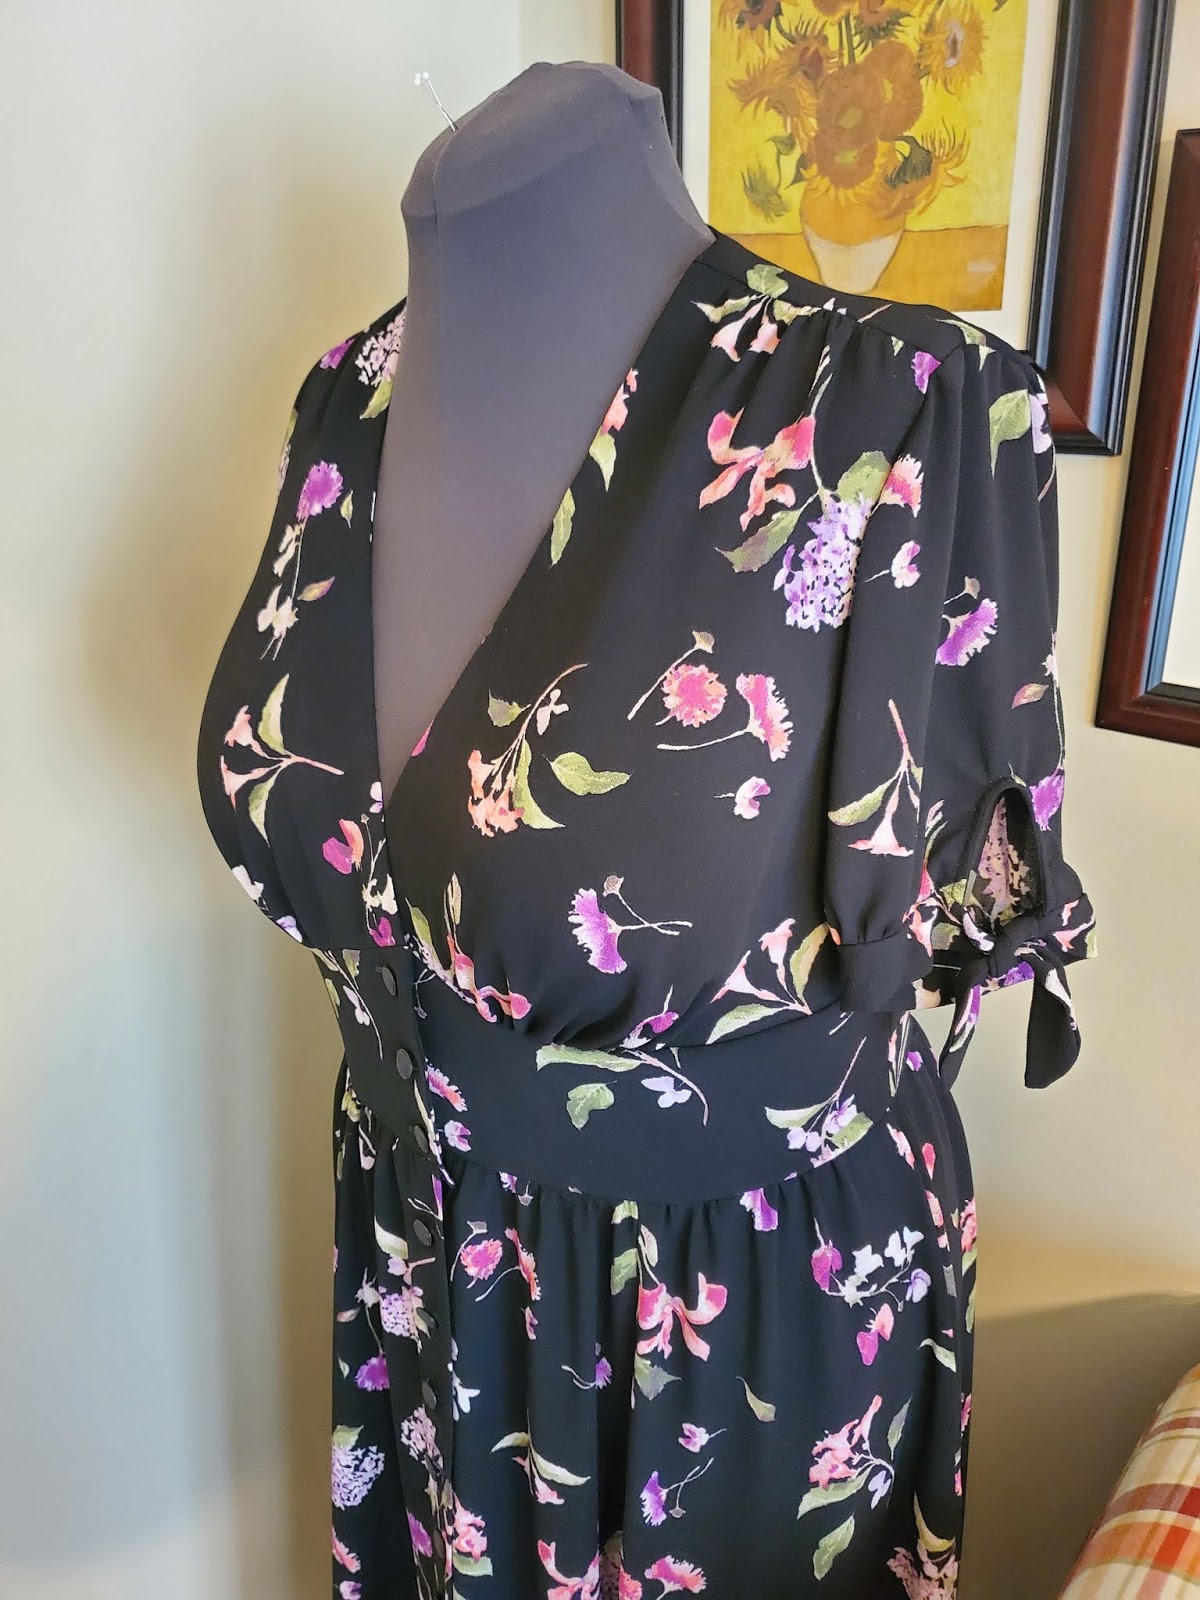
This is one of those feel good and pretty dresses that you cherish for years to come.  I love the way it moves.  The floaty fabric dances about you as you walk.   It feels soft and spongy.  The surface has that pebble crepe texture, but it is not rough. 

This is a closeout fabric that I purchased from Mood Fabric last winter.  The fabric was labelled item# 327930 Black Byzantium and Sage Green Polyester Crepe.  Unfortunately, it is no longer available.


This pattern has been made by so many fabulous sewists on Instagram.   All of the beautiful dresses that I saw inspired me to make it too.  I put it on my "To Make List" last year in July soon after I purchased the pattern.  And I think around September I made the pattern adjustments.  I didn't see the need to make a muslin because I'd made dresses with a similar front bodice.  So, I just went from adjusting to laying out the pattern and cutting the dress out. 

I was able to make my own romantic floaty floral dress for which I am very pleased.  So hear is my review.  


The pattern description  given by McCall's  is misses' dresses: buttoned front dress. A, B. C. D has sleeve and length variations, fitted bodice with front midriff, back yoke and gathered skirt with side seam pockets.

It is available in sizes 6 to 22.  I used 16 with modifications.

I made view A with the length between A and C. The skirt takes up a lot of yardage.  I had four yards of the crepe.  It wasn't enough for the length of view C.  

My dress does look like the illustrations.  The bodice is less fitted then I expected.  And that is true for the dress on the model pictured on the envelope.  The "V" neck is deep.  So I am wearing a lace trim full slip underneath.  It's needed for modesty for the dress as a whole because of transparency.  

The instructions were typical.  I've seen these steps in many, many other similar patterns.  There was nothing confusing in them.


My likes for this dress are many:
  • The sleeves of view A and C
  • "V" neckline and midriff
  • The yoke back
  • The fullness of the six panel skirt
  • Buttons instead of zipper.  Nice change
Dislikes:
  • None

I made my usual fit adjustments:


  • FBA -  I started out with a much larger adjustment.  I changed it.  So It might be a little hard to follow what was done.  But here is the photo of the front bodice and the facing.

  • Prominent Shoulder Blades - I added about an inch to the width of the back.  Then gathered the excess for more ease at the shoulder blades.  At the waist, I just gathered at center back.  So it slightly change the design.  Excess could also be taken up with waist darts.  I followed the design with gathers. 
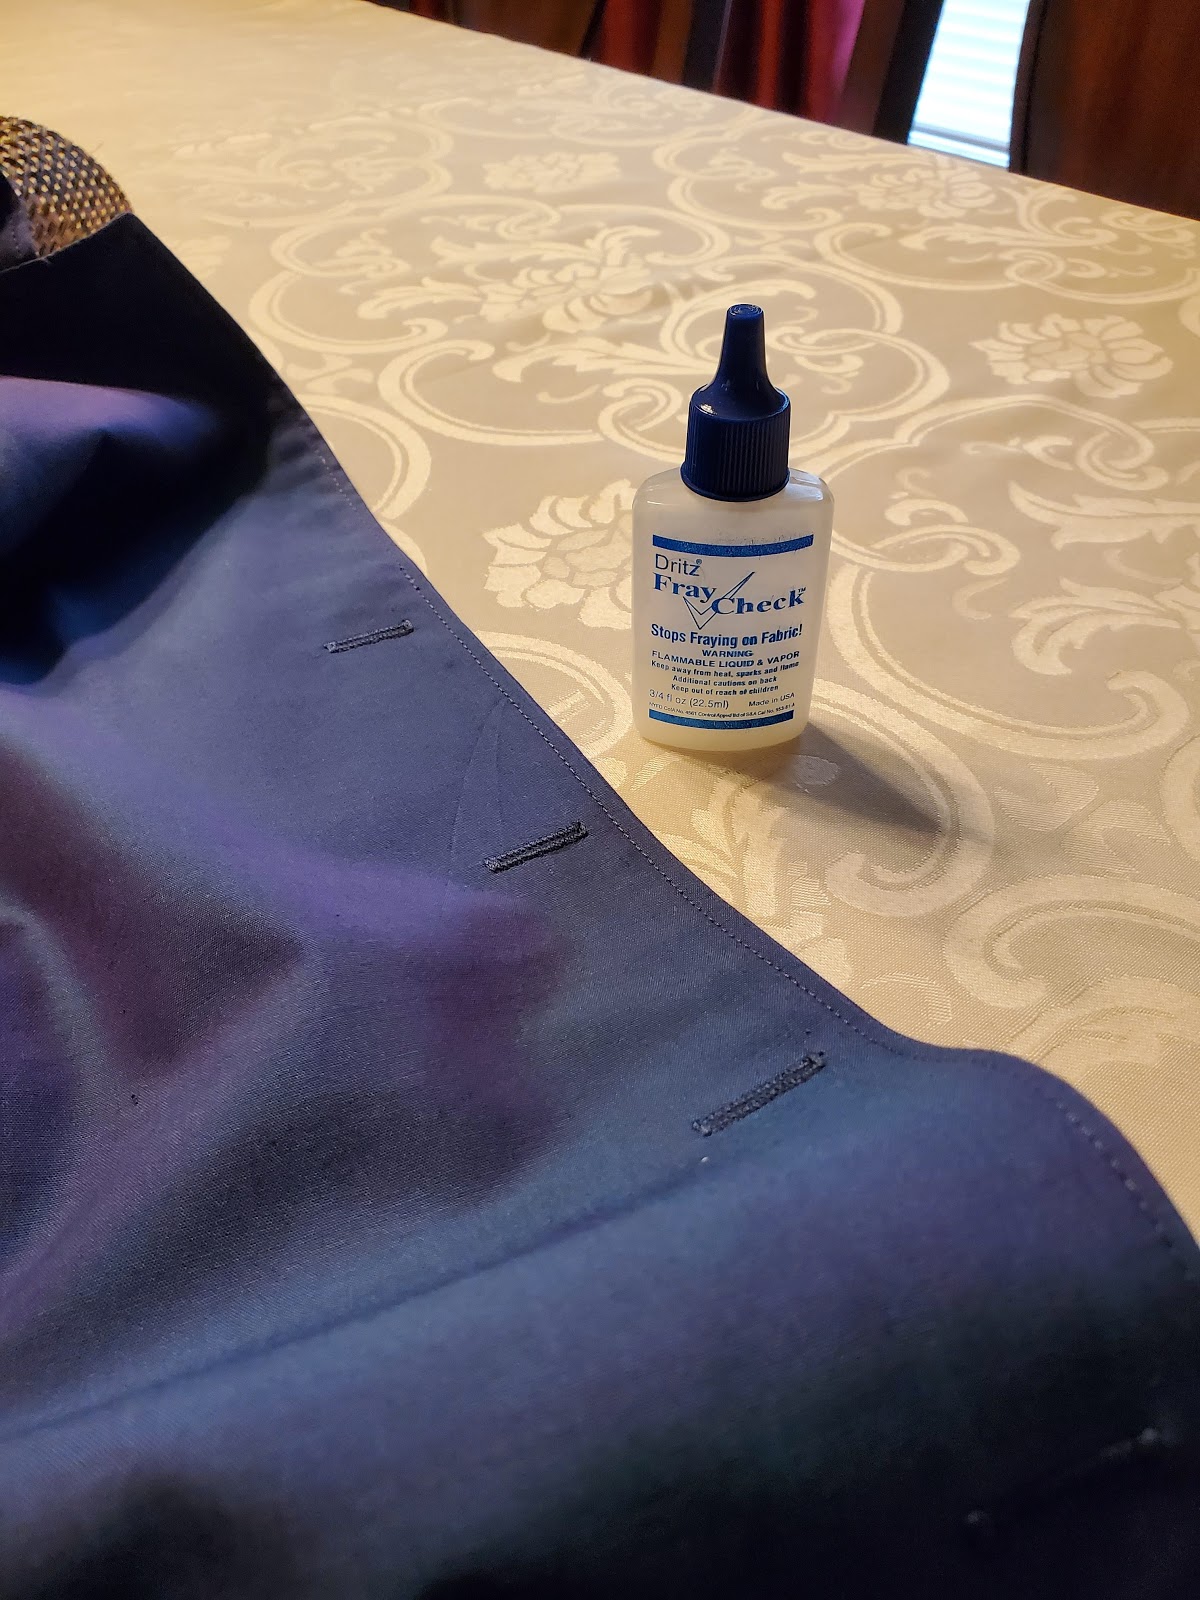
  • I used a bias strip of the fabric to finish the keyhole on the sleeve.  It looks better to me. ;-)
  • Skirt Length Change - I just cut it where I wanted between view A and C.

My chest needs some sun. Tee Hee.


Of course, I have to make it again in a solid color next time. I highly recommend this dress to others.  There are a lot of buttonholes to sew and a lot of gathers to make, but it is worth it.  In the end, you will have a lovely dress.

I  am glad I decided to make it.  I think the sleeves of view A and C are adorable, and I will probably mix and match them with other patterns.   

Happy Sewing!
C


Monday, May 18, 2020

The Shirt Project 2020 - Simplicity S1166 In Review


The making of these three shirts is the beginning of my second Shirt Project.  About two weeks ago, I found the shirts in a bag while inventorying my UFO bin.  Everything was already cut and marked.  All I needed to do was sew them.  This was the perfect project to finish while I wait for my button order to arrive.

I made this shirt once before, but I didn't do a full pattern review.  So today I'd like to share my thoughts on this pattern. 

Simplicity almost never gives a good description of the pattern views. For this one they just said, "Misses' blouse, skirt, and bra top.  How vague is that?


My description for view B - Misses' blouse with dolman like 3/4 length cuffed sleeves with wide collar and curved hem.


The pattern comes in sizes 6 to 24. The sizes are grouped: 6-14  and 16-24.  I used size 14 with modifications.

This drawing and the envelope photo do not match.  The drawing is the same silhouette as my blouse, but the blouse on the model is different.  Either the blouse she is wearing  is three sizes too big or the pattern design is for an all together different pattern than what is provided in the envelope.


The instructions were easy, and I didn't see anything confusing in them.  I did make some fit adjustments and minor changes for my versions.

My likes:
  • Sleeve design
  • Wide collar
  • Cuffs
No real dislikes other than the misinterpretation of the design modelled on the envelope.


I used three different fabrics from three different sources:
The pattern alterations are some of my usual adjustments:  FBA plus I lowered the bust dart; and I lengthen the blouse about a few inches.

Design/Construction changes:  I did something a little different for each blouse
  • White - No top-stitching except for the cuffs.  I didn't do a rolled hem.  I serged, turned and sewed the hem.  Added darts to the back.  Stitched in the ditch of the shoulder seams instead of tacking the facing to it.
  • Stripe - Followed the instructions except for the hem and tacking the facing to the shoulder seams.  The collar design change for this one was due to limited amount of striped fabric.  I didn't have enough for both upper and lower collars.  So I used some of the white pima for the under collar.
  • Blue - Same as the stripe blouse. No design change.

So far I've made a total of four blouses using this pattern.  Why stop now?  I can see myself using it again.  And I do recommend it to others.  It's an easy sew.  All level sewists can enjoy making this blouse.

I noticed a few areas where I could tweak the fit a little more.  But overall I'm pretty pleased with how these turned out. They are good wardrobe staples and will be in high rotation.  Perfect pairing with jeans and pull-on pants.  


My tips:

Buttonholes
Collar

My first blouse made 2016.


Side Note:  Whenever I make shirts, I include at least one white one.  You can never have too many. ;-)


Happy Sewing!
C


Sunday, May 17, 2020

Butterick B6090 - The Final Notes


I'm happy to post my final review on Butterick B6090.  This dress was a great project.  I don't know why it took me so long the make this dress.  Almost six years between initial fit to finished dress.


Pattern Description: Misses' dress fitted bodice with yoke and slightly flared skirt with pleats, collar gathered at the front yoke, button front in-seam pockets, and sleeve variations.


Pattern Sizing:  I used size 16 with modifications.  All of the deets of the fit and alterations are posted in my Notes on a Pattern Butterick B6090

Did it look like the photo/drawing on the pattern envelope once you were done sewing with it? Yes, I think my dress has a little more ease in it.  But it is all good.


Were the instructions easy to follow? The instructions were typical; nothing confusing or difficult about them.


What did you particularly like or dislike about the pattern?  My likes:  gathered yoke, pleated skirt, and vintage style about the dress.  No dislikes.


Fabric Used: I used this lovely rayon challis from Vogue Fabrics.  It has been in my fabric collection for several years.  The pairing of the dress and fabric were perfect.  I love the way the fabric glides across the body.  It's soft and fluid.  The polka-dot "heart" print is cute too.

Waving at one of my neighbors during my little photo shoot.

Pattern alterations or any design changes you made: So many fit adjustments.  All detailed in previous post.  Link above.  I only made two minor design changes: I didn't have enough fabric to make the sleeves long enough.  So I added a little sleeve band to compensate for the difference in length.  And I omitted the pockets.


Would you sew it again? Would you recommend it to others? All the work put onto the fit and adjustments I MUST make it at least once more.  Hopefully, within the next year.  If you have it, and it is your style, sure I recommend it.  It is easy to sew.  The hardest part is making sure it fits.


Conclusion: I am so pleased to finally make this dress.  It is definitely my style.  I love the yoked neckline and the pleated skirt.  It is the perfect length for me.


So until next time,  "Happy Sewing".
Cennetta


Friday, May 15, 2020

Shirt Making Project Spring/Summer 2020 - Simplicity S1166


Sometime in January, I decided to do another "Shirt Making Project".  To start, I cut out three shirt using Simplicity S1166.  These shirts were in a bag in the UFO bin that I had almost forgotten about.  This week I decided it was about time I made them.  This is a pattern that I used before.  The initial review and project here.

I like the shape of the collar and design of the sleeves.  These details make it a little better than your average button down shirt (to me).  They can  also make or break the project as they are focal points of the garment. Making this batch of shirts was an opportunity to do a lot of top-stitching and paying attention to the simple details and construction processes.

Tip 1:  Construction of the Collar

The collar is large and curvy ending in the typical point on each end.  There are a few approaches to making the point just right.  I posted Sandra Betzina's method of redrafting the collar pattern.  The details:  Part I and Part II


For these shirts I used another method.  Sorry I don't know what it is called.  But, instead of sewing the seam and pivoting at the corner.  I made it "squared" at the corner then I pivoted to continue.  This is done in addition to "not" interfacing the corners of the collar.


The next few steps are critical:  Use a pointer/creaser to help turn the collar inside out using the point to push the tip of the collar out.

Next, this is key:  Pressing.  I made sure I gave that collar a great press.


My last step is the top-stitching.  I use thread at each point to help guide the collar under the needle.  Often, at the corners of a garment it is difficult to get the end to move through the stitching area.


This method is also good for the cuffs.


Tip 2:  Construction of the Buttonholes

These days I'm making a lot of garments that button down the front.  This is another focal point and I want it to look as good as possible.  I've said this many times before.  I test before I do it on my actual project.  And for each shirt, each type of fabric I tested making the buttonholes.

After successful testing, I sew the buttonholes on my garment.  They are not complete without some Dritz Fray Check.  After the buttonholes are constructed, I apply fray check and allow it to completely dry before opening the buttonholes.

So that's it for my tips.  I hope this information is helpful.

Happy Sewing!

C

Thursday, May 14, 2020

This and That

Hi everyone,

It's been awhile.  I hope everyone is well and staying safe.  I only go out to the grocery store and to the park for walks.  This week has been very productive for me.  I've been spending a lot of time in my sewing studio, and I'm loving it!

Several weeks ago, I posted about making masks.  Well I'm still making them.  I've received so many requests for them!  And it's so hard to say no.  So, I worked out a strategy for sewing masks and sewing for myself: make several masks, make two dresses for myself.  Or make several masks, make three shirts for myself.  It's working. :-)

So hopefully, I'll have pictures and reviews to post soon.  Sometimes it takes awhile for me to get the photos needed to complete a post.  In the meantime, I'll continue to enjoy the extra sewing time.


I received the best gift for Mother's Day.  My DD knows that I'm a Prince fan, like forever.  So she created a Prince gift basket for me.  It included Prince's autobiography "Prince, The Beautiful Ones", The "Prince Fashion" book, and "When Doves Cry" body scrub and wash.  Great gift!

Today, I wanted to include some photos of the costumes designed for Prince.  Great eye candy and inspiration for any sewing enthusiast.  The costumes are SPECTACULAR!  Enjoy!


LinkWithin

Blog Widget by LinkWithin