Thursday, July 28, 2011

Knit Tops A Plenty - M6036


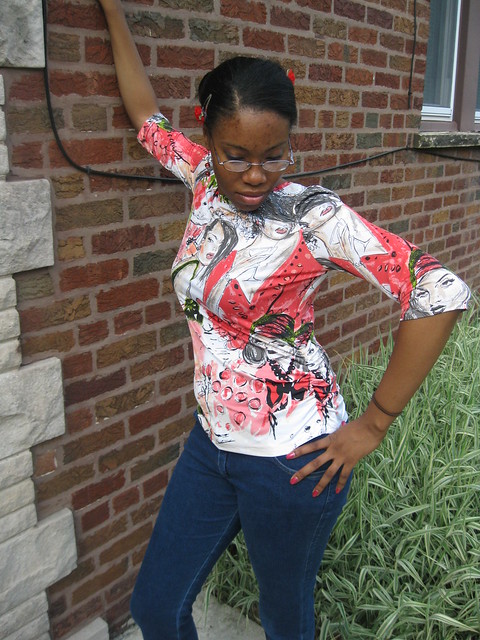
The topic of this post is to review M6036. But the underlining subject is to discuss some of the issues related to fitting my DD’s torso. Over the past few years, I tried to figure out which adjustment would best resolve the pulling cross the upper chest area. I tried making a broad and square shoulder adjustment. But that didn’t completely resolve the issue. This year I made a muslin out of some cheapo knit. While fitting the t-shirt, I realized she also has a pigeon chest. Dah.., This means her collar bone and (rib cage) chest area is more pronounced than the rest of her upper body. I pulled out my “sewing Bible”, Vogue Sewing, to see what it says about diagnosing this type of adjustment. The illustration showed the same type of pulling at the armholes that I’ve seen in RTW and a few garments that I’ve made for her.

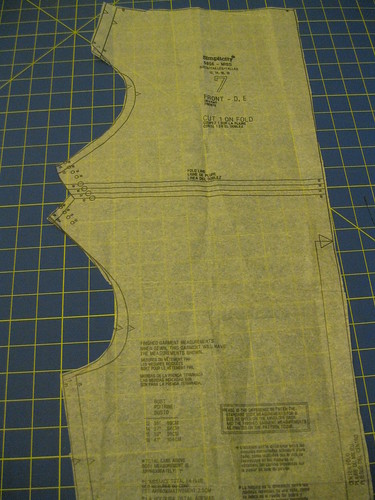
So following the instructions in Vogue Sewing, I made the adjustments to the pattern.


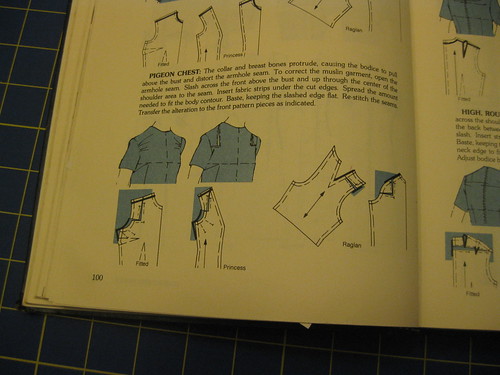
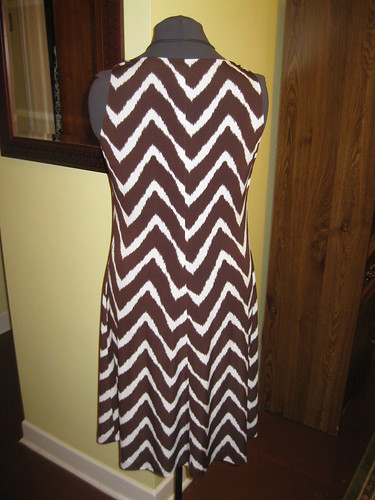
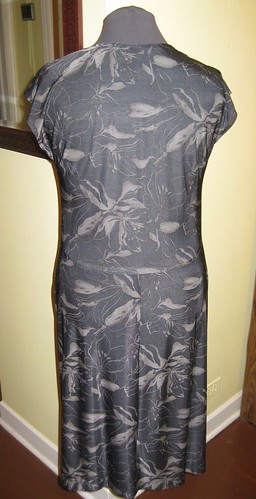
The good news is the pigeon chest adjustment is similar to the prominent shoulder blade adjustment. So it’s easy to do. It’s a matter of slicing the pattern in the right place and then spread it for the needed amount of space. The bad news is there is still a problem with fitting the back torso. Because her chest is pronounced, her back is slightly concaved and swayed which creates vertical and horizontal pooling of fabric in various regions of her back. Sometimes, I’m able to fold some of the excess fabric out along the center back and across the lower back (horizontal fold), but there are instances where my method does not completely solve the problem. Suggestions are welcome.

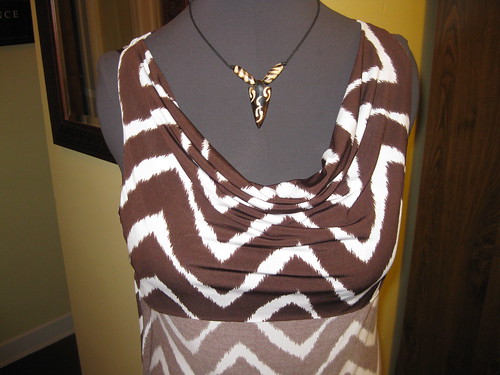
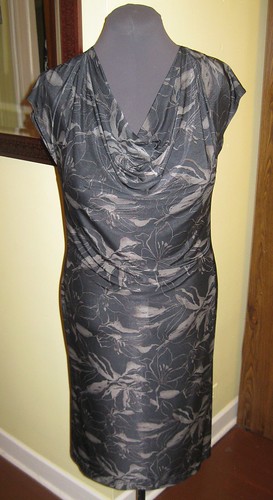
All year long, she has been begging me for t-shirts. Finally, I sat down to revisit the fitting issues. For the most part the issues are resolved. So I made her three t-shirt using M6036. I’m still not satisfied with the fit right at fold between the chest and armhole. It hollow there.


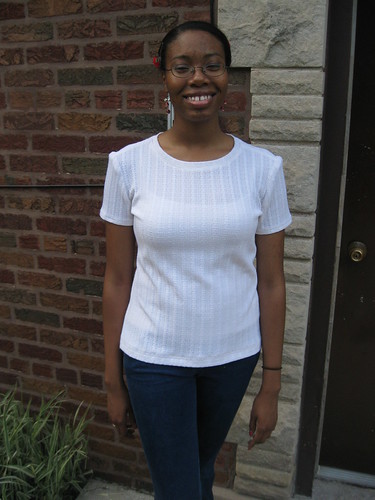
My second issue is upper finishing of the armhole. On some t-shirts it looks bulky across the ball of the shoulder. I think that can be easily fitted by trimming away most of the seam allowance. I need to do a little more tweaking, but that’s it. Knits can be very forgiving. With right amount of stretch in a “good” knit fabric, fitting becomes less complicated. To conclude on the fitting part, I was able to produce a few decent t-shirts for her by making a few adjustment s in the front and a sway back adjustment.

Here is the rest of the review:

Pattern Description: MISSES' TOPS: Close fitting, pullover tops A, B, C, D, E have rounded or scooped neckline; top A has purchased lace appliques; top B has contrast flowers; top C has front ruffles; top D has appliques cut from lace fabric; top E has neckline ruffle.

Pattern Sizing: X-Small to X-Large

Did it look like the photo/drawing on the pattern envelope once you were done sewing with it? The basic t-shirt yes. But as for the embellishment, I didn't do any. I wanted to get the t-shirt fitting down pat.

Were the instructions easy to follow? Yep. I just glance at them.

What did you particularly like or dislike about the pattern? I like the embellishment options. I use them later. No dislikes.

Fabric Used: Sweater knit from Walmart; jersey knit from Vogue(Evanston) and JoAnn's. All of them had a fair amount of stretch and great recovery.

Pattern alterations or any design changes you made: Most of the alterations are discussed above. Other changes:

Added some rushing on the sides of two t's.
Modified the sleeve length.
Added a neckband.

Would you sew it again? Would you recommend it to others? Yes and yes.

All photos are on Flickr.

Conclusion: I used this pattern to help address some fitting issues for my daughter (sloper).  There is nothing difficult about making the basic t-shirt and the embellishment designs could be used to spruce up your shirts.

Monday, July 25, 2011

Summer Dress Challenge 2011 - Finale PT V New Look 6824


Finally, I finished my Summer Dress Challenge.  I started making this dress early June and six weeks later it's finished.  I've made at least two other dresses, several tops and bottoms in the course of making this dress.  Why did it take so long?  After accepting Faye's invitation to the Summer Dress Challenge, I decided I wanted to do something a little different and "challenging". So I pulled out ole' faithful (NL6824) and some beautiful silk dupioni from Fishman's, and decided to follow Susan Khalji's underlining technique.

If you follow my blog, you'll know that NL6824 is one of my TNT patterns.  This is the forth time I've used it and it has helped me produce four nice dresses. Can't say which one I like the best, all of them fit well and suit my taste and figure.

Following Susan Khalji's technique was a learning experience and was a bit of a challenge when it came to all the hand stitching and transferring of ALL the markings onto the underlining. It was certainly worth all the effort though.  This approach is not for the faint at heart, it takes a lot of patience and time.  The hours I invested were equalient to the amount of time that I spend making a prom dress, wrap and purse.    And as I hand stitched the underlining to the dress, I decided I wouldn't do this type of work for pay unless someone had a lot of money to spend and to pay me. Lol. It's an undertaking to say the least.

Some might say, now where would you wear this type of dress?  My daughter's friend, Joanna, married on Saturday.   So I thought this would be a good occasion to wear it.  And of course, I'll wear it to the captain's ball while on vacation.
 
Since this is the forth time around, do I really need to give the description and size?  I guess so for new followers.
 

Pattern Description: Misses dress with various neckline, sleeve and skirt options.  You can design your look with mixing and matching pattern pieces.

Pattern Sizing: 8 - 18; I used 14 with modifications.

Did it look like the photo/drawing on the pattern envelope once you were done sewing with it?  Yes. Similar to the coral view on the pattern envelope.

Were the instructions easy to follow? This time around I didn't look at the instructions. I chose this pattern because I was familiar with the instructions and I had already worked out the fitting issue. It was the perfect pattern to use for this projects. My focus was on getting the technique down pat.

What did you particularly like or dislike about the pattern?  I love this pattern.  You have so many options for designing your dress.  I could easily use it four more times and get four more looks that work for me.


Fabric Used: Silk Dupioni (Fishman's); silk organza and china silk (New Rainbow).  Originally I thought I would use silk charmeuse for the lining, but the china silk worked best for the weight of the dupioni.


Pattern alterations or any design changes you made: Oh boy,  many changes and alterations.  Above all else, I did my usual FBA, sway back, prominent should blade, a few inches to the length of the skirt adjustments.  All are illustrated in previous reviews and on Flickr.  The other changes are related to follow Susan Khalji's technique. That information can be found here PT 1, here PT 2,  here PT 3, and here PT IV.

Lining attached to the hem.

Lining skirt and bodice lining sewn to waist. Lining hand stitched to invisible zipper.


Would you sew it again? Would you recommend it to others? Like I said, "This is one of my TNT. I will probably make another version within six months. And Yes, of course, I do recommend it to others.


Conclusion:
Follow Susan Khalji's underlining technique was a great experience. I learned how the color of the underlining affects the color of the fashion fabric; the underlining can also affect the drape of the garment; how to baste the underlining to the garment pieces, and how to ultimately create a better dress. Note on the pattern: this is one of my go to patterns. It has good bones and I've worked out the fitting issues so that make the whole process fifty percent easier. Try both the pattern and the technique. Both are worth your while.

Jewelry; bold and simple.


Shoes from shoesonline.com, J. Renee.


Parting shots: Here are a few photos from the wedding. The bride and groom were graciously beautiful.


Happy Sewing!

Tuesday, July 19, 2011

Thanks for Your Visits and Comments

Thank you for commenting on my latest posts.  I really like receiving your comments and hope that you will continue to share your thoughts on my blog.  Please expect a visit from me soon.  Friday was the last day of a three-day business processing and mapping meeting.  All appropriate stakeholders made the trek from their respective campuses to the Hilton Garden Inn in Kankakee, Illinois.  It was intense.  We reviewed previously discussed business processes, the corresponding process maps, and completed the future state documentation for each associated unit.  Talk about TIRED.  I didn't sew a stitch last week.  But Sunday afternoon I was able to sew the lining for my Summer Dress Challenge.  It's almost finished.  I need to sew the bodice lining at the waist, armholes and along the zipper.  Then I'm done. 

In the meantime, I have a few more reviews on sewing projects completed in July.

Happy Sewing!
C

Saturday, July 16, 2011

Ponchos in Summer - Simplicity 4781


I'm always looking for ways to jazz up the wardrobe. But at the same time keeping it classic. This next review is on a fall/winter accessories or cover up pattern. This has been in the collection for a while. But is not outdated or dull.

This poncho is great for keeping the chill off your arms in those air conditioned theaters and restaurants.  It's also perfect for fall like evenings that we sometimes get in the summertime.

S4781

The view that drew me to this pattern is the one I'm reviewing today.

Pattern Description: Misses' ponchos, vest, scarf, head band and bag.

Pattern Sizing: XS to XL, I made large. I made view A.

Did it look like the photo/drawing on the pattern envelope once you were done sewing with it? Yes, it did.

Were the instructions easy to follow? You really don't them. But, yes they were easy to follow. This is one of the one hour patterns. It didn't take me an hour to make the poncho.

What did you particularly like or dislike about the pattern? I like the simplicity of it. I may make up the scarf, vest and head band for myself and for gifts. No dislikes.

Fabric Used: Knit from Walmart and a stable knit from Vogue. Both have been is the stash for a while.

Pattern alterations or any design changes you made: Instead a sewing a small hem, I serged the edges.

Would you sew it again? Would you recommend it to others? I've already made two ponchos. I will sew a few of the other views. Yes, I recommend it if you have this pattern in your collection. It's easy.


Conclusion: This is an easy pattern that a beginner could sew with no problems.

Wednesday, July 13, 2011

Talking Wardrobe Building - Presentation at the ASG meeting in Chicago

A few months ago, Wendy G. asked me to be the guest speaker at one of monthly gatherings for American Sewing Guild. I gladly accepted and was thrilled at the opportunity to share what "little I know" about wardrobe building. Surely, I'm no expert.  I pick up bits and pieces here and there.  And like many of you, I love clothes that look and fit well.

My little talk was well received by the ladies. Big thanks to Wendy G. Susan G.- you certainly captured the essence of the presentation in your blog post, Thank you. It was an honor. More details on the presentation are here: Sew Chicago

Happy Sewing!
C

The Cardigan of Simplicity 2424 - Threads Collection


I've been loving the cardigans that Carolyn makes and finally decided to start making my own. I'm going to get a lot of mileage out of this pattern. I can see myself making this cardigan over and over again. I already have the fabric for the next one.

Simplicity 2424

Pattern Description: This is a Threads pattern that includes a jacket, dress, and knit cardigan.

Pattern Sizing: 8-24; I made 16; I was concerned about the bust area and didn't want to make bust darts.

Did it look like the photo/drawing on the pattern envelope once you were done sewing with it? Yes, it did.


Were the instructions easy to follow? A piece of cake. This pattern was very easy to follow and I had no problems sewing up the cardigan. I guess I'm on a easy, make it quick kick. I need to get back to my silk dress. That's another story.

What did you particularly like or dislike about the pattern? It's something that I've been wanting to make for a while. And I decided to make it. I consider this my test/mock garment.

The side seam is more like a side back seam.


Fabric Used: I purchased the knit fabric at Walmart several years ago for a dollar a yard. I bought all that was left. So I was able to make this cardigan and two other toppers that I will review later this week.

Pattern alterations or any design changes you made: Added about an inch to the length. That's it. Future cardigans, I may have to make some alterations. This knit is very stretchy. I'm surprised; it has great recovery too.

I did notice that the shoulder seam is a bit long and that I need to trim the allowance of the armhole.

Would you sew it again? Would you recommend it to others? I plan to make at least five more. Lol This is a good sloper for a simple cardigan. Yes, I do recommend it to all level sewers.

Conclusion:
This is a simple versatile style that's a wardrobe staple. And it's easy to sew.

Tuesday, July 12, 2011

Simplicity 5956 - Just as Easy as Vogue 1250


I picked up this very nice knit fabric at Vogue. It was about 1 3/4 yards and perfect for another easy knit dress. I thought about making Vogue 1250 out of it. But it darned on me I had another very easy Simplicity dress that I hadn't years in years. The first dress was made in 2004; long before I started blogging and reviewing patterns. So here's my review.

Simplicity 5956

Pattern Description: Misses' knit dresses or tops and knit or woven skirt.

Pattern Sizing: 4 -18; I made size 14.

Did it look like the photo/drawing on the pattern envelope once you were done sewing with it? Yes, it did.

Were the instructions easy to follow? The instructions were as easy as Vogue 1250. No problems. It took about two hours to make as the pattern envelope suggests.

What did you particularly like or dislike about the pattern? I like that it was another variation of a drape neck dress. The design of the front drape overlapped inside and connected to the front armhole which made for a clean finish. Additionally, the back of the dress is cut in two pieces. This give me better a fitting opportunity for a sway back.


This dress is A-line, not fitted or penciled like the Vogue dress. I think this silhouette looks better on me. No dislike.

Fabric Used: I think the fabric is a rayon jersey. It's similar to the fabric I used for the first version of V1250. I purchased it for under $7.00.

Pattern alterations or any design changes you made: My alterations were minor as the fabric had quite a bit of stretch in it. I did a sway back adjustment and lengthen the dress by a few inches. Also, I hand stitched the back neckline and back armholes. That's it.


I had limited fabric, but I managed to line up the print at the back seam.


Would you sew it again? Would you recommend it to others? This pattern is a keeper. I could go for another dress and a top or two. And yes, I do recommend it to others. It's super easy and stylish too. This pattern is out of print; But if you have it in your collection, give it a try. It's an alternative to Vogue 1250.

Conclusion: This dress sews up very quickly and a beginner could easily make it with no problems. I highly recommend it to all level sewers.

Vogue 1250 - The Second Time Around


Two weeks ago, I finished my second Vogue 1250 dress. The fabric is a tighter weave than the first dress. So I graded up a 1/2 size to make sure it fits. On the back bodice, three inches above the waistline I scooped out about 1/2 inch hoping to pull the lower back closer to my body. It's better. So, I know many of you have made this dress multiple times. It's definitely the most popular dress pattern of the summer.

Next, I revisited a dress pattern that is as easy as the Vogue 1250. My full review will be posted this evening or tomorrow morning.

Stay Tuned!
C

Monday, July 4, 2011

4th Blogiversary!


Today is my 4th blogiversary and Independence Day. Wow! Exciting! It doesn't seem like it's been four years! It's amazing to look back and see how far I've come since 2007. The first post that anyone commented on was July 23rd. That post featured the faux leather outfit that I made to wear to a John Legend concert. I was kinda of skinny then, to say the least. My photographer's (DD) picture taking skills have improved. My sewing is better too. Some of that credit goes to the fabulous sewing fashionistas that inspire and teach me in the blogasphere.

This next year, I plan to incorporate more couture techniques into my projects. My dress for the Summer Dress Challenge is still not done. I will wear it to a wedding later this month and then again while on vacation. The zipper is in, but the sleeves are not. The final processes are to complete the lining and attach it to the dress. Then I will be done. In retrospect, I think the Summer Dress Challenge was supposed to be something less labor intensive and more something to stay cool in. My dress doesn't exactly fit that description. Since the start of my dress, I've made a few others (quick and easy), several tops, coverups and a cardigan. All will be featured here soon.

So, I hope everyone is enjoying their holiday weekend. It's beautiful in Chicago, and I've enjoyed being away from the office for five solid days. So, beautiful ones, that's all for now. Have a great day!
C

LinkWithin

Blog Widget by LinkWithin