Friday, December 28, 2012

Copy That: Trendy Top Using Sandra Betzina's Vogue 8151- Part II

Last week I finished my trendy color blocked turtleneck. This was a really fun and easy project. It all started when I saw this sweater on Pinterest. Initially I did not know what fabrics I would use for it. Then Rhonda made a top out of stretch velvet. So I decided to make this top using the same fabric. It worked out well. I need to tweak it a little more. There are a few wrinkles around the bust area and I need to do a sway back adjustment.
I used Sandra Betzina's Vogue 8151 View B to draft the color block top. I wondered if the bust darts would take away from the design. They didn't. So I will use it again. One big advantage of the design is you can increase your fit options along the newly drafted princess seams. My first post gives details on how I drafted the pattern.

The original pattern is described as MISSES’ TOPS: Pullover tops with set in sleeves. A: wrapped front, band, shirred sides and long sleeves. B: top with three-quarter length sleeves and optional tie front. Sizing A through J.

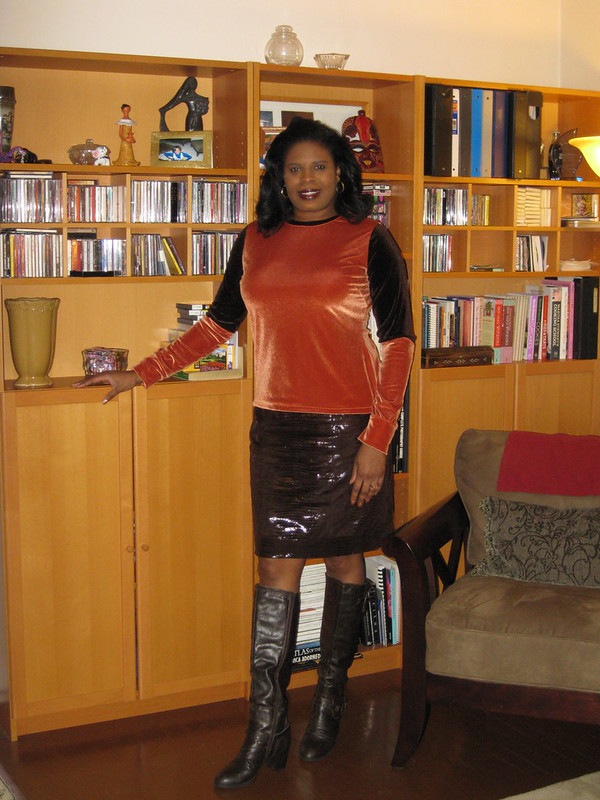
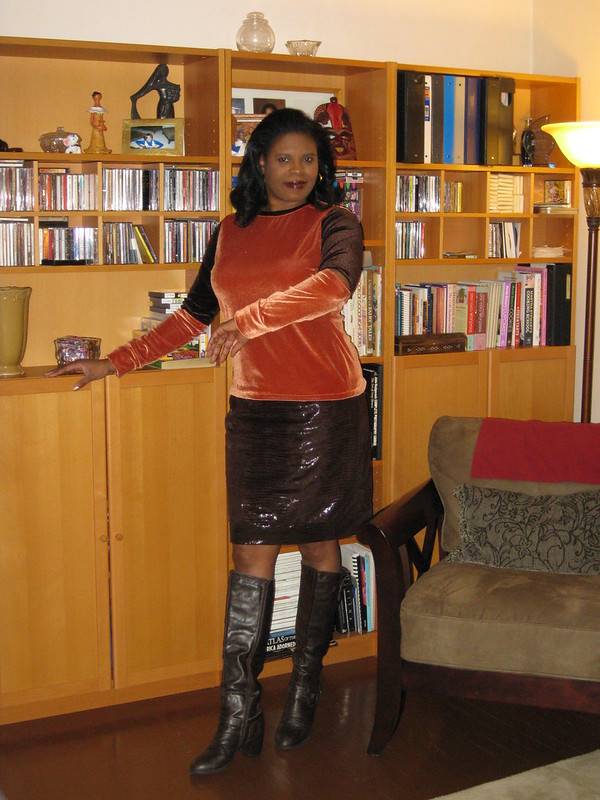
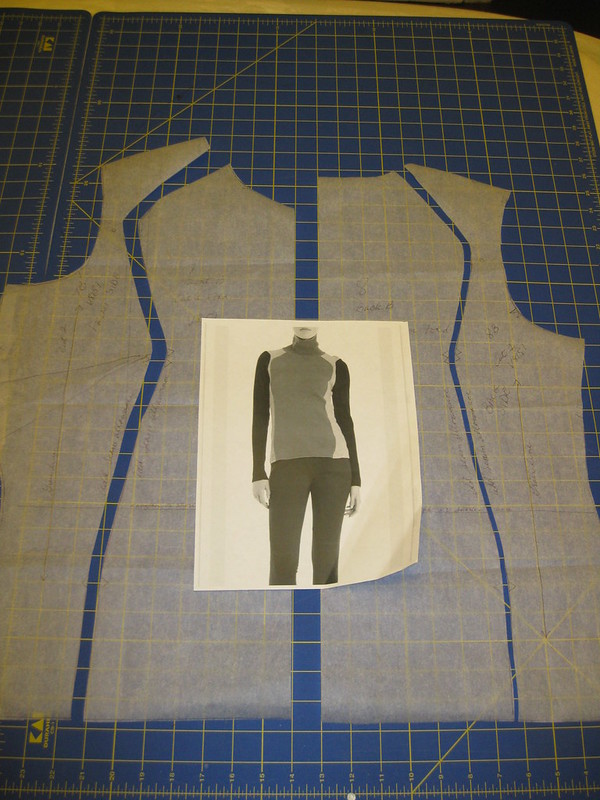
I selected this pattern because it had the basic design lines needed to create my inspiration top. Of course when I finished, my version did not look like the pattern photo or drawing. But it did look very much like the inspiration sweater.

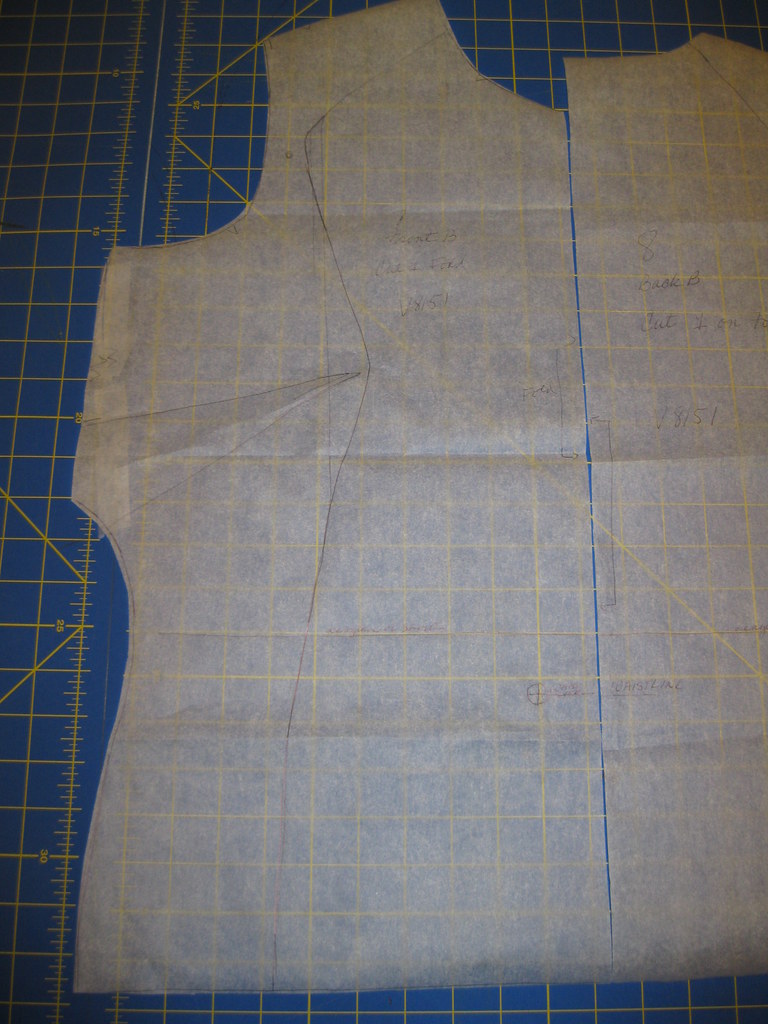
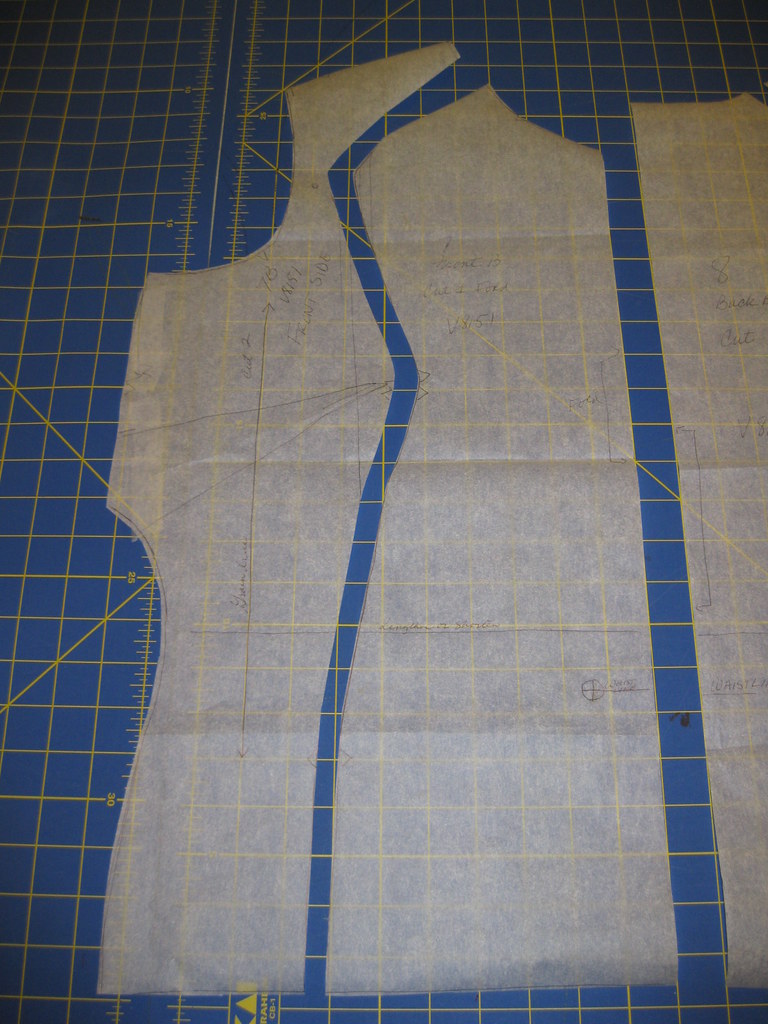
As for the instructions, I didn't read them. I basically followed typical construction techniques for a princess seam top with a turtleneck. Now, in sewing, I needed to carefully assemble it as not to lose the curves in the design. I added notches and circles where needed to join the pieces.

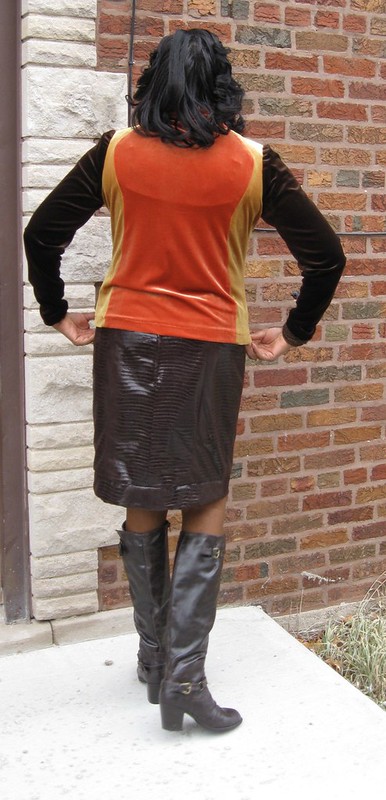
The original design used the 3/4 length sleeves. I just used the long sleeve provided for view A instead. For the turtle neck. I cut the velvet crosswise the length of the neckband, adding about ten inches to the width to form the turtle neck. The seam allowance was added to the princess seams during the cutting process. I also added to the side seam allowances just in case. Still, I ended up trimming it away later. About two inches were added to the length of the top. I really like how this project turned out. And I will certainly make at least one more.


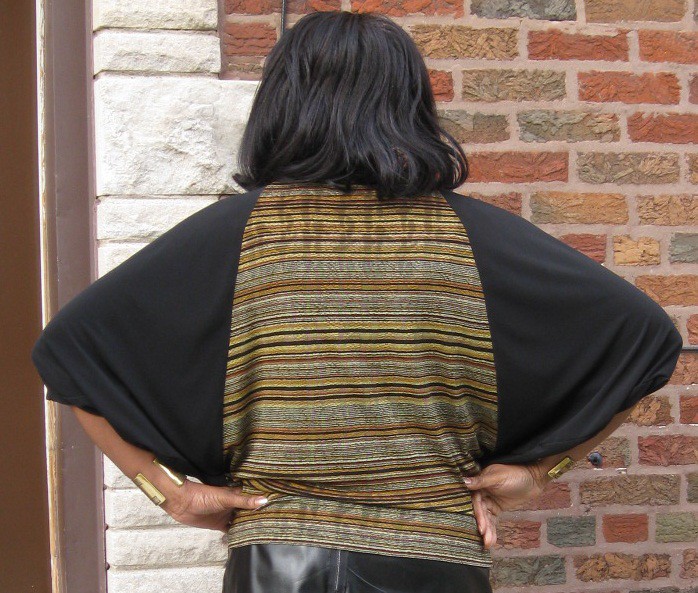
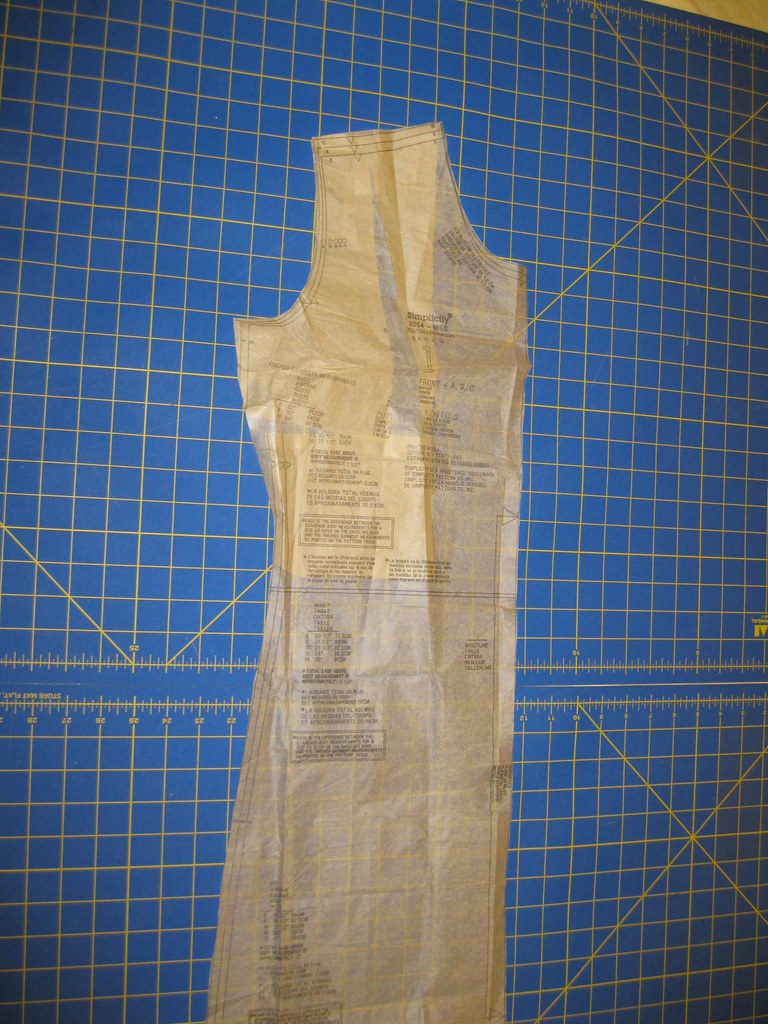
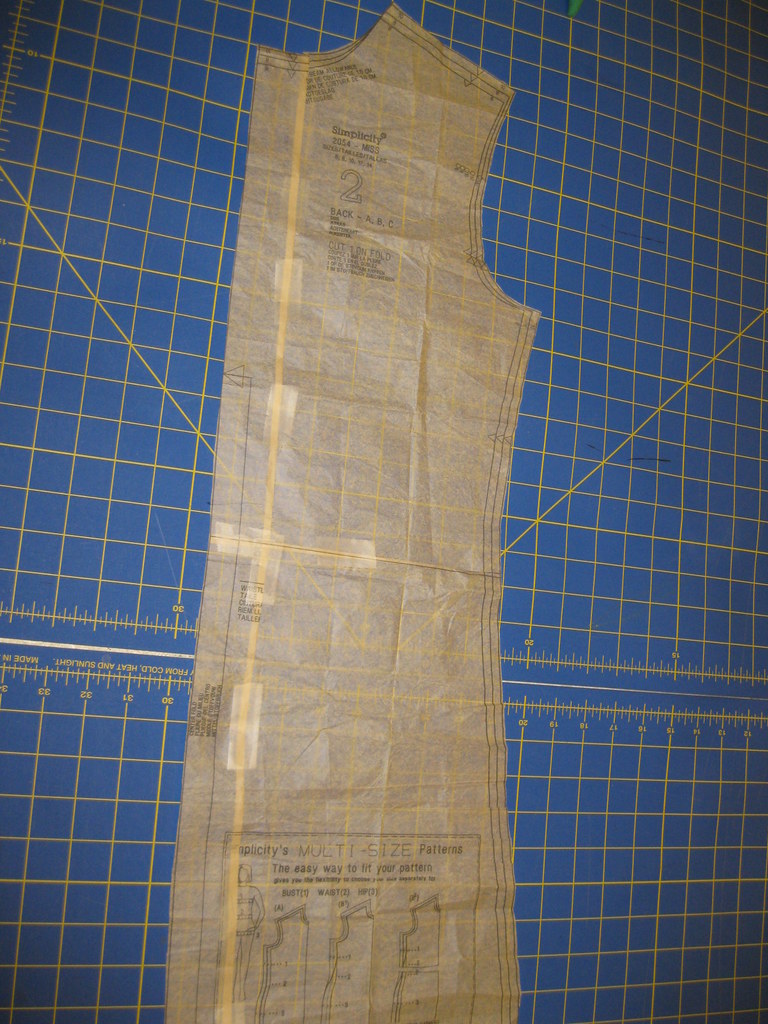
Since I purchased quite a bit of velvet, I decided to make a second top. This one followed more of the basic design of the original pattern. I added the sleeves from Simplicity 2054. Again, I wanted to do a little color blocking. The Simplicity sleeve is slightly smaller than the Vogue sleeve. So before you try this top, please make sure you make adjustments to the pattern before cutting into your fabric.

On the Fabric: The first top is cut to showcase the matte color of the velvet and the second top showcases the frosty pile of the velvet.

The original pattern is a great basic t-shirt faux wrap top pattern that can be used to beef up your wardrobe. Or you can use it as a basis to create an inspiration top like the one I just made. Following this practice can greatly reduce the number of pattern you purchase, and you will increase the usability of the patterns you already own.

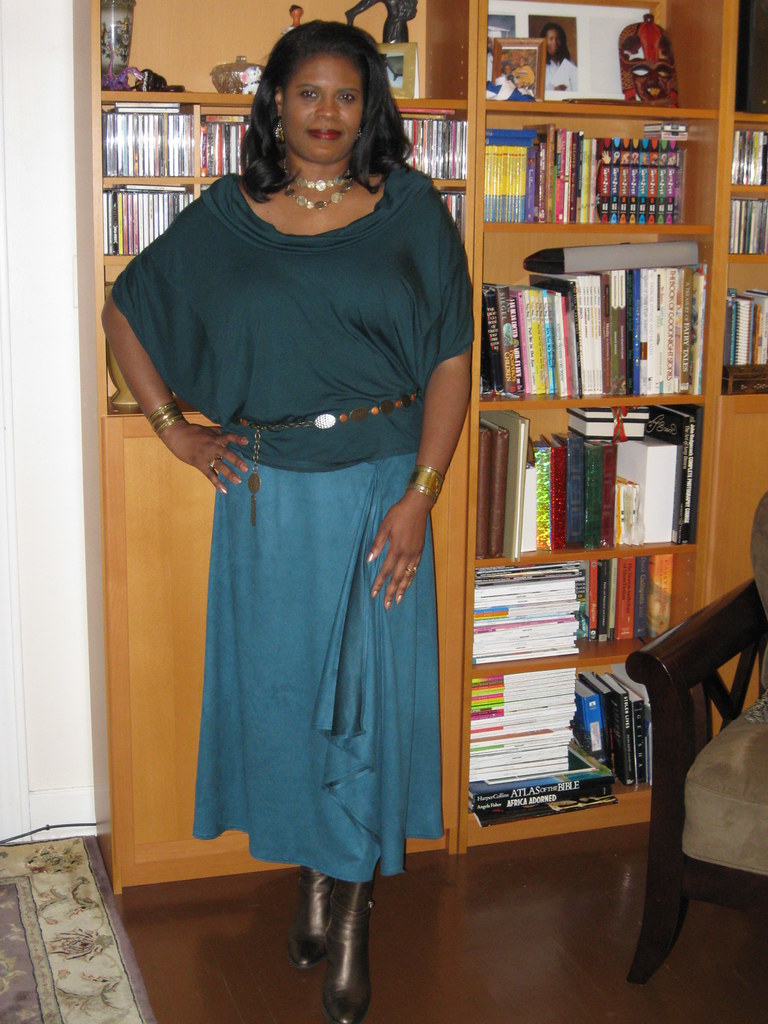
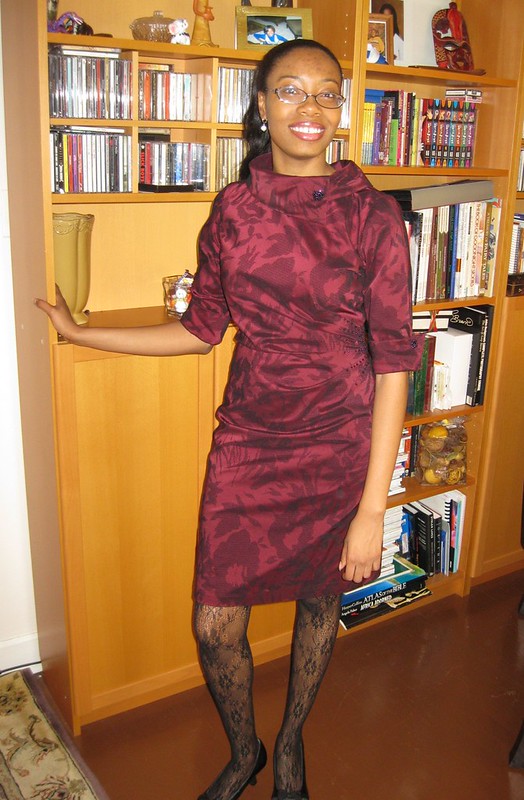
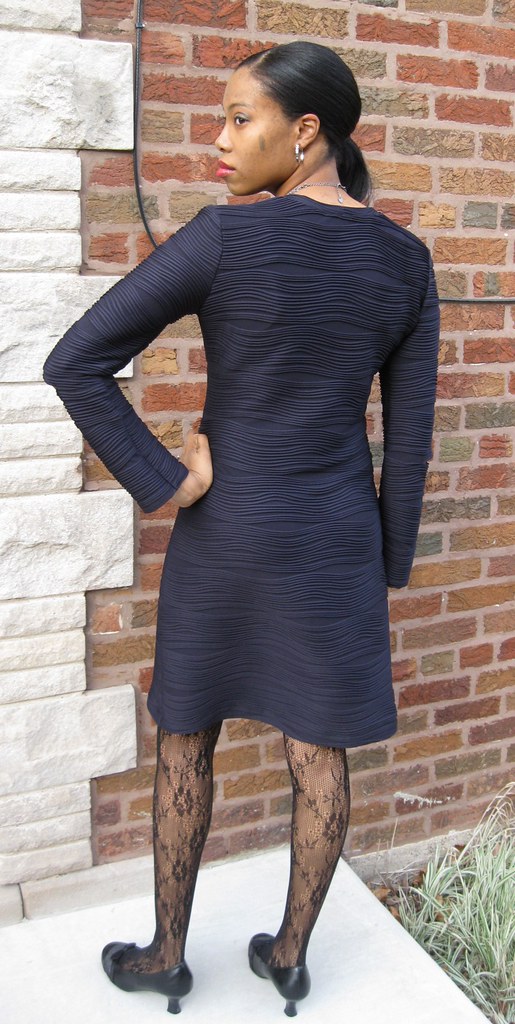
Side note: My skirt was made using Vogue 8727 the slim skirt of View A, shortened and a band added to the bottom. My skirt was fully lined and a band attached to the bottom so no seaming is exposed.

 Happy Sewing!
Cennetta

Thursday, December 27, 2012

Lovely Blogger Award


Big Thanks to Lori and L for the Lovely Blogger award.  These two "Lovely" creative bloggers gave me an award!

The rules of the award are as follows:

  • Thank the person who nominated you
  • Add The One Lovely Blog Award/The Very Inspiring Blogger Award to your post
  • Share 7 things about yourself
  • Pass the award on to 10 nominees
  • Include this set of rules
  • Inform your nominees by posting a comment on their blogs

Seven Things About Me:  honestly, I think my blog tells quite a bit about me.  But I tell seven things anyway.

  • This year I turned 50 and am very happy to be above ground.
  • I'm the 2012-13 Fashion Show Chairperson  for the Haute Couture Club of Chicago.  I didn't think I was qualified because I'm inexperienced in this area.  We will see how it goes. Wink, wink.
  • Two years ago, I was diagnosed with scoliosis.  I always wondered why I had prominent shoulder blades and a swayed back.
  • I'm kind of nerdy.  I love science.  As a kid, I was also one of the first people to volunteer for the science fair.  
  • I'm a daddy's girl.  My dad passed in 2006 and I miss him. He was my confidant and devoted adviser. 
  • I'm a foodie.  I love trying different cuisine and watching the food network.
  • I'm seriously thinking about retiring in the next five years.  Hopefully, I can do more teaching  and sewing.
  • You can count on me to cry during sad or happy scenes in movies.

Now the hard part, nominating ten creative souls.

  • 1 - The super generous and acutely talented Rhonda Buss.  The is one phonenmenal creative woman.  Rhonda's "online design school" is priceless.  It has inspired me to experiment with patter drafting.  Every week she features a free pattern and showcases fellow creative souls.  Rhonda is a gem.
  • 2 - Allison C.  I absolutely love the things this woman makes.  Very polished and pristine.
  • 3 - You can count on Faye Lewis to inspire the sewing ladies to join a sew along.  It sparks creativity and encourages others to try something new.
  • 4  & 5 - Andrea and Sheila.  These two ladies are my friends.  We can talk for hours on the phone about, you know, sewing.  To top that they are expert knitters.  Boy do I wish they lived in my town.
  • 6  -  Bunny is another sewing expert who give free online lessons.  She meticulously shares how to details in sewing.
  • 7 - I've appreciated Ann's teachings for over ten years.  I like became acquainted with her on PatternReview.com where she shared excellent details of her sewing projects.  
  • 8 - I think everyone knows of Carolyn.  This woman given new life to the concept of the TNT pattern.  The sista can work a pattern!
  • 9 - Irene is another favorite.  Her designs are clean and polished.  
  • 10 - I hate to stop at ten because there are so many great sewing designers out there.  For the sake of this nomination process.  I'd like to end with Pam who makes the most beautiful tailored shirts.  I wish.  
So this completes the nomination process for me.  Enjoy everyone.
Cennetta


Enjoying The Holiday Season!


I hope everyone is enjoying the holiday season. I've sort of taken a break from blogging and sewing to spend a little more time with family and friends. And, of course, I've watched a fair amount of Christmas stories on Turner Classic Movies (TCM). It's been a great relaxing time for me. Sometimes you don't know how tired you are until you take a little time to just be still.

This little break has also provided some time to reflect on the passed year and to think about how to do even better in the coming one. Right now, I have about five sewing projects to blog about and I'm hoping to get it all done by the end of the first week of the new year.

A few weeks ago Lori and L gave me a Lovely Blogger award, which I will blog about next. The hard part is to pass the award onto someone else. Many have already receive it. So who will I give the award to?  Anyway, I hope you will continue to enjoy this festive season.

God bless!
Cennetta

Tuesday, December 11, 2012

Shades of Green - Simiplicity 1761


The it color for 2013 is emerald green. So I'm a little bit ahead of the trend. I'm already a fan of green, all shades of it. Today I'm reviewing skirt from Simplicity 1761, made in November first wearing last Sunday.

The pattern envelope photo shows the skirt made in a stiff fabric that doesn't do it justice in my opinion. I always open the envelope to see the actual line drawing. Before I made it, Sheila and I talked about how unattractive the skirt looked on the envelope. But I thought the faux suede, soft and fluid, would be a great fabric to showcase this pattern.

It can be described as unlined skirt in two lengths with front flounce that shows the wrong side of the fabric.  The pattern also includes a jacket and knit top.

The sizing is from 10 to 28W.  I used size 14, adding about 1/2 to side seams just in case.

My skirt does look like the one photographed, but with more drape.  The instructions were easy, nothing difficult.

What drew me to this pattern was the jacket.  Then I noticed the skirt.  I liked the flounces and fullness of the design. I thought this would be a great addition to my cold weather wardrobe.  There was nothing to dislike about it.  simple and easy.  It was perfect for what I had in mind for the fabric.

The green faux suede has been in my stash for about six years.  I bought it at Hancock's and initially thought I would make a button down shirt out of it.  Plans do change if you let enough time pass.


The changes I made were very minor.  I thought the fullness of the skirt would somehow expose the seaming.  So I sewed a french seam at the center back.  I didn't add any length to it.  As a result, my skirt stops higher the Khaliah Ali's version.


I might sew it again, but not soon.  Just last night I was looking at other skirt patterns I'd like to make this winter.  But I do recommend it to other if this is a style that you like.

This is a simple skirt to make that can be paired with a simple or dramatic top.

Next up, I will review the top that I am wearing with this skirt.  It is one of Rhonda Buss' designs.  It easy to sew and can be worn several different ways.

Stay Tuned!
C

Monday, December 10, 2012

Rhonda's Slippers - The Third Time is A Charm!


Happy Monday everyone!

The Christmas Holiday Season is in full gear.  I'm looking forward to festive gatherings with family and friends.  This is also the season when we exchange gifts with our love ones.  If you are crafty, some of the gifts will be handmade with loving thoughtfulness.

A few weeks ago, Rhonda Buss posted a picture of some slippers made by one of her faithful readers.  When I saw them I said to myself, "I can do that."  Well, it took three iterations before I came up with a pair that I could be pride of.

So here are all three pairs, left to right:  Chewbacca, Man Size, and Just Right for Women.


And here is how the table looked after all the cutting and trimming.


My problem was I didn't start with Rhonda's pattern, I thought I could replicate it without the exact measurements.  Below is what I finally came up with and I still had to trim and adjust as I sewed.  In the end, I came up with wearable, comfortable boot slippers.


Supplies needed:

Paper to draft pattern
Pen
Serger and thread
Fleece
Grip Stop, I found it at JoAnn's in the utility clothe section.


You are ready to make your very own boot slippers?


Next time, I think I add a little more cushion to the sole of the slippers by doubling the fleece at the bottom.  We will see how that goes.


Happy Sewing!
C

Thursday, December 6, 2012

Copying That Trendy Sweater using Vogue 8151


Like most of us, my "project-to-make" list is way out of control. There are at least two large bags of things already cut and ready to sew.  Then there are things half sewn that are hanging in one of my closets.  And then there is a basket of patterns that I hope to make this season.  That's not all.  This year I became a "pinner" on Pinterest.  Need I say more.  Anyway, I pinned this O'2nd Color Blocked Turtleneck Sweater  a few weeks ago with the intention of making it before the color block trend disappears.  Vogue 8151 View-B basic t-shirt knit pattern has handy (in the basket) so I used it to draft a new pattern for the inspiration top.


First I traced the pattern onto the drafting paper that I use to copying and alter patterns.  I didn't make a FBA.  I went up a size.   I'm also thinking about eliminating the bust darts.  The new pattern is princess seam, which creates more opportunities to make adjustments in the bust area.  I'll see how it goes with fitting a muslin.  Above, I drew the cutting lines to create the blocked areas of the sweater.


Next I cut along the color block design lines.   When I cut the fabric, the seam allowances along the new cutting lines.   


Here's the new pattern pictured (front and back) with the inspiration top.

Stay Tuned. Caution -  Multiple projects in progress. 
    
Happy Sewing!
C


Wednesday, December 5, 2012

New Look 6000 - Dress #2 A Little Holiday Spirit


New Look 6000

I finished the bead work on my daughter's second dress, Monday night. It took a while, but it was worth the effort. FX was featuring "X-Men Origin of Wolverine", so I decided it was as good a time as any to do the bead work on my daughter's second dress. So I watched the movie for the 100th time while I completed the dress.

Other bloggers and PR members inspired me to try this pattern. Its simple elegance is perfect for showcasing a beautiful fabric. My favorite view is View C. Here again, is a great basic pattern that has a few design options built in. Views E and D can be used to create a sloper for other dresses of the same style.

The pattern can be described as a fitted misses' dress, mid-knee with front side pleats or darts. The back has 22" inch zipper and darts. It comes with a two piece collar that over-laps on the front left. The pleated area can be embellished with fabric flower or beads. There are two sleeve options: 3/4 length with cuffs or short sleeves. View B is collared and sleeveless. The only description on the envelop is Misses' seven sizes in one.

Sizes are 4 to 16. I used size 10 with modifications.

My rendition looked like view C. I just added beads instead on buttons. I really didn't use the guide sheet during the construction of the dress.

When I sat down to write the review, I read them to help me identify the changes that I made and to properly review the construction of the dress. There was nothing difficult about the instructions.

There are quite a few things I liked about this dress. Most have been noted in other views. But here is my list:

 - Easy to make; Easy is always a plus. There is one less thing to consider when making adjustments to fit the body. Simple design lines and easy constructions techniques needed to make the garment.
  - Collar; For some reason, I really like dresses with this type of collar treatment.
  - Adorned Cuffs and Sleeve length; The below the elbow sleeve with the adorned cuffs is attractive to me.
  - Pleats; Love them along the side. Gives definition and option to add to design of the dress. I don't have any dislikes about the dress' design.

 My dislikes are related to its construction.

 - Facings; I prefer lining the dress. It adds body, sturdiness and it eliminates the need for a slip.
  - Zipper; I prefer an invisible zipper.
  - Flower; The flower pattern has a rolled hem edge. I prefer a pattern that conceal the wrong side of the fabric. (I didn't make that view, but it's one of my construction dislikes.)
  - Ease in Sleeve Cap; There is quite a bit of ease in the sleeve cap. You may want to take some of it out if your fabric is tightly woven.

I purchased this fabric at Hancock Fabrics about a month ago. It has a little stretch to it. The texture kind of reminded me of a stretch woven polyester taffeta. It's definitely a mystery polyester "something".

My changes and alterations include:

 - Pigeon Chest/Slight FBA Adjustment. This added a little length to the front side seams. I ease in the difference just above the side notch. (After thought - I think I added just a little too much. Next time I'll take out some of the adjusted fitting.)

 - Narrowed or Center Back Adjustment. I made a tuck in the center back section the length of the dress back. Then I added that amount starting at mid-back to the hem of the back dress.
 - Installed an invisible zipper.
 - Lined the dress instead on using the facings.


 - Added seed beads instead of buttons at the collar and cuffs. Also added them along the pleats.
 - Used Bias tape to finish the hem of the dress.

I plan to make this dress at least one more time for myself. This pattern has good bones. It sews up quickly and has simple, elegant details. I highly recommend it to others.


This is second of four dresses I'm making for my daughter. This one can be worn to holiday festivities or to church. My daughter loves it. And that's saying a lot. ;-)

Happy Sewing! C

 PS - Today she proclaimed, "Wrap this one so I can have something to open on Christmas Day!"

Thursday, November 29, 2012

The Second Time Around with Sandra Betzina's Vogue 1291


Last Friday, I made my second Sandra Betzina Butterfly top.  This time using knit fabric.  Before cutting it out, I readjusted the pattern by eliminating all of the changes made for the previous woven version.

This time around it sew up even quicker with no zipper to install.  I used two fabrics: the print is from Vogue and the Black Lux Jersey is from Supreme Novelty Fabrics.

Many of my Chicago sewing friends frequently shop at Supreme Novelty Fabrics, but three weeks ago was my first time.  It's only 5 minutes away from the job. I went looking for a nice knit for a Haute Couture Club Blue Challenge dress.  And of course, I found a few more fabrics to buy.  Good I was on my lunch break and needed to get back to work within an hour.  So the damage to my pocket was minimum. Lol

Okay, back to the review..,

This top is described as a loose-fitting, pullover top has bias neck band, front sleeve overlapping back sleeve forming shoulder opening, no shoulder seams and narrow hems.

I still like it for the reasons mentioned in the previous review.  It's stylish and comfortable.   I drafted a little skirt with a narrow black side panel to wear with it.  The two garments aren't so hot together but worn with other separates they look fine.

I plan to make some faux leather/knit skinny pant to wear with this new top. But in the meantime, I can pair it with jeans or my faux leather skirt (Burda 7303).

This is a great top to add to your wardrobe.  You can dress it up or down, and it is easy to sew.

Happy Sewing!
C

Wednesday, November 28, 2012

Simplicity 2054 - A Great Beginner Pattern for Knit Dresses

 
For Christmas I decided to make my daughter I few new dresses.  I also wanted to  sew a simple knit dress to help her learn to fit and sew garments for herself.  I chose Simplicity 2054 because it is very simple and gives options to make a crew or turtleneck top.

I started with making the usual adjustments for my daughter.  There are three basic adjustments:  pigeon chest, sway back, and decrease width across the center back. 

Simplicity describes this pattern as a Misses' knit dress with a cowl collar.

 
It comes in sizes 6 to 22. I used size 10 with modifications. 
 
I changed the style of the dress. It was a loose fit. For the fabric I selected, the loose fit would not work. So my version, didn't exactly look like the picture or drawing. 
 
I only looked at the instructions to be able to comment on them in this review. They were typical and straight forward. Nothing confusing about them. 
 
There are a few reasons why I selected this pattern. The first is I liked that it was simple. The fabric that I chose is the "speaker" in this garment. So a simple pattern worked best. The second reason was to alter a pattern for DD that she could try to make it for herself. Throughout the adjustment phase of the process, I told her why I made the adjustments. I also talked a little about the sewing process. I'm sure I'll have to give her another lesson when she is ready to try it on her own. And the third and final reason why I selected this particular pattern is because it can serve as a great sloper for future garments of a similar style. It can also be used to make t-shirts and turtlenecks. 
 
The navy fabric was purchased at Stone Mountain and Daughter (San Francisco). It's a medium weight knit with raised waves running crosswise. It has about 30 percent stretch and was very easy to sew. 
 
 
The first adjustment I made was to the front dress. DD's upper chest is slightly rounded, like a bird. Her RTW tops and dresses pull across the shoulders and upper arm. Vogue Sewing describes this alteration as a pigeon chest adjustment. I made the horizontal slash a few inches below the armhole, to give her a little more room across the bust area. Then I made a vertical slash up to the shoulder seam then spread the pattern as needed. This adjustment increases the length of the side seam of the front. I just eased the difference in above the notch. No dart needed. 
 
 
The next adjustments are to the back. I started with the sway back adjustment. It's a small one, which consists of a horizontal tuck across the lower back. I think because DD's chest protrudes, her center back is slightly concave. So I have to make a vertical tuck within the neckline curve of the back of the pattern. This adjustment removes the pooling that occurs. The tuck is only needed for the back area. So I have to add to the sides to make sure there is enough ease/room in the hip area. This is usually done as I cut. For this dress I didn't add to the side seams.  There was enough ease built into the pattern. 
 
 
After I cut the front and back dress out, I pin fit it to see how the dress would fit and look on DD. It was shapeless, like a sack. So I created shape. I pinned the silhouette I envisioned. Then I used tailor chalk to mark the stitching line on both sides of the dress (wrong side of the fabric). After that was done, sewing it together was a piece of cake. 
 
We will probably use this pattern over and over. It's a great sloper for other garments and we can modify it to make tops.


Just A Little Catching Up

Today was the last day of class for me.  I'm very pleased with how well I've transitioned back into school.  But I'm glad I can relax and enjoy sewing a little more.

This morning, I realized I didn't wish my devoted readers a Happy Thanksgiving.  I hope you had a great feast with your family and friends.  

It's Christmas time again.  This is my favorite times of the year.  Most people seem to be happier and full of cheer during this holiday season.  I'm looking forward to spending more time with my family and friends. 

Over the past few weeks, I've been thinking about making things, all sorts of things; things to wear, things to sell, and things to teach other people who want to learn more about sewing.  Although, school has consumed a great deal of my time, I've managed to continue to teach a little and to sew a few garments.  My productivity is very low compared to last year. But that's okay.  I was blessed to attend two sewing retreats this year, which is awesome.  It gave me many opportunities to develop new skills and techniques.  I hope to set some new goals next month to take full advantage of the knowledge I've gained over the past several months.

The Haute Couture Club of Chicago Fashion Show is fast approaching (May, 2012).  I'm excited about the event and hope to make something special.  The next challenge is the Embellished Coat.  I haven't a clue as to what I will make for it.  We will see..

Well enough chatter for now.  I'll start reviewing the garments that I made during October and November.

Happy Sewing! 


Friday, November 16, 2012

Fancy Pants - Inspiration Part II

Last summer I made two pairs of "Fancy Pants".  But I still not satisfied.  For months I have searched for more ideas.  Pinterest is the major source  of my recent search for wearable "Fancy Pants".  Caution, some are more "run way" than "real way".  So here goes!


Now comes the hard part deciding which will be my prime source for my next pair of fancy pants.

Having Sewing!
C

Thursday, November 15, 2012

The Sway Back Dilemma - Simplicity 5956 and Vogue 1197

One of my biggest fitting challenges is the sway back adjustment. I have tried adding darts and folding out were the pooling occurs. Sometimes it works and other times it doesn't. I've tried using the method of making the horizontal tuck with placing the center back on the fold. That doesn't completely resolve the issue.

 A few years ago, Pati Palmer noticed that one of my hips was slightly higher than the other and gave me some advice on how to fit my pants (M5818) better. After an spinal x-ray two years ago, I learned that I have slight scoliosis in my lower back. This discovery supported Pati's observation. So of course, when I went to the Palmer/Pletsch fit workshop, I planned to learn more about addressing my back fitting issues.

Because of the curve, the level of adjustment is slightly different for each side. This is probably no surprise. I think most of us are larger on one side of our bodies.

I decided to try a different approach for the sway back adjustment. It's easiest to make the adjustment if the back has a center seam. This allows me to scoop out access at the lower, center back as well as make a horizontal tuck across the lower back. I also have the option of making two backs to address the differences between my left and right side.

When making the horizontal tucks, I noticed that the back hem along the center is shorter than the rest of the garment by the amount of the tuck. This amount needs to be added back into the garment either in the hip or at the hem. I haven't figured out the best place to add this for a top, jacket, or dress. Recommendations are welcomed.

The type of garments where the sway back fitting is the biggest challenge are in knit tops and dresses that do not have a horizontal seam at the waist. I made Simplicity 5956 several times. Last year I tried this adjustment and it was nearly perfect. I had added the tucked length to the hemline where needed. This method was also used in the two versions I made this year.

Last month, I made a wearable muslin of Sandra Betzina's Vogue 1197. Pictured at the top of this post.  This top does not have a center back seam. I created one. I think the adjustment worked. I also think I will use this approach more often to get a better fit across the sway in my back.

What are your thoughts on sway back adjustments? Do you have issues with fitting your back? Have you found a way to successfully alter your garments for your back fitting issues? Please share.

Happy Sewing!
Cennetta

LinkWithin

Blog Widget by LinkWithin