Tuesday, June 30, 2009

I Love My Maxi - M5624


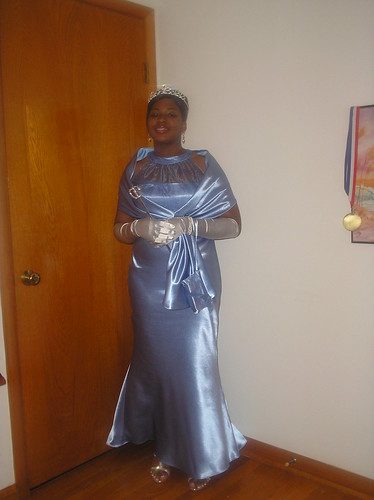
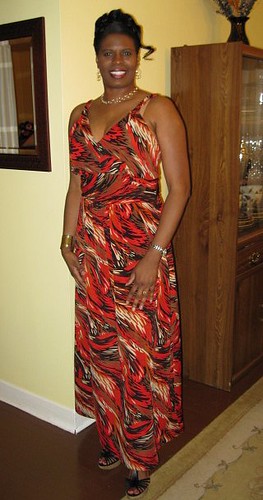
So many sewists/designers/fashionistas have made beautiful maxi dresses. This weekend I made my first. I'm hooked and am already planning to make another. It's funny how my "To Make" list keeps growing. At the same time, I'm moving new garments to the top, "Must Make This Season".

A few weeks ago, I blogged making a mini wardrobe for DD (Career). The "project" hasn't been scratched from the list, but moved further down the list.

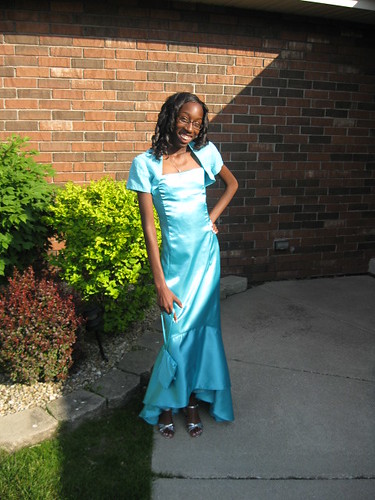
Pattern Description: MISSES' DRESS IN TWO LENGTHS AND JUMPSUIT: Close fitting dresses A, B or jumpsuit C have self-lined bodice with pleats, midriff and center back zipper; dresses A, B have very loose fitting skirt; jumpsuit C have semi-fitted pants.

From the pattern I made the jumpsuit and the maxi dress. I will try to review both in the single review. Hopefully I will not confuse anyone making sure I identify which garment I speaking about as a complete the review.


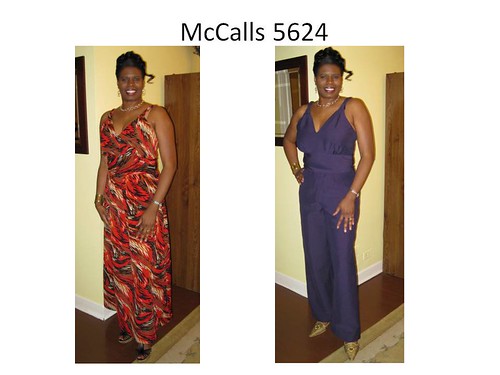
Pattern Sizing: 6 to 18; I made size 14 for both with modifications.

Did it look like the photo/drawing on the pattern envelope once you were done sewing with it? Pretty much.


Were the instructions easy to follow? Pretty much. The instructions on how to twist the straps didn't tell you how many times to twist. I ended up twisting them about nine times. Then I had to shorten them by one inch. Other than that, the instructions were okay, standard.

What did you particularly like or dislike about the pattern? There are a few things that I like and dislike about the pattern.

Like:
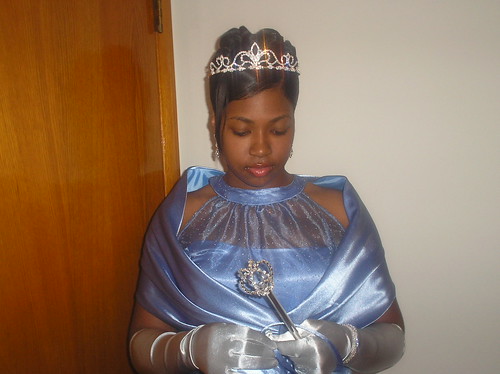
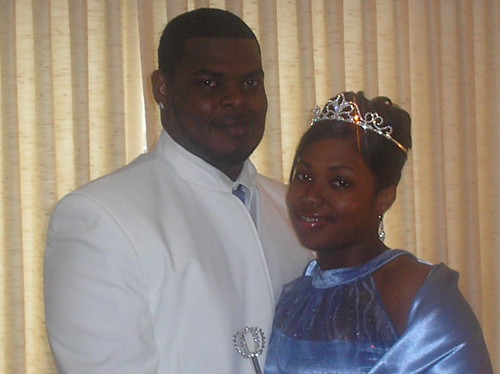
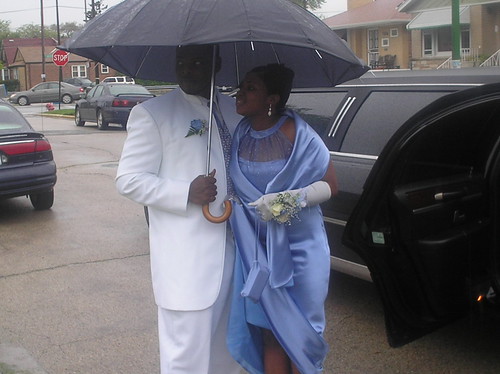
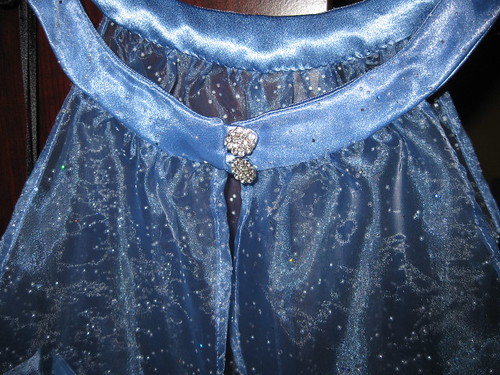
I like the design of the bodice and thought the twisted straps were interesting. I primarily bought the pattern for the maxi dress, but thought the jumpsuit was worth a try as well. In the end, I still liked the maxi dress more than the jumpsuit.

Dislike:
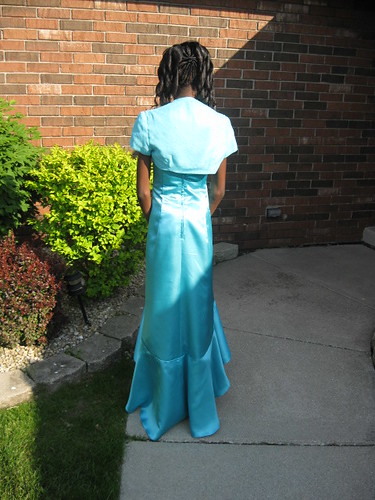
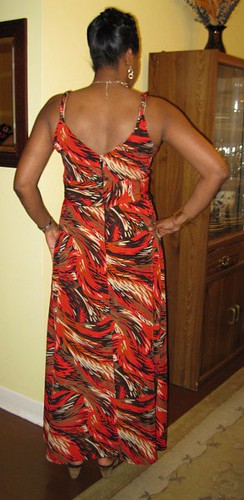
After I completed both garments, worked on them at the same time, I didn't like the twisted straps so much. They feel a little bulky and don't lay as flat at the join of the bodice front and back.

The bodice front is a little lower than my comfort. If I use the bodice again, I'll bring it up about an inch.

Pleats at the bodice/strap join. This really isn't a dislike, but I think it would be better if I sew them down. It would looks neater.

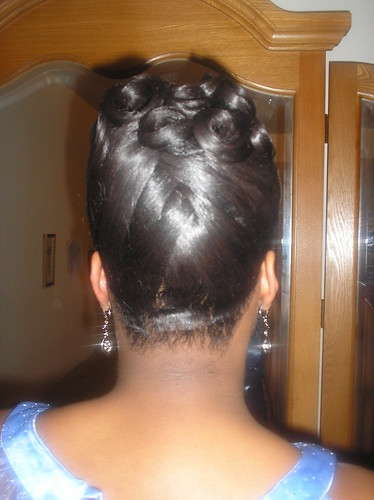
Caution: The back is low too. You will need to wear a bra that fasten about two inches lower than the standard.

Fabric Used: Maxi dress - polyester print (red, biege, brown, black) from Hancock. On sale, I can't pass up a sale. I didn't pre-wash it.

Jumpsuit - Some mystery fabric (eggplant) with stretch from Vogues Fabric on Roosevelt. I did pre-wash it.

Pattern Alterations or any design changes you made:

The same bodice was used for both. I did a FBA (compare original and new draft) and shorten the straps by one inch. Even with the FBA I noticed a very small gap at the side bust area near the armpit. Not much though. So next time, I'll tweak that area a bite.

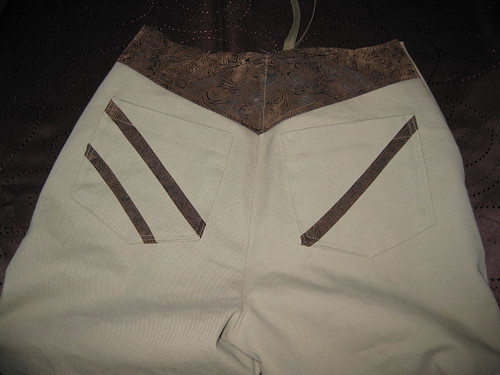
Pant Back Alteration. I also shorten the front pattern.

Both the Dress and pant were lengthen about four inches. I also made my usual crotch alteration.

Dress: instead of the suggested hem method, I did a rolled hem.

Because the jumpsuit fabric had some stretch in it, I sewed slightly larger seam allowances. After, it was finished I felt it could have been sewn at the regular seam allowance of 5/8". I was just testing the stretchability of the fabric.

Would you sew it again? Would you recommend it to others? Yes, I will make another maxi dress. And yes, I recommend it to others, but with modifications. You might consider making a muslin of the bodice and midriff, straps attached as well.


Conclusion: I really like the maxi dress. The jumpsuit not so much. It doesn't look as smooth as I would like in the back. That could be because of my sway back.

I think this pattern is worth a try, test the bodice first. Espeically if you are a C cup or larger.

The Pants I Thought I Wouldn't Make - M5818


Worn Monday June 29, 2009

These are the pants that I thought I wouldn't make. In May, I made and reviewed the dress and declared that I would make the jacket, but not the pants. Wrong! I needed (wanted) some new pants to wear at the Annual InfoEd meeting so I made these and M5710.

Again, Palmer/Pletsch delivers. The seam allowance enables the sewists to fit as you sew, which is a plus when you are in a hurry or need a quick sewing project.

Pattern Description: MISSES' LINED JACKET, DRESS AND PANTS: Lined jacket A has princess seams, welt pockets, flaps and sleeve with slit; lined dress B has front and back pleats, front and back darts, back zipper, back slit and topstitching detail, length is 1" above mid-knee; pants C have fly front, front, back darts and self-faced yoke, purchased belt.

Pattern Sizing: 4 to 20; I used a size 14.

Did it look like the photo/drawing on the pattern envelope once you were done sewing with it?
Yes.

Were the instructions easy to follow? You bet.

What did you particularly like or dislike about the pattern? I liked this pattern because it was quick and easy. A nice pair of pants with clean lines. The design included a separate piece for the fly and the contour waist band are always a "like" for me. No dislikes.

Fabric Used: I purchased some spring/summer suiting from JoAnn's in a wheat and medium brown polyester during one of the sales this spring.


Pattern Alterations or any design changes you made: I did my usual crotch alterations: shorten the length and added more room to the body space of the pattern; swayback adjustment to the contoured waistband; and added about four inches to the length of the pants.
Back Pant Adjustment
Front Pant Adjustment
Swayback Adjustment


The pattern includes one inch seam allowances, but I was able to fit them perfectly with just my normal adjustments. So I sewed all seam at the one inch mark. For the waist I sewed one inch allowance on all seams.

Would you sew it again? Would you recommend it to others? Yes and yes. This is a wardrobe builder. You can easily add lining to the pant, and you can match them up with another cordinates. I matched them with S4076 and S2977. (Shoes not the best match for this combination. lol)

Conclusion: This is a wardrobe builder that is easy to fit and sew. The pattern has clean lines. You can wear knit tops over them or wear blouses tucked inside them.

Sometime this summer, I will make the jacket.

Parting shot: I wore my "Big" flower dress to church on Sunday.


Happy Sewing!
C

Monday, June 29, 2009

M5710 - The Second Time Around


This is the second time around for these pants. This time I inserted the zipper in the front instead in the back. I wanted a smoother finish in the back. I also slightly narrowed the pant leg.

If you remember, when I first made these pants I followed the crotch alterations given in a Threads magazine issue. This alteration works for me as it provide the right amount of comfort in the crotch area.

This pattern is a keeper!

Saturday, June 27, 2009

Found the Curve - M5667 Part III


DD got some lotion on the pants while putting them on. Oh well, it should wash out.


Next version I'll narrow the legs a little more for a snug/comfort fit.


A few weeks ago, I made the first pair of jeans using M5667. The pattern photo shows a curver pant leg than the pattern produced. So I re-shaped the pant leg of the second pair to create "the curve" shown in the photo.

Inspired by a 1981c Palmer/Pletsch jean pattern, I decided to include some detailing on the back pockets.

I didn't have enought fabric for the back yoke, so I used some left over faux leather from a jacket made for DD in 2007. DD was quite pleased with the results and so was I.

Hear are a few photos of DD wearing the jeans with the jacket (2007).


This is the first of several projects that I will post this week. Left to review:

Three pairs of pants for me
One jumpsuit
and
One maxi dress

Happy Sewing

Friday, June 26, 2009

Michael Jackson - The King of Pop 1958 - 2009

Truly the world has lost one of the greatest musical geniuses, Michael Jackson. I grew up on MJ music and am still a fan. Here are three of my favorite music videos by MJ.


Monday, June 22, 2009

Finding The Curve M5667 - Part II

I'm almost finished with the second pair of jeans for from M5667. Both DD and I are pleased with the look so far. If I'm up to it, tonight I will sew the loops, waistband, hem and press them.

Wondering why I'm posting now when I'm so close to finishing? This process ties in with a previous post titled: "Jean Pool". It's all about discovering new and better ways to sew a great pair of jeans, which most of you have already done. The process is more for me, but I hope it inspires/helps some of you as well.

Also, today's post is about designing unique and interesting details on the back pocket. My vintage Palmer/Pletsch McCall's pattern (1981). Can I call it vintage (over 25 years old)? Anyway, they are two columns of instructions that teaching the sewist how to design unique pockets. Two topics in one post, blended. First progress on DD jeans.

Plain pocket canvas. Ready for embellishment and/or details. I had already finished the edges and press the fold lines.

Adding embellishment to the back pocket is new to me. So I wanted to keep it simple. I used some faux leather leftover from a jacket made for DD about two years ago. The faux leather was cut into two stripes. I didn't do any measuring, just guessing the length and width. Here are the two back pockets for the pants. After I sewed them on I notice that the stripes were not placed exactly the same on each pocket. I didn't want to ripped one out. So I added another stripe to one of the pockets.

Here's the pocket with the top edge finished.

To test the look of the pocket on the pant, I placed the pocket onto the pant with the yoke before sewing.

Here both pockets sewn onto the pant.


Here is a view of the two back pant legs joined at center back.


The first pair I just quickly sewed them together, not spending a lot of time trying to make them "perfect", or my version of perfect. Here is a view of the zipper.

Here is a view of the pants (rightside out). I think the reshaping looks more like the photo on the pattern envelope.

Tips from M7555 (1981).


Quick Tips - Design

Look in a child's cooking book for illustrations to inspire pocket designs. Use the illustrations to trace onto the pocket with tracing paper and wheel.

Add appliques and ribbons. Fuse them; then edge stitch or zigzag around them.

Add middy braids to create designs

Create your own name tag with permanent markers and faux suede; then attach it to the pocket.

Add piping - copy pocket pattern. Split into section, add seam allowance where necessary, and add piping as you join the pieces together.

Quick Tips - Sewing

When the pocket is ready to be attached to the pant:

Pound to flatten and trim away bulk at top corners.
Use fusible web to hold the pocket in place while stitching to pant.

Those are the tips.

Happy Sewing!
C

Sunday, June 21, 2009

Happy Father's Day


Wishing everyone a joyous Father's Day!

Wednesday, June 17, 2009

Stuck - Flight Delayed A Second Time! Grrr!

The conference is over and I'm stuck at the airport. This is so irritating, but what can I do about it? Nothing. So I'm sitting here reading blogs and thinking about project planning for the "summer" wardrobe.

So far this year, I have made five dresses, five vest/jackets, two pairs of pants, and one skirt for myself. For DD: one dress, three pairs of pants, and a vest. Clients: three skirts, four dresses, five accessories, and four jackets/covers ups. Quite a list of completed projects so far.

This summer, I'm hoping to design a wardrobe for DD (Career). She'll be graduating from college next spring. Part of my gift to her is a mini wardrobe. She most look polished and professional when she starts her "new job". Graduation isn't for several months so I probably won't start sewing it until late in year. In the meantime, I'll work out the wardrobe design, decide on a color palette, and gather fabric and notions.

Another project on the horizon is making some jeans, following some Palmer/Pletcsh tips.


To match, shabby chic t-shirts. Last week I read an article in "Real Simple" that featured the evolution of the infamous t-shirt. There were some very interesting designs. I'm inclined to copy one or two. Pom-pom adorned to sheer trim contrasts with rich jewel tones to a flowy white tee.


Well, I guess I'll go back to reading. I have two more hours to wait in this d**n airport. Grrr! I see telecommuting in my future the rest of the week.

Happy Sewing, fashionistas!
C

Sunday, June 14, 2009

Here In Albany, NY - Sewing on My Mind

Well this week I'm in Albany, New York, attending the annual User Group Meeting (InfoEd International). Every year my team makes the trek to the conference. Originally, it was supposed to be in New Orleans, but because of low participation the vendor moved the conference to Albany. It was a good decision. About 150 institutions are in attendance.

Everyone is suffering budget cuts. I'm glad we were able to attend. It's good to get away from the day to day, and it's great to talk and see the people who help us keep the system running. There are a lot of familiar faces (other customers), but many that attended last year's conference aren't here this time. May be more people will come tomorrow.

I was able to make a two pair of slacks, both from McCall patterns: M5818 and M5710. Both turned out well. I've used the M5710 before. Back zipper in pants is my least favorite; so I installed in the front. No changes to the M5818 pair. When I posted my review of the dress from this pattern I thought I wouldn't use the pant pattern, but you know how that goes. I actually cut out two pair, only had time to sew one. I'll post my review later.

Anyway, I'm here; my sewing stuff is at home. There isn't a lot to do or see in Albany. Oh well...,

Happy Sewing!
C

Thursday, June 11, 2009

Prom 2009 - The Princess Ball Final Chapter B5182

Miss. Archanette, Prom May 15, 2009

Happy lady

Joseph and Archanette

At the Car

Pretty Hair

Daughter, Mother, and Son


B5182
Finally, I am able to post the final review on the making of my niece's prom dress. It's been a journey, but a pleasant one. There is a lot to cover in this review and my sister in law provided lots of photos.

This was the second choice. The first was V2891, which turned out to be a little too much exposure. This pattern was the perfect selection for her frame, her style, and the occasion. I must admit, when I arrived at her home I was delighted to see a young lady who looked like she was going to a "princess ball".

Pattern Description: MISSES' DRESS: Lined dresses A, B, C have close-fitting bodice, semi-fitted bias skirt, train and back zipper. A: contrast drape and trim. C: bow. I made view A.

Pattern Sizing: 6 - 20. I started with between size 16 to 18. Then reduced the bodice between 14 and 16.

Did it look like the photo/drawing on the pattern envelope once you were done sewing with it? Yes, I made a few changes. But for the most part my version of view A looked like the dress on the envelope.

Were the instructions easy to follow? Yes, the parts of it that I followed. There were a few that I opt to use a different method.

Step 9 - I made french seam to join the front and back of the drape instead of double-stitching the seam. The french seam look much better than the double stitching. Pattern companies tend to suggest this method over the french seam method for handling sheet fabric.


Before Step 18 - I used the organza as an overlay on the collar instead of adding trim (Step 88).


Step 89 - I made loops for the button on the collar instead of sewing thread eyes.


Step 85 & 86 - For the lining and the skirt hems I did a rolled hem instead of following the instructions given.

What did you particularly like or dislike about the pattern? My sister in law picked this as the second choice; my niece agreed. I thought it was a much better choice than the V2891. I was happy to make it for her.

Fabric Used: Crepe Satin - Back from JoAnn Fabrics and a organza with peppered with glitter. Ambiance lining.

Pattern Alterations or any design changes you made: There were quite a few.

Notions: My sister in law couldn't find a good thread match for the fabric. So she bought Sulky embroidery thread. I tried it; it sewed beautifully.

Alterations are recorded here.

Design and Construction Changes: See notes above in the instructions section.

I also made a stole, garter (a Chicago thing), and purse for the occasion.

My nephew (Archanette's brother) also went to a prom.


Would you sew it again? Would you recommend it to others? Probably not. But I think its a great choice for a special occasion.

Conclusion: This was a great choice for my niece's prom dress. She looked absolutely beautiful and enjoyed her special day. I would recommend this dress to others.

Here is my flickr set which documents the project and the event.

Tuesday, June 9, 2009

Peter Sow Dress - Part IV


In this review I will include information on two dresses that were "partially" made from S2926. For the first dress, I made alterations to copy an inspiration dress. And the second one, I used the bodice to save what would have been a disaster.

In January 2009, I started a series of projects called "Copy That". I am constantly on the hunt for fashion that appeals to my taste and life style. I found the inspiration dress in Marie Claire magazine, which features a tweed coat a top of an audacious print dress, "Classy meets Sassy".


I like both pieces. And plan to make a similar coat with a basketweave boucle purchased from Gorgeous Fabrics.

I used this simplicity pattern to copy the style of the Peter Sow dress.

Pattern Description: Short waist dress, midriff with skirt variations.

Pattern Sizing: 8 - 24, I used 14 a neckline, 16 through the shoulder and upper body to capture the fullness of the inspiration dress. For the skirt I used to straight pattern size 14.

Did it look like the photo/drawing on the pattern envelope once you were done sewing with it? No. I changed it to match the inspiration dress. But based on the paper pattern I think it would look very much like the photo on the pattern.

Were the instructions easy to follow? Yes the parts of it that I followed.

What did you particularly like or dislike about the pattern? I selected this pattern because it was the perfect solution for creating the Peter Sow dress. It had a similar neckline and bodice. Making the adjusts in the bodice and the elasticized waist was easy. I didn't dislike anything about it as I had a special goal in mind when I selected it.

Fabric Used: silky polyester floral print that I purchased at JoAnn's a few years ago. I didn't know what I would make out of it when I purchased it, but it was perfect for the Sow dress.

Pattern Alterations or any design changes you made:There were several including my usual FBA. I added bust darts, extended the bodice, eliminated the midriff, made the sleeve band half the width, and added elastic to the waist.

Initial Alterations and Inspiration Information

After I attached the bodice to the skirt and tried the dress on, I noticed the bodice was too long. I decreased the bodice length by 1 1/2 inch then reattached it. Perfect.

The sleeve band was wider than I wanted for this dress. So I cut two bands instead of four. Then I folded them in half, stitched the short seam of each, then sewed one end of the length to the sleeve. To finish it, I slip stitched it closed.

Elastic waist - I sewed a 7/8 seam allowance. Turn it down toward the skirt and stitch to make the elastic casing. Then threaded 3/8 inch elastic measured for by waist. At the back opening I stitched closed the ends of the casting with the elastic slightly passed the end. Then I inserted the zipper.


Now for the second dress. This was truly a "save the dress anyway you can". I blogged about five must haves last fall and the structured dress was included in the five. Well, Vogue has the perfect structured dress. V8280, which has been reviewed here several times.

Well, my first mistake was not making a muslin. The back was too tight and the flange didn't lay flat and had some excess fabric at the side seam. You can imagine I was disappointed when I couldn't come up with a quick fit. The fabric that I used was leftover from a dress that I made many, many years. There was only about a yard to make the bodice.


I wanted/needed a quick fit. So I took the top of the S2926 and combined it with the bottom of V8280 to come up with a wearable dress.

Fabric: Very nice polyester for the skirt and leftover dupioni silk from DD Easter dress.

Changes:
Continued the back darts through the midriff to address my sway back.


Followed the same sleeve band application as the inspiration dress, adding a inch more to the width.


Would you sew it again? Would you recommend it to others? I probably will not make this one again. I think I've worked "it" enough. But do try it if it suits your taste. It's not a difficult pattern to sew, and I didn't notice any fuzzy instructions on how to make it.


Conclusion: This pattern was the perfect solution to copy my inspiration dress. And the plus is: it saved the bottom of my V8280 dress (will try again in the fall).

Friday, June 5, 2009

Nickie's Dinner Dance Dress (M5382 & 5669) - Final Chapter

At last, I'm finally able to post the Dinner Dance Dresses that I made for my niece and her friend Rihanna. They looked very beautiful today. Caution: The post is image heavy. The reviews of my sewing experience follow.


My niece, Dominique, in M5382


Rihanna, Dominique friend in B4731.


Pretty Feet and shoes.

Dominique's Jacket is made from M5669.


Everyone is happy! Me and the ladies.


Review of Dominique's outfit:


Pattern Description: MISSES'S DRESS AND SASH: Close-fitted, fully lined dress with princess seam on bodice, gathered at waistline and front pleated over bodice, back zipper closing; dresses A, C have shoulder straps; dress B has waist and lower edge with lace trim; dress C has skirt with drape detail and sash; dresses A, B, C are below mid-knee lengths.

Pattern Sizing: size 4 to 18; I made view A with Sash size 8.

Did it look like the photo/drawing on the pattern envelope once you were done sewing with it? Pretty much.

Were the instructions easy to follow? No problems, easy.

What did you particularly like or dislike about the pattern? We liked everything about the design. The pattern was not difficult to sew and the alterations: minor. It's wonderful sewing for the young and kinda flat. ;-) I have no dislike. But a few observations:

The pleated front bodice may require some interfacing for crispness. My version is made of dutchess satin. I didn't add interfacing, but tacked the pleated front bodice to the inside bodice to keep it in place. Second, the front skirt has fewer gathers than the back. On the envelope photo, the gathers appear to be evenly formed through the front and back.

Fabric Used:; dutchess satin and nice polyester lining.

Pattern Alterations or any design changes you made: I should have cut it at size 8 to begin with. So altering the muslin, I decided to cut it a size 8, which gave her the needed ease through the bodice and I added about an inch to the top of the inner bodice. We were a little short on length of fabric; so the sash is about 5 inches shorter than the drafted pattern.

More detailed on alterations and changes here

Would you sew it again? Would you recommend it to others? Probably not. I made this dress from niece and don't plan to make it for myself or DD.

Conclusion: I recommend this pattern to others. It's perfect for a prom dress. It's not difficult to sew and yields very nice results.

My Flickr Set on the making of the outfit

Jacket Review:

I made this jacket (view-C without the ribbon closure) for my niece. It compliments the dress made from M5382-A. I will review it later. This outfit was finished a little over a month ago. My niece will wear it to her 8th grade dinner dance on June 5th. I'll post the event photo later; today I wanted to post some reviews as I have many. I started with making a muslin several months ago. Then in March I made the actual outfit out of the fashion fabric. My review is below.

Pattern Description: MISSES’ JACKETS: Loose fitting, unlined jacket ends at waist and has neck ruffles, snap closure at neck and sleeve variations; jackets B, C have ribbon bow; jacket C has ribbon binding.

Pattern Sizing: 4 to 18, I cut between a 6 and 8.

Did it look like the photo/drawing on the pattern envelope once you were done sewing with it? Yes, for the most part.

Were the instructions easy to follow? Yes, they were.

What did you particularly like or dislike about the pattern? I picked this jacket to complete the outfit, and my sister approved it. What we liked about the design was the ruffled neckline. Pretty and appropriate for the occasion. My niece liked it too, which was a plus. Young ladies can be hard to please. :-) My dislike from a seamstress point of view was the application of the ruffle. I didn't like the finished inside of the neckline. I couldn't sew perfect seams. So the stitching lines were not perfectly uniform. To help make myself feel better I added bias tape to the inside of the neckline

Fabric Used:Pattern Alterations or any design changes you made: There were only a few alteration and design changes.
- Added bias tape to inside neckline
- Omitted the ribbon and snap closures at the neckline
- Added 1/4" to the length of the shoulder seam.

Would you sew it again? Would you recommend it to others?Conclusion: Nice little jacket that produce satisfactory results. It even pleased a 13 year old. I think a beginner could make this jacket.

LinkWithin

Blog Widget by LinkWithin