Friday, December 20, 2019
Client Holiday Skirt - Burda 6390
Hi Everyone,
Christmas is just a few days away. With parties, celebrations, and quite a bit of sewing going on in my world, no time for blogging and very little time for Instagraming. But I just had to post this picture of Alesa, my dear friend's daughter holiday skirt that I made two weeks ago.
Burda 6390 dress pattern is what I used to make it. I'm not sure if this is a true pattern hack. I simply used the skirt portion of the dress, added a lining with tulle and a waistband. That's it!
I simply put it together like any other seven gored skirt with a zipper back and waistband. To show off the fullness of the skirt, I added a lining that I sewed on two tiers of gathered tulle. The tulle is between the lining and the skirt. The front of the waistband is about 3 inches wide tapering to 1.5 inches wide in the back.
She chose this audacious, eye popping, African or Ankara print fabric that she purchased at a local store on west 95th street in the Chicago Beverly area. This no fuss cotton fabric sewed up quickly and the finished press was nice and crisp.
Alesa received loads of compliments, and she was over-joyed with her "holiday outfit". After her event, she reminded me that this would not be the last skirt I'd make for her. ;-)
Pattern Ready!
Happiest of Holiday!
Cennetta
Sunday, December 8, 2019
Giveaway Winner! "A Stylish Guide to Classic Sewing"
And the winner is:
Kitty please provide your email address so that I can forward it on to Sarah and Julie. Just click on the profile Blogger link on my home page to send me an e-mail.
Thank you everyone for participating in the "A Stylish Guide to Classic Sewing" giveaway.
Happy Sewing!
C
Kitty please provide your email address so that I can forward it on to Sarah and Julie. Just click on the profile Blogger link on my home page to send me an e-mail.
Thank you everyone for participating in the "A Stylish Guide to Classic Sewing" giveaway.
Happy Sewing!
C
Saturday, December 7, 2019
A Stylish Guide To Classic Sewing And Giveaway
I'm so excited to be part of the second book released by Sarah Gunn and Julie Starr. Earlier this year Sarah invited to be one of the contributors. I was delighted to have an opportunity to be one of a select group of fabulous sewists/designers.
The look and feel of "A Stylish Guide To Classic Sewing" sets it apart from other sewing/style related resources. It is well written and beautifully illustrated. It's a great resource to help you sew and create a wardrobe to die for.
"A Stylish Guide to Classic Sewing" examines 30 garment types that allow you to explore history, styling, sewing tips. My favorite chapter is the Classic Garment Gallery. This chapter features over 50 impeccably made garments. Each photo is labelled with the style and references the page in the book. This allows easy look up for interested style information.
Also, there is a classic pencil skirt pattern included with detailed instructions on how to make a beautifully tailored modern pencil skirt. It doesn't stop there. The resources section lists a plethora of vendors and references to help you fulfill your classic wardrobe dreams. It's a winner all the way around!
"A Stylish Guide to Classic Sewing" is available in paperback or for your Kindle. If you would like to purchase a copy, it is available on Amazon
To my readers, I am happy to announced a book giveaway! Please leave a comment with your name and e-mail address by tomorrow, December 8th , for a chance to win your very own copy! The winner will be announced on my blog the following day. The book will be shipped from the publisher C&T Publishing. The winner residing in the USA will receive a hard copy. Those who reside outside of the USA will receive a digital copy.
Book Release Blog Tour
As part of book release, Sarah has arranged a blog tour with several creators who are featured in the book's gallery. Please stop by to hear what they have to say about the book.
Dec 2 Lori VanMaanen / Blog - girlsinthegarden.net / Instagram -@girlsinthegarden
Dec 3 Andrea Birkan / Instagram - @andreabirkan
Dec 4 Anita Morris / Blog - anitabydesign.com / Instagram - @anitabydesign
Dec 5 Karen Helm / Blog - fiftydresses.comfiftydresses.com / Instagram - @fiftydresses
Dec 6 Alex Florea / Blog -sewrendipity.com / Instagram - @sewserendipity
Dec 7 Lucy VanDoorn / Blog - myloveaffairwithsewing.com / Instagram - @myloveaffairwithsewing
Dec 7 Cennetta Burwell / Blog -themahoganystylist.blogspot.com / Instagram - @cennetta_burwell
Dec 8 Manju Nittala / Blog - sewmanju.com / Instagram - @sewmanju
Dec 8 Dorcas Ross / Instagram – @lonestarcouture
As alyways, thank you for stopping by my little space is the cyber world.
Now is the time to start creating "A Stylish Wardrobe".
Happy Sewing!
C
Now is the time to start creating "A Stylish Wardrobe".
Happy Sewing!
C
Friday, December 6, 2019
Rhonda's Shirred Wrist Sleeve Hacked Into A Shirred Forearm Sleeve - Notes on a Pattern - M8003 Part II
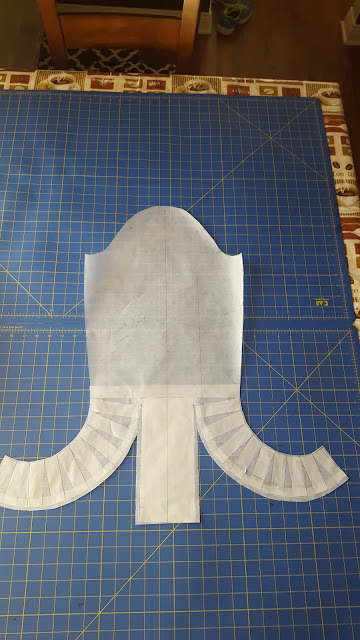
Happy to post about my little experiment with Rhonda's shirred wrist sleeve. I decided to hack it into a shirred forearm sleeve. It turned out beautifully.
This was so easy to design/hack. I made a shirred wrist sleeve for another McCall's m6964 knit top a few years ago. That post is here.
Rhonda give you step by step instructions on how to make the shirring. It's really up to you on how far you want to go with it.
I will use this sleeve again. It adds style to a regular ole plain sleeve. Below is how it looks just hanging.
Here are my tissue patterns for both sleeve designs: shirred wrist and shirred forearm. Try it; you'll like it.
 |
| shirred wrist sleeve |
 |
| Shirred Forearm sleeve |
Happy Sewing!
C
Notes on a Pattern - McCall M8003
Have you ever been so excited about a pattern so much that you envisioned wearing the finished garment with enormous confidence? Or have you ever worked so hard with resolving a fit issue that in the end still did not meet your standards? Or have you found it too hard to just give up on making it just right for you? Well, it happened to me. AGAIN...,
This time with McCall's M8003. The process started out as always. I liked the pattern. I cut it out. I made my pattern adjustments, so I thought. I cut out the bodysuit (at least that's what we used to call them in the 70's). I put it together feeling like I'd followed all the steps just right.
Now, It's time to try it on minus the neckband, sleeves, and closure. Multiple issues...,
UGH..,
Okay, Okay, let me give you some of the basic information about the pattern before I continue.
The Pattern Description from McCall's website. Close fitting tops, or pullover with snap closing, mock collar or neck band, has length variations. B: Contrast yoke. Sizes: 6-22 in two size groupings.
I used a ITY polyester/lycra knit from Fabric Mart Fabrics. Love this fabric. I purchased multiple yards in multiple colors. Anyway, it was perfect for this bodysuit.
The instructions were clear and very easy to follow and so was the construction techniques.
After I examined my top and noted all of the issues, I looked back at the top modeled on the envelope and saw some of the very same issues. My initial thoughts were, I didn't allow enough for the FBA. But the model doesn't appear to need an FBA; yet the issue exist for her as well.
My first and most visible problem was the yoke. I had adjusted it to include a partial FBA. When I tried it on, it didn't fit across the upper chest. My initial adjustment is below.
 | |
| Yoke over the front top to show adjustment for FBA |
Below is a picture of the modeled top on the envelop. Take a look at the hem of the yoke. So, it might be good idea to add the elastic to help keep the shape of the yoke. Again, another solution, may be to to lengthen it. Maybe that will resolve the issue.
Next, I have vertical drag lines pointing to the shoulder. My thought was the FBA and not enough length along the torso could be the cause. Again, the modeled top has the same issue when the arm is in a relaxed state.
Sorry this is not a happy review. I struggled with this one. It took me hours to get it to a better state. And I was still not totally pleased with the results of my efforts. To complete the adjustment section of this post, my other adjustments are below: FBA, prominent shoulder blades, and slightly forward shoulder. No swayback or center back seam added. It's a bodysuit and will be held close to the body.
 | |
| I used the Sandra Betzina's FBA (no dart method). |
I did make one design change, which I am very pleased. I used Rhonda's shirred wrist design to create a shirred forearm. It looks great. That will be the very next post.
I've put a lot of time into the bodysuit already, but I feel like giving it one more try!
Parting Shot: I was gifted this snap fastener tape over fifteen years ago. Never knew how I would use it. So, instead of placing individual snaps on the closure, I used the tape. Perfect.
Happy Sewing!
C
Wednesday, December 4, 2019
Simplicity S8982 - The Great Wardrobe Builder
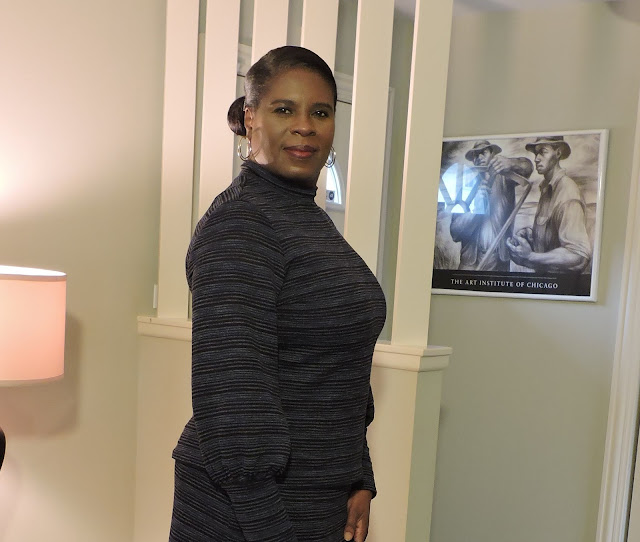
This Simplicity pattern can be used to build a little mini wardrobe. For the SewYourView November Challenge, I came away with four new pieces: three tops and one skirt. They can be mixed and matched with other pieces I already have.
For now, this raps up my posts on S8982. It's an easy pattern that you can get a lot of mileage out of. Out of the four pieces that I made, my favorite is the hacked key hole top made of ITY polyester/lycra jersey. You'll see this one again.
Anyway, this is more of a pictorial posts. All of the pattern review notes are in the two previous posts. Enjoy! More to come later.
Happy Sewing!
C
Labels:
fabricmart fabric,
fall,
knit,
mood blogger,
mood fabrics,
S8982,
sewyourview,
Simplicity,
skirt,
sleeve,
top,
wardrobe
Subscribe to:
Posts (Atom)


