Friday, June 29, 2018

Burda Flounce Top 6428 and McCall Pants 7483


Happy FRIDAY!  It is super hot in the Chicago land area.  I'm talking upper nineties, feeling like 105 degrees and very sticky.  I think I'll spend a little time sewing this weekend.


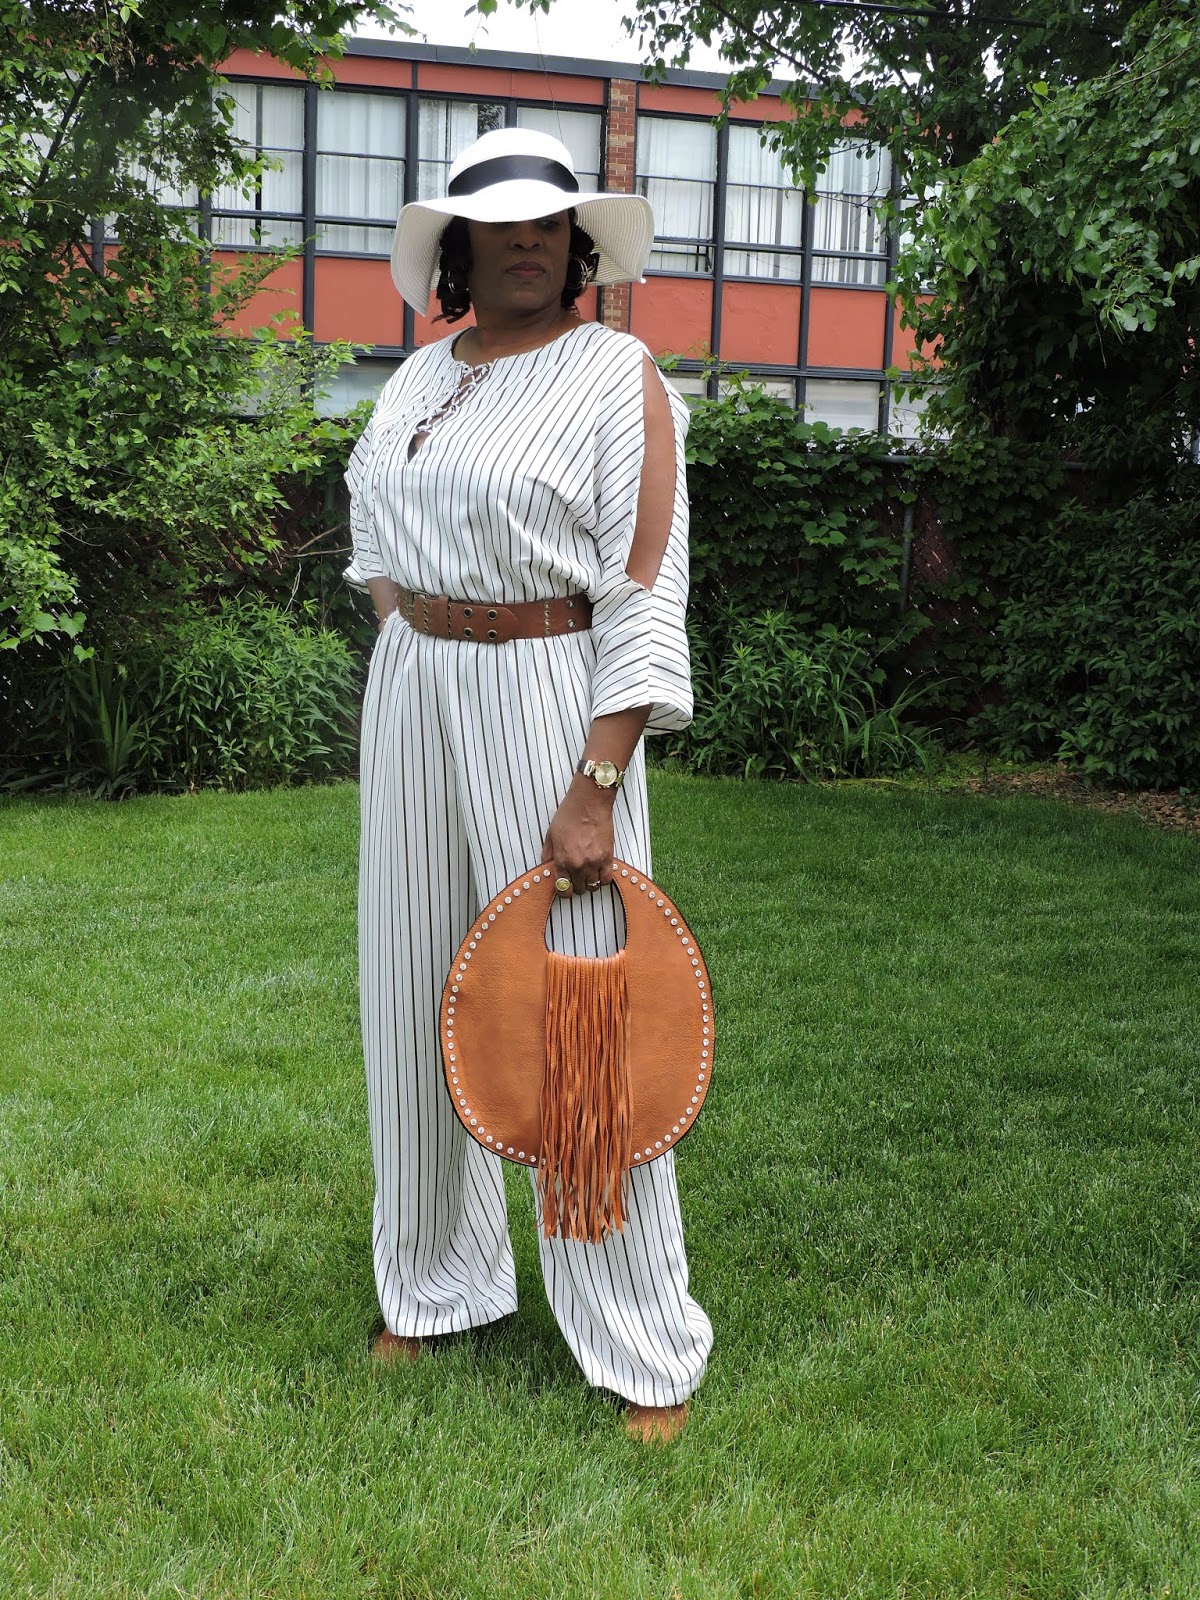
Today, I'm reviewing McCall 7483 (pants); also I'm wearing my new Burda flounce top 6428.  NOTE:  I used steam a seam on the hem of my top.  It created puckering all the way around.  I hate that.  I'm going to try to correct it.  Wish me luck.

The pants are wide leg with a deep yoke, front pleats and back invisible zipper.  I used size 16 with minor changes.  There's not a lot to these pants: front and back yoke; front and back pants.

I used a light weight polyester suiting that was gifted to me some time ago.  It has a crisp hand and stands slightly away from the body.  It's charcoal in color.  Good to wear in the fall and cooler spring/summer days.


The instructions were pretty typical of the big four.  And I didn't see anything confusing or difficult in them.  The construction was easy enough for a beginner to sew.

I only made very minor changes:  lengthen them about for inches and shorten the front pant about 1.5 inches at center front and tapering to 0 at the side seam.

I could have added maybe .5 inch to the center back and added a bit to the hook of the crotch.  If I make them again, I will.  Another change I'll make to this pair is to sew the pleats together through the mid hip area.  I don't like the way they open.  It's not neat to me.  That's my only dislike about how they turned out.

I can't say that I will make these again for myself.  But that remains to be seen. ;-)

These are a basic pants with a pleated front that all level sewists can make.  If this is a style that you like, I recommend that you give them a try.  Make a muslin first to make sure the fit is right.

Have a great weekend and happy sewing!
Cennetta


Wednesday, June 27, 2018

Mood Fabrics Swatch Club


Every once in a while, I request swatches of a few fabrics I'm interested in just to see how they actually look and feel in person before I decide to buy yardage for a sewing project.  Yesterday, I was surprised to receive a box full of beautiful fabric swatches.


The first thing I notice was the cute sturdy box.  It looked like a gift.  When I opened the box, inside there was a gift, a set of 25 "big" swatches to gaze at, to feel, and to decide how much of each I'd like to purchase.


There is a wide variety of textiles, my box included a mini sequins, silk chiffon, two weights of denim, knits, and some polyesters and viscoses.  Just a beautiful array of fabrics, something for every occasion and lifestyle.

I mentioned "big" because I never received swatches this large before from any swatch club.  There was no newsletter type booklet included to staple the swatches to.  But the little gift box did include a coupon, booklet of potential ideas.


If you are interested in joining the Mood Fabric Swatch Club click on the link:  Mood Swatch Club  for details.  There are three subscription options that you can enjoy.

Happy Fabric Shopping!
C

Thursday, June 21, 2018

Cute Flounce Knit Top - In Review Burda 6428


I finally got around to making my "first" top from Burda 6428.  This is the same top made by Ms. Faye of Faye's Sewing Adventures.  Her top inspired me to give it a try.  I even selected a similar color to her inspiration top.  Here is my review.


Pattern Description:  Burda describes this as a fitted t-shirt pattern.  I'd like to add with neck variations.  Looking at view 1 on the pictured model, it a little loose to me. 


Pattern Sizing: It is available in sizes 8 to 18.  I used 14/16 with modifications. 

Did it look like the photo/drawing on the pattern envelope once you were done sewing with it?  Yes, it did look like the photo.

Were the instructions easy to follow?  Everyone knows that Burda can be a little vague with the instructions.  But they were fine for me.  I didn't see anything confusing.

What did you particularly like or dislike about the pattern? I like the neckline, the flounce, simply the look of the t-shirt.  It didn't look like your typical T.  On the construction - I like the finishing of the neckline and the lower armhole.  It looks clean and RTW.

After my few modifications, the neckline is still a little wider than I am accustom to.  Next time I'll bring it in a little more. 

Fabric Used:  I purchased this knit from Marcy Tilton.  It kinda of slinky and has great recovery.  It's semi-opaque.  I did experience a little stitch skipping even though I used a microtex sewing machine needle, size 10, which works for me with most knits.

Pattern alterations or any design changes you made: 


  • I cut size 14 at the neck and 16 through the bust area and tapering back to size 14.  
  • Swayback adjustment - added a center back seam, tuck at lower back,  scooped out excess at lower back and adding the amount of the tuck at the hem.  
  • FBA - I used Sandra Betzina Fast Fit FBA.  I saw Ann of Gorgeous Fabrics' Blog use this technique for one of her projects.  Sorry, I can't remember which project.  Her post post reminded me that there was alternative to creating a FBA.  This one does not produce a bust dart.


Would you sew it again? Would you recommend it to others?  I'll give this one another try.  I like the cut of the t-shirt.  Next time, I'll reduce the opening of the neckline.  I do recommend it to others.  It's easy and it's cute.

Wednesday, June 20, 2018

Notes on Two Patterns - Vogue 1498 and McCall 7775


Good afternoon everyone!

I wanted to share some thoughts on upcoming sewing projects.  Today's Notes on "Two" Patterns is about two dresses I plan to make during the spring/summer 2018.  Monday I spent time anaylzing and fitting patterns for my summer wardrobe.  So far, I'm working on two color palettes: one is black and white with a little color here and there and the two shades of green.  These are the basic colors for the wardrobe capsules.  I'm still trying to work out the garment types for each capsule.  So that's a work in process.

I bought McCall 7775 and Vogue 1498.  They have similar upper body style, right?  Yes and no.  McCall's 7775, views A/B are just one front pattern piece, but Vogue 1498 has a two piece bodice front and a front slim skirt.


McCall's 7775- I was skeptical about trying the views A/B because of the neck and bust area.  There is possible gapping at the neck.  The finished bust for size 16 is 40.5".  I need a little more width. I put the pattern against my body to see how it would fit my upper body.  The armhole area is low, the apex was close to the center front seam instead of the center of the pattern piece, and not enough width.  Definitely there are adjustments needed.   Then, I examined views C/D.  The fullness of the bust area for the same size was a few inches wider.  These views have pleats in the neck area, which gives more volume throughout the dress.  I like this view too, but was more interested in making view A/B first.    So back to view A/B.  Initially, I hated the idea of making a FBA.  But it was the only way I could have a dress that fits well.

My next step is to make the required adjustment.


  • I slashed and spread the front dress the desired amount, which includes some wearing ease.
  • The resulting change created a bust dart.  I rotated it slightly, because I think this location looks a little better than a horizontal bust.
  • This change created width as well as length.
  • I added to the armhole area to bring it closer to the pit of my arm.
  • The front facing also required the same adjustments as the front dress.  I used the front dress pattern as a guide to make those changes.  The picture below shows the front facing over the front dress.


Back adjustments.


  • There is a center back seam, which is great for me.  So I didn't have to add one for the swayback adjustment.
  • No prominent shoulder blade adjustment as most of the shoulder area is exposed.  Will see how that works after the muslin fit.
  • Swayback adjustment - tuck across the lower back area, slight curve out at the lower back, and add the amount of the back tuck at the hem (sorry, hem not pictured here.  The pattern was long and this was a minor adjustments).
  • Update - I forgot to raise the armhole on the back dress pattern. I will certainly do that before the muslin fit.
My plan is to make a muslin sometime this week.  When the fit is right, I will make the actual dress.  So stay tuned for the final outcome of my fit of this pattern.

Vogue 1498


Love this dress. It's slimming, sassy and sophisticated all at the same time.  What do you think?  Anyway, it's a winner for me.  This number has a similar neckline of McCall 7775.  A plus is that the bodice is princess seam, which makes the FBA a little easier to fit.  No super wide bust darts to fiddle with.  The details in another post, though.

Coming soon McCall's 7775, View A/B dress.

Happy Sewing!
C


Monday, June 11, 2018

Summer Jumpsuit Brown, Black and White Striped Rayon Twill - Vogue 9260


Summer time sewing! 
 I was so happy when the rain stopped. Being so anxious to show you my latest sewing project, I quickly got ready to take a few pictures outdoors.  


This jumpsuit was half finished for about two weeks.  Friday evening I was determined to finish it.  This lovely brown, black, and white striped rayon twill was purchased several months ago from Mood online store.  It's still available.  It has a smooth hand and it's floaty.  Perfect for the summer time comfortable.  This new jumpsuit is perfect vacation sportswear.  Of course, it's good to wear for Saturday lunch with the girls or a nice stroll in the park with your better half.  Rayon is easy to press, but does wrinkle a bit.  No worries with this fabric.  The stripes makes them barely noticeable.

The pattern that I used to make it is Vogue's very easy 9260, copyright 2017.  I think I bought it last year, but I hadn't decided on how I would style it.

The description is very brief:  very loose-fitting pull on romper and jumpsuit have cold should and length variations.  The "cold shoulder" description shoulder be "cold arm" instead.  It comes in two size groupings:  XS-S-M and L, XL,XXL.  The second grouping was the only copy at the Orland Park JoAnn's. So I just bought it with the thought of adjusting it as needed. So I used the large and scaled it down.  I guess somewhere between a medium and large.  As the large was much too big for me.  This pattern has a lot of style ease.  The finished bust is 48.5 inches and the finished hips is 50 inches.  Both well above my measurements. I scaled it back at least 4 inches in both areas.

My finished jumpsuit looks similar to the drawing.  I don't think the "cropped" pants is quite the look for me.  So I lengthened the pants by several inches so that the hem falls around the heel of my shoes.  Outside of that it does look like the drawing.

The instructions were a piece of cake.  Nothing difficult or confusing.  (It seems like I always say that. ;-) )

I like the style of it.  The drawstring, the cold arm, and the wide pant leg.  No real dislikes.


I did make a few more changes in the construction of it.
  • Instead of purchasing cording, I made my own.  Cutting the fabric on the bias about an inch wide, two pieces 12 inches long for the loops and one piece 20 inches long for the drawstring.   Plus it is a perfect match for the jumpsuit.
  • I added 1.5 inches to the length of the bodice.
  • The raw edges were serged.  To finish the cold arm opening I only turned the cloth once.  So you can see the serged edges.
  • The instructions say to cut the elastic the measure of your waist plus an inch.  I cut it 5 inches smaller.
I will make it again.  I think I will use the bodice and make a skirt waist dress instead of a jumpsuit.  I do recommend this fabric and the pattern to others.  The fabric is perfect for those fun floaty summer projects that you might be planning.  The pattern is very easy and does not take long to sew.  


Side Note- I was a little worried about how the photos would turn out.  I had a chemical facial peel and laser hair removal less than 24 hours before the pictures were taken.  I'm glad that they were publishable as I didn't want to wait another day before posting something to the Mood Sewing Network blog and my own blog.

Happy to be back sharing my sewing adventures and hope to post again soon.  

Have a great one!


Wednesday, June 6, 2018

Eyes Closed Shut in Simplicity 4112


I cannot for the life of me figure out why my DD always has her eyes closed when I trying to take pictures.  This time I decided to go ahead with the posting, instead of taking more pictures again.

Another early spring 2018 project finally making it to the blog.  The (S4112) pattern is out of print, but still fashionable.  When I approached her with the idea to make a blouse, I was aiming for the another view pictured on the envelope.  She favored the second view.  So that what I made.

She is wearing it with a denim skirt that I made for my sister many years ago.  (No review on that today.)  

Simplicity gives sparse descriptive information.  All is stated is misses shirt and sash.  I will add Nehru or mandarin collar, button up with two sleeve variations.  Sizes 4 to 20.  I used size 12 with modifications.  

This was a fairly easy blouse to sew.  The instructions were typical and I did not see anything confusing in them.  There are a few pattern flaws and construction steps that I'd like to point out.  But first, I must say that this is a wearable muslin.  Because I didn't make one; I should have all things considered.

  • The front and back pattern length are different.  Matching up the notches, the back is slightly longer than the front.
  • There is more ease in the neckline.  I made it work by easing, soft gathering to make it fit.
  • There is some pulling at the neckline.  That could be due to my daughter's square shoulders.  Something that I have adjusted in the past, but some how forgot for this project.
  • The armhole has more curve in it than expected, considering setting/curve of the sleeve, even with gathers, if that makes sense.
I like the sleeve variations and the longer hemline with the sash.
No real dislike beyond the small things mentioned above.

The fabric that I used came from Vogue Fabrics in Evanston.  I think I bought it a few years ago.  It's a lightweight cotton blend.  Easy to sew and press.  Perfect for a button up shirt.

I doubled the front facing to help support the buttonholes and buttons.  To make the buttonholes, I sewed each once then again to get a nice even stitching.


The minor flaws are just that; easy to correct.  So this is a pattern that I would consider using again for her and maybe myself.  I have two copies. 

Anyway, this one is a short review on a pretty simple blouse to sew.

Happy Sewing!
C


Tuesday, June 5, 2018

V1570 In Black and White


This is another outfit that I started while at Sew Camp Spring 2018.  All fabrics purchased at Fabric Mart.  I actually didn't bring any fabric with me on purpose.  The goal was to purchase fabrics to sew while at camp and to purchase fabrics to be shipped home.  

Between the two coordinates, I was most interested in making the pants.  I am always on the hunt for bottoms that give me a little volume to help balance out my silhouette.  The drape was interesting and added just a little imaginary hip.  Looking at the model on the envelope, she reminds me of a former me.  Way back when I was a rail.  Time has past and I'm a much bigger lady.  The good news is I can sew whatever I want.

Anyway, this outfit is part of a pseudo wardrobe capsule that I kind of decided to do as I shopped the floors at FabricMart Fabric.  I like both coordinates, but I think I like them better with other pieces.  More on that as I continue to work on the capsule.  


I used Vogue 1570 for my outfit.  It is described as A: fitted top has front and back princess seams, back invisible zipper and asymmetrical hem.  Fitted pants have back invisible zipper and front overlay. It comes in two size groupings 6-14 and 14-22.  I used 14 and 16 with modifications.

My finished garments do look like the drawing on the pattern envelope.  There was nothing in the instruction or construction of the outfit that was confusing.  I did, however, have to do a little tweaking with the neckline and one of the armholes appeared to be slightly larger than the other.  More on that later.

I had a lot of likes for this pattern:


Top:
  • Shoulder seam.  It's not straight on, from ear to center shoulder tip.  It curves around to the front.  That's a cute detail.
  • Asymmetrical hem.
  • Peak a boo front yoke
  • Topstitching

Pants:
  • Overlay as stated above
  • Slim pant leg - easily worn with a variety of tops.  Sews up quickly.
The top is a lightweight striped cotton blend pique, which I thought would be perfect to play up the design lines of the top. It is softer than most piques that I've own/touched.

The pants is a lovely medium wool crepe.  Love, love this fabric.  I wish they had more in other colors.  I bought all they had.  Same for the pique.

There were a few challenges with the top.  I almost gave up on it.  After I made my usual adjustments, I had to do quite a bit of tweaking along the side seams, below the bust and in the armhole areas.  I think I ripped out the sleeves at least three times before getting it to a good, not perfect, state.  Once that was done, The front neckline gapped a bit more on one side.  Odd.  So I ended up undoing quite a bit of topstitching to adjust the length of the front neckline.  Truth be told after all that tweaking, I can't remember how much for each tweak. Lol  


The pants were easy.  I extended the back curve about an inch tapering into about four inches into the inseam.  At the center back, I raised it about an inch or so and tapered to zero near the dart.  The front pant does not have darts.  Knock it off!!  No way!! I added some.  Lastly, I lengthen the pants by three/four inches.

I plan to make both coordinates again.  At least one more top, for my sister. And one pants without the overlay.  It's a nice fit. After all those adjustments, I need to make them at least one more time.

I'm glad I was able to workout the kinks.  These are two pieces for my black and white capsule.  More in months to come.  I do recommend it, because of the likes I mentioned above.

Happy Sewing!
C


Monday, June 4, 2018

McCall 6886 Easy T-Shirt Dress Hacked at Sew Camp Spring 2018


It's always a good day to talk about my sewing adventures.  Especially when the sun is shining and I have at least three pictures to share while I talk about it.  This dress was finished almost two months ago. 

Finally, I was able to take a few pictures of me wearing it.  I started and almost finished it at Sew Camp Spring 2018.  On our shopping day, I decided to purchase another copy of McCall 6886 from Fabric Mart.  It was only 25 cents.  I thought it would be a perfect project at the retreat.

This is a very basic t-shirt dress pattern that has three different necklines and three different lengths.  Actually, you can make the length whatever you want.  It comes in sizes 6-22, which is great.  I think this is the type of pattern all of us sewists should have in their collection.  There are so many possibilities.  And it can be used as a sloper to create and adjust other patterns for knit tops and dresses.


I purchased this really great knit with good color and recovery.  I didn't decide to use it for the dress until we returned from our shopping day.  My project started with, of course, cutting out the pattern; then making my usual fit adjustments.  Starting with size 14, I made a FBA, swayback, and prominent shoulder blade adjustments.

Before my adjustments, I decided on the length of the dress minus the flounce that I created.

FBA - I slashed and spread the front about 2" creating a bust dart slightly rotated for a more flattering look.  Because the spread was more than an inch, I used the Palmer-Pletsche "Y" FBA.  After all the slashing and spreading, I removed some of the excess width below the  bust area.  See picture below.


Swayback - To start, I made a tuck in the back pattern where my back curves to eliminate the pooling of fabric.  Next, I created an even more pronounced curved line along the lower back area where I made the tuck.  At the hem, I added the same amount that was tucked at the lower back.


Prominent Shoulder Blade -  Here again, I slashed and spread the desired amount and added a dart at the shoulder seam.  This adjustment gives me enough room across my upper back.

The flounce was so easy to create.  First, I determine the length.  Then added seam allowance to that number.  Next, I measured the width of the front and back of the dress.  Then, I cut one rectangle for the front and one for the back.  If the width of the front and back are the same, you only need one.  Next, I made slashes about every inch and spread the tissue for the desired  amount.


The flounces were sewn together.  Then attached to the bottom of the dress.  No hemming required.


More Changes:

I used a black lycra knit for the sleeve and neckband.  To finish the sleeve, I added a band in the dress fabric.  This I thought was a nice finishing touch.  Plus it breaks up the pattern of the dress.  The pattern neckband is always too long.  I generally shorten it by about 2" to eliminate gapping.


The style lines dress were the same as the drawing with the exception of the flounce.  For me, everything about the process was pretty easy.  Even the drafting of the flounce.  This is something a beginner can do with no problems.


What I like about it?

Everything: the pattern adjustment, drafting, sewing and wearing it. I really like the movement of the flounce around the bend of my legs.   So, I'm cutting another one cut this week.


Stay tuned!

Cennetta

LinkWithin

Blog Widget by LinkWithin