Wednesday, December 16, 2020

Plaid Hat Vogue V8403 and Pants Simplicity S2315 To Match


The brown plaid pant suit is complete!  I actually finished the pants and hat almost two weeks ago.  The pants is Simplicity S2315.  I've used this pattern twice before.  So I won't review the pattern again.  You can read the initial review here. 

The hat is another view of Vogue 8403.  There was enough fabric leftover to make a hat.  So I did.  Lately, I'm trying to make use of as many remnants and scraps from previous projects.  I have a really tough time tossing out pieces that are a half yard or more.  


This hat was really fun to make.  I completed it while watching a Hallmark Christmas movie.  So, it took less than two hours to make.  I changed a few of the construction steps.  Nothing earth shaking.  It was a matter of taking my time with the stitching and pressing as needed.  


I enjoyed the process and will probably make at least one more view of this hat pattern.

Happy Sewing!

C


Monday, December 7, 2020

Simple Turtleneck top with a twist - S8750


I'm finally sharing this turtleneck top on my blog.  It has been a challenge for me to synchronize my Instagram posts with my blog posts.  I need to work on that. Lol  This top was completed early November.  Today, I want to share how I made the full bust adjustment for it.  This is my wearable muslin which I've ready worn a few times.  I do plan to make a few more during the winter season.

This pattern is part of the Simplicity Mimi G S8750 pattern.  My description: a turtleneck with one yoke shoulder and gathered upper chest.  That sound weird but I'm going to go with it.  Simplicity's description is just "knit top." It's is available in sizes 6 to 24.  I used 14 with modifications starting with grading it up a bit.

It looks like the drawing, and the instruction were typical.  Nothing confusing about them.  Pretty straight forward.


What I like about it is the gathers and the front yoke.  Everything else typical turtleneck design.  Nothing to dislike.  This is a simple staple knit top with a little something extra.

The fabric used is a cotton blend.  It was gifted to me.  A perfect textile to test my adjustments.


PLEASE NOTE - I made an adjustment right below the dart because I initially made the dart too low. So I cut a box around the dart and moved it up.


Usually, the first thing I like to address is the full bust adjustment.  For this top the front is drafted as the full front with the exception of the yoke.  Each side of the pattern requires a different FBA.  So, I cut it along the center front.  Then, I adjusted the left side.  The FBA created a dart. This was done by simply making a basic FBA.  Next, I slashed through the gather section on the right side from top to bottom  spreading it about 1.5 inches.   I used the right side to determine the amount of length to add.  Once both sides were adjusted, I taped them back together.  I had to true up the front with the back.  This was not done until the top was tried on and ready for hemming.  Next, the back adjustments. I added a center back seam and made a swayback adjustment. The final adjustment was to add a few inches to the sleeve. 

I used a twin needle to finish the hem.


Really basic and easy project.  I will get a lot of wear out of this top in the coming months.  I hope to make a few more.  I recommend this turtleneck to all level sewists. It's a great staple and good for layering during the colder months.

This is the third piece completed for my blue and red wardrobe capsule.  I was hoping to post about the vogue jacket, but I ran into a little hemming problem with it.  So, I'm still taking a break from it.  Hopefully, I'll work on it soon.

Anyway, this is a great staple to beef up your wardrobe.  It's an easy sew.  I made this top a little over an hour.  Try it.


Happy Sewing!

C


Thursday, December 3, 2020

Simplicity S8844 Mad About Plaid


This plaid blazer is part of my Brown/Cream Wardrobe Capsule.  (I know it probably seems like I'm all over the place.  But there is a method to my madness. Tee Hee.) Anyway, I've been wanted to sew more plaids this year.  And I was happy to be gifted this stretch plaid suiting from Minerva Fabrics.  When I first selected this fabric, I really didn't know which jacket I would make.  I wanted to choose a pattern that would complement the plaid.  Simplicity S8844 was one of three jackets that I'd plan to make before the end of the year.  


The pattern is described as Misses'/Miss petite unlined blazer with front variations with individual pattern pieces for B, C, D, and DD cup sizes.  It comes in sizes 6 through 24.

The princess seams and the individual cup sizes are what sold me.  My hoped the FBA pattern piece would only need tweaking.  So I used size 16, view A, with still a lot of modifications.  The changes included fit, construction, and design.

For the most part my jacket looked liked the one on the envelope.  The modelled jacket looks a little to full in the upper chest area though.  The instructions were typical.  I didn't see anything difficult in them.  Half of them I didn't follow because I changed a lot of the construction steps and techniques to suit my own preferences.

There were a few things that I like about it and a few things I didn't care for.  I'll start with the likes:

  • The separate pattern pieces for the cup sizes.  I wanted to spend less time adjusting the pattern. 
  • Princess seams.  Easier to adjustment
  • Gathered sleeve cap
  • Separate pattern pieces for the upper and lower collar
  • Separate pattern pieces for the front and front facing
Dislikes:
  • Length of the shoulder seam.  I don't under stand why the pattern company makes them so long.  I removed about 1.75" from the end.
  • "Unlined" blazer.
  • One piece sleeve.  I prefer a two piece sleeve
My fabric choice is a stretch suiting from Minerva Fabrics.  It has a slightly coarse hand.  It sews and presses beautifully.  The plaid is Glenn plaid, I think.  It's uneven.  The matching of the plaid was a bit of a challenge.  I came close with the matching; it's not perfect but wearable. For the lining, I used an anti-static cream colored lining from Vogue Fabrics.  Nothing fancy.  I just pulled it from my stash.

I didn't have to make my usual FBA.  I was able to tweak the DD pattern to fit.  Then I made my usual swayback, prominent shoulder blades, and lengthening the sleeves. 


My other changes were more construction and style preference changes.  They are:
  • Lined the entire jacket
  • I made my own shoulder pads.  There was a hallow area between the upper chest and armpit area.  So I made them larger than the average pad.
  • I added hem facings to the sleeve.  This change was because I didn't add enough length to the sleeve.  This worked out fine.
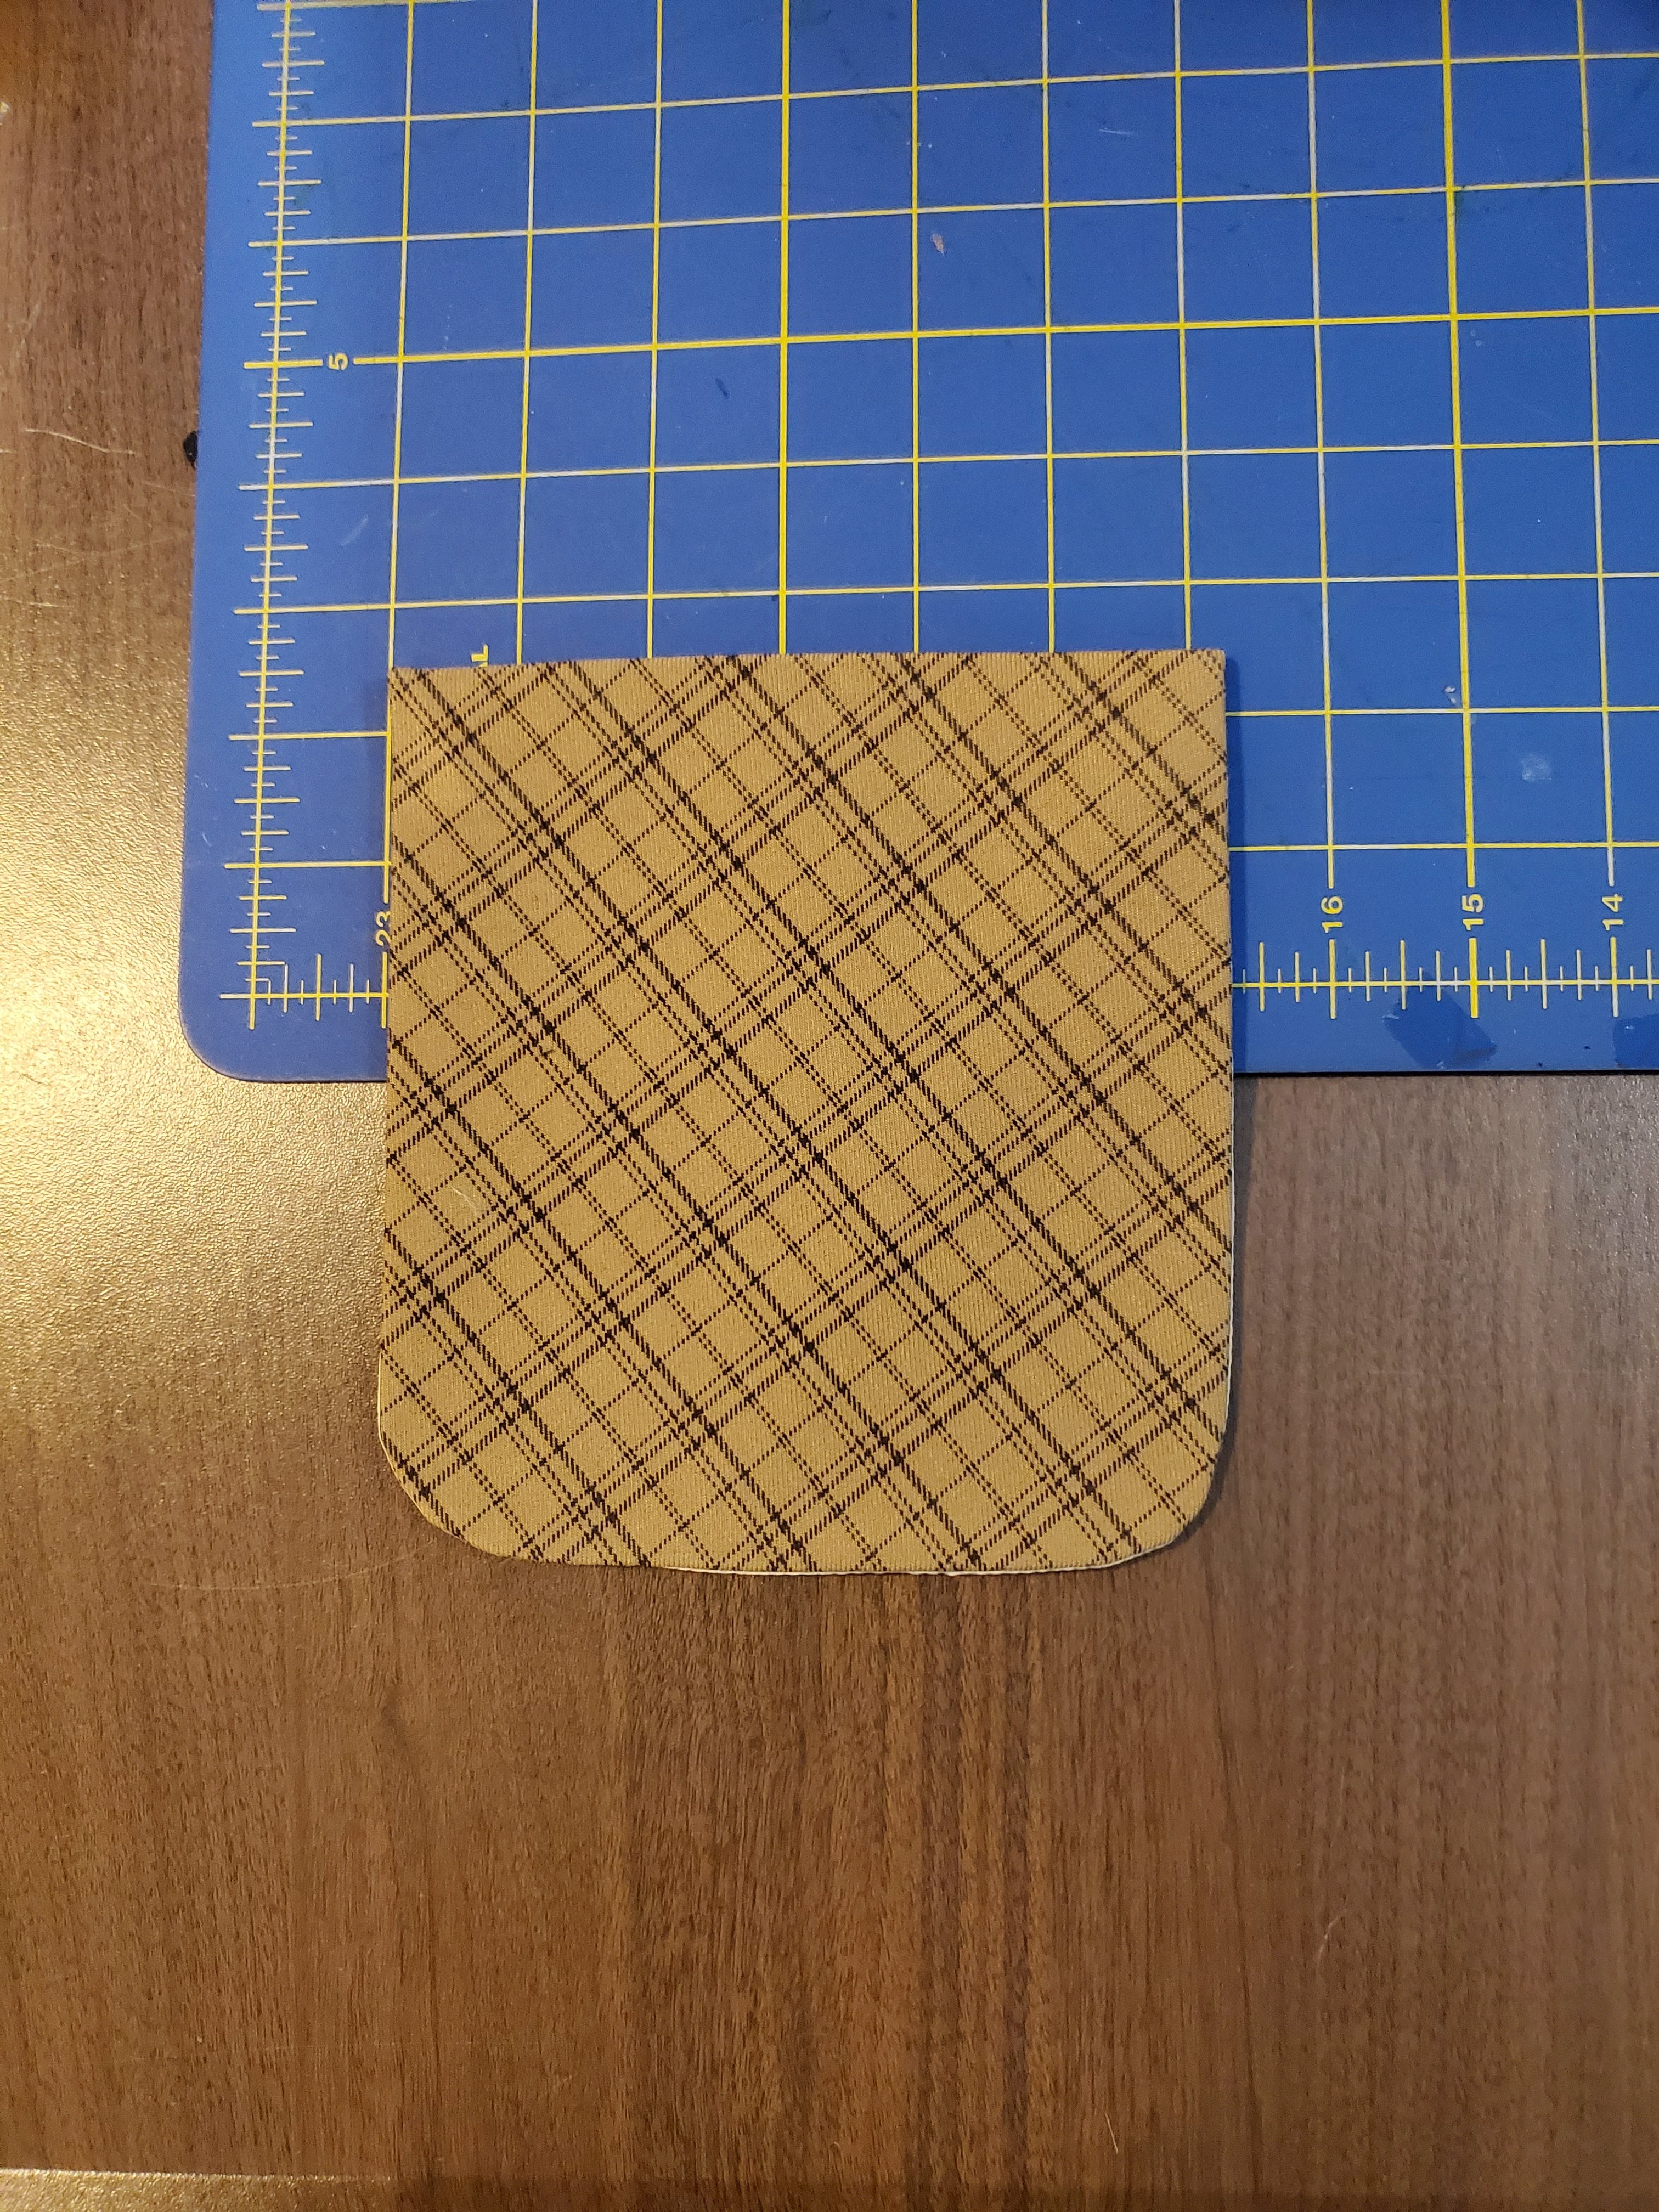
  • Cut the pockets of the bias.  I love the weight of the interfaced patch pocket.  And I love the bias cut of them. It plays of the plain on the front of the jacket adding a little more interest to the style.
  • I sewed on the pocket after the jacket was assembled.
Note:  I need to move the button about 1/2" up.  The length of the front edge are the same.  I just need to move the button.  I noticed it after I saw the pictures.


I want to make this again soon.  But before that happens, I want to make a pair of pants.  I had enough fabric left.  So hopefully, I will share that project soon.  They are cut and ready to sew.

I recommend this pattern to all level sewists.  Make a muslin first.  I had to make two ;-)  It's important to test before you cut into your fashion fabric. 

Overall, I happy with how this jacket turned out.  It will be in high rotation.  The color looks great with red, and of course, brown.


This blazer is not difficult to sew, but there may be some adjustments needed.  Adding a lining was relatively easy to do.  I just used the jacket pattern pieces to do so.  The back facing looks much nicer with the entire jacket lined.

Until next time, happy sewing!
C

Wednesday, December 2, 2020

Pockets Simplicity S8844


I changed the construction of the patch pocket for my Simplicity S8844 jacket, view A.  The original pocket is unlined, but I chose to line them instead.  Also, I didn't want to try to match the plaid.  So I cut them on the bias.  


Here are the steps that I used to make the plaid on plaid patch pocket.


I interfaced them to help maintain the shape.. Using the pocket pattern I cut the lining 1.25" shorter than the pocket.


Next, I stitched the upper edge of the pocket to the lining leaving an opening. Pressed the seam allowance forwards the lining. 


I Sewed the lining to the pocket starting at the top, making sure the seam allowance is sewn 5/8" all the way around.  Note- For curved pockets, I sew one side halfway around, then flip it to sew the other side sewing slightly passed the end of the previous stitch. 


Next, I trimmed the seam allowance at the curve and notched the edge. Then, I turned the pocket to the right side, using a pointer creaser to make sure the pocket is completely turned out. While pressing I slightly rolled the pocket to the inside to help reduce the possibility of the lining showing on the outside.


Next I stitched the opening closed. Pressed again. Pinned the pocket in place. 


Next step, I usually base it in place and then machine sew.  That's it.


Happy Sewing!

C


Catching Up


My goodness!  It's been awhile since I did a blog post.  My intentions were to post a detailed post to support each sewing project Instagram post.  Didn't happen.., So now I'm playing catch up.

So sorry.  November has been really busy for me.  I wanted so much to have our traditional family gathering for Thanksgiving.  But weeks before we decide to follow the guidelines set by the CDC and other governmental officials.  I still cooked the major part of the meal.  We shared dishes and eat at our respective homes. Boring..,  My hope is that we have a better Christmas dinner.  But, right now it looks like we will celebrate with only the members of our household.

Anyway, I've completed several projects since my last post, and I wanted to share the details of those projects.  I would be remised if I didn't mention the Vogue jacket V8627 of my previous post.  I actually finished it; well almost finished it.  The hem is wonky.  I remade the lining and installed it a second time.  It still wasn't right.  So I put it aside to work on something else.  Now it is Christmas month and I have a few gifts to make.  So maybe after Christmas I'll pick it up again.  

Meanwhile, I want to blog about some successes.  They are: Simplicity S8750; McCall M7836-B; and Simplicity S8844-A.  I'll start with another jacket project.  There will be a few post about it starting with a mini tutorial about making the patch pocket for the jacket.


Happy Sewing!

C

LinkWithin

Blog Widget by LinkWithin