Showing posts with label New Look 6067. Show all posts

Sunday, December 11, 2011

Faux Suede, Faux Leather - New Look 6067


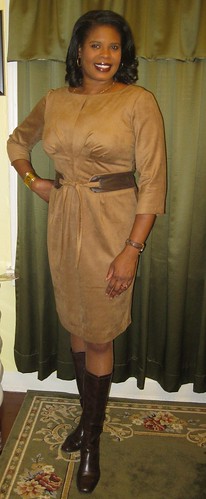
Saturday evening I finished New Look 6067, View D with belt. I made a few trips to the store in search of a fabric to make this dress. But after not finding that "perfect fabric", I turned to my forever growing collection of fabric. I decided on a faux suede. It's been in the collection for several years and no better time like the present to reduce the stash. It's sort of a taupe, camel-ish in color. The faux leather is leftover from a previous project.


This dress is described as: Misses' pleated dress in two lengths with sleeve and belt variations.  It comes in sizes 6 to 16.


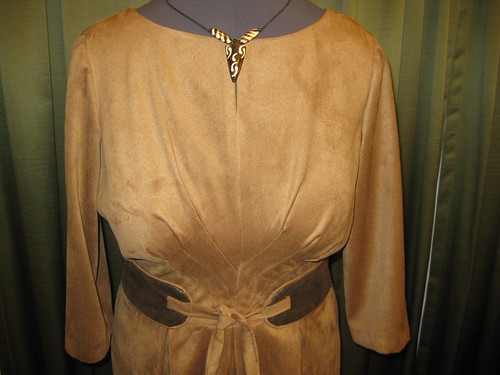
My dress looks much like the drawing on the envelope. My belt does not exactly meet in the front like the drawing, but the model's does either. If I make the belt again, I'll lengthen it so it does meet. View C appear to have a slim keyhole at the neckline. I wanted that same design element. So I modified my dress to include it. There were no instructions for that neckline variation. It's easy to do. Just sew from the top down about 1 1/2 inches stop, then start sewing again at the notch to the end of the CF. Finish the front facing the same way. After attaching the facing to the neck, sew the edges of the opening to the facing on either side make finish the keyhole.


The instructions were typical. Nothing difficult or confusing. However, I didn't like how the zipper is finished (#15). By the way, it calls for an invisible zipper, I used a standard one. I am so trying to reduce the collection, notion included. So I used what I had on hand.


The pleating on the bodice is what attracted me to this pattern. I made a few changes, some I've already mentioned. Others changes: lengthen skirt about three inches, omitted the lining, FBA, sway back, prominent shoulder blades.

The piping for the belt is made from the same fabric used for the dress. It's not difficult to make. It just takes a little time. I want to test using the Simplicity Bias and Piping machine, but I didn't have the fusible tape.  So I had to make it the traditional way.  Later expect a review on the machine.  It's sure to speed up the time it takes to make custom piping.


This is a nice dress to have in your wardrobe. It sews up quickly and has some nice design elements. I probably won't sew it again for myself. I have about 500 dress patterns to try. Seriously, 500. But if you like this style, I do recommend that you try it.

Happy Sewing!
C

Thursday, December 8, 2011

To Muslin or Not To Muslin - Fitting New Look 6067

To Muslin or Not to Muslin. That is the question...,

While working on a muslin fitting for a client who sewed, she said to me, "When I sewed for people I never made muslins. I just went by the measurements." My reply, "Oh no, I have to make a muslin to get the fitting right.  I'm afraid not to."


There are great benefits to making a muslin first especially when the garment is for someone other than yourself.  


better fitting of the garment
helps avoid re-dos of garment
Saves money and time on fitting mistakes made

Now as for myself and DD, I don't always make a muslin.   Our basic adjustments have been pretty much worked out using the big four patterns. I have a few patterns that I use as slopers that help make adjustment easier on new patterns.  As a safety precaution, I cut one inch  side seam allowances.  This adjustment gives me a little more room to make changes if needed.

My biggest challenge is fitting my torso due to my fuller bust and prominent should blades.  Both changes are made in the same reign of my upper body front and back respectively.  But when it comes to the upper chest, neck, length of shoulder (from neck to ball of my arm) and my waist, there are almost no change needed from the pattern size 14.

One of my current projects is New Look 6067. Cute dress with pleating at the center front just below the bust area.  This pattern has no bust or waist darts.  My initial reaction was cute but I'll take a pass.  My second thought, but I like it.  I'll give it a try anyway.

Challenge:  Full bust adjustment in the absence of a waist and bust dart (woven fabric).


So this project required me to make a muslin to test my solution for a FBA adjustment. 

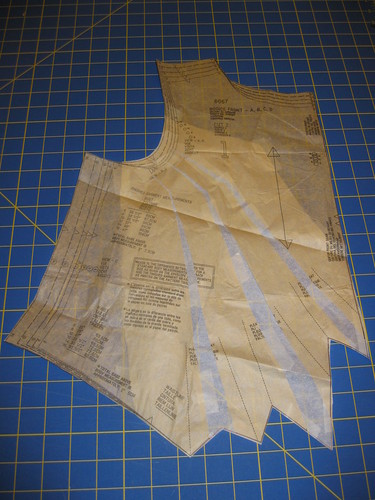
First the pattern:  I slashed the pattern in the center of each pleat pivoting a few inches away from the armhole.  Each slashed is spread increasing with width of the pleats and the bust area.  Total amount of spread in the bust area is about 1 1/4 inch.


My typical prominent shoulder blade and swayback adjustments are shown below.


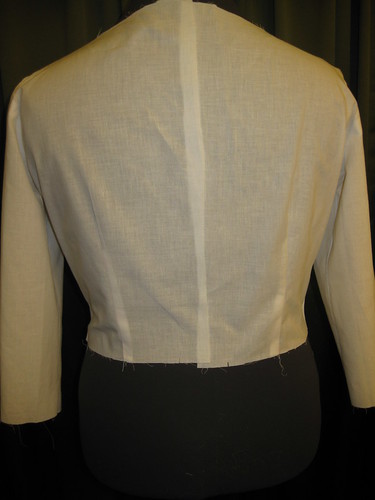
Second the muslin:  Sorry it's on Rochelle and not me.  But you'll get the idea of how it will fit.  It looks like there is too much fabric around the armhole and side area.  It's just that way on Rochelle.  It fits better on me.  When I tried on the muslin, I noticed the waist was a little high.  I will add about an inch to the length of the bodice to correct that.


I hope this information is helpful.  Now my question to you:  Do you make a muslin?  If not, what's your process for getting the right fit?

Happy Sewing!
C 

LinkWithin

Blog Widget by LinkWithin