This morning I woke up to over 12 inches of snow! Yesterday afternoon we thought we had a head start on clearing it off driveway and the side walk. But when I peaked out of the window, there it was more of the fluffy white stuff.
Surprised? Nope. It is to be expected. We hoped for a lighter snowfall over night. So, while the mini blizzard was taking place, I spent the evening cooking and sewing up Mimi G.'s Simplicity S9182 top, view A.
I grabbed a copy of the pattern at Hobby Lobby on Saturday for 99 cents. I couldn't wait to try it. The the collar and the center front zipper were what that sold me on this one. So, today I'm reviewing View A.
This pattern includes three views: two tops and a slim skirt. Simplicity has very little descriptive information. So here is mine. Knit tops with center front zipper, dropped sleeves with sleeve bands and large sailor like collar. The waist is finished with or without a waistband. The skirt is a pencil skirt with waist darts, center front and back seams. Large hip pockets with flaps and a center back zipper.
This pattern is available in sizes 6 to 24. I used a size 16 with a few modifications.
My "first version" looks like the drawing. The instructions were typical. Most of them I followed as stated and others I changed a bit. Nothing complicated though.
I used a tie dye french terry knit that I purchased from Sew So English Fabrics. I ordered this yardage along with a few others months ago. The same day that I received the fabric, I tossed it in the washer so it would be ready to sew when I decided what to make. The fabric came from the dryer soft and fluffy ready to sew.
The few changes are:
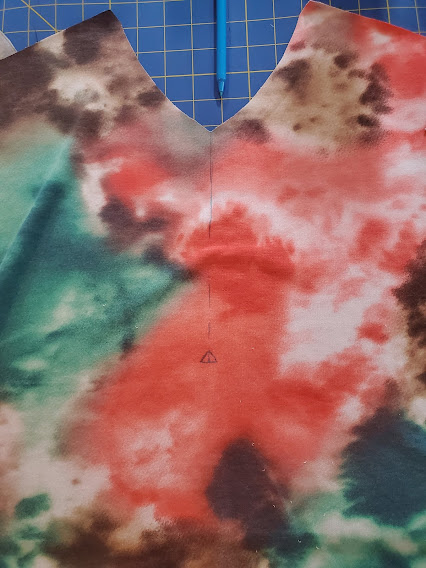
- The first few steps are related to sewing the zipper to the center front of the top. This is the major focal point. So I really wanted to get this right. First, I marked the cutting lines. Then, I fused a strip of fusible tricot interfacing to the wrong side where the zipper would be placed. Next, I stay stitched along the lines where the zipper would be stitched. Carefully I cut the center front and each side of the triangle where the base of the zipper would rest. Next, placed the zipper with the right side facing the right side of the top, the bottom of the zipper pointing to the top edge of the top. Stitched horizontal seam. Then flipped the zipper up with the zipper pull at the neck edge. Using the stay stitching as a guide, I turned the edges in along the vertical sides of the zipper. Pinned and hand based in place. Finally, I machine stitched the zipper to the top. I used this method because I was sure it would work for me. It was very important that the zipper looked perfectly centered and stitched to the top.
- I did a small FBA (,75") for comfort. This FBA does not result in a bust dart. Instead I eased in the difference to maintain the original look of the top. It worked well. The adjustments added 1.5" to the width of the top. I eased it in when I attached the waistband as I only need the extra width in the chest area. I actually could have reduce the length of the band maybe a inch or so.
- Instruction #15 indicates stitch stretching band to fit. The sleeve opening is several inches wider than the opening of the sleeve band. So I decided to gather it instead. It worked.
- I lengthen the sleeve two inches. I have long arms.
- After stitching the under collar to the top, I folded the upper collar over the top sandwiching the top between the two collar layers pinning only to the front neckline. The rest of the collar was hand stitched to the back. I like this finish better.


Wow, that's a lot of snow. Thank you for the review and pictures - love your blog!
ReplyDeleteLook at all that SNOW! Your top looks great, and I am glad you could spend the time doing something you enjoyed while it snowed.
ReplyDeleteWhat a cute top! I love it! And wow, look at all of that snow! What a beautiful winter wonderland!
ReplyDelete